As an Amazon Associate BakingBakewareSets.com earns from qualifying purchases.
Brighten Silverware: Easy Foil & Baking Soda Method
Does the sight of your once-gleaming silverware looking dull and discolored fill you with dread? You’re not alone. Many find restoring the shine to tarnished silver a tedious chore, often resorting to harsh chemical polishes with strong fumes or spending precious time scrubbing with limited results. It can be frustrating trying to figure out the best, safest, and most effective way to bring back that brilliant luster without damaging your cherished pieces.
To effectively clean silverware using aluminum foil and baking soda, create an electrochemical reaction by lining a non-metallic container with foil (shiny side up), adding baking soda and the silver pieces (ensuring contact with foil), and covering with boiling water. This process naturally transfers tarnish from the silver to the foil.
But what if there was a remarkably simple, inexpensive, and surprisingly effective method using common household items you likely already have? Get ready to rediscover the beauty of your silver! This guide dives deep into the science-backed technique of cleaning silverware with aluminum foil and baking soda. We’ll walk you through exactly why silver tarnishes, provide step-by-step instructions for this “magic” cleaning method, discuss crucial safety precautions, offer tips for achieving the best possible results, and answer all your pressing questions. Say goodbye to tarnish and hello to effortless shine!
Key Facts:
* Tarnish is Silver Sulfide: The black coating on silver isn’t dirt; it’s silver sulfide (Ag2S), formed when silver reacts with sulfur compounds in the air or certain substances.
* Electrochemical Reaction: The foil and baking soda method works via an electrochemical reaction (galvanic reduction), not by abrasion, which safely converts silver sulfide back to pure silver.
* Baking Soda’s Role: Baking soda (sodium bicarbonate) acts as an electrolyte when dissolved in hot water, facilitating the transfer of sulfur ions from the silver to the aluminum foil.
* Aluminum as a Sacrificial Anode: The aluminum foil attracts the sulfur atoms more strongly than silver does, effectively pulling the tarnish off the silverware and onto itself.
* Non-Abrasive Cleaning: Unlike many polishes, this method doesn’t physically scrub away layers of silver, making it gentler on your items, especially sterling silver.
☰ Table of Contents ▼
show
Why Does Silverware Tarnish in the First Place?
Silver tarnishes due to a chemical reaction with sulfur compounds present in the air or from certain foods. This reaction forms silver sulfide, a black coating on the surface. Humidity and pollutants accelerate this process, dulling the silver’s appearance over time.
It’s a common misconception that tarnish is just dirt or a sign of poor quality silver. In reality, tarnish is the result of a natural chemical process called oxidation, specifically reacting with sulfur. Sterling silver, which is typically 92.5% pure silver and 7.5% other metals (like copper), is particularly susceptible.
Sulfur compounds are more prevalent than you might think. They exist in the air (as hydrogen sulfide, especially in polluted areas or near industrial zones), in certain foods (like eggs, onions, mayonnaise, and mustard), and even from handling (oils and salts on our skin). Humidity acts as a catalyst, speeding up the reaction between silver and sulfur. This reaction creates a thin layer of silver sulfide (Ag₂S) on the surface, which appears as a yellow, brown, or eventually black discoloration – the tarnish we aim to remove.
Understanding this process helps explain why silver stored improperly or exposed to certain environments tarnishes faster. Preventing exposure to air, moisture, and sulfur-containing substances is key to minimizing tarnish formation between cleanings.
How Do You Clean Silverware Using Aluminum Foil and Baking Soda?
To clean silverware with aluminum foil and baking soda, line a container with foil (shiny side up), add baking soda, place silver ensuring contact with foil, and pour boiling water. The electrochemical reaction transfers tarnish (sulfur) from silver to aluminum.
This method is a favorite for many because it leverages basic chemistry to do the hard work for you, often feeling like a magic trick! It avoids harsh scrubbing and relies on an electrochemical process where the tarnish essentially transfers itself from your silverware to the aluminum foil, leaving the silver bright and clean underneath. It’s particularly effective for intricate patterns where polishing cloths struggle to reach.
The combination of aluminum foil, baking soda (sodium bicarbonate), and hot water creates a simple electrolytic cell. The hot water dissolves the baking soda, creating an electrolyte solution that conducts a small electric current. The aluminum foil and the silver, when in contact within this solution, act like electrodes in a battery. Because aluminum has a higher affinity for sulfur than silver does, the sulfur atoms from the silver sulfide (tarnish) are drawn to the aluminum foil, leaving behind pure, shiny silver.
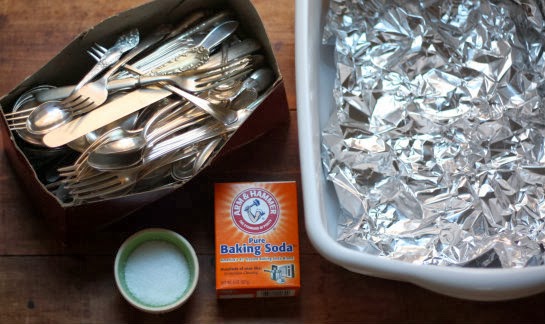
What Materials Do You Need?
You’ll need aluminum foil, baking soda, boiling water, a non-metallic container (like glass or ceramic), tongs for handling hot items, and a soft cloth for drying. Table salt is optional but enhances the reaction.
Gathering your supplies beforehand makes the process smooth and efficient. Here’s a checklist:
- Aluminum Foil: Enough to generously line the bottom and partly up the sides of your chosen container. Standard household foil works perfectly.
- Baking Soda (Sodium Bicarbonate): Regular baking soda from your pantry. You’ll typically need a few tablespoons to a cup, depending on the container size and amount of water.
- Boiling Water: Enough to completely submerge the silverware pieces. Heating it in a kettle or pot is easiest.
- Non-Metallic Container: A glass baking dish, ceramic bowl, or even a plastic tub is ideal. Avoid using metal containers (other than potentially an aluminum one, though glass/ceramic prevents any unwanted reactions with other metals if your container isn’t pure aluminum). Using a metal sink isn’t recommended unless it’s stainless steel and you’re careful, as other metals could interfere or discolor.
- Silverware: Your tarnished items – forks, spoons, knives, small serving pieces, etc.
- (Optional) Salt (Sodium Chloride): Adding a tablespoon or so of regular table salt can help speed up the electrochemical reaction, especially for heavily tarnished items. It increases the conductivity of the electrolyte solution.
- Tongs: Non-metallic tongs (silicone-tipped or wooden) are best for safely removing hot silverware from the water. Metal tongs can be used carefully but avoid prolonged contact that might scratch.
- Soft Cloth: A clean, lint-free cloth (like microfiber or flannel) for drying and buffing the silver afterward.
Step-by-Step Guide: Foil-Lined Container Method
Ready to witness the magic? Follow these simple steps:
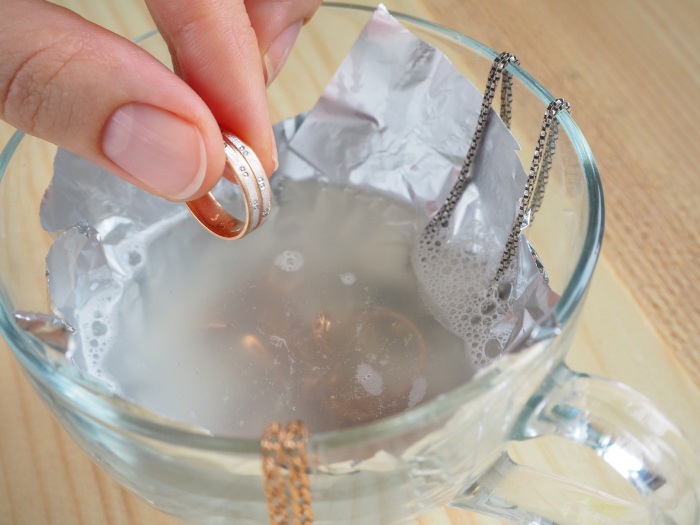
- Line the Container: Take your non-metallic container (glass baking dish, ceramic bowl) and line the bottom completely with aluminum foil. Ensure the shiny side of the foil is facing up. Extend the foil slightly up the sides if possible.
- Arrange Silverware: Place the tarnished silverware pieces directly onto the aluminum foil lining. It’s crucial that each piece makes contact with the foil. Avoid overcrowding; clean in batches if necessary. Do not let pieces overlap significantly if possible, as areas not touching the foil or submerged won’t clean as effectively.
- Add Baking Soda: Sprinkle baking soda generously over the silverware and foil. A common ratio is about 1/4 to 1/2 cup of baking soda per gallon of water, but for a typical baking dish, 2-3 tablespoons might suffice. Add a tablespoon of salt now if using.
- Pour Boiling Water: Carefully pour boiling water into the container until the silverware is completely submerged. You should see some bubbling or fizzing as the baking soda dissolves and the reaction begins. Be cautious with the boiling water to avoid splashes and burns.
- Let it Soak: Allow the silverware to soak in the solution. The time needed depends on the level of tarnish. Light tarnish might clear up in 2-5 minutes, while heavily tarnished pieces could require 10-15 minutes or even longer. You might notice the water becoming cloudy or the foil darkening – this is normal, indicating the tarnish is transferring. You may also detect a faint sulfur smell (like rotten eggs), which is the sulfur leaving the silver.
- Remove and Rinse: Using tongs, carefully remove the silverware pieces from the hot water. Immediately rinse them thoroughly under cool running water. This washes away any residual baking soda solution.
- Dry and Buff: Dry each piece completely with a soft, clean cloth. Buff gently with the cloth to bring out the final shine.
Key Takeaway: The effectiveness hinges on direct contact between the silver and the shiny side of the aluminum foil within the hot baking soda (and optional salt) solution. Ensure complete submersion for even results.
How Does the Science Behind This Cleaning Method Work?
This method uses an electrochemical reaction. Hot water and baking soda create an electrolyte solution. Aluminum foil acts as an anode, attracting sulfur atoms from the silver sulfide (tarnish) on your silverware, converting it back to pure silver while forming aluminum sulfide on the foil.
It might seem like magic, but it’s pure chemistry! Here’s a breakdown:
- Tarnish: Your silver is coated with silver sulfide (Ag₂S).
- Electrolyte: The hot water dissolves the baking soda (NaHCO₃) and optional salt (NaCl), creating an electrolyte solution. This solution allows ions (charged particles) to move freely, enabling an electric current to flow.
- Electrodes: You have two different metals in the electrolyte: silver (Ag) from your silverware and aluminum (Al) from the foil. They act as electrodes.
- Galvanic Cell: Because aluminum is more reactive than silver (meaning it gives up electrons more easily), a simple galvanic cell (like a battery) is formed.
- Electron Flow: The aluminum foil acts as the anode (negative electrode) and oxidizes, releasing electrons (e⁻). The silver acts as the cathode (positive electrode).
- Reduction Reaction: The silver sulfide (Ag₂S) on your silverware gains these electrons. This process, called reduction, converts the silver ions (Ag⁺) within the silver sulfide back into pure metallic silver (Ag), effectively removing the tarnish. The sulfide ions (S²⁻) are released into the solution.
- Sulfur Transfer: The negatively charged sulfide ions (S²⁻) are attracted to the positively charged aluminum ions (formed as the aluminum oxidizes) or react directly with the aluminum foil. They combine to form aluminum sulfide (Al₂S₃) on the surface of the foil. This is why the foil often darkens or looks dirty after the process – it has literally taken the tarnish from your silver.
Essentially, you’re reversing the tarnishing process chemically, transferring the sulfur from the silver to the more reactive aluminum, without physically scrubbing away any silver.
Adapting the Method for Larger Silver Items
Cleaning larger items like trays, teapots, or bowls requires a slightly modified approach, primarily needing a larger container and potentially more materials.
- Choose a Container: Find a container large enough to fully submerge the item. A plastic storage tub, a large bucket, or even a clean (ideally stainless steel, used cautiously) sink can work. If using a sink, ensure the plug is secure.
- Line or Wrap:
- Lining: If the container allows, line the bottom and sides generously with aluminum foil (shiny side facing inward/up). Place the large silver item inside, ensuring good contact with the foil.
- Wrapping: For awkwardly shaped items or if lining is difficult, you can loosely wrap the silver item directly in aluminum foil (shiny side facing the silver). Ensure plenty of contact points. Place the wrapped item in the container.
- Prepare Solution: Boil enough water to completely cover the item. For larger volumes, use a ratio of approximately 1 cup of baking soda per gallon of water. Add salt (around 1/2 cup per gallon) if desired for heavier tarnish. Dissolve the baking soda (and salt) in the container before adding the boiling water, or add them to the container and carefully pour boiling water over them.
- Submerge and Soak: Carefully place the foil-lined or foil-wrapped silver item into the hot solution, ensuring it’s fully submerged. Larger or heavily tarnished items may need a longer soaking time, potentially up to 30 minutes. Check periodically.
- Remove, Rinse, and Dry: Using heat-resistant gloves or sturdy tongs, carefully lift the item from the hot water. If wrapped, remove the foil. Rinse the silver thoroughly under running water, paying attention to spouts, handles, and crevices. Dry completely with a soft cloth and buff for shine.
Tip: When cleaning hollow items like teapots or goblets using the wrapping method, try to ensure some of the baking soda solution gets inside the item during soaking for internal cleaning, and always rinse the inside thoroughly afterward.
Is Cleaning Silver with Aluminum Foil and Baking Soda Safe?
Yes, cleaning silver with aluminum foil and baking soda is generally safe and non-abrasive for solid sterling silver. However, avoid using it on antique pieces with intended patinas, silver-plated items (potentially), or jewelry with stones, as it can cause damage.
One of the major advantages of this cleaning method is its non-abrasive nature. Unlike polishes that contain fine abrasives to physically remove the tarnish (and a tiny layer of silver with it), the electrochemical reaction targets only the silver sulfide. This makes it an excellent choice for most sterling silver flatware and serving pieces.
However, “safe” comes with caveats. The process removes all tarnish, including any intentional darkening (patina) used in patterns or designs to create contrast. It can also potentially affect silver-plated items or jewelry in unintended ways. Understanding the risks and knowing what not to clean with this method is crucial.
What Types of Silver Should Avoid This Method?
While great for standard sterling silver, this method is NOT recommended for:
- Antique Silver with Patina: Many antique pieces have an intentional patina – darkening in the crevices of patterns – that contributes to their value and aesthetic appeal. This cleaning method will strip away that patina, potentially reducing the item’s value and altering its appearance significantly. If preserving the patina is important, use a gentle, targeted silver polish cream instead.
- Silver-Plated Items (Use with Caution): Silver plating involves a thin layer of silver over a base metal (like copper, brass, or nickel). While the electrochemical process itself shouldn’t harm the silver layer, if the plating is already worn thin, damaged, or peeling, the process could potentially accelerate damage or expose the base metal underneath, especially with prolonged soaking or repeated cleanings. Inspect plated items carefully first. If unsure, test on an inconspicuous area or opt for a gentler polish designed for plated wares.
- Jewelry with Stones or Pearls: Porous gemstones (like turquoise, opal, coral, lapis lazuli) and pearls can be damaged by the hot water and baking soda solution. The heat and chemicals can cause discoloration, cracking, or dulling. Furthermore, the process can potentially loosen settings or dissolve adhesives used to secure stones. Never submerge jewelry with stones or pearls using this method.
- Items with Oxidized Finishes: Some modern or artistic silver pieces have intentionally oxidized (darkened) finishes as part of their design. This method will remove that finish.
- Silver Weighted Items: Items like candlesticks often have weighted bases filled with materials like cement or pitch. Submerging these fully in boiling water can damage the filler material or cause it to expand, potentially harming the item.
Key Precautions to Take
To ensure a safe and successful cleaning experience, keep these precautions in mind:
- Use a Non-Metallic Container: As mentioned, glass, ceramic, or plastic tubs are best. Metal containers (unless pure aluminum or stainless steel used cautiously) can interfere with the electrochemical reaction or become discolored themselves.
- Handle Hot Water Carefully: Boiling water presents a burn risk. Pour slowly and deliberately, keep children and pets away, and use tongs or gloves when handling hot items.
- Rinse Thoroughly: Ensure all traces of the baking soda solution are rinsed away, especially from intricate patterns, hollow handles, or the insides of vessels like teapots. Dried residue can leave white marks.
- Don’t Use on Stainless Steel Flatware: While sometimes confused with silver, stainless steel should not be cleaned this way. The process can potentially cause discoloration or pitting on stainless steel. Keep your silver and stainless steel separate during cleaning.
- Ventilation: While generally safe, the process can release a faint sulfur smell. Working in a reasonably ventilated area is always a good idea.
- Test First (If Unsure): If cleaning a valuable or unfamiliar piece, especially if you suspect it might be plated or have a delicate finish, test the method on a small, hidden spot first before submerging the entire item.
What Are Some Tips for the Best Silver Cleaning Results?
For best results, ensure silver pieces directly contact the aluminum foil (shiny side). Use very hot or boiling water, add optional salt to boost the reaction, and adjust soak time based on tarnish level. Always rinse thoroughly and buff dry.
While the basic process is straightforward, a few extra tips can help you achieve a flawless, brilliant shine every time:
- Maximize Foil Contact: The reaction only happens where silver touches the foil (or is very close in the electrolyte). Spread items out, avoid stacking, and ensure good contact. For stubborn spots, you might gently reposition the item during the soak.
- Use Very Hot Water: Boiling or near-boiling water is essential to effectively dissolve the baking soda and facilitate the reaction. Water that’s merely hot won’t work as quickly or efficiently.
- Consider Adding Salt: Especially for heavily tarnished pieces, adding a tablespoon or so of table salt (NaCl) to the baking soda solution significantly increases the electrical conductivity, speeding up the tarnish removal process.
- Adjust Soak Time: Don’t rely on a fixed time. Monitor the silver. Light tarnish might vanish in minutes, while dark, heavy tarnish could need 15-30 minutes. Remove items once they appear clean to avoid unnecessary prolonged exposure.
- Clean in Batches: Don’t overcrowd the container. Cleaning fewer pieces at a time ensures better foil contact and more consistent results.
- Pre-Wash Greasy Items: If silverware is greasy or has food residue, give it a quick wash with regular dish soap and water before the baking soda/foil treatment. Excessive grease can interfere with the electrochemical reaction.
- Use Distilled Water (Optional): If your tap water is very hard (high in minerals), using distilled water can sometimes yield slightly better results by preventing potential mineral deposits, though it’s usually not necessary.
- Immediate Rinse and Dry: Don’t let the items air dry with the solution on them. Rinse immediately under cool water and dry thoroughly with a soft cloth to prevent water spots.
- Buff for Extra Shine: While the process reveals the clean silver, a final gentle buff with a clean, soft cloth (like microfiber) enhances the luster and removes any lingering water marks.
Which Side of the Aluminum Foil Should You Use?
Most instructions recommend using the shiny side of the aluminum foil facing the silver. While both sides conduct electricity, the shiny side is often preferred, potentially offering slightly better contact or reactivity, though the difference is minimal.
This is a common question! Aluminum foil has one shiny side and one dull side due to the manufacturing process (where the final pass through the rollers polishes one side more than the other). Chemically and electrically, both sides are aluminum and will work for this cleaning method.
However, the convention and most recommendations specify using the shiny side up/facing the silver. There’s no definitive scientific proof it works significantly better, but potential reasons for the preference include:
* Slightly smoother surface might offer better contact.
* Minor differences in the oxide layer might make it marginally more reactive initially (though this is debatable).
* It’s simply become the standard instruction.
Bottom line: Using the shiny side is the standard recommendation and certainly works well. If you accidentally use the dull side, don’t worry – the process should still be effective. The critical factor remains the contact between the silver and the foil in the hot electrolyte solution.
Dealing with Heavily Tarnished Silver
If your silver looks almost black or has very stubborn tarnish, you might need to adjust the process slightly:
- Increase Soaking Time: Be prepared to soak the items for longer, potentially 20-30 minutes or even more. Check progress periodically.
- Boost the Solution: Use the optional salt (1-2 tablespoons per dish, or ~1/2 cup per gallon) to enhance the reaction speed. You could also slightly increase the concentration of baking soda.
- Repeat the Process: If one soak doesn’t completely remove heavy tarnish, you can repeat the entire process with fresh foil, baking soda, and boiling water.
- Gentle Assistance (Post-Soak): After soaking and rinsing, if some stubborn spots remain, you might try gently rubbing them with a paste made of baking soda and water on a soft cloth. Be very gentle to avoid scratching. Avoid abrasive scrubbing.
- Ensure Maximum Contact: Double-check that the most tarnished areas have excellent contact with the foil during the soak.
Tip: For intricate pieces with deep crevices that remain dark, a very soft brush (like an old, soft toothbrush) used gently with a baking soda paste after the main soak might help dislodge any remaining tarnish loosened by the process. Always test gently first.
Comparing Briefly: Foil/Baking Soda vs. Other Methods (Salt, Vinegar)
The foil/baking soda method uses an electrochemical reaction. Adding salt enhances this. Using vinegar with baking soda creates a fizzing reaction but is generally less effective for tarnish removal and can be abrasive or acidic, posing risks to some silver.
How does the standard foil/baking soda method stack up against variations or other DIY approaches?
- Foil/Baking Soda/Salt: As discussed, adding salt enhances the conductivity of the baking soda solution, speeding up the same electrochemical reaction. It’s a helpful boost, especially for heavy tarnish.
- Baking Soda + Vinegar: Mixing baking soda (a base) and vinegar (an acid) creates a vigorous fizzing reaction (carbon dioxide release). While this looks impressive and is useful for some types of cleaning (like unclogging drains), it’s generally less effective for removing silver tarnish than the electrochemical method. The primary cleaning action comes from the slight abrasiveness of the baking soda paste formed, and the acidic nature of vinegar can potentially damage silver over time, especially plated items. It doesn’t utilize the tarnish-transfer principle.
- Foil + Salt + Water (No Baking Soda): Salt water is an electrolyte, and aluminum foil is reactive. This combination can induce a weaker electrochemical reaction, but it’s significantly less effective and slower than when baking soda is included. Baking soda provides the optimal alkaline environment and electrolyte strength for efficient tarnish removal via this method.
- Just Baking Soda Paste: Making a paste of baking soda and water and rubbing it on silver works primarily through gentle abrasion. It can remove light tarnish but requires physical effort and carries a slight risk of scratching if too much pressure is applied or the paste is too gritty. It doesn’t chemically convert the tarnish back to silver.
In summary: The aluminum foil, baking soda, and hot water method (with optional salt) stands out for its effectiveness based on electrochemical principles, its non-abrasive nature (when done correctly), and its ability to clean intricate areas without scrubbing.
FAQs About Cleaning Silverware with Aluminum Foil and Baking Soda
Here are answers to some frequently asked questions about this popular silver cleaning technique:
Is it safe to clean silver with aluminum foil and baking soda?
Generally, yes, it is safe for solid sterling silver items without intentional patinas or delicate additions like stones. It’s non-abrasive. However, it should be avoided or used with extreme caution on antique silver with patinas, silver-plated items (especially if worn), and jewelry containing porous gemstones, pearls, or adhesives.
Which side of aluminum foil should touch the silver for cleaning?
The standard recommendation is to have the shiny side of the aluminum foil facing upwards, in direct contact with the silverware. While both sides conduct electricity, the shiny side is conventionally preferred and ensures the method works as expected.
Does cleaning silver with baking soda and aluminum foil cause damage?
When used correctly on appropriate items (solid sterling silver), it does not cause damage because it’s non-abrasive. Damage can occur if used on unsuitable items like those with intended patinas (which it will remove), potentially worn silver plating, or jewelry with stones/glue. Improper handling (like scratching with tongs) could also cause damage.
What is the chemical reaction when cleaning silver with baking soda and foil?
It’s an electrochemical reaction (galvanic reduction). The aluminum foil acts as an anode, and the silver as a cathode, in an electrolyte solution of hot water and baking soda. Aluminum attracts the sulfur from the silver sulfide (tarnish), converting the tarnish back to pure silver and forming aluminum sulfide on the foil.
How long should I soak the silver in the baking soda solution?
Soaking time varies depending on the level of tarnish. Light tarnish might only need 2-5 minutes, while moderate tarnish could take 5-15 minutes. Heavily tarnished items might require 15-30 minutes or even longer. Monitor the silver and remove it once the tarnish is gone.
Can I use this method to clean silver-plated items?
Use this method with caution on silver-plated items. If the plating is thick and intact, a short soak might be okay. However, if the plating is thin, worn, or damaged, the process could potentially worsen the damage or expose the base metal. Testing on an inconspicuous area first is highly recommended.
What happens if I use a metal container instead of glass or ceramic?
Using a reactive metal container (other than aluminum itself) can interfere with the intended electrochemical reaction between the silver and the foil. It might slow down the process, make it less effective, or potentially cause discoloration on the container itself. A non-metallic container (glass, ceramic, plastic) ensures the reaction occurs primarily between the foil and the silver.
Do I need to add salt to the baking soda and water mixture?
No, adding salt is optional. The method works effectively with just baking soda and hot water. However, adding a small amount of salt (sodium chloride) increases the conductivity of the electrolyte solution, which can speed up the reaction, making it particularly helpful for very heavily tarnished silver.
Can I clean tarnished silver with just baking soda (without foil)?
Yes, you can clean lightly tarnished silver using a paste of baking soda and water, gently rubbing it with a soft cloth. This works through mild abrasion. However, it requires more physical effort, may not reach intricate areas as well, carries a slight risk of scratching if done too vigorously, and doesn’t utilize the efficient electrochemical tarnish reversal.
How is this method different from using commercial silver polish?
Commercial silver polishes typically work through chemical action (dissolving tarnish) and/or physical abrasion (removing tarnish with fine particles). They often contain harsher chemicals and can remove a microscopic layer of silver over time. The foil/baking soda method is non-abrasive, uses common household ingredients, and reverses the tarnish chemically via an electrochemical reaction.
Summary: Effortless Silver Cleaning at Home
Restoring the shine to your tarnished silverware doesn’t have to involve harsh chemicals or laborious scrubbing. The cleaning silverware with aluminum foil and baking soda method offers a remarkably simple, inexpensive, and effective solution rooted in basic chemistry. By creating a simple electrochemical cell in your kitchen, you can watch tarnish disappear as it transfers from your cherished silver pieces to the sacrificial aluminum foil.
This non-abrasive technique is ideal for most sterling silver flatware and serving pieces, gently lifting away silver sulfide without wearing down the metal itself. Remember the key elements for success: use a non-metallic container, ensure the silver directly contacts the shiny side of the foil, use boiling water with dissolved baking soda (and optional salt for a boost), rinse thoroughly, and buff dry. While generally safe, exercise caution with antique pieces bearing patinas, potentially worn silver-plate, and delicate jewelry.
Why not give this method a try next time your silver needs a refresh? You might be surprised at how effortlessly you can bring back that brilliant, beautiful shine.
Have you tried this method before? Share your experiences or ask any further questions in the comments below!
