As an Amazon Associate BakingBakewareSets.com earns from qualifying purchases.
11 Easy Impressive Recipes Good Looking Food Made Simple
Have you ever scrolled through Pinterest, mesmerized by a dish that looks like a work of art, and thought, “I could never make that”? You want to serve good looking food—the kind that makes your friends and family’s eyes light up before they even take a bite—but the thought of complicated techniques and hours spent in the kitchen is completely overwhelming.
Here’s the deal: we’ve all been there. You have guests coming over, and the pressure is on to impress. You want to create a meal that feels special and celebratory, but you’re not a professional chef with a fully staffed kitchen. The gap between the beautiful food you envision and the simple recipes you feel comfortable with can feel massive.
The secret to creating good looking food is choosing recipes that maximize visual impact with minimal effort. It’s not about complex skills; it’s about smart strategies. By focusing on vibrant, fresh ingredients, straightforward cooking techniques, and simple plating tricks, any home cook can create a stunning meal that looks like it came from a high-end restaurant. This guide will walk you through 11 deceptively simple recipes—from starters to desserts—that are guaranteed to ‘wow’ your guests and make you feel like a culinary rockstar.
☰ Table of Contents ▼
show
Want to ‘Wow’ Your Guests Without Spending Hours in the Kitchen?
The key to good looking food made simple is choosing recipes that use vibrant, fresh ingredients and straightforward techniques. These dishes maximize visual impact with minimal effort, relying on color, texture, and simple plating to look impressive. In my experience, the most successful hosts don’t slave away over complicated meals; they master a few recipes that deliver a high visual and flavor payoff without the stress.
4 Stunning Starters That Look Deceptively Gourmet
Easy but impressive starters often require minimal cooking and focus on fresh ingredients and colorful presentation. Options like Cherry Bruschetta, Caprese Skewers, Smoked Salmon Dip, and Baked Feta are perfect examples. They come together quickly, can often be prepped in advance, and look incredibly elegant when served, setting a sophisticated tone for the rest of the meal.
1. Vibrant Cherry Bruschetta with Ricotta & Prosciutto
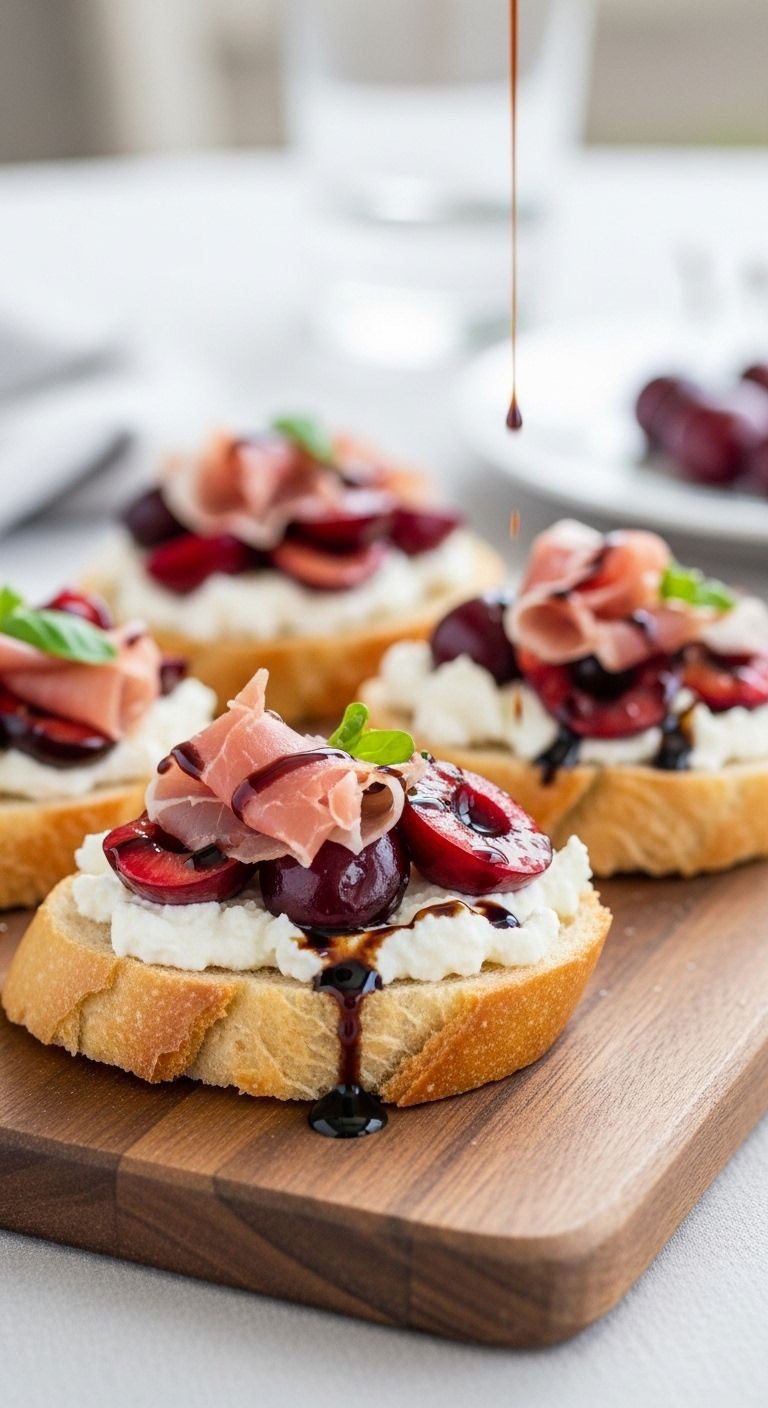
This vibrant bruschetta is a perfect no-cook appetizer that gets its ‘wow’ factor from the beautiful contrast of colors and textures. The sweetness of the cherries, the saltiness of the prosciutto, and the creaminess of the ricotta create a flavor combination that’s as impressive as it looks.
Ingredients:
- 1 baguette, sliced into ½-inch rounds
- Olive oil for brushing
- 1 cup creamy, whole-milk ricotta cheese
- 1 cup fresh cherries, pitted and halved
- 4-6 slices of high-quality prosciutto, torn
- Balsamic glaze for drizzling
- Fresh basil leaves for garnish (optional)
Instructions:
- Preheat your broiler or a grill pan. Brush the baguette slices lightly with olive oil.
- Toast for 1-2 minutes per side until they are golden brown and crisp. Let them cool slightly.
- Spread a generous layer of ricotta cheese onto each piece of toasted bread.
- Artfully arrange the halved cherries and pieces of torn prosciutto on top of the ricotta.
- Just before you’re ready to serve, drizzle lightly with balsamic glaze and top with a fresh basil leaf.
Pro-Tip: For the best flavor, use high-quality, in-season cherries. If cherries are out of season, roasted red grapes or even thinly sliced figs make a fantastic and equally impressive substitute.
Save this no-cook starter for your next party!
2. Sophisticated Smoked Salmon Dip

This elegant dip takes about five minutes to make but looks and tastes like a high-end appetizer from a fancy catering company. The secret is using good quality smoked salmon and fresh herbs to create a vibrant, flavorful spread that pairs perfectly with almost anything.
Ingredients:
- 8 oz cream cheese, softened to room temperature
- 4 oz smoked salmon, finely chopped
- 2 tbsp fresh dill, chopped, plus extra for garnish
- 1 tbsp fresh lemon juice
- Freshly cracked black pepper to taste
- Crisp crackers, baguette slices, or cucumber slices for serving
Instructions:
- In a medium-sized bowl, combine the softened cream cheese, chopped fresh dill, and lemon juice. Use a spatula or mixer to combine until everything is smooth and well-incorporated.
- Gently fold in the finely chopped smoked salmon. Be careful not to overmix; you want to see little flecks of salmon throughout the dip.
- Season with a few cracks of fresh black pepper.
- Transfer the dip to a beautiful serving bowl. Garnish with an extra sprig of fresh dill and serve immediately with your choice of crackers or vegetables.
Pro-Tip: For an extra smooth, whipped texture like you’d find at a deli, blend the cream cheese, dill, and lemon juice in a food processor for about 30 seconds before folding in the salmon by hand.
Pin this elegant dip for your next celebration!
3. Classic Caprese Skewers with Balsamic Glaze
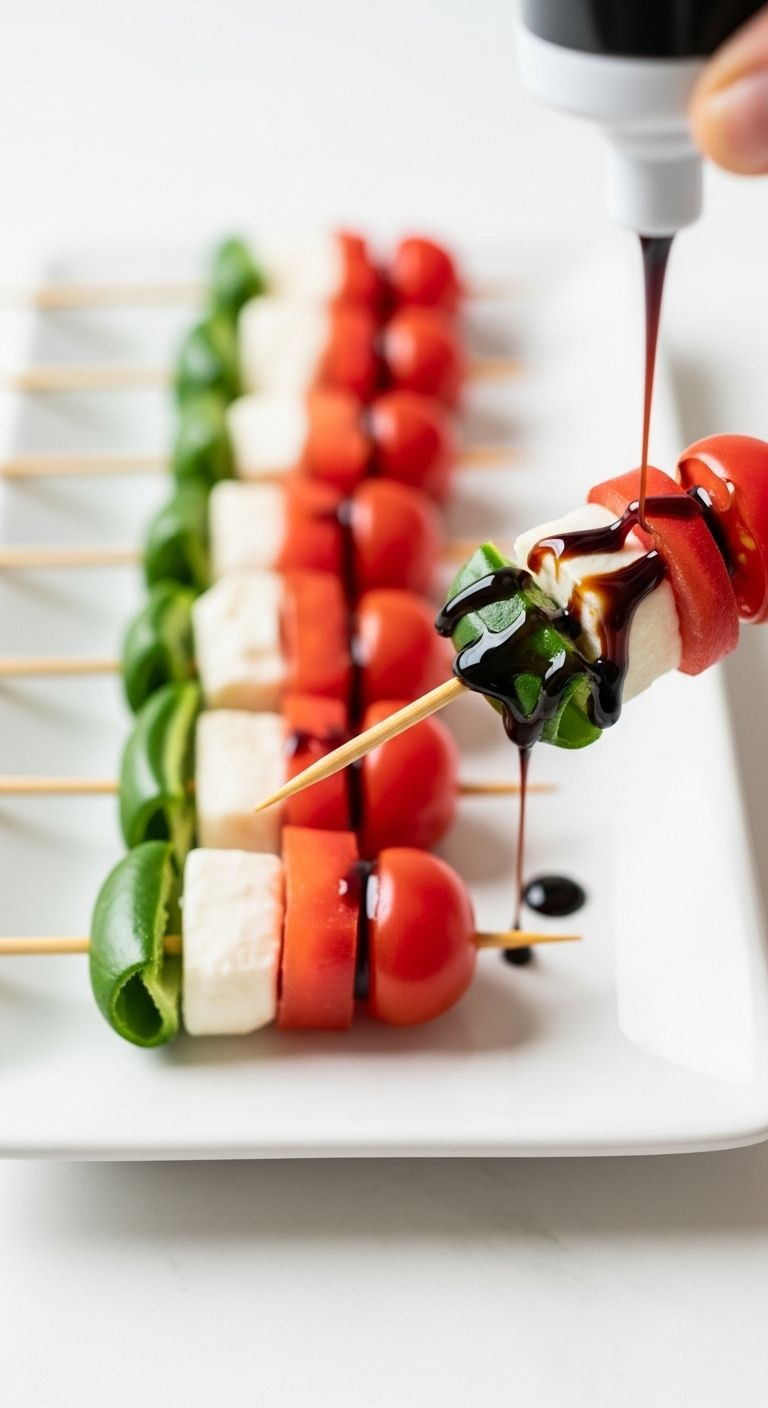
These skewers are the definition of simple elegance, where the beauty comes from the fresh, high-quality ingredients and their iconic colors. They are incredibly easy to assemble and are always a crowd-pleaser, making them a perfect bite-sized appetizer for any party.
Ingredients:
- 1 pint sweet cherry tomatoes
- 1 container (8 oz) fresh mozzarella pearls (bocconcini)
- 1 large bunch of fresh basil leaves
- High-quality balsamic glaze for drizzling
- Small bamboo or decorative skewers
Instructions:
- On each skewer, carefully thread one cherry tomato.
- Next, take a fresh basil leaf, fold it in half, and thread it onto the skewer.
- Follow the basil with one fresh mozzarella pearl. If your skewers are long, you can repeat the pattern.
- Arrange the finished skewers on a clean white platter to make the vibrant red, white, and green colors pop.
- Just before serving, drizzle the skewers generously with a good balsamic glaze.
Lesson Learned: One thing I learned the hard way is not to drizzle the balsamic glaze until right before serving. If you do it too far in advance, the glaze can pool at the bottom of the platter and make the presentation look messy instead of fresh and sharp.
The perfect fresh bite! Save this idea for later.
4. Warm Baked Feta with Sesame & Honey

This communal starter is the ultimate “wow-factor for minimum-effort” dish, as it transforms a simple block of cheese into a warm, gooey, and decadent appetizer. It’s perfect for gathering people around the table and requires almost zero hands-on time.
Ingredients:
- 1 block (8 oz) of good quality feta cheese (in brine is best)
- 2 tbsp olive oil
- 2 tbsp honey
- 1 tbsp sesame seeds
- Warm pita bread or crusty bread for serving
Instructions:
- Preheat your oven to 400°F (200°C).
- Place the block of feta cheese in the center of a small oven-safe dish or cast-iron skillet. Pat it dry before placing it in the dish.
- Drizzle the top of the feta generously with olive oil.
- Bake for 15-20 minutes. You’ll know it’s ready when the feta is soft, warm all the way through, and slightly golden on the edges.
- Remove it from the oven and immediately drizzle with honey, then sprinkle with sesame seeds. Serve hot with warm pita for dipping.
Pro-Tip: Toast the sesame seeds in a dry pan over medium heat for 1-2 minutes before sprinkling them on top. This simple step takes no time but brings out their nutty flavor and adds another layer of complexity to the dish.
Share this cozy appetizer! Pin it now.
4 Restaurant-Quality Main Courses Made Easy
Creating an impressive main course doesn’t mean you have to attempt something impossibly complex. The key is to focus on recipes with a ‘secret weapon’—a glossy sauce, a vibrant color, or a clever use of an ingredient like puff pastry. These four dishes look like they belong on a restaurant menu but are secretly simple to execute for a special dinner at home.
5. Glossy Honey Garlic Pork Chops

These pork chops get their stunning appearance from a rich, sticky, and incredibly glossy honey garlic sauce that you make right in the same pan. This technique not only creates an amazing visual but also ensures the pork chops are juicy, tender, and packed with flavor.
Ingredients:
- 4 bone-in pork chops, about 1-inch thick
- Salt and freshly ground black pepper
- 2 tbsp olive oil
- 6 cloves garlic, minced
- 1/4 cup honey
- 1/4 cup water (or low-sodium chicken broth)
- 2 tbsp soy sauce
- Fresh parsley, chopped, for garnish
Instructions:
- Pat the pork chops completely dry with a paper towel and season both sides generously with salt and pepper.
- Heat the olive oil in a large skillet over medium-high heat. Once hot, add the pork chops and sear for 3-5 minutes per side, until a deep golden-brown crust forms. Remove the pork chops and set them aside on a plate.
- Reduce the heat to medium. Add the minced garlic to the same skillet and sauté for about 30 seconds until fragrant.
- Pour in the honey, water, and soy sauce. Stir to combine and bring the mixture to a simmer. Let it cook for 2-3 minutes, stirring occasionally, until the sauce begins to thicken.
- Return the pork chops to the skillet. Spoon the glossy sauce over them, ensuring they are well-coated. Cook for another minute or two until the chops are heated through.
- Serve immediately, garnished with fresh parsley.
Pro-Tip: The key to a glossy, not burnt, sauce is to manage the heat. Once you add the honey to the pan, lower the heat to a steady simmer. This allows the sauce to thicken perfectly without the sugars in the honey caramelizing too quickly and burning.
Make a restaurant-worthy dinner tonight! Pin this recipe.
6. Colorful Nduja-Baked Hake with Chickpeas & Mussels
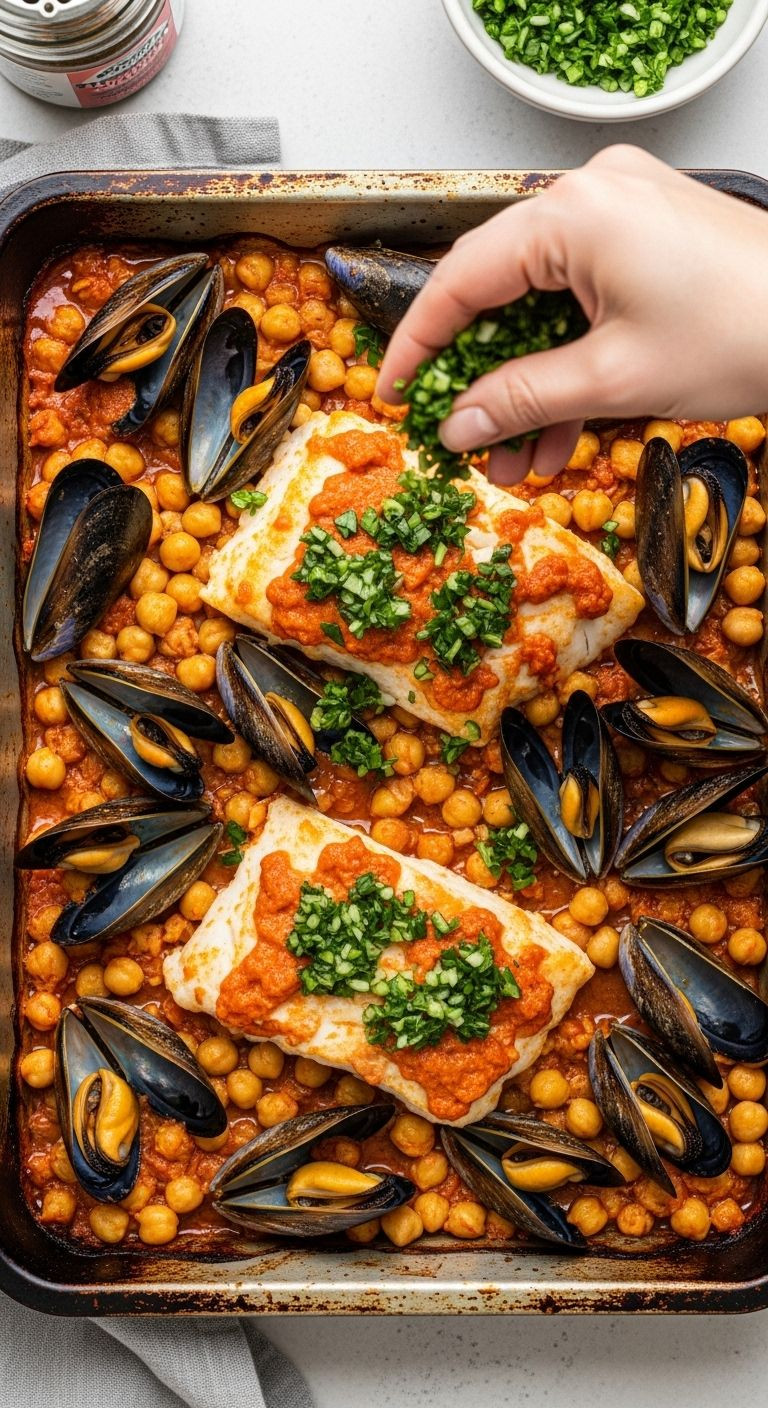
This one-pan wonder looks incredibly impressive due to its vibrant colors and mix of beautiful ingredients, all thanks to the spicy Nduja paste. Nduja is a spicy, spreadable pork sausage from Italy that melts into a flavorful, colorful oil when cooked, coating everything in the pan.
Ingredients:
- 2 large hake or cod fillets (about 6 oz each)
- 2 tbsp Nduja paste
- 1 can (15 oz) chickpeas, rinsed and drained
- 1 lb fresh mussels, cleaned and debearded
- For the gremolata: 1/4 cup fresh parsley, 1 clove garlic, zest of 1 lemon
Instructions:
- Preheat your oven to 400°F (200°C).
- In a large oven-safe pan or baking dish, spread the drained chickpeas in an even layer.
- Place the fish fillets on top of the chickpeas. Dot the fish and chickpeas with small spoonfuls of the Nduja paste.
- Bake for 10 minutes.
- Carefully remove the pan from the oven. Add the cleaned mussels around the fish. Return to the oven and bake for another 5-7 minutes, until the fish is flaky and cooked through and the mussels have opened.
- While it bakes, make a simple gremolata by finely chopping the parsley and garlic, and mixing it with the lemon zest.
- Sprinkle the bright green gremolata over the finished dish right before serving.
Lesson Learned: It’s important to discard any mussels that haven’t opened after cooking, as this means they weren’t good to eat. Also, be aware that Nduja can vary in spiciness. If you’re sensitive to heat, I’d suggest starting with a smaller amount and you can always add more next time.
Pin this vibrant one-pan wonder for an easy dinner party!
7. Simple & Elegant Fennel & Lemon Risotto

Risotto has a reputation for being difficult, but it’s actually a simple process that results in a luxuriously creamy and elegant dish that always looks impressive. The combination of fresh fennel and bright lemon makes this vegetarian main course feel light yet sophisticated.
Ingredients:
- 1 tbsp olive oil
- 1 large fennel bulb, thinly sliced (reserve fronds for garnish)
- 1 shallot, finely chopped
- 1.5 cups Arborio rice
- 1/2 cup dry white wine (like Pinot Grigio)
- 4-5 cups hot vegetable broth
- Zest and juice of 1 lemon
- 1/2 cup freshly grated Parmesan cheese
- Salt and pepper to taste
Instructions:
- In a large, wide saucepan, heat the olive oil over medium heat. Add the sliced fennel and chopped shallot and sauté for 5-7 minutes until soft and fragrant.
- Add the Arborio rice to the pan and stir continuously for 1 minute to toast the grains.
- Pour in the white wine and stir until it has been completely absorbed by the rice.
- Begin adding the hot vegetable broth, one ladleful at a time. Stir frequently, and only add the next ladleful once the previous one has been mostly absorbed.
- Continue this process for about 18-20 minutes. The risotto is done when the rice is creamy but still has a slight bite (al dente).
- Remove the pan from the heat. Stir in the Parmesan cheese, lemon zest, and lemon juice. Season to taste with salt and pepper. Serve immediately, garnished with fennel fronds.
Pro-Tip: The true secret to creamy risotto is using hot broth. I keep my broth in a separate small pot on a low simmer right next to my risotto pan. Adding cold broth shocks the rice and prevents it from releasing its starches properly, which is what creates that signature creamy texture.
Master creamy risotto! Save this elegant recipe.
8. 5-Ingredient Chicken in Puff Pastry
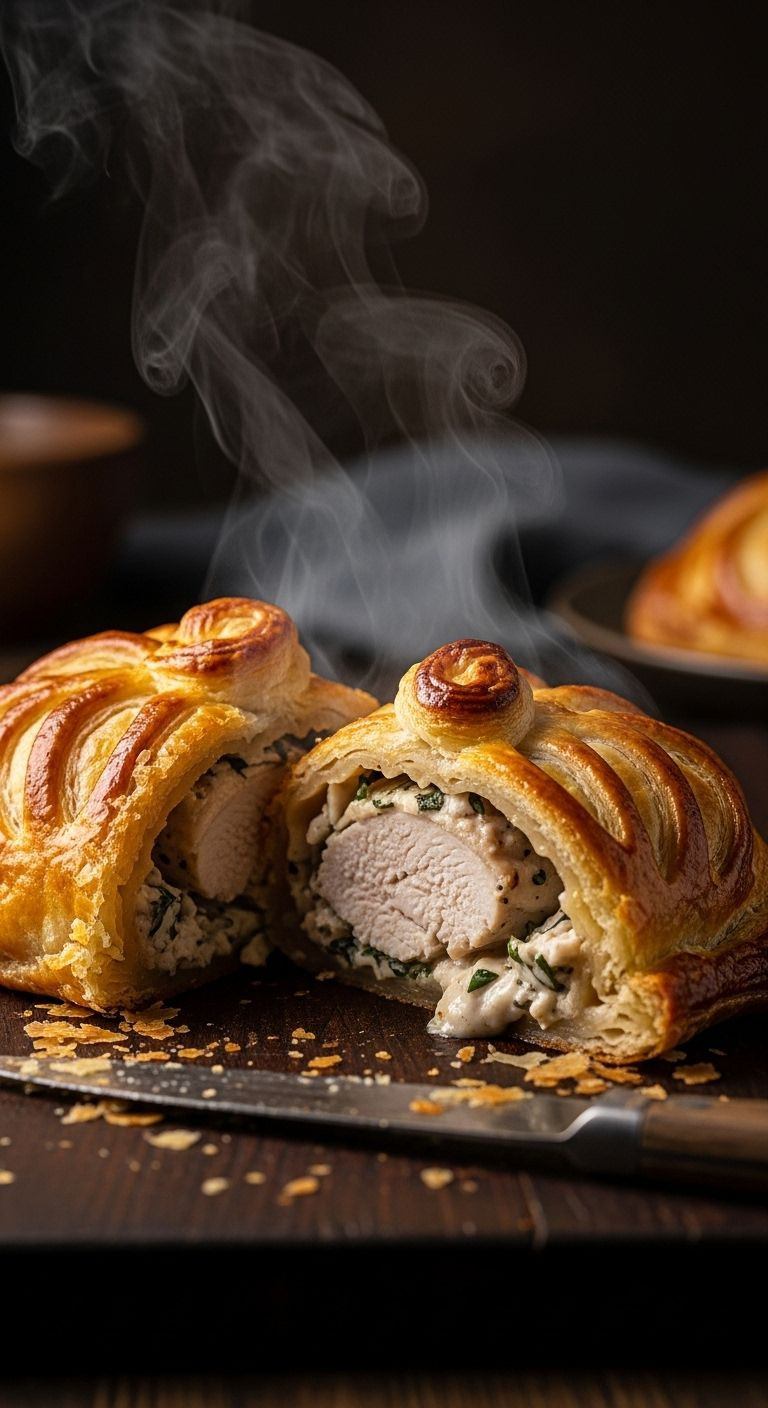
This recipe is the ultimate shortcut to an impressive dinner, looking like a mini Chicken Wellington but with almost no effort thanks to store-bought puff pastry. The golden, flaky crust hides a juicy chicken breast with a savory cream cheese filling, creating a visually stunning main with just 5 ingredients.
Ingredients:
- 2 boneless, skinless chicken breasts
- 4 oz herb and garlic cream cheese (like Boursin)
- 1 sheet of frozen puff pastry, thawed according to package directions
- 1 egg, beaten
- Salt and pepper
Instructions:
- Preheat your oven to 400°F (200°C). Line a baking sheet with parchment paper. Season the chicken breasts on both sides with salt and pepper.
- Heat a tablespoon of oil in a pan over medium-high heat. Sear the chicken for 2-3 minutes per side, just until lightly browned. This step isn’t to cook it, just to get some color. Let it cool on a plate for a few minutes.
- Unroll the puff pastry sheet and cut it in half to create two rectangles. Spread 2 oz of the herb and garlic cream cheese in the center of each pastry half.
- Place a seared chicken breast on top of the cream cheese. Fold the pastry over the chicken, trimming any excess and pressing the edges to seal firmly.
- Place the parcels seam-side down on the prepared baking sheet. Brush the entire surface of the pastry with the beaten egg.
- Bake for 20-25 minutes, or until the pastry is deeply golden brown, puffed, and beautiful. Let it rest for 5 minutes before serving.
Lesson Learned: My first time making this, my pastry got a bit soggy. I learned to ensure your puff pastry is very cold and your chicken has cooled down a bit before you assemble the parcels. A hot chicken breast will start to melt the butter in the cold pastry, preventing it from puffing up perfectly in the oven.
Only 5 ingredients to this impressive dinner! Pin it now.
3 Showstopper Desserts That Require No Pro Skills
A showstopper dessert is the perfect end to an impressive meal, and the best ones look incredibly complicated but are secretly simple to make. These three desserts rely on clever shortcuts, like no-bake fillings and pre-made pastry, to create stunning final courses that will leave your guests in awe of your (supposedly advanced) skills.
9. No-Bake Salted Caramel & Honeycomb Cheesecake
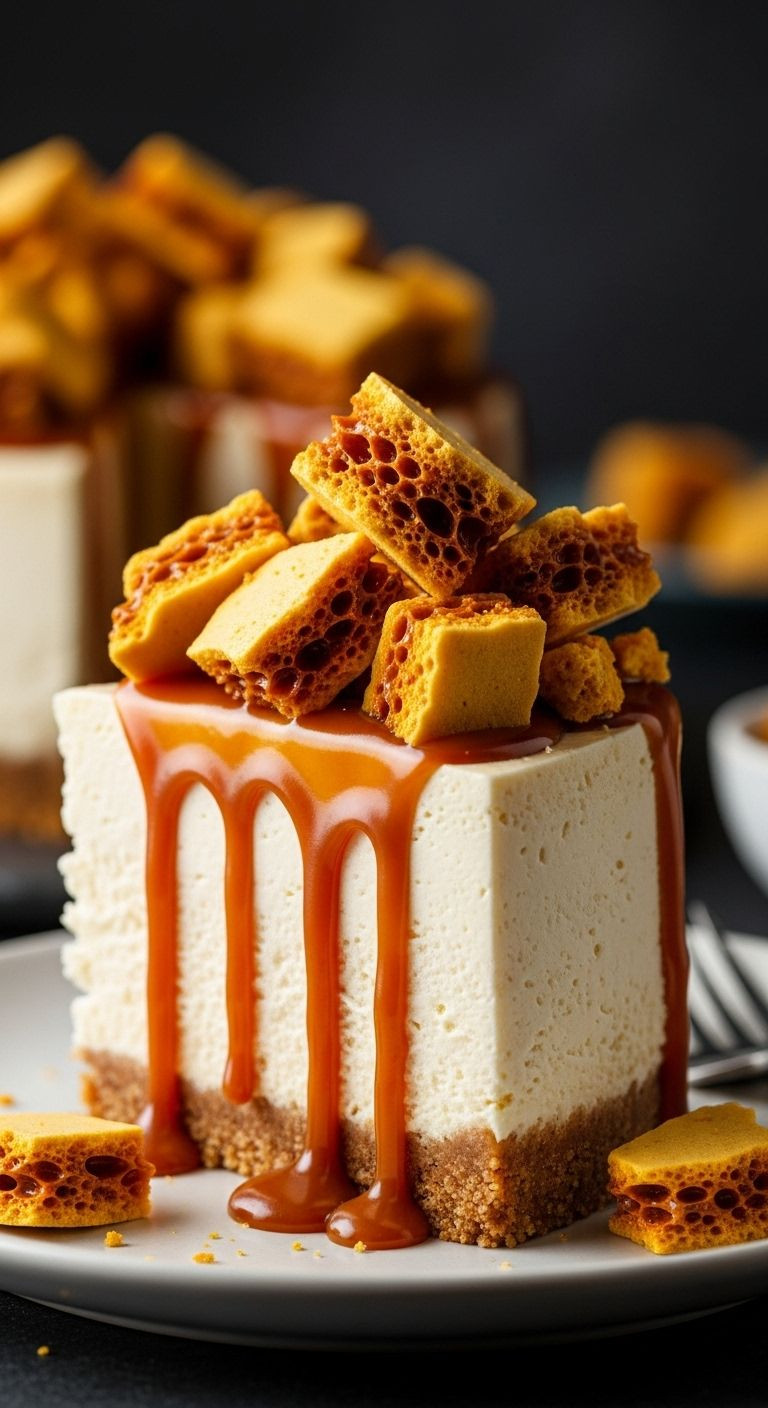
This cheesecake is a true showstopper, getting its visual drama from a decadent salted caramel drizzle and a pile of crunchy, golden honeycomb. The best part? It’s a completely no-bake dessert, meaning you can’t mess it up in the oven.
Ingredients:
- For the base: 1.5 cups crushed digestive biscuits or graham crackers, 1/2 cup (1 stick) unsalted butter, melted
- For the filling: 16 oz full-fat cream cheese, softened, 1 cup powdered sugar, 1 tsp vanilla extract, 1 cup heavy whipping cream, 1/2 cup salted caramel sauce
- For topping: Extra salted caramel sauce, 1 cup crushed honeycomb (or crushed Crunchie/Violet Crumble candy bars)
Instructions:
- In a bowl, mix the crushed biscuits with the melted butter until it resembles wet sand. Press this mixture firmly into the bottom of an 8-inch springform pan. Place in the refrigerator to chill.
- In a large bowl, beat the softened cream cheese, powdered sugar, and vanilla with an electric mixer until completely smooth.
- In a separate bowl, whip the heavy cream until stiff peaks form.
- Gently fold the whipped cream into the cream cheese mixture, then gently fold in the 1/2 cup of salted caramel sauce, creating light swirls.
- Spoon the filling over the chilled biscuit base and smooth the top with a spatula.
- Refrigerate for at least 6 hours, or preferably overnight, until firm.
- Before serving, release the cheesecake from the springform pan. Drizzle generously with more caramel sauce and top with the crushed honeycomb.
Pro-Tip: To get those perfectly clean, professional-looking slices, fill a tall glass with hot water. Dip a large, sharp knife into the water, then wipe it completely dry with a paper towel before making each cut. This melts any residue and prevents the creamy filling from smudging.
Pin this no-bake showstopper for your next special occasion!
10. Classic & Airy Chocolate Mousse
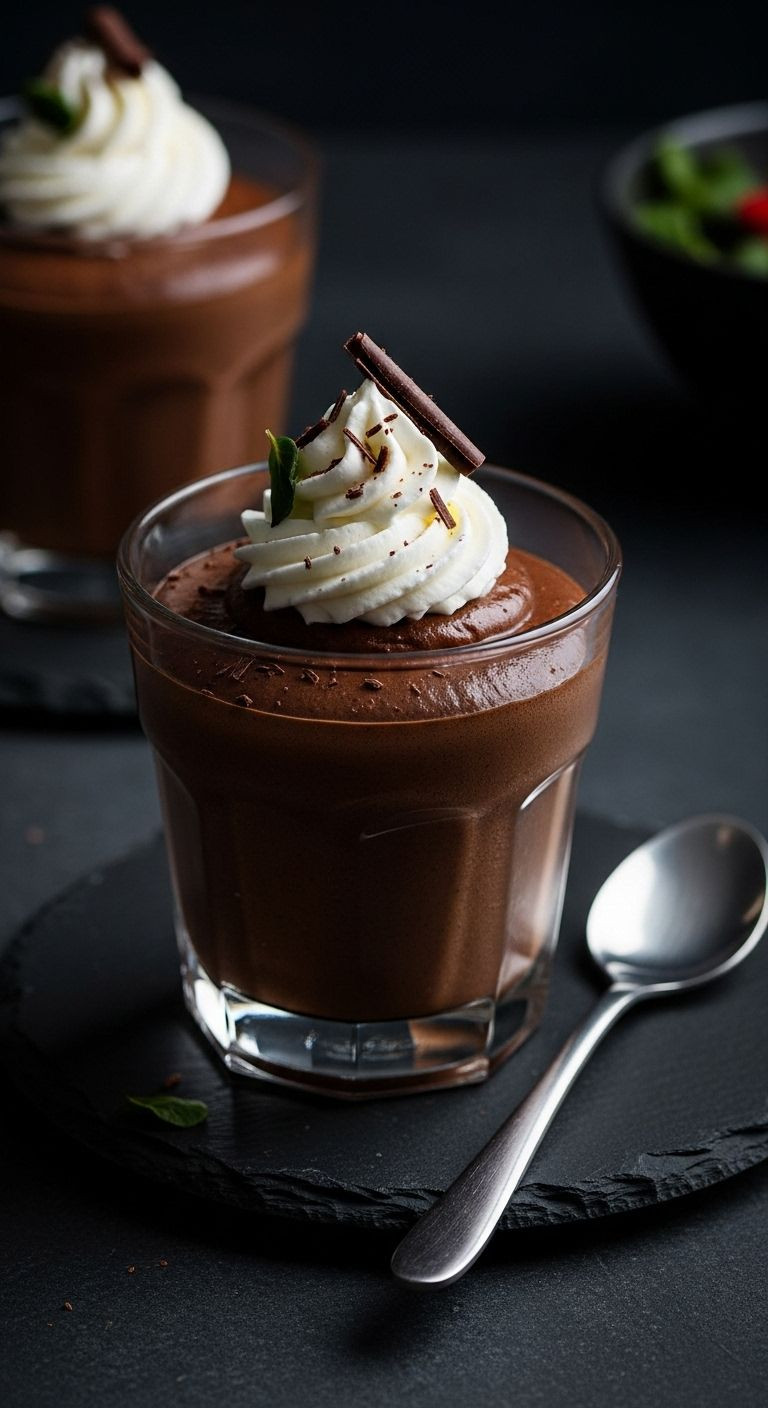
Classic chocolate mousse is the epitome of French elegance, and it’s surprisingly easy to make with just a few ingredients. Its impressive quality comes from its incredibly light, airy texture and rich, deep chocolate flavor. Serving it in individual glass cups instantly makes it look sophisticated.
Ingredients:
- 6 oz high-quality dark chocolate (at least 70% cacao), chopped
- 3 large eggs, separated into yolks and whites
- 1 cup heavy cream
- Optional: Chocolate shavings or a dollop of whipped cream for garnish
Instructions:
- Gently melt the chopped chocolate in a heatproof bowl set over a small pot of simmering water (a double boiler). Ensure the bottom of the bowl doesn’t touch the water. Once melted and smooth, remove from heat and let it cool slightly for about 5-10 minutes.
- While the chocolate cools, whip the heavy cream in a chilled bowl until soft peaks form. Set aside in the fridge.
- In a separate, completely clean bowl, use clean beaters to whip the egg whites until stiff, glossy peaks form.
- Once the chocolate is lukewarm to the touch, whisk in the egg yolks until combined.
- Gently fold in one-third of the whipped egg whites into the chocolate mixture to lighten it. Then, gently fold in the remaining egg whites until just combined.
- Finally, gently fold in the whipped cream. Spoon the mousse into individual serving glasses or ramekins and chill in the refrigerator for at least 4 hours to set.
Lesson Learned: The biggest mistake you can make with mousse is folding too aggressively, which knocks out all the air you worked so hard to whip in. Use a large rubber spatula and a gentle “under-and-over” motion to combine the ingredients. The goal is to keep the mixture as light and airy as possible.
The definition of elegance. Save this classic dessert recipe.
11. Stunning Hasselback Pear Tart
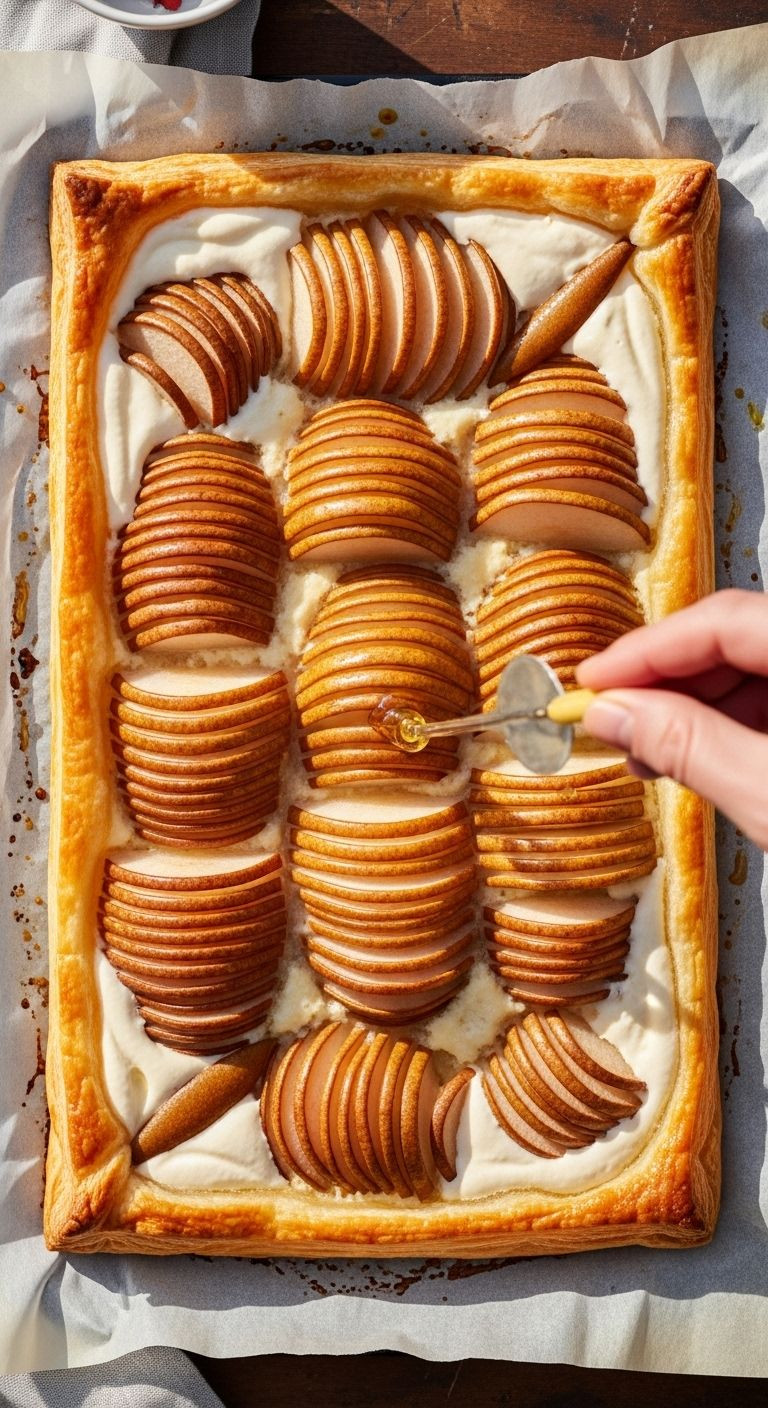
This tart looks like it came from a French patisserie, but it’s another brilliant use of frozen puff pastry. The beauty of this dessert comes from the ‘Hasselback’ technique—thinly slicing the pears creates a stunning fanned-out pattern that looks incredibly intricate.
Ingredients:
- 1 sheet of frozen puff pastry, thawed
- 4 oz cream cheese, softened
- 1/4 cup granulated sugar
- 2 ripe but firm pears (like Bosc or Anjou)
- 1 egg, beaten
- Optional glaze: 2 tbsp apricot jam, warmed with 1 tsp water
Instructions:
- Preheat your oven to 400°F (200°C). Lay the thawed puff pastry sheet on a baking sheet lined with parchment paper.
- Using a small knife, gently score a 1-inch border around the edges of the pastry, being careful not to cut all the way through.
- In a small bowl, mix the softened cream cheese and sugar until smooth. Spread this mixture evenly inside the scored border.
- Peel, halve, and core the pears. Place them cut-side down on a cutting board. Make thin slices crosswise along each pear half, stopping just before you cut all the way through.
- Gently fan the pear halves out and arrange them beautifully on top of the cream cheese layer.
- Brush the scored pastry border with the beaten egg.
- Bake for 20-25 minutes, until the pastry is puffed and golden brown and the pears are tender.
- For a professional finish, warm the apricot jam and brush it over the pears for a beautiful, shiny glaze.
Pro-Tip: Use firm pears like Bosc or Anjou. I’ve tried this with softer pears, and they tend to turn to mush when baked. Firmer varieties hold their shape much better, which is crucial for achieving that beautiful fanned, Hasselback effect.
Create a work of art for dessert! Pin this stunning tart.
Key Takeaways: Your Quick Guide to good looking food
Feeling inspired? Here’s a quick summary of the core principles for making impressive-looking food without the fuss. Keep these in mind, and you’ll always have a strategy for elevating your dishes.
- Focus on Color: A colorful plate is naturally more appealing. Use ingredients with vibrant, contrasting colors like red tomatoes, green basil, orange Nduja, or deep purple cherries.
- Leverage Texture: Make dishes more interesting to look at and eat by combining different textures. Think creamy ricotta with crunchy toasted bread, or flaky puff pastry with a smooth, juicy filling.
- The Garnish is Key: Never underestimate the power of a final touch. A simple sprinkle of fresh herbs (like parsley or dill), a drizzle of balsamic glaze, a swirl of sauce, or a bit of lemon zest can elevate a simple dish to a showstopper.
- Embrace Smart Shortcuts: Don’t be afraid to use high-quality pre-made ingredients. Store-bought puff pastry, good quality Nduja, or no-bake dessert options are your best friends. The goal is an impressive result, not unnecessary work.
- Plating Matters: The final presentation is everything. Serve your creations on clean, simple plates (white is often best as it makes the food’s colors pop) and avoid overcrowding the plate. Give your food room to shine.
People Also Ask About good looking food
How do you compliment good looking food?
To compliment good looking food, go beyond “it looks delicious” and use descriptive words that touch on specific visual qualities. For example: “The colors on this plate are so vibrant and fresh!” or “The way you plated this is a work of art.” You could also say, “That glossy sauce looks incredible,” or “I love the visual contrast between the flaky crust and the creamy filling.” Complimenting the specific effort and visual appeal makes the praise much more meaningful and appreciated.
How can I make my food look more appealing?
You can make food look more appealing by focusing on three key elements: color, height, and garnish. First, use ingredients with a variety of contrasting colors. Second, create height on the plate by stacking elements or placing your main on a bed of greens. Finally, always finish with a thoughtful garnish like fresh herbs, a sprinkle of toasted seeds, a swirl of sauce, or fresh lemon zest. Using a clean, uncluttered plate is also essential.
What are some easy recipes that look fancy?
Easy recipes that look fancy often rely on one showstopper ingredient or a simple but visually effective technique. Great examples include baked feta with honey and herbs, chicken wrapped in golden puff pastry, no-bake cheesecakes with dramatic toppings like caramel and honeycomb, and colorful Caprese skewers. These dishes use simple assembly but result in an elegant presentation that looks far more complicated than it actually is to prepare.
Final Thoughts
Creating beautiful, good looking food isn’t reserved for professional chefs with years of training. As we’ve seen, it’s not about mastering impossibly complex techniques. It’s about being creative, choosing fresh ingredients that pop with color, and learning a few simple tricks and shortcuts that deliver a huge visual payoff. It’s about understanding that a glossy sauce, a flaky pastry crust, or a thoughtful garnish can transform a simple meal into a memorable experience.
The power to ‘wow’ your family and friends is already in your hands. It’s found in a block of feta, a sheet of puff pastry, and a handful of fresh cherries. It’s about cooking with confidence and having fun with the presentation.
Now that you have these 11 recipes in your toolkit, which impressive dish are you most excited to try first? Let me know in the comments below
