As an Amazon Associate BakingBakewareSets.com earns from qualifying purchases.
Pickled Beets Recipe No Fail Small Batch Refrigerator and Canning Guide
Craving that perfect, old-fashioned sweet and tangy flavor of homemade pickled beets? There’s something deeply satisfying about the vibrant, jewel-toned jars lining a shelf, promising a delicious addition to salads, sandwiches, and side dishes. It’s a taste of nostalgia, a connection to canning traditions, and a truly delicious condiment.
But let’s be honest, getting started can feel a bit overwhelming. You might be wondering which recipe to trust, or perhaps you’re caught between wanting a quick batch for this week’s meals and wanting to preserve your garden’s bounty for the winter. The fear of a failed canning seal or a flavor that’s just not quite right is real, and it can stop you before you even begin.
Here’s the deal: making perfect pickled beets is an easy, three-stage process of cooking the fresh beets until tender, creating a flavorful sweet and tangy brine of vinegar, sugar, and spices, and then preserving them using either a quick refrigerator method for short-term enjoyment or a traditional water bath canning method for long-term, shelf-stable storage. This guide will walk you through every single step, ensuring you get it right every time.
☰ Table of Contents ▼
show
Want to Make Perfect Pickled Beets (Without the Guesswork)?
The secret to a flawless pickled beets recipe lies in understanding the three simple stages: preparing the beets, creating the brine, and choosing your preservation method. By first cooking fresh beets until they are perfectly tender, you set the foundation for a great texture. Next, simmering a balanced brine of vinegar, water, sugar, and spices creates the signature tangy-sweet flavor. Finally, you decide whether to make a quick refrigerator batch or use a water bath canner for long-term storage.
This guide is designed to be your one-stop resource for making incredible homemade pickled beets. In my own kitchen, I’ve found that the best results come from combining my grandmother’s classic flavor profiles with modern, crystal-clear instructions. This approach removes all the guesswork, ensuring you get perfect, delicious results whether this is your very first time pickling or you’re an experienced canner looking to perfect your craft.
We will break down every part of the process, from selecting the right beets to the final satisfying “ping” of a successfully sealed jar.
First, Choose Your Path: Refrigerator vs. Canning
The best method for you depends entirely on how soon you want to eat your beets and how long you need them to last. Refrigerator pickles are a fast, small-batch option perfect for immediate use, while canning is the traditional method for long-term pantry storage. I use the refrigerator method constantly for topping salads all week long, and I dedicate a weekend in late summer to the canning method to preserve our garden harvest for the entire winter.
To make the choice crystal clear, here is a simple breakdown of the two methods:
| Factor | Refrigerator Method | Canning Method |
|---|---|---|
| Best For | Beginners, small batches, quick results | Long-term storage, large harvests |
| Storage Time | Up to 2 months in the refrigerator | 12-18 months in a cool, dark pantry |
| Equipment | Standard pots, jars with lids | Water bath canner, rack, jar lifter, new lids |
| Process Time | About 1 hour (plus marinating time) | About 2 hours (including processing time) |
Key Takeaway: If you want pickled beets ready to eat in a day or two and plan to finish them within a couple of months, the refrigerator method is your best friend. If your goal is to stock your pantry with jars to enjoy for many months to come, you’ll want to use the water bath canning method.
The Only Pickled Beets Recipe You’ll Ever Need
The absolute best pickled beets recipe is one that is versatile, reliable, and produces a perfectly balanced sweet, tangy, and spiced flavor every single time. This master recipe is designed to be the foundation for both quick refrigerator pickles and traditional canned beets, giving you one trusted set of measurements for any pickling project. The core of the recipe lies in the simple, flavorful brine that enhances the natural earthy sweetness of the beets.
Over the years, I have tested this specific recipe dozens of times to achieve what I believe is the perfect balance of sweet, tangy, and earthy flavor. It’s not just about taste; it is designed with food safety and reliability at its core, especially for those who choose the canning path.
https://www.facebook.com/cookingwithbrendagantt/videos/pickled-beats/1062928705330603/
1. Gather Your Ingredients & Equipment
Before you begin, the first step is to gather all your ingredients and necessary equipment to ensure a smooth and organized process. For the best flavor, you’ll need fresh beets, a vinegar with 5% acidity, sugar, and salt, along with any optional spices. Your equipment needs are simple for the refrigerator method but more specific if you plan on canning.
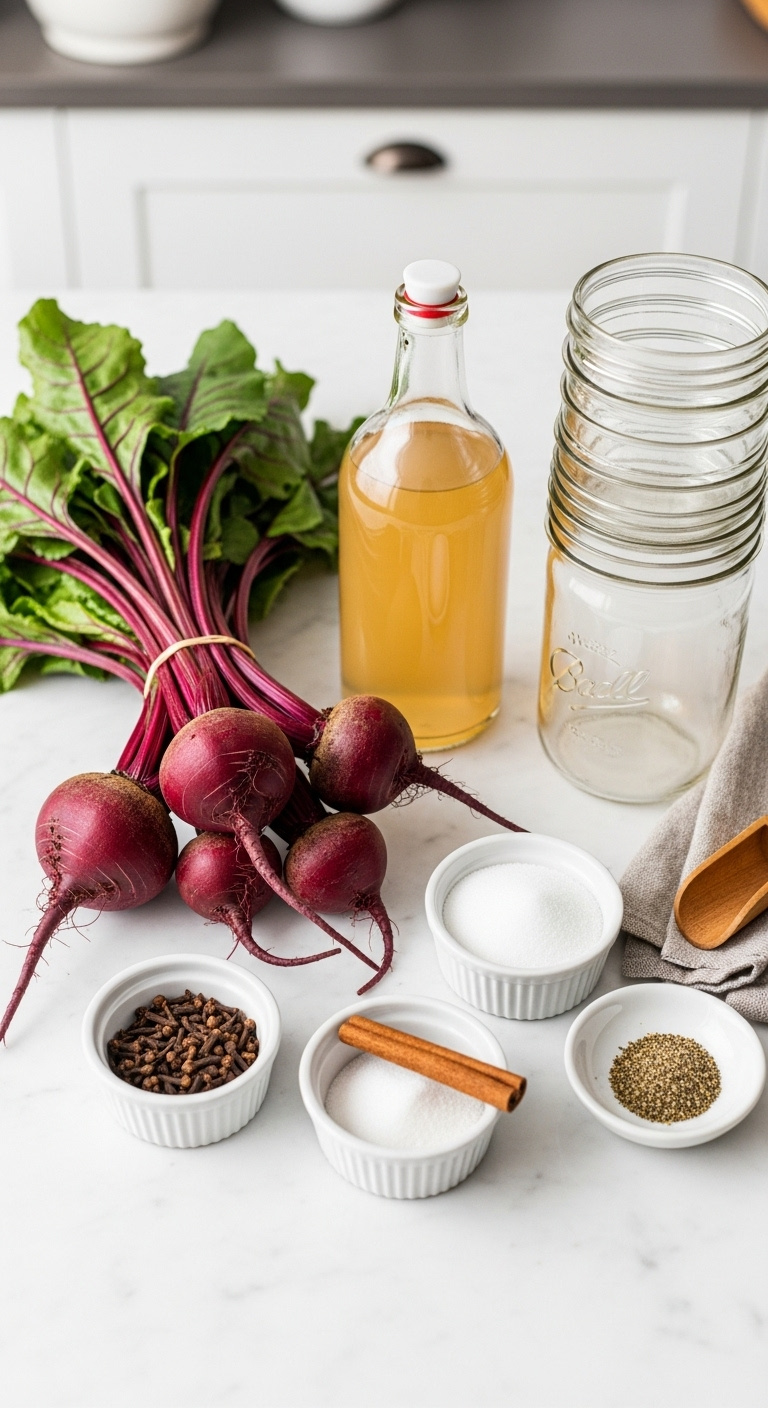
Ingredients:
- 3 lbs fresh beets
- 1 ½ cups apple cider vinegar (must be 5% acidity)
- 1 ½ cups water
- ¾ cup granulated sugar
- 1 ½ tsp pickling or kosher salt
- Optional Spices: whole cloves, cinnamon sticks, whole allspice, sliced onions
Materials Needed:
- Large pot (for cooking beets)
- Saucepan (for making the brine)
- Clean glass jars with new lids and bands
- For Canning Only: Boiling water canner with a rack, jar lifter
Pro Tip: In my experience, it’s absolutely crucial to always use new lids when you are canning. The sealing compound on a lid is only designed to create a perfect vacuum seal a single time. Reusing them, even if they look fine, is the most common reason for a failed seal, which can lead to spoiled food and wasted effort.
Save this ingredient list to your ‘Harvest Recipes’ board on Pinterest!
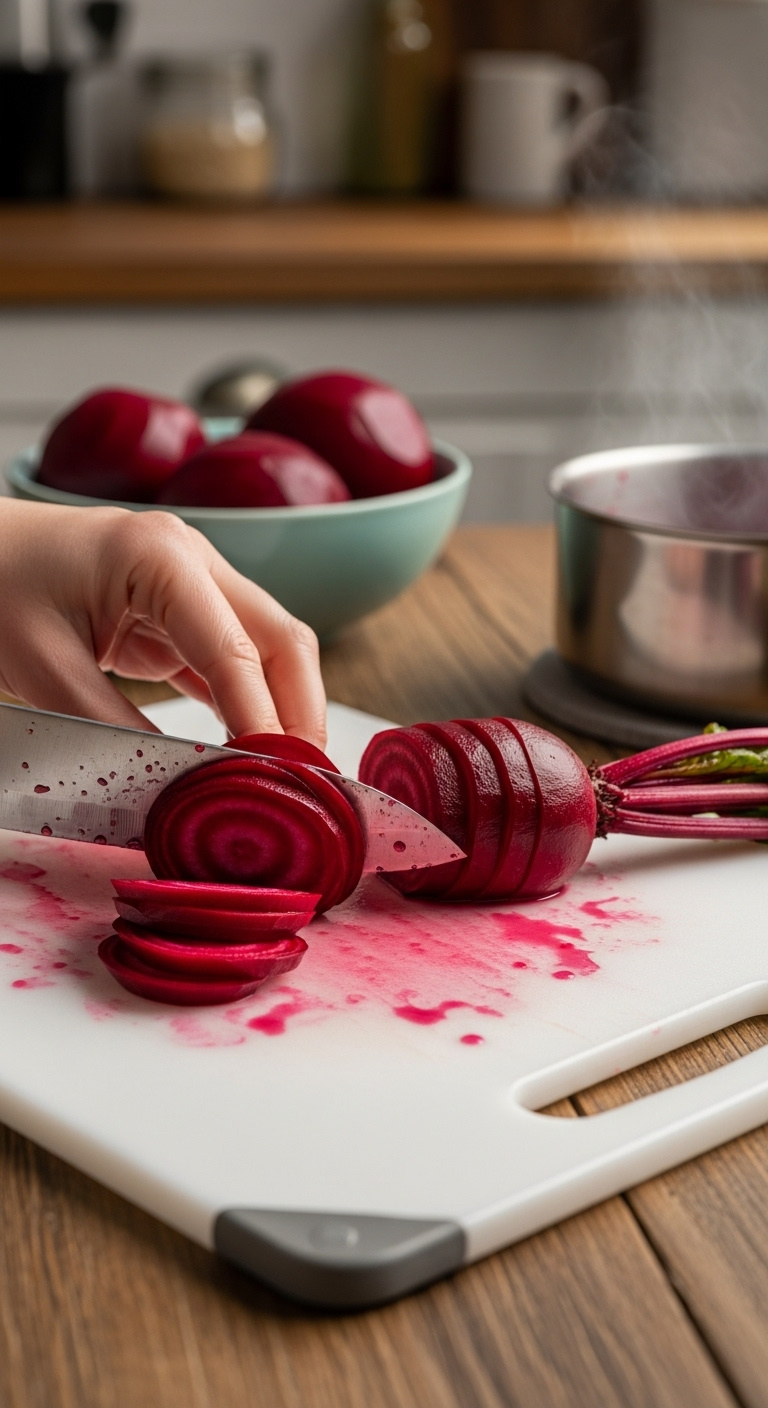
2. Cook the Beets & Create the Brine
The foundational step to any great pickled beet recipe involves simultaneously cooking the beets until tender while preparing a hot, flavorful brine on the stovetop. This two-part process ensures that your beets are perfectly cooked and ready to absorb the delicious pickling liquid as soon as it’s ready.
Step-by-Step Directions:
- Cook Beets: Start by washing your beets thoroughly. Trim the leafy tops down to about 1 inch, but leave the root tail intact for now. Place the beets in a large pot and cover them completely with water. Bring the water to a boil, then reduce the heat to a steady simmer. Cook for 20-30 minutes, or until the beets are fork-tender. The exact time will vary based on their size. Drain the beets and let them cool slightly.
-
Peel & Slice: This is where the magic happens (and the mess!). I always recommend wearing gloves to prevent your hands from getting stained. Once the beets are cool enough to handle, the skins should rub off easily. After peeling, trim off the stem and root ends. You can then slice them into rounds, cut them into cubes, or leave very small beets whole.
-
Make Brine: While the beets are cooking, you can prepare the brine. In a separate saucepan, combine the apple cider vinegar, water, granulated sugar, and salt. Place it over medium-high heat and bring the mixture to a rapid boil, stirring occasionally until you are certain the sugar and salt have completely dissolved. Reduce the heat and keep the brine hot.
Lesson Learned: One thing I learned the hard way is how much color beets can lose when boiling. The best trick I’ve found is to leave about an inch of the stem and the entire root tail attached while they cook. This simple step drastically reduces “bleeding,” which helps keep your beets a beautiful, vibrant, and deep ruby red.
Pin this step-by-step guide to remember the process!
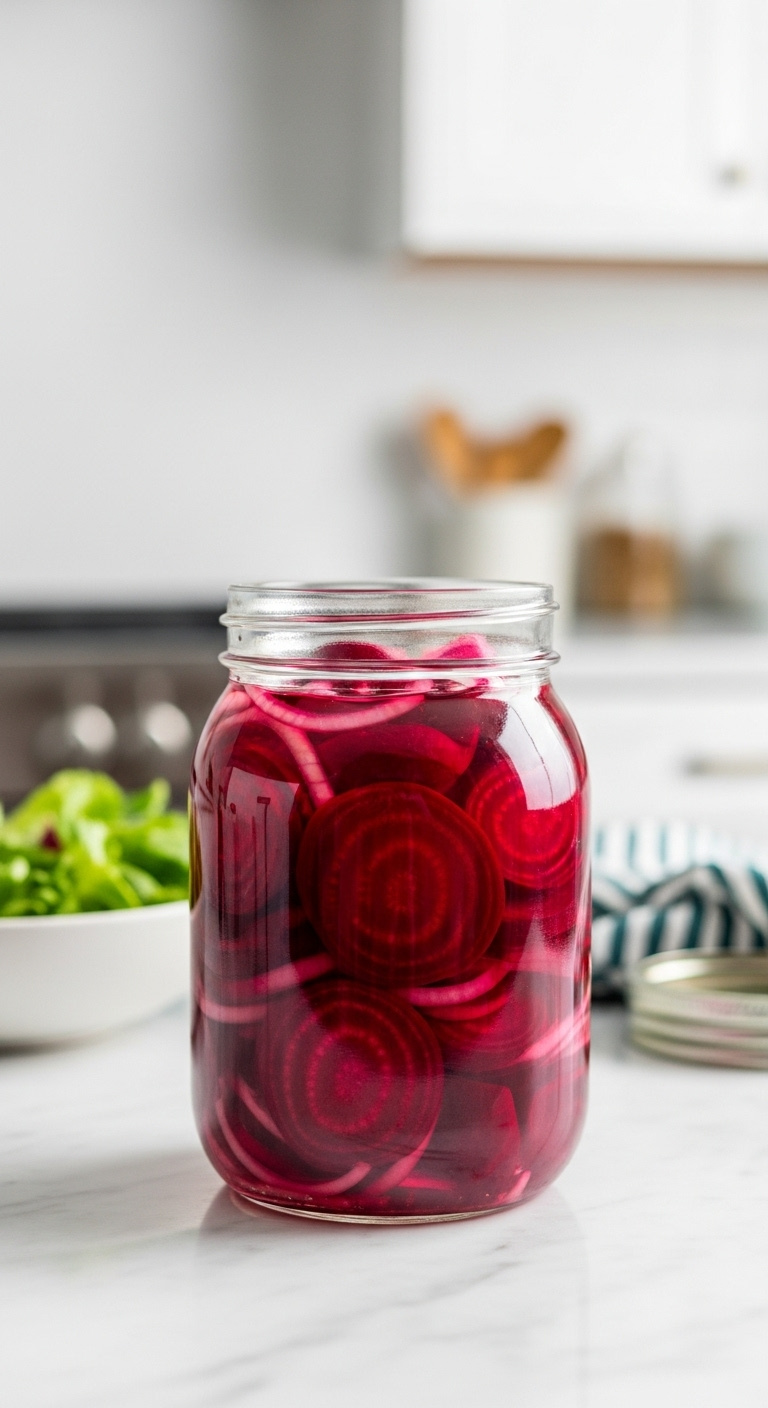
3. Method A: Quick Refrigerator Pickled Beets (Easy & Fast)
This method involves packing your cooked beets and spices into clean jars, covering them with the hot brine, and storing them in the refrigerator. It is the fastest and simplest way to enjoy homemade pickled beets, requiring no special canning equipment and allowing the flavors to develop within just 24 hours.
Step-by-Step Directions:
- Pack Jars: Take your clean glass jars and begin packing the sliced beets inside. If you’re using optional flavorings like sliced onions, whole cloves, or a cinnamon stick, this is the time to add them directly into the jars amongst the beets.
-
Pour Brine: Carefully pour the hot brine over the beets in the jars. Fill each jar until the beets are completely submerged, leaving about a ½-inch of headspace (empty space) at the top.
-
Cool and Seal: Let the open jars sit on the counter and cool down to room temperature. This can take about an hour.
-
Refrigerate: Once cooled, screw on the lids tightly and place the jars in the refrigerator. While you can technically eat them after a day, I strongly recommend waiting at least 24 to 48 hours for the flavors to fully penetrate the beets and meld together. They will be at their absolute best after 2-3 days and will keep wonderfully in the fridge for up to 2 months.
Pro-Tip: For this refrigerator method, you have a choice. Using hot brine helps the beets absorb the flavor faster. However, in my experience, if you let the brine cool completely before pouring it over the beets, you can achieve a slightly crunchier final texture. This is purely a matter of personal preference, so feel free to experiment!
Love easy recipes? Save this quick refrigerator method!
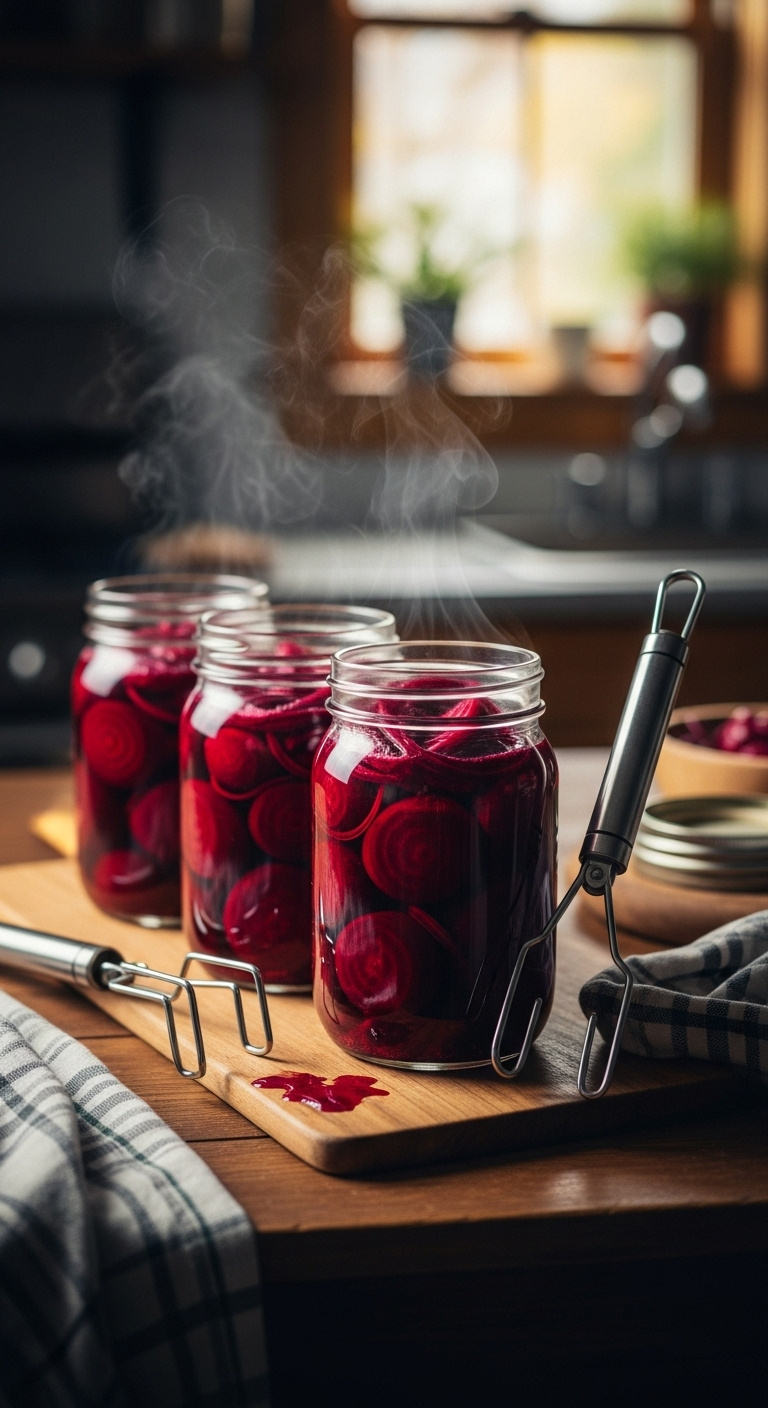
4. Method B: Water Bath Canning (Shelf-Stable & Traditional)
The water bath canning method involves packing hot beets into sterilized hot jars, covering them with boiling brine, sealing them, and processing the jars in a boiling water canner for a specific amount of time. This process creates a vacuum seal, which makes the pickled beets shelf-stable and safe to store in your pantry for over a year.
Step-by-Step Directions:
- Prepare Canner: Before you start, prepare your boiling water canner by filling it with water and placing your clean jars inside to sterilize and keep them hot. Wash your new lids and bands in warm, soapy water.
-
Pack Hot Jars: Carefully remove one hot, sterilized jar at a time. Tightly pack the hot, sliced beets into the jars, leaving a ½-inch of headspace at the top.
-
Add Boiling Brine: Bring your pickling brine back to a full, rolling boil. Ladle the boiling brine over the beets in the jars, making sure to maintain that crucial ½-inch of headspace. After filling, use a non-metallic tool (like a chopstick or plastic bubble popper) to run along the inside of the jar and release any trapped air bubbles.
-
Seal Jars: Wipe the rims of the jars with a clean, damp cloth to remove any residue. Center a new lid on top of each jar. Screw on the bands until they are just “finger-tight”—meaning you stop turning as soon as you feel resistance.
-
Process: Use a jar lifter to carefully place the jars into the rack in your boiling water canner. Ensure the jars are covered by at least 1 inch of water. Cover the canner, bring the water to a full rolling boil, and process the jars for 30 minutes. Remember to adjust this time if you live at a high altitude.
-
Cool & Store: Once the processing time is complete, turn off the heat and let the jars sit in the canner for 5 minutes before removing them. Place the hot jars on a towel-lined counter to cool, undisturbed, for 12-24 hours. You will hear the satisfying “ping” sound as they seal. After they have cooled, check the seals by pressing on the center of the lid; it should not flex. Store your sealed jars in a cool, dark place for up to 18 months.
Critical Safety Note: I cannot stress this enough—following the exact processing time and ensuring you use a vinegar with at least 5% acidity are absolutely non-negotiable for creating safe, shelf-stable canned goods. These steps are what prevent the growth of harmful bacteria and ensure your preserved food is safe to eat for months to come.
Pin this guide for your next canning day!
Key Takeaways: Your Quick Guide to Pickled Beets Recipe
For quick reference, here are the most important, non-negotiable rules for making perfect homemade pickled beets every single time.
* Cook Beets First: Always boil or roast your beets until they are just fork-tender before you peel, slice, and introduce them to the brine.
* Choose Your Method: Use the easy Refrigerator method for quick consumption and storage up to 2 months. Use the Water Bath Canning method for long-term, shelf-stable pantry storage of 18 months or more.
* Vinegar is Key: For safe and effective pickling, especially when canning, you must use a vinegar with an acidity level of at least 5%.
* Mind the Headspace: Always leave a ½ inch of empty space at the top of your jars. This is crucial for creating a proper vacuum seal during the canning process.
* Patience Pays Off: Whether you’re refrigerating or canning, always allow the flavors to meld for at least 24-48 hours before enjoying. The taste will be dramatically better.
FAQs About Pickled Beets Recipe
Do beets have to be cooked before pickling?
Yes, it is essential to cook beets before pickling them. Cooking softens their naturally dense texture, which makes them pleasant to eat and allows them to properly absorb the flavors of the pickling brine. Raw beets would remain unpleasantly hard and crunchy and would not pickle correctly. Boiling or roasting them until they are fork-tender is the standard and necessary first step.
How long do I boil beets for pickling?
The boiling time for whole, fresh beets typically ranges from 20 to 30 minutes, but it ultimately depends on their size. You should cook them until they are just tender enough to be easily pierced with a fork. It’s important to be careful not to overcook them, as this can lead to a soft, mushy texture in your final pickled beets.
What is the difference between refrigerator and canned pickled beets?
The primary difference is the preservation method and the resulting storage life. Refrigerator beets are quick pickles that are simply stored in the fridge and are best consumed within about 2 months. Canned beets are processed in a boiling water bath, which creates a strong vacuum seal, making them shelf-stable at room temperature for over a year. Canning requires more specific equipment and safety procedures.
Are pickled beets healthy?
Yes, pickled beets can be a healthy part of a balanced diet. Beets themselves are a fantastic source of essential nutrients like fiber, folate, potassium, and manganese. While the pickling brine does contain sugar and salt, the benefit of making them at home is that you have complete control over the amounts you use. They are a delicious and flavorful way to add more vegetables to your salads, sandwiches, and meals.
Final Thoughts
There is truly nothing more satisfying than the moment you open a jar of your own homemade pickled beets. The vibrant color and the tangy-sweet aroma are the rewards for a simple and enjoyable kitchen project. Whether you chose the fast and easy refrigerator method for this week’s meals or you stocked your pantry for the year using the traditional canning route, you now have a delicious, versatile condiment ready to elevate any meal.
I’d love to hear how yours turned out—what’s your favorite way to eat them? Share in the comments below
