As an Amazon Associate BakingBakewareSets.com earns from qualifying purchases.
Pork Tenderloin Recipes Instant Pot Juicy Tender in 25 Minutes
Have you ever dreamed of a melt-in-your-mouth pork tenderloin dinner, only to pull a tough, dry, and chewy piece of meat from your Instant Pot? You’re not alone. It’s a common frustration that leaves even experienced cooks wondering where they went wrong. You followed a recipe, you heard the beep, but the result was anything but the tender, juicy masterpiece you were promised.
This cycle of disappointment ends today. Forget everything you thought you knew about pressure cooking this lean cut of meat. The problem isn’t your Instant Pot or the pork itself; it’s the technique. Many recipes fail to account for the delicate nature of pork tenderloin, leading to overcooked, stringy dinners that are a chore to eat.
The secret to a perfectly tender and juicy Instant Pot pork tenderloin lies in a simple, counterintuitive method: a very short high-pressure cook time followed by a patient natural release. This guide will walk you through the foolproof, 5-step process to achieve flawless results in under 30 minutes, every single time. Get ready for a weeknight dinner that tastes like a weekend feast.
☰ Table of Contents ▼
show
Why Is My Instant Pot Pork Tenderloin Always Tough? Here’s the Secret to Juicy Results Every Time
The most common reason for tough Instant Pot pork tenderloin is overcooking and using a quick pressure release. The secret to juicy, melt-in-your-mouth results is a short high-pressure cook time of just 3-5 minutes, followed by a crucial 10-15 minute natural pressure release, which allows the meat’s juices to fully redistribute.
Pork tenderloin is an incredibly lean cut of meat. Unlike tougher cuts that need a long time under pressure to break down connective tissue, tenderloin cooks very quickly. When you use a “quick release” on your pressure cooker, the sudden drop in pressure forces moisture out of the meat violently, leaving it dry and tough. A gentle, natural release allows the muscle fibers to relax and reabsorb all that flavorful juice.
After testing countless methods, we’ve pinpointed the exact steps—from searing to resting—that make all the difference. This isn’t just a recipe; it’s a technique for perfection.
Pork Tenderloin vs. Pork Loin: The #1 Mistake to Avoid
Pork tenderloin is a long, thin muscle weighing 1-1.5 lbs that cooks in 3-5 minutes, while pork loin is a large, wide roast weighing 2-5 lbs that requires a much longer cooking time. Using them interchangeably is the number one mistake that will lead to undercooked or severely overcooked meat.
It’s easy to get them confused at the grocery store, but they are completely different cuts that cannot be substituted for one another in this recipe.
- Pork Tenderloin:
- Shape: Long and very narrow, like a thick sausage.
- Weight: Small, typically 0.75 to 1.5 pounds.
- Texture: Extremely lean and tender.
- Cook Time: Very fast (3-5 minutes on high pressure).
- Pork Loin:
- Shape: Wide and thick, often sold as a roast.
- Weight: Large, typically 2 to 5 pounds.
- Texture: Lean, but can have a fat cap on top.
- Cook Time: Much longer (pressure cooker time per pound is significantly higher).
Remember: This recipe is specifically designed for pork tenderloin. Using a pork loin will not produce the same tender, juicy results.
5 Simple Steps to the Juiciest Instant Pot Pork Tenderloin
Ready for the most tender and flavorful pork tenderloin you’ve ever made? This foolproof method breaks down the process into five simple, manageable stages. By following these steps exactly, you guarantee a perfect result. From the savory seasoning rub to the silky two-minute gravy, this recipe is your new weeknight hero.
1. Prep & Season: Building the Flavor Foundation
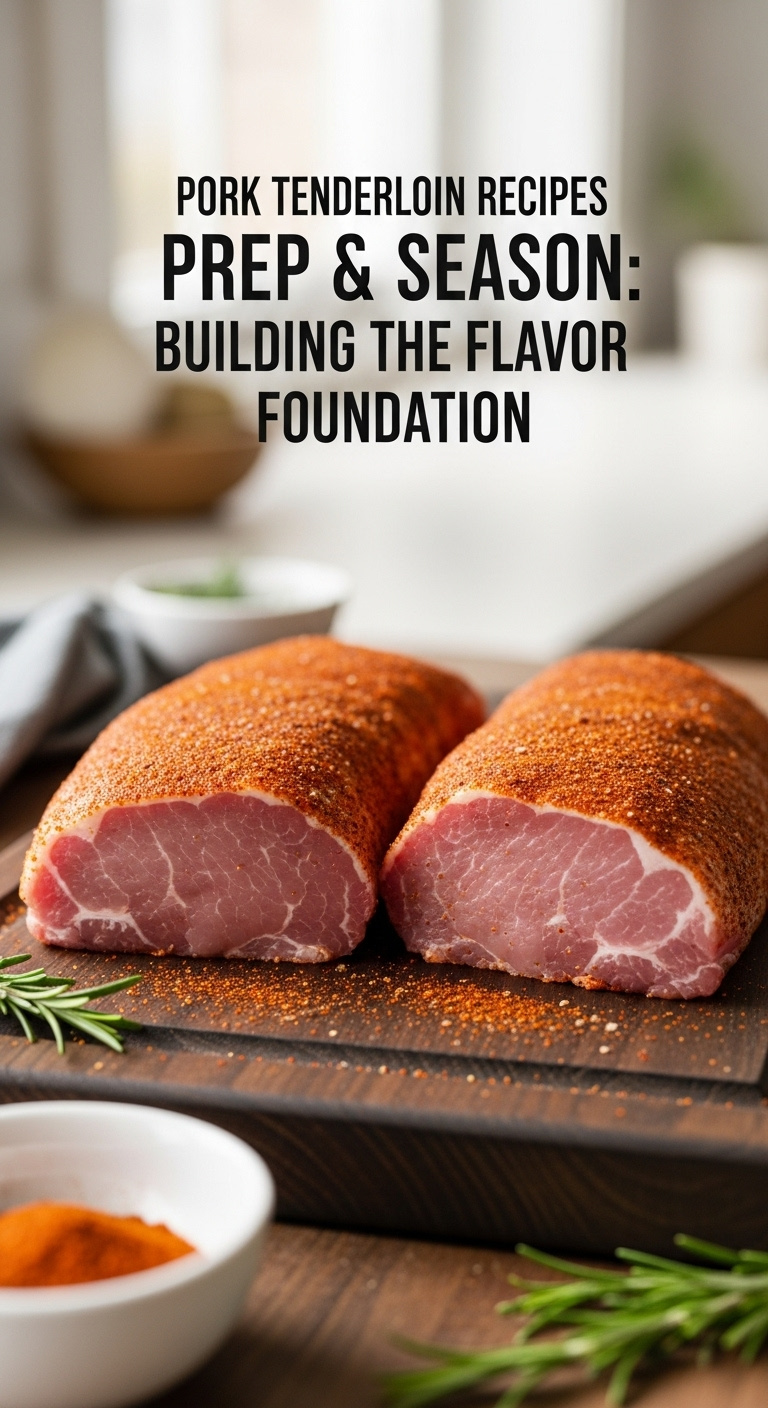
The first step to an amazing pork tenderloin is creating a savory crust with a well-balanced seasoning rub and properly trimming the meat. This ensures every bite is packed with flavor and has the perfect texture.
Ingredients:
* 1.5 lb pork tenderloin
* 1 tbsp olive oil
* 1 tbsp brown sugar
* 1 tsp smoked paprika
* 1 tsp garlic powder
* 1 tsp onion powder
* 1/2 tsp salt
* 1/2 tsp black pepper
Instructions:
1. Let the pork tenderloin rest at room temperature for 15-20 minutes. This helps it cook more evenly.
2. Pat the pork completely dry with paper towels. This is key for getting a good sear.
3. Trim off any large patches of excess fat and, most importantly, the tough, silvery membrane known as “silver skin.”
4. Cut the tenderloin in half crosswise. This allows it to fit easily into the Instant Pot for even browning.
5. In a small bowl, mix together the brown sugar, smoked paprika, garlic powder, onion powder, salt, and pepper.
6. Rub the pork pieces all over with olive oil, then generously coat every surface with the seasoning mixture.
Pro-Tip: “Don’t skip removing the silver skin! It doesn’t render down during cooking and will result in a chewy texture. Use a thin, sharp knife to slide just underneath it and peel it away.”
Pin this simple seasoning rub for later!
2. Searing: The Non-Negotiable Step for Flavor
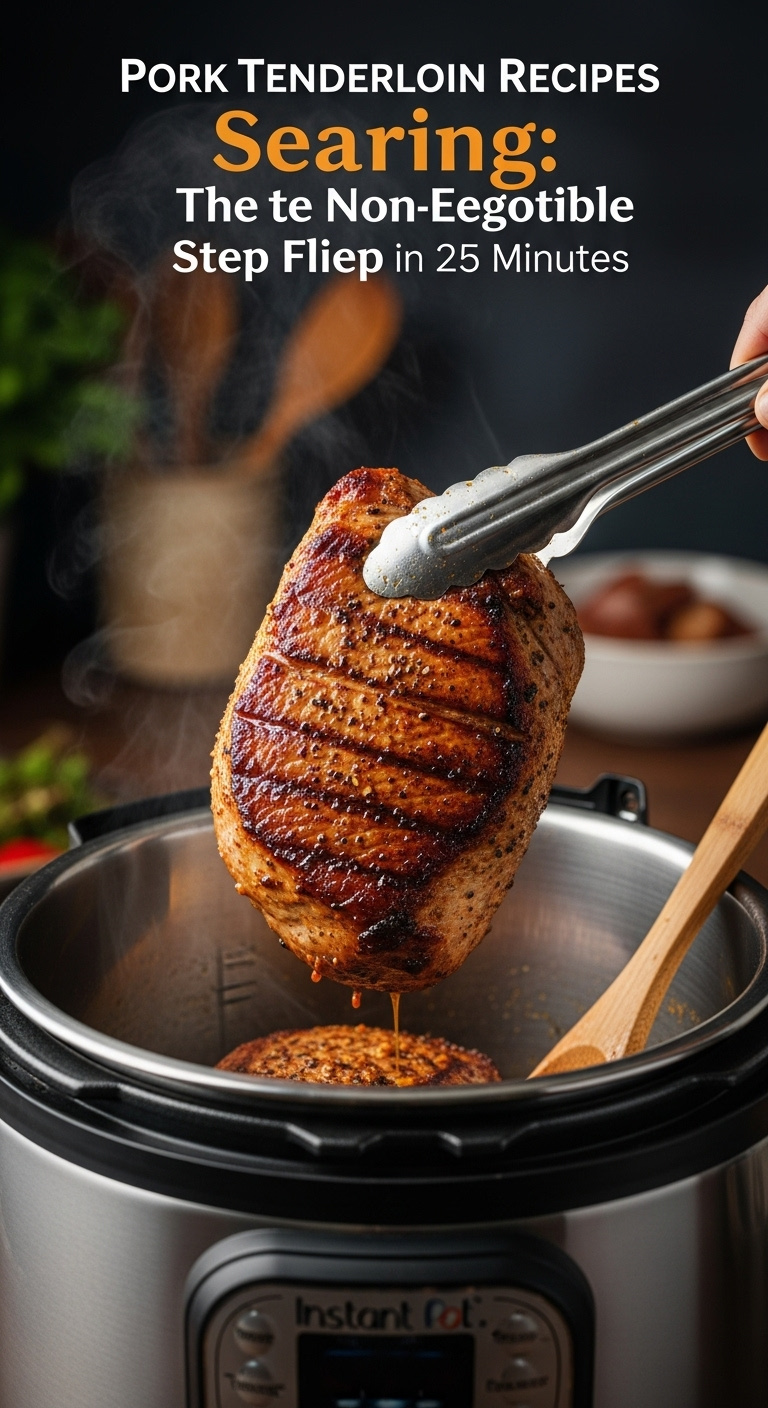
Searing the pork before pressure cooking is essential for creating a deep, caramelized flavor and preventing the dreaded “Burn” notice. This step builds the foundation for your delicious pan gravy.
Materials Needed:
* Seasoned pork tenderloin pieces
* 1 tbsp olive oil
* 1 cup chicken broth
* Wooden spoon or spatula
Step-by-Step Directions:
1. Set your Instant Pot to “Sauté” on the high heat setting. Wait until the display reads “Hot,” then add the olive oil.
2. Using tongs, carefully place the seasoned pork tenderloin pieces into the hot pot. Sear them for 2-3 minutes per side, until a rich, golden-brown crust forms. Avoid moving them around too much. Do not overcrowd the pot; work in batches if needed.
3. Once seared, remove the pork and set it aside on a clean plate.
4. Pour the chicken broth into the hot pot to deglaze. Use a wooden spoon to vigorously scrape all the browned bits (the fond) from the bottom. This is where all the flavor is!
5. Press “Cancel” to turn off the Sauté mode completely.
Lesson Learned: “Skipping the deglazing step is the #1 cause of the ‘Burn’ notice on an Instant Pot. Those flavorful browned bits will burn if not scraped up into the liquid before pressure cooking.”
See the difference searing makes! Save this tip.
3. Pressure Cook to Perfection (It’s Faster Than You Think!)

The key to a tender pork tenderloin is an incredibly short cook time on high pressure. For a standard 1 to 1.5 lb tenderloin, you only need 3 minutes.
Materials Needed:
* Seared pork tenderloin pieces
* Instant Pot with broth inside
* Instant Pot trivet (optional, but recommended)
Step-by-Step Directions:
1. Place the metal trivet inside the Instant Pot, into the broth. Arrange the seared pork tenderloin pieces on top of the trivet so they aren’t fully submerged.
2. Secure the lid on the Instant Pot. Ensure the steam release valve is turned to the “Sealing” position.
3. Select the “Pressure Cook” (or “Manual”) function and use the +/- buttons to set the timer to 3 minutes on high pressure.
4. The Instant Pot will now take about 5-10 minutes to come to full pressure, after which the 3-minute cooking countdown will begin.
Pro-Tip: “For a tenderloin under 1 lb, reduce the time to 2 minutes. For one closer to 2 lbs, increase to 4 minutes. The short cook time is key; the magic happens during the natural release.”
Share this quick dinner tips with a friend!
4. The 10-Minute Natural Release (The Secret to Juiciness)
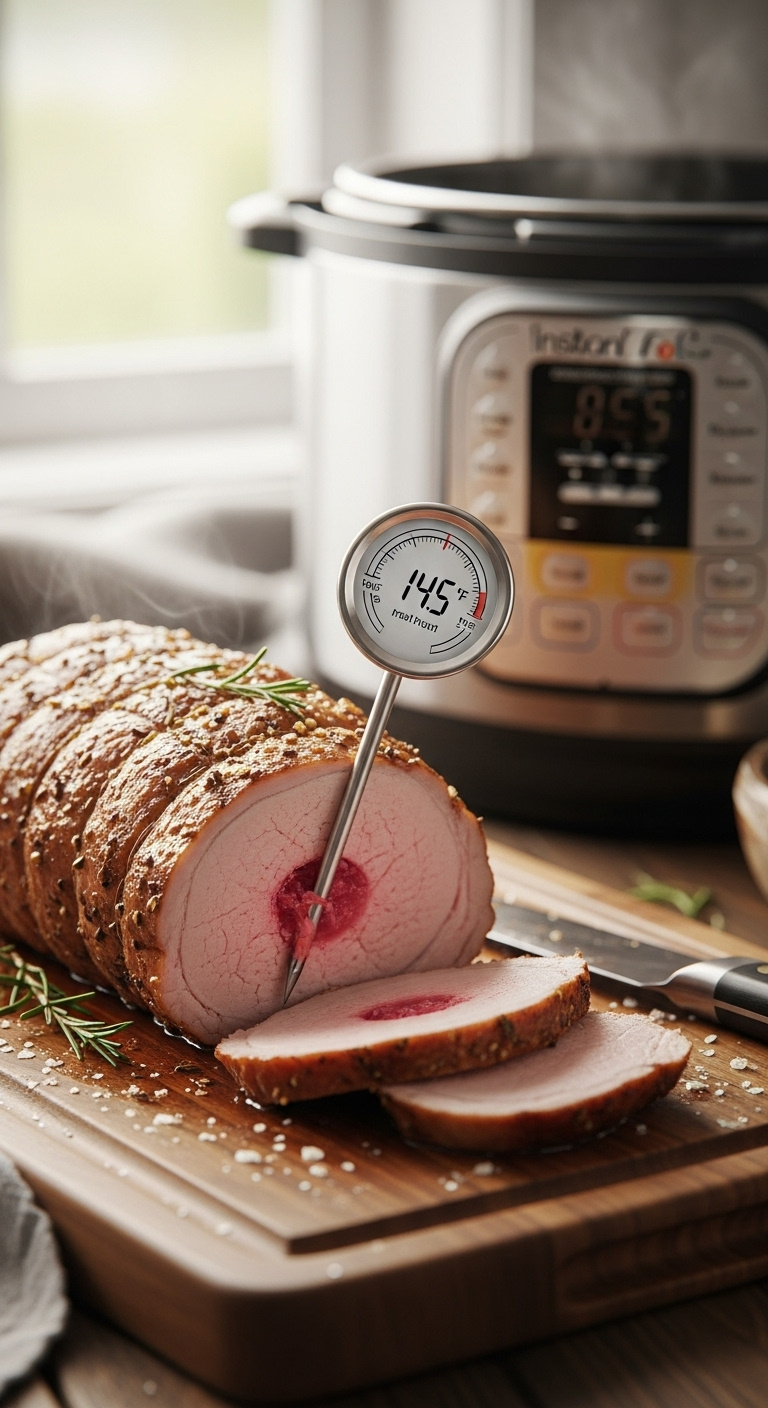
This is the most critical step. A 10-15 minute Natural Pressure Release (NPR) is mandatory for a juicy pork tenderloin. This gentle process allows the meat to finish cooking and reabsorb all its juices.
Materials Needed:
* Cooked pork tenderloin in the Instant Pot
* Instant-read meat thermometer
Step-by-Step Directions:
1. Once the 3-minute pressure cook cycle is complete, do nothing. Let the Instant Pot automatically switch to its “Keep Warm” mode and allow the pressure to release naturally for 10 to 15 minutes. Do not touch the steam valve.
2. After 10-15 minutes have passed, carefully move the steam release valve to the “Venting” position to release any small amount of remaining pressure.
3. Once the float valve pin has dropped, it is safe to open the lid. Immediately check the internal temperature of the thickest part of the pork with an instant-read thermometer. For a perfectly juicy and safe result, it should read 145°F.
4. Transfer the pork tenderloin to a cutting board and let it rest for another 5-10 minutes before slicing against the grain. This final rest locks in the juices.
Lesson Learned: “A quick release will cause the juices to violently exit the meat, resulting in a dry, tough tenderloin. The gentle, natural release allows those juices to settle back into the meat, which is the true secret to tenderness.”
The perfect temperature every time! Pin this essential tip.
5. Make the 2-Minute Silky Gravy

Transform the flavorful liquid left in the pot into a rich, smooth gravy by thickening it with a simple cornstarch slurry. This no-waste step takes just two minutes and elevates the entire meal.
Ingredients:
* Flavorful liquid left in the Instant Pot
* 2 tbsp cornstarch
* 2 tbsp cold water
Instructions:
1. After removing the cooked pork, turn the Instant Pot back on to the “Sauté” mode and bring the liquid to a simmer.
2. In a separate small bowl, whisk together the cornstarch and cold water until a completely smooth slurry forms. There should be zero lumps.
3. While the liquid in the pot is simmering, slowly pour in the cornstarch slurry while whisking continuously.
4. Continue to whisk and let the gravy simmer for 1-2 minutes until it has thickened to your desired consistency. It will thicken more as it cools slightly.
5. Press “Cancel” to turn off the heat. Serve the gravy hot over the sliced pork tenderloin.
Pro-Tip: “Always mix your cornstarch with cold water before adding it to the hot liquid. Adding cornstarch directly to a hot pot will create lumps that are impossible to whisk out.”
Ready for the best gravy ever? Save this recipe!
Key Takeaways: Your Quick Guide to Juicy Instant Pot Pork Tenderloin
Feeling confident? Here’s a quick-glance summary of the most important rules for getting it right every single time.
- Use the Right Cut: Always use pork tenderloin, not pork loin. They are not interchangeable and require vastly different cook times.
- Sear for Flavor: Searing on Sauté mode before pressure cooking is essential for developing a deep, rich flavor. Always deglaze the pot with liquid to prevent a burn notice.
- Short Cook Time: Pressure cook on high for only 3-5 minutes depending on the size. The real cooking continues during the gentle release phase.
- Natural Release is Mandatory: A 10-15 minute Natural Pressure Release is the non-negotiable secret to locking in juices and ensuring maximum tenderness.
- Check the Temp: Cook to a final internal temperature of 145°F for a perfectly cooked, slightly pink, and incredibly juicy center. Use a meat thermometer to be sure.
People Also Ask About pork tenderloin recipes instant pot
Why is my pork tenderloin tough in the Instant Pot?
The primary cause of tough pork tenderloin is overcooking or performing a quick pressure release. A short cook time (3-5 minutes) followed by a 10-15 minute natural release is crucial. This gentle process allows the meat’s fibers to relax and reabsorb moisture, preventing a tough, dry result. Make sure you are using tenderloin, not a larger pork loin.
How long do you cook a 2 lb pork tenderloin in an Instant Pot?
For a 2 lb pork tenderloin, a high-pressure cook time of 4-5 minutes is recommended. The most important step remains the 10-15 minute natural pressure release that follows. This ensures the thicker cut cooks through gently without drying out. Always verify doneness with a meat thermometer, aiming for 145°F.
Can you cook a frozen pork tenderloin in an Instant Pot?
Yes, you can cook a frozen pork tenderloin, but you cannot sear it first. Skip the searing step and place the frozen tenderloin on the trivet over your liquid. Increase the high-pressure cook time significantly, typically to around 12-15 minutes, followed by a 10-15 minute natural release. Results will be less flavorful than with a thawed tenderloin.
What side dishes go well with pork tenderloin?
Instant Pot pork tenderloin pairs beautifully with classic comfort sides that can soak up the delicious gravy, such as mashed potatoes, creamy polenta, or egg noodles. For lighter options, consider roasted vegetables like Brussels sprouts, carrots, or asparagus, or a simple green salad with a vinaigrette.
Final Thoughts
Making a restaurant-quality pork tenderloin at home doesn’t have to be intimidating or reserved for the weekend. With your Instant Pot and this proven technique, a tender, juicy, and flavor-packed dinner is easily achievable even on the busiest of weeknights. By mastering the simple secrets of searing, short cook times, and the all-important natural release, you’ll never have to suffer through dry, tough pork again.
What’s your favorite flavor combination for pork tenderloin? Let us know in the comments below
