As an Amazon Associate BakingBakewareSets.com earns from qualifying purchases.
Instant Pot Ribs Fall Off The Bone Tender in Under an Hour 2026
Craving those slow-smoked, fall-off-the-bone ribs that taste like they’ve been cooking all day, but you only have an hour? We’ve all been there. You want that incredible, melt-in-your-mouth texture and deep, smoky flavor, but the thought of spending 6 to 8 hours tending to a smoker or oven is just not feasible for a weeknight dinner.
The frustration is real. You’ve tried other “quick” rib recipes that promised tenderness but delivered tough, chewy meat. You’re left wondering if it’s even possible to achieve smokehouse-quality results without the massive time commitment. It feels like you have to choose between a delicious meal and a free evening.
The secret to incredible fall-off-the-bone Instant Pot ribs is a game-changing two-stage process: pressure cooking to rapidly tenderize the meat, followed by a quick broil or grill to caramelize the BBQ sauce. This revolutionary method unlocks that slow-cooked flavor and perfect texture in under an hour, turning an all-day culinary project into a simple, foolproof weeknight delight.
☰ Table of Contents ▼
show
Craving Tender Ribs Without the All-Day Wait?
The promise of delicious ribs often comes with the reality of a long, slow cooking process. It’s the one thing that holds most of us back from enjoying them more often. But what if you could bypass the hours of waiting and still get that succulent, juicy result you’re dreaming of? The Instant Pot is the game-changing solution that makes this possible. It delivers ribs so tender they practically fall off the bone, and it does it in a fraction of the traditional time. After testing countless batches, we’ve perfected a method that guarantees juicy, tender ribs every single time, turning an all-day affair into a weeknight possibility. This is your foolproof, step-by-step guide to achieving rib perfection.
Why the Instant Pot is a Game-Changer for Cooking Ribs
The Instant Pot is a game-changer for ribs because it cooks them significantly faster than a Crock-Pot by using high pressure to raise the boiling point of water, forcing moisture into the meat and breaking down tough connective tissues much more quickly. This scientific advantage results in incredibly tender ribs in about 30 minutes of cook time, compared to the 6-8 hours required for a slow cooker. We break down the science behind pressure cooking and why it creates such a moist, tender result for tough cuts of meat like ribs.
Here’s how the Instant Pot stacks up against traditional methods:
- Speed: An Instant Pot can cook a rack of baby back ribs to fall-off-the-bone perfection in about 25-30 minutes. A slow cooker takes 6-8 hours, and an oven can take 3-4 hours.
- Tenderness: The high-pressure environment is incredibly effective at breaking down collagen in the meat, resulting in an ultra-tender texture that rivals, and often matches, low-and-slow methods.
- Flavor Infusion: Pressure cooking forces the flavors from your dry rub and cooking liquid deep into the meat, ensuring every bite is packed with flavor.
5 Simple Steps to Perfect Instant Pot Ribs in Under an Hour
The secret to perfect, fall-off-the-bone Instant Pot ribs can be broken down into five simple, foolproof stages. This is our tested and perfected master recipe. Follow these 5 steps exactly, and you’ll have the best ribs of your life, guaranteed. Even if you’re a complete beginner, this method ensures success.
The 5 steps for perfect Instant Pot ribs are: 1. Prep the ribs by removing the tough membrane. 2. Apply a flavorful dry rub. 3. Pressure cook on high with a flavorful liquid. 4. Allow a natural pressure release to keep them juicy. 5. Glaze with BBQ sauce and broil until perfectly caramelized.
1. The Critical First Step: Removing the Membrane
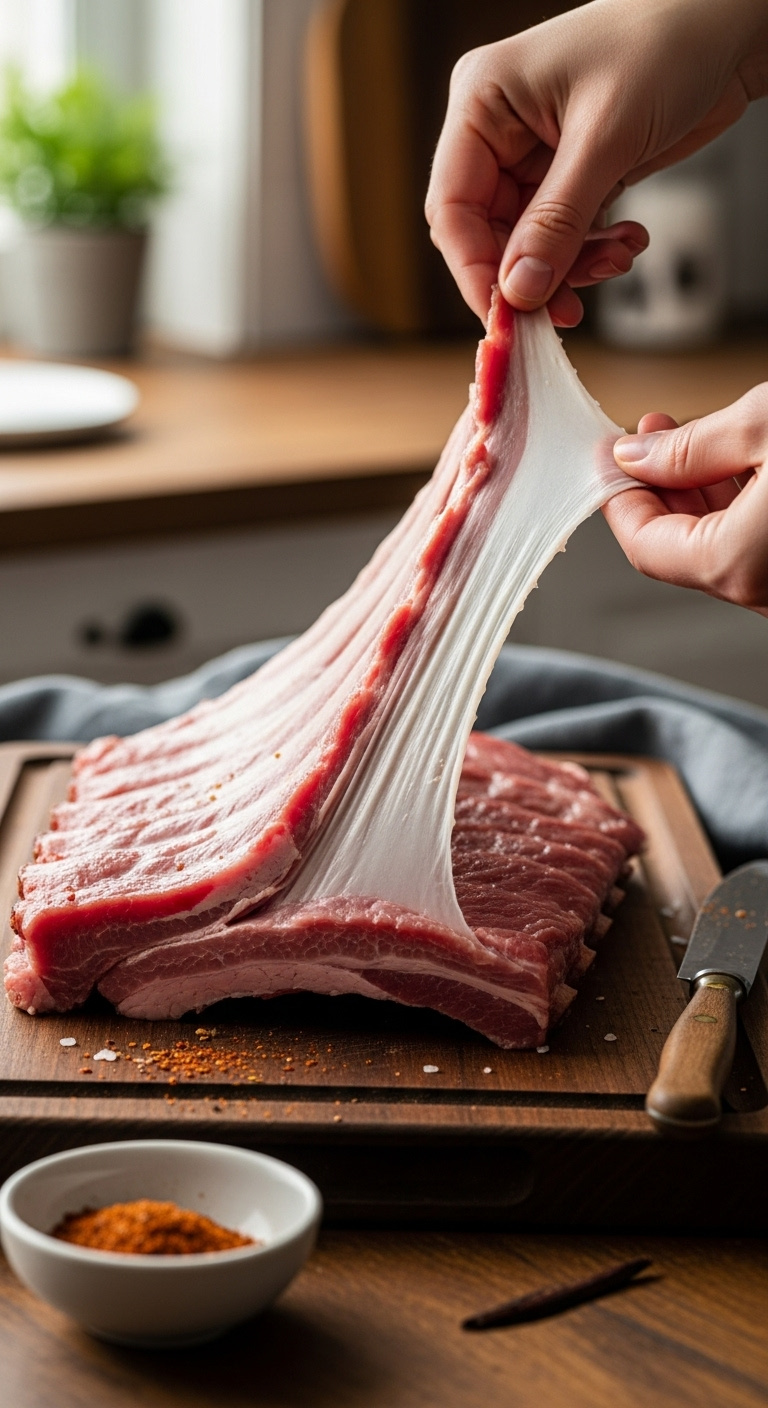
The most crucial part of preparing ribs is removing the silverskin, a thin, tough membrane on the bone-side of the rack, which ensures the meat becomes truly tender and allows the rub to penetrate deeply. This simple step makes a world of difference in the final texture.
- Materials Needed:
- A rack of ribs
- A butter knife or the handle of a small spoon
- A paper towel
- Step-by-Step Directions:
- Pat the ribs completely dry with a paper towel and place them on a cutting board with the bone-side facing up.
- Carefully slide the tip of a butter knife under the thin, whitish membrane located at one end of the rack.
- Gently lift the knife to loosen the membrane just enough so you can get a finger underneath.
- Grab the edge of the loosened membrane with a paper towel. The paper towel gives you a firm, non-slip grip.
- Pull the membrane firmly and steadily across the ribs. It should peel off in one single, satisfying sheet. If it tears, simply start the process again on the torn edge.
Pro-Tip: Don’t skip this! Removing the tough membrane allows the dry rub to penetrate the meat more effectively and results in a much more tender, pleasant texture. Without this step, your ribs can have a tough, chewy layer on the back.
Pin this crucial tip for later!
2. Building Flavor: The Ultimate Sweet & Smoky Dry Rub
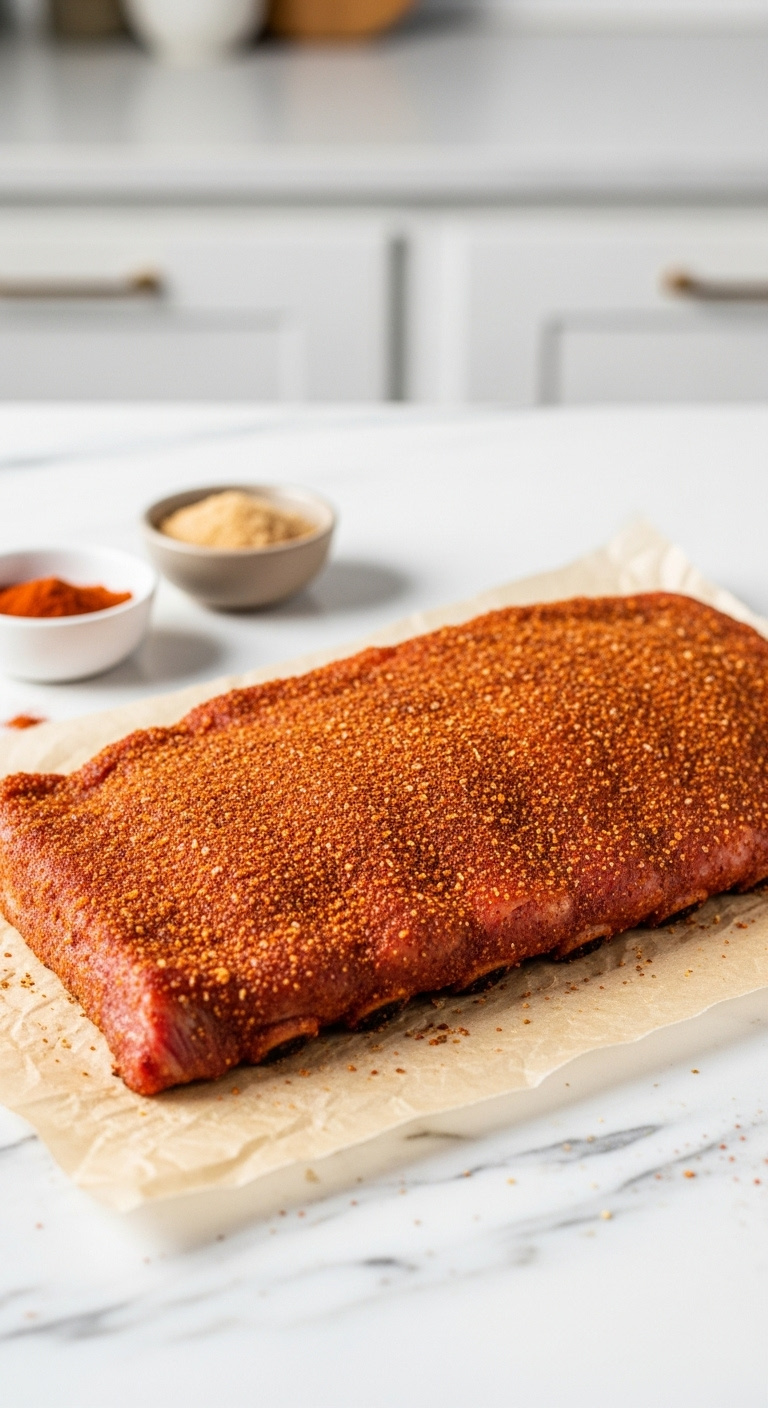
A great dry rub is the foundation of amazing ribs, creating a flavorful crust that seasons the meat from the outside in. This homemade blend strikes the perfect balance between sweet, smoky, and savory with a hint of spice.
- Ingredients:
- 1/2 cup packed brown sugar
- 2 tbsp smoked paprika
- 1 tbsp chili powder
- 1 tbsp garlic powder
- 1 tbsp onion powder
- 2 tsp salt
- 1 tsp black pepper
- 1/2 tsp cayenne pepper (optional, for a little heat)
- Instructions:
- In a small bowl, combine the brown sugar, smoked paprika, chili powder, garlic powder, onion powder, salt, black pepper, and cayenne pepper.
- Mix with a fork or whisk until all the spices are thoroughly combined and there are no clumps.
- Ensure the ribs are patted dry on all sides for the best adherence.
- Generously sprinkle the dry rub mixture over the entire surface of the ribs, covering both the meaty top and the bone-side.
- Use your hands to press and massage the rub firmly into the meat, ensuring a thick, even coating.
Lesson Learned: For the most intense flavor, apply the rub, wrap the ribs tightly in plastic wrap, and let them rest in the refrigerator for at least 4 hours or up to overnight. This allows the salt to penetrate the meat, acting as a dry brine for extra flavor and moisture.
Save our Ultimate Rib Rub recipe to your favorite board!
3. The Pressure Cook: Setting Up for Success
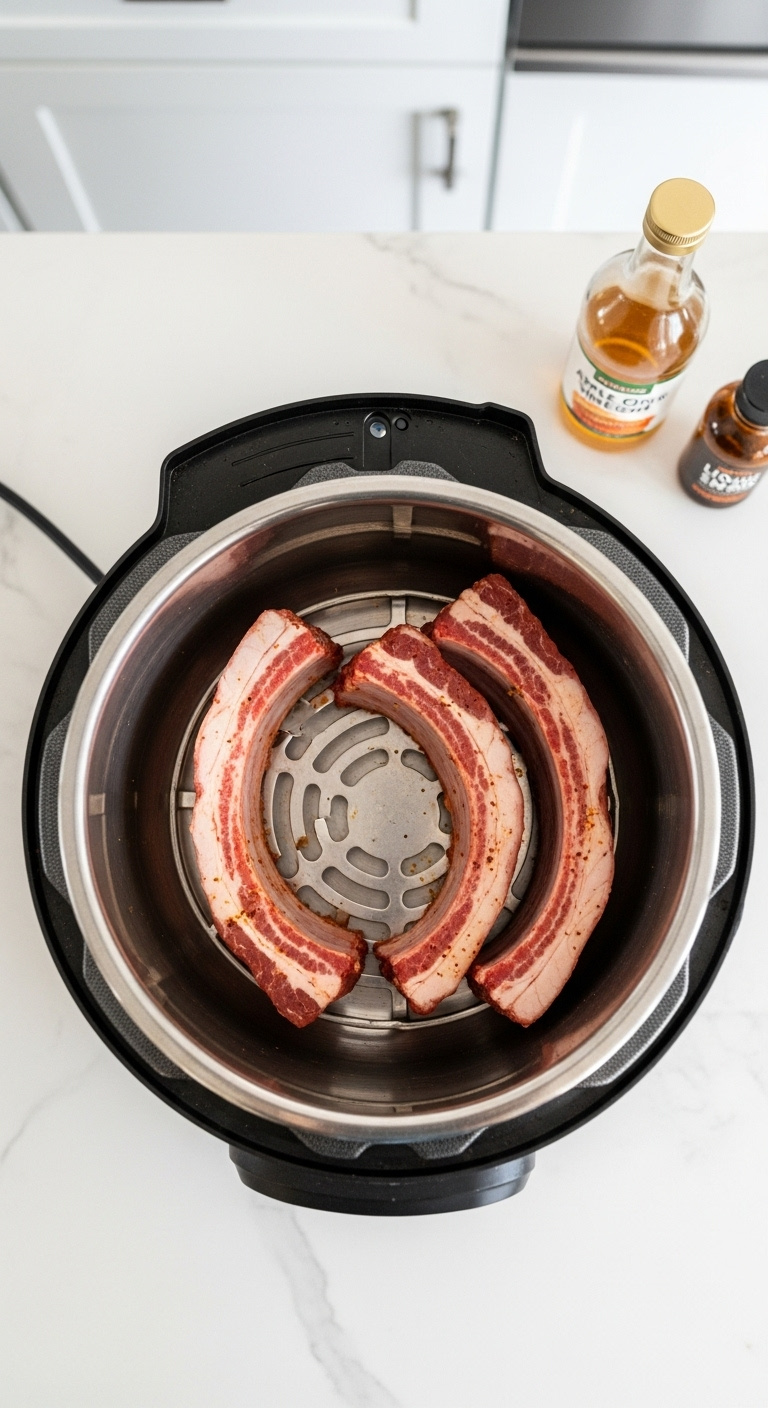
Properly setting up your Instant Pot is essential for success, as this ensures the ribs steam above the liquid rather than boiling in it, which is the key to a perfect texture. This method uses liquid to create steam and add a base layer of flavor.
- Materials Needed:
- 6 or 8-quart Instant Pot
- Metal trivet or steam rack that came with your Instant Pot
- 1 cup of flavorful cooking liquid
- 1-2 racks of seasoned ribs
- Step-by-Step Directions:
- Place the metal trivet in the bottom of the Instant Pot’s inner liner.
- Pour in 1 cup of your chosen cooking liquid. A 50/50 mix of apple cider vinegar and water is classic, but apple juice, beer, or even Dr. Pepper work great for a sweeter profile.
- Add 1/2 teaspoon of liquid smoke directly to the liquid. This simple addition imparts a wonderful, slow-smoked flavor that you can’t get otherwise.
- If your rack of ribs is too long to fit, cut it in half or into thirds.
- Carefully stand the rib sections on their side on top of the trivet. Curl them around the inside of the pot in a circle, with the meaty side facing outwards towards the wall of the pot.
Pro-Tip: Always use the trivet. Placing ribs directly in the cooking liquid will cause them to boil and become mushy. The trivet elevates the meat, allowing the pressurized steam to circulate and cook them to tender perfection.
Share this setup tip with an Instant Pot beginner!
4. The Magic Moment: Pressure Cooking to Perfection
The correct cooking time is the most critical variable for achieving tender ribs, and it varies based on the type of rib you are using. Baby back ribs are smaller and leaner, requiring less time than their larger, meatier spare rib counterparts.
- Materials Needed:
- Prepared Instant Pot with ribs inside
- Step-by-Step Directions:
- Lock the lid onto the Instant Pot and ensure the steam release valve is turned to the “Sealing” position.
- Press the “Pressure Cook” or “Manual” button (depending on your model) and set it to High Pressure.
- Adjust the cook time according to your type of ribs for fall-off-the-bone tenderness:
- Baby Back Ribs: Cook for 25 minutes on High Pressure.
- Spare Ribs / St. Louis Style Ribs: Cook for 35 minutes on High Pressure.
- When the timer beeps, do not touch the valve. Let the pressure release naturally for 10-15 minutes. This is a critical resting period for the meat.
- After 10-15 minutes of natural release, carefully move the steam release valve to the “Venting” position to release any remaining pressure before you safely open the lid.
Lesson Learned: Don’t rush the natural release. A quick release will cause the moisture to rapidly exit the meat, resulting in tougher, drier ribs. This resting period allows the juices to settle and redistribute back into the meat, ensuring they are ultra-moist and flavorful.
Found this timing chart helpful? Pin it!
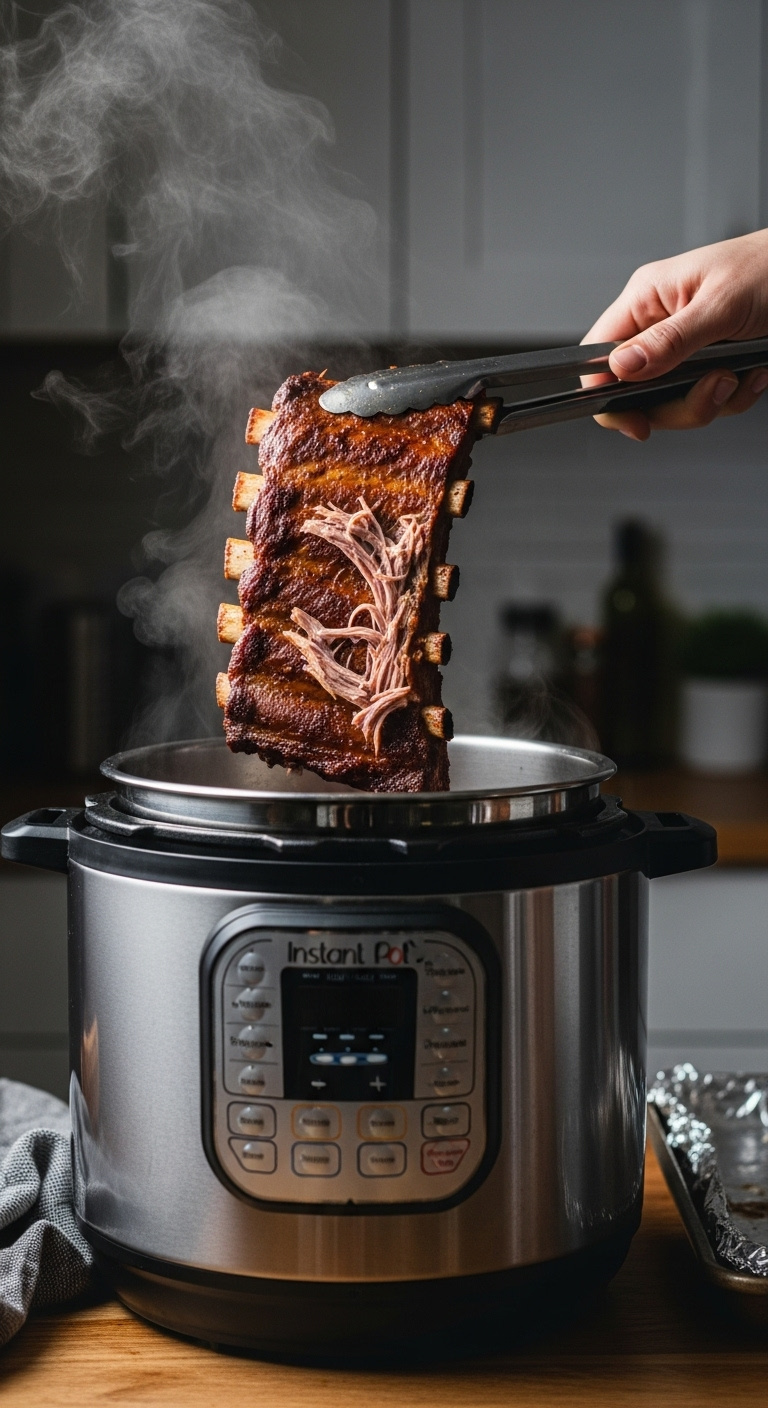
5. The Grand Finale: Getting that Sticky BBQ Glaze
The final and most satisfying step is finishing the ribs under a broiler or on a grill to caramelize your favorite BBQ sauce, creating a sticky, bubbly, and slightly charred glaze. This step transforms them from simply cooked to truly spectacular.
- Materials Needed:
- Tender, cooked ribs from the Instant Pot
- Your favorite brand of BBQ sauce
- A baking sheet lined with aluminum foil for easy cleanup
- A silicone basting brush
- Step-by-Step Directions:
- Adjust your oven rack so it’s about 6-8 inches from the heating element and preheat the broiler to high.
- With extreme care, use tongs to transfer the super-tender ribs from the Instant Pot to the foil-lined baking sheet, placing them meat-side up.
- Use the basting brush to apply a generous, thick layer of BBQ sauce all over the top surface of the ribs.
- Place the baking sheet directly under the preheated broiler for 3 to 5 minutes. Stay close and watch them carefully!
- Remove the ribs from the oven when the sauce is bubbling, thickened, and has developed beautiful caramelized and charred spots. For an extra saucy finish, apply a second coat and broil for another minute.
Pro-Tip: Watch them like a hawk! The high sugar content in most BBQ sauces can go from perfectly caramelized to burnt in just a matter of seconds under the intense heat of a broiler. Don’t walk away during this final step.
Save this post for your next BBQ craving!
Key Takeaways: Your Quick Guide to instant pot ribs
For quick reference, here are the most important things to remember for guaranteed success with your Instant Pot ribs:
- Don’t Skip the Prep: Always take a minute to remove the tough membrane from the back of the ribs. This is the secret to the most tender results.
- Pressure & Time are Key: Use the High-Pressure setting. Cook Baby Back Ribs for 25 minutes and larger Spare Ribs for 35 minutes for that perfect fall-off-the-bone texture.
- Rest the Meat: A 10-15 minute Natural Pressure Release is absolutely crucial for keeping the ribs juicy and moist. Do not quick release the pressure.
- Finish with Fire: A final 3-5 minutes under the broiler is what creates that iconic sticky, caramelized BBQ glaze. This step is not optional for the best flavor!
- Liquid Smoke is Your Friend: To get that classic “slow-smoked” taste, add a few drops of liquid smoke to the cooking liquid in the bottom of the pot.
People Also Ask About instant pot ribs
Why are my pork ribs tough in the Instant Pot?
Ribs are usually tough for two main reasons. First, they may have been undercooked; if they’re not tender enough, simply seal the pot again and cook them for an additional 5-10 minutes at high pressure. Second, and more commonly, the tough membrane (also called silverskin) on the back of the ribs was not removed before cooking, which prevents the meat from becoming fully tender and can leave a chewy texture.
Are ribs better in a Crock-Pot or Instant Pot?
It depends on your priority. A Crock-Pot produces extremely tender, fall-off-the-bone meat over a long period of 6-8 hours. An Instant Pot achieves a very similar tender result in about 30 minutes of cook time. For speed and convenience with excellent tenderness, the Instant Pot is better. For a true “low and slow” method where time is not a factor, a Crock-Pot is also a fantastic choice, though some argue it produces the absolute most tender meat.
How long do you cook ribs in the Instant Pot?
For fall-off-the-bone tender ribs, you should cook them on High Pressure for 25 minutes for Baby Back Ribs and 35 minutes for larger Spare Ribs or St. Louis Style ribs. This cook time should always be followed by a 10-15 minute natural pressure release to ensure the meat stays juicy and tender. If you prefer ribs with a slight chew that stay on the bone better, you can reduce the cook time by 5 minutes.
Do you have to use the trivet for ribs in Instant Pot?
Yes, using the trivet is essential because it keeps the ribs elevated out of the cooking liquid, allowing them to steam perfectly under pressure. If you place the ribs directly in the liquid at the bottom of the pot, they will boil instead of steam. This can result in a mushy, waterlogged texture and will wash away much of the flavorful dry rub you applied.
Final Thoughts
Achieving delicious, tender, “all-day” tasting ribs on any weeknight is no longer a dream—it’s a reality thanks to the Instant Pot. By combining the science of pressure cooking with the classic finish of a caramelized glaze, you can create a meal that will impress your family and friends without sacrificing your entire day. This recipe proves that you don’t have to choose between convenience and quality. You can truly have both.
Now that you have the ultimate guide to perfect Instant Pot ribs, you’re ready to tackle this recipe with confidence. What’s your favorite BBQ sauce or side dish to serve with ribs? Let us know in the comments below
