As an Amazon Associate BakingBakewareSets.com earns from qualifying purchases.
The Secret To A Juicy Glazed Christmas Ham Recipe That Never Fails
Ever feel that mix of excitement and panic when you’re in charge of the Christmas ham? You picture a glossy, juicy centerpiece, but fear a dry, disappointing failure. It’s the star of the holiday meal, and the pressure is real.
A glazed Christmas ham recipe is a traditional main course where a cured ham is baked and coated with a sweet and savory glaze. The real challenge is achieving that perfect balance—a moist, tender inside with a sticky, caramelized crust that isn’t burnt.
The secret to a juicy glazed Christmas ham is a combination of choosing the right cut, proper preparation before baking, applying the glaze in stages to prevent burning, and using a meat thermometer to guarantee perfect doneness without overcooking. This guide will walk you through every step, turning holiday anxiety into culinary triumph.
☰ Table of Contents ▼
show
Why Is It So Hard to Get a Juicy Christmas Ham Right?
The pressure of the holiday meal is immense. You’ve invited family and friends, and the Christmas ham is the centerpiece, the main event. In my early days of hosting, I remember the anxiety of pulling the ham from the oven, holding my breath as I made the first slice. Would it be succulent and flavorful, or a dry, tough lesson in holiday cooking?
Many home cooks share this fear. It’s not your fault. Most recipes focus on the glaze but gloss over the critical techniques that prevent the two most common disasters: a dry, chewy ham and a burnt, bitter glaze. You follow the instructions, but the ham dries out while you wait for the glaze to caramelize, or the sugary glaze turns black long before the ham is heated through.
This isn’t a story of failure; it’s the result of missing a few key secrets learned through experience. We’re about to change that. This tested, no-fail holiday ham method addresses those problems head-on, ensuring a perfectly moist ham with a sticky, flavorful glaze every single time.
The 7 Secrets to a Juicy Glazed Christmas Ham That Never Fails
This is the heart of the recipe, where we move beyond simple instructions and into the game-changing techniques that guarantee success. Think of these seven points not just as steps, but as secrets learned from experience. Each one is designed to solve a specific problem and deliver on the promise of a juicy, flavorful glazed holiday ham that never fails. By understanding the “why” behind each secret, you’ll be cooking with the confidence of an expert.
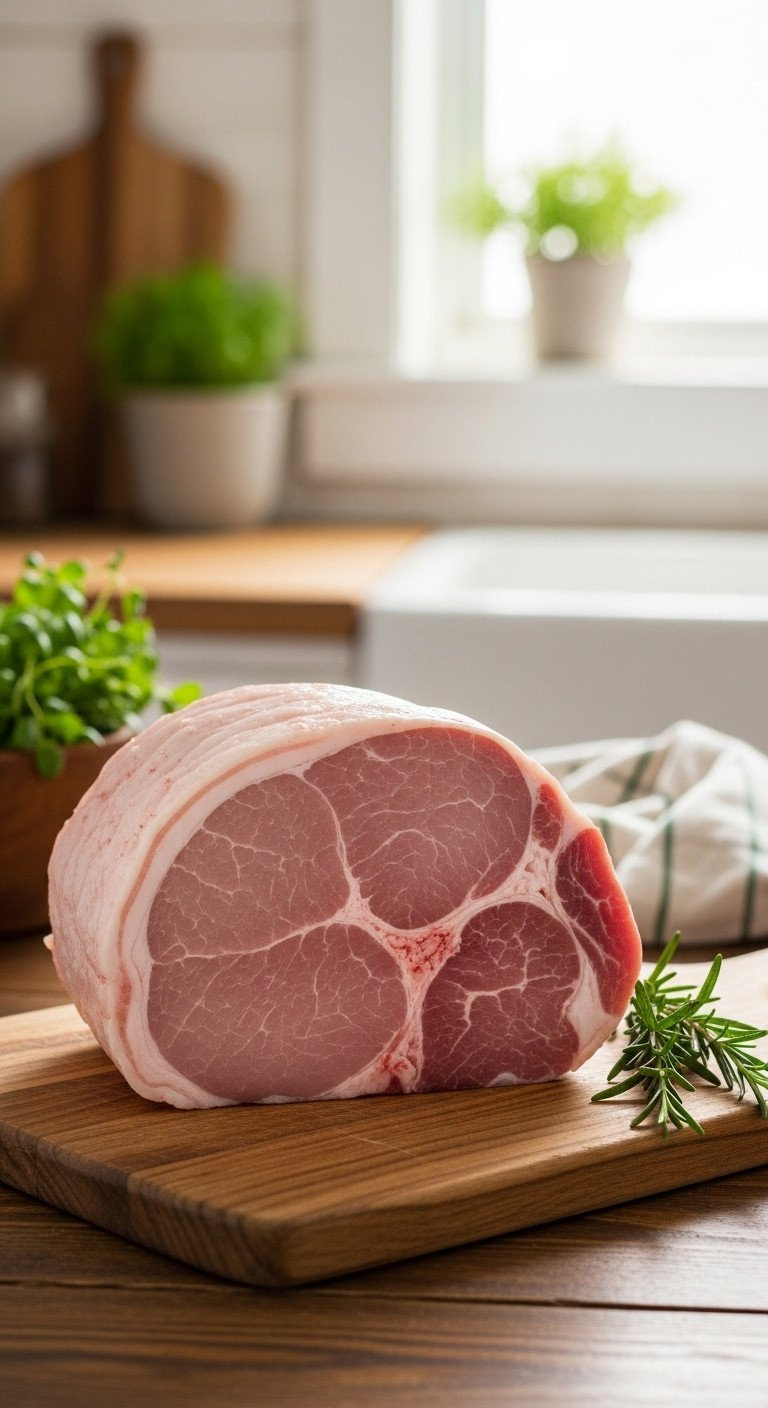
1. Start with the Right Ham & Let It Temper
Pin this foundational tip to your ‘Holiday Cooking’ board!
What You Need:
- A quality ham: For ultimate flavor and moisture, a bone-in, partially cooked ham (shank or butt portion) is recommended. Look for one with a good fat cap on top.
- A sturdy roasting pan with a rack: The rack allows air to circulate for even cooking.
Step-by-Step Directions:
- Choose Your Ham: Decide between bone-in for flavor or boneless for easy carving. For a crowd, plan on 1/2 pound per person for bone-in, or 1/3 pound for boneless.
- Remove from Fridge: Take the ham out of its packaging and place it in your roasting pan. Pat it completely dry with paper towels.
- Temper on the Counter: Let the ham sit at room temperature for 1 to 2 hours before it goes in the oven. A cold ham cooks unevenly, leading to dry spots. This is a crucial first step for a juicy result.
Pro-Tip: A spiral-cut ham is convenient but dries out faster. If using one, be extra vigilant with basting and watch the temperature closely.

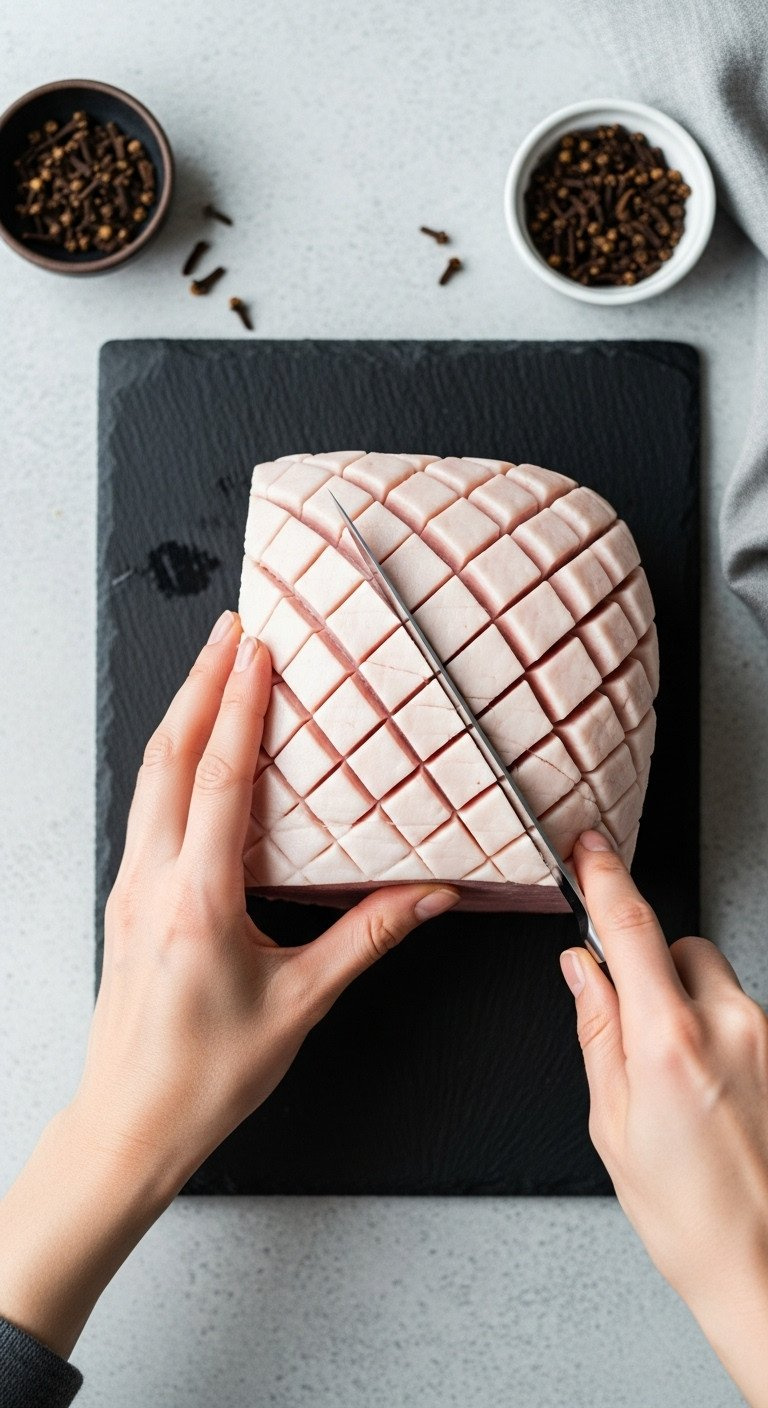
2. Score the Fat for Deeper Flavor Penetration
Save this simple trick for a more flavorful ham!
Materials Needed:
- A very sharp carving knife or utility knife: A sharp blade is essential for clean cuts without tearing the fat.
- (Optional) Whole cloves: For a traditional look and flavor.
Step-by-Step Directions:
- Identify the Fat Cap: Position the ham so the thickest layer of fat is facing up.
- Make Parallel Cuts: Using your sharp knife, make shallow cuts (about 1/4-inch deep) across the fat, spaced about 1 inch apart. Be careful not to cut into the meat itself.
- Create the Diamond Pattern: Turn the ham (or your knife) and make a second set of parallel cuts diagonally to the first set, creating a diamond pattern.
- (Optional) Stud with Cloves: For that classic Christmas look, press a whole clove into the center of each diamond.
Lesson Learned: My first time, I cut too deep into the meat, which caused that section to dry out a bit. Shallow cuts in the fat only are the key!

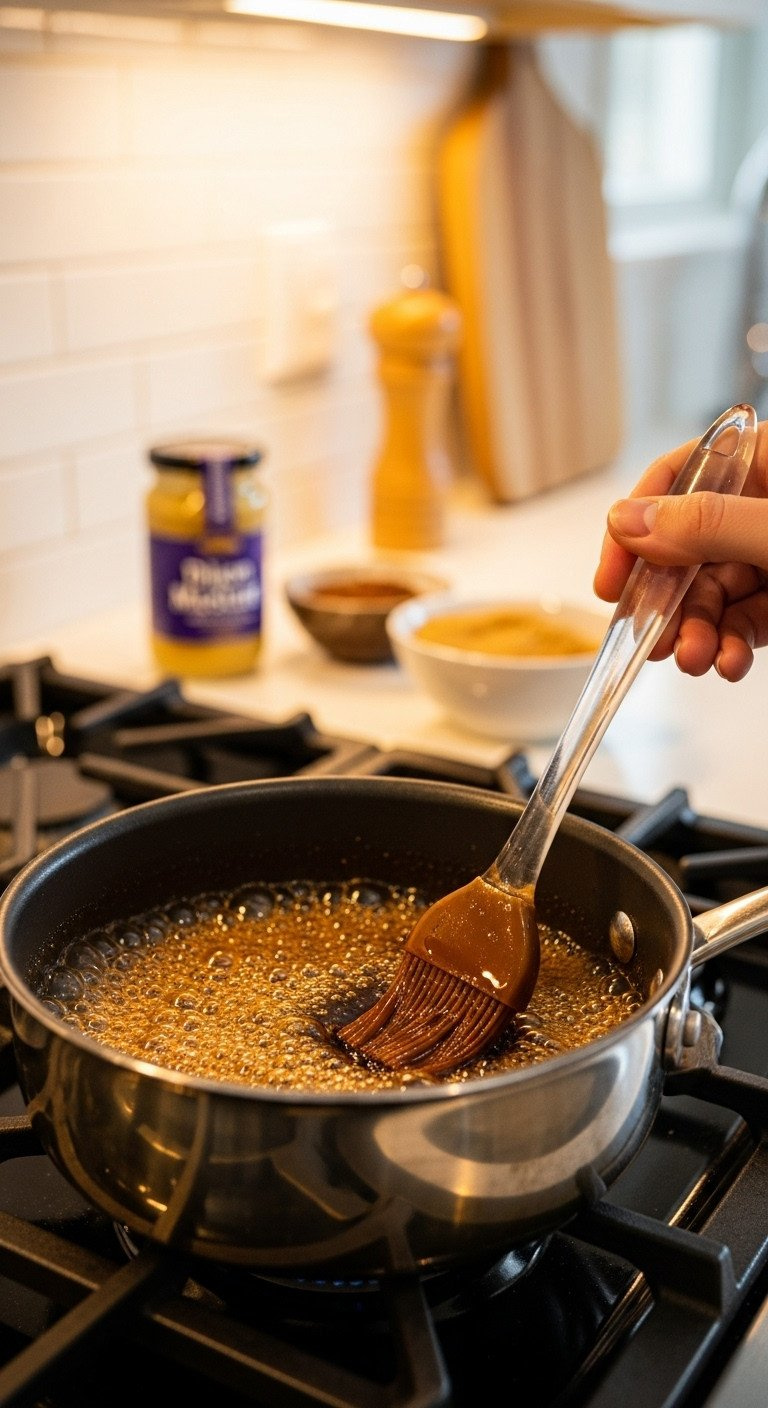
3. Simmer Your Glaze First to Marry the Flavors
Pin this perfect Brown Sugar & Mustard Glaze recipe!
Ingredients Needed:
- 1 cup packed light brown sugar
- 1/2 cup honey
- 1/4 cup Dijon mustard
- 2 tablespoons apple cider vinegar
- 1/4 teaspoon ground cloves
- A high-quality, heat-resistant silicone basting brush for smooth application.
Step-by-Step Directions:
- Combine Ingredients: In a small saucepan, combine the brown sugar, honey, Dijon mustard, apple cider vinegar, and ground cloves.
- Bring to a Simmer: Place the saucepan over medium heat. Whisk continuously as the mixture heats up.
- Simmer and Thicken: Once it begins to bubble, reduce the heat to low and let it simmer for 3-5 minutes, stirring occasionally. The sugar will fully dissolve, and the glaze will thicken to a syrupy consistency.
- Set Aside: Remove the glaze from the heat. It’s now ready to be brushed onto your ham at the proper time. This step ensures the flavors are perfectly blended and the glaze will cling beautifully.
Pro-Tip: The glaze can be made up to 3 days in advance and stored in an airtight container in the fridge. Gently re-warm it on the stove before using.

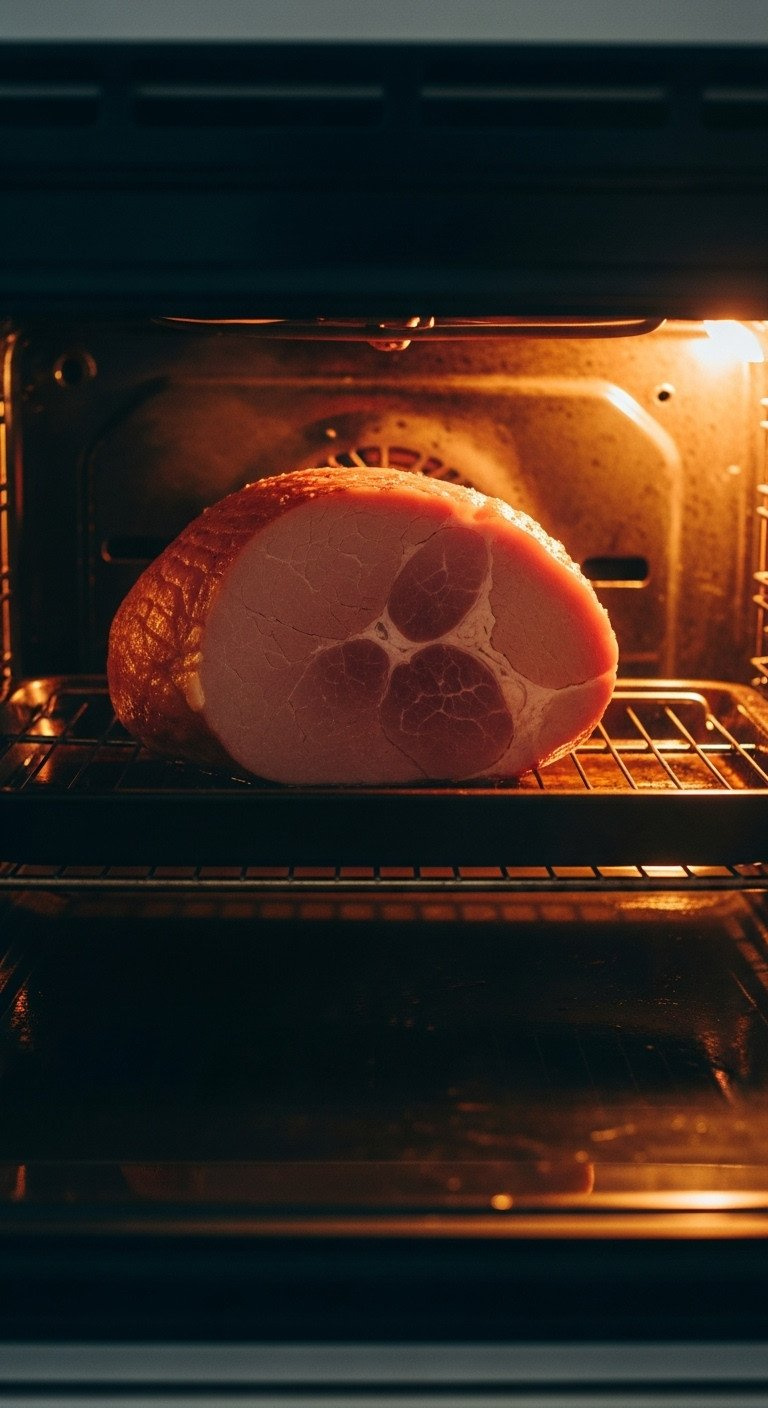
4. Bake Low and Slow Before You Glaze
Save this tip—it’s the key to preventing a burnt glaze!
What You Need:
- Your tempered and scored ham in its roasting pan
- An oven preheated to 325°F (165°C)
- (Optional) 1 cup of water or chicken broth for the bottom of the pan to create steam and prevent drippings from burning.
Step-by-Step Directions:
- Preheat Oven: Ensure your oven is fully preheated to 325°F. A lower temperature gently heats the ham through without drying it out.
- Initial Bake: Place the ham in the oven. For a fully cooked bone-in ham, bake for approximately 15-20 minutes per pound.
- Check Progress: After about an hour, check on the ham. It should be warming through nicely. This initial, unglazed bake is designed to heat the ham to about 120°F internally before you ever introduce the sugary glaze. This prevents the glaze from burning during a long cook time.
Pro-Tip: Adding a cup of water to the bottom of the roasting pan creates a steamy environment, which is another secret to keeping the ham extra moist.
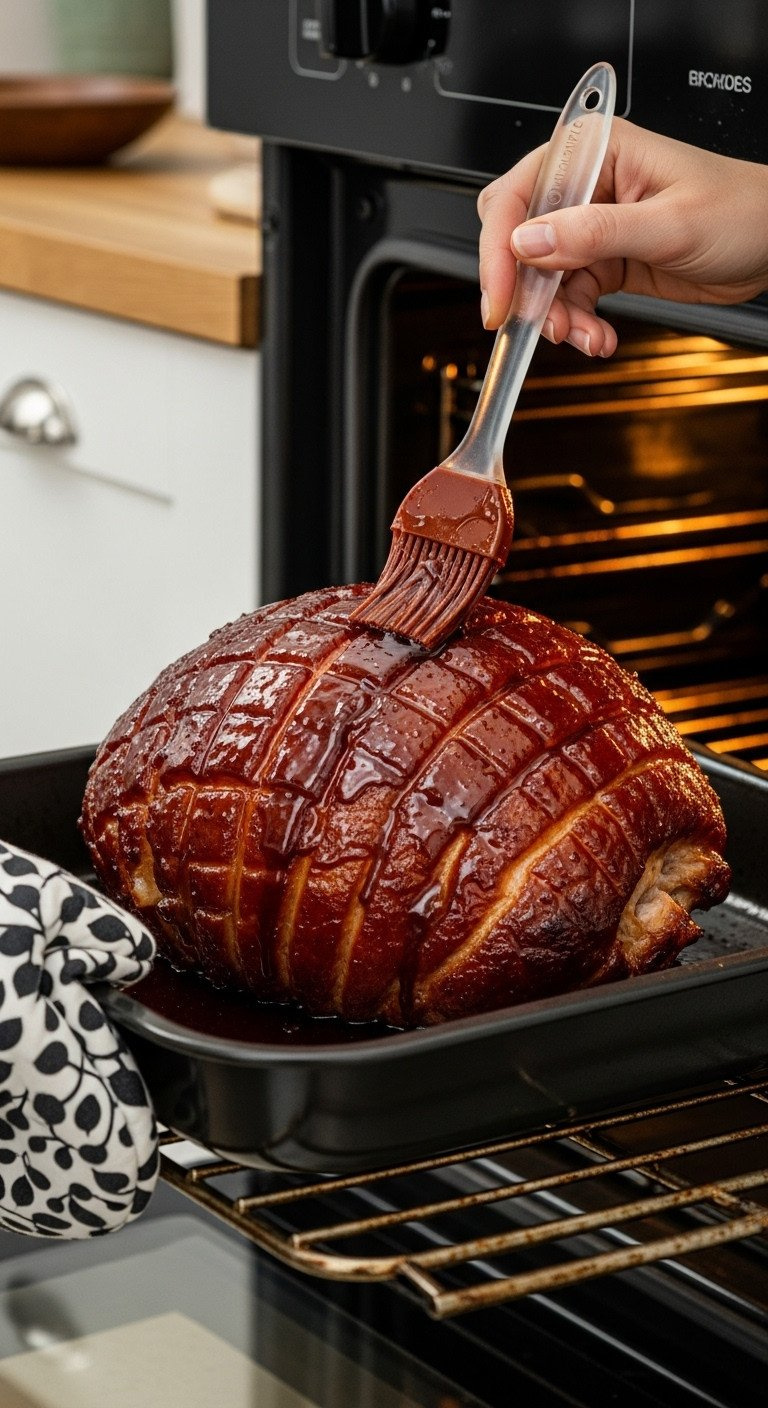
5. Glaze Late, and Baste Often for a Perfect Crust
The secret to a sticky, perfect glaze is all in the timing. Pin this!
Tools Needed:
- Your prepared saucepan of glaze
- A silicone basting brush
- An oven mitt
Step-by-Step Directions:
- Wait for the Right Moment: Only begin glazing during the last 30-45 minutes of the total cooking time.
- Apply First Layer: Remove the ham from the oven and brush a generous layer of glaze all over the surface, getting into the scores.
- Return to Oven & Increase Heat: Return the ham to the oven and increase the temperature to 400°F (200°C). This higher heat helps the glaze caramelize.
- Baste, Baste, Baste: Set a timer for 15 minutes. After 15 minutes, remove the ham and apply another layer of glaze. Return to the oven. Repeat one more time. This builds up the beautiful, sticky, and flavorful crust.
Lesson Learned: Don’t just pour the glaze on top. Brushing it on ensures an even coating and prevents a big puddle of burnt sugar at the bottom of the pan.

6. Trust a Thermometer, Not the Clock, for Perfect Doneness
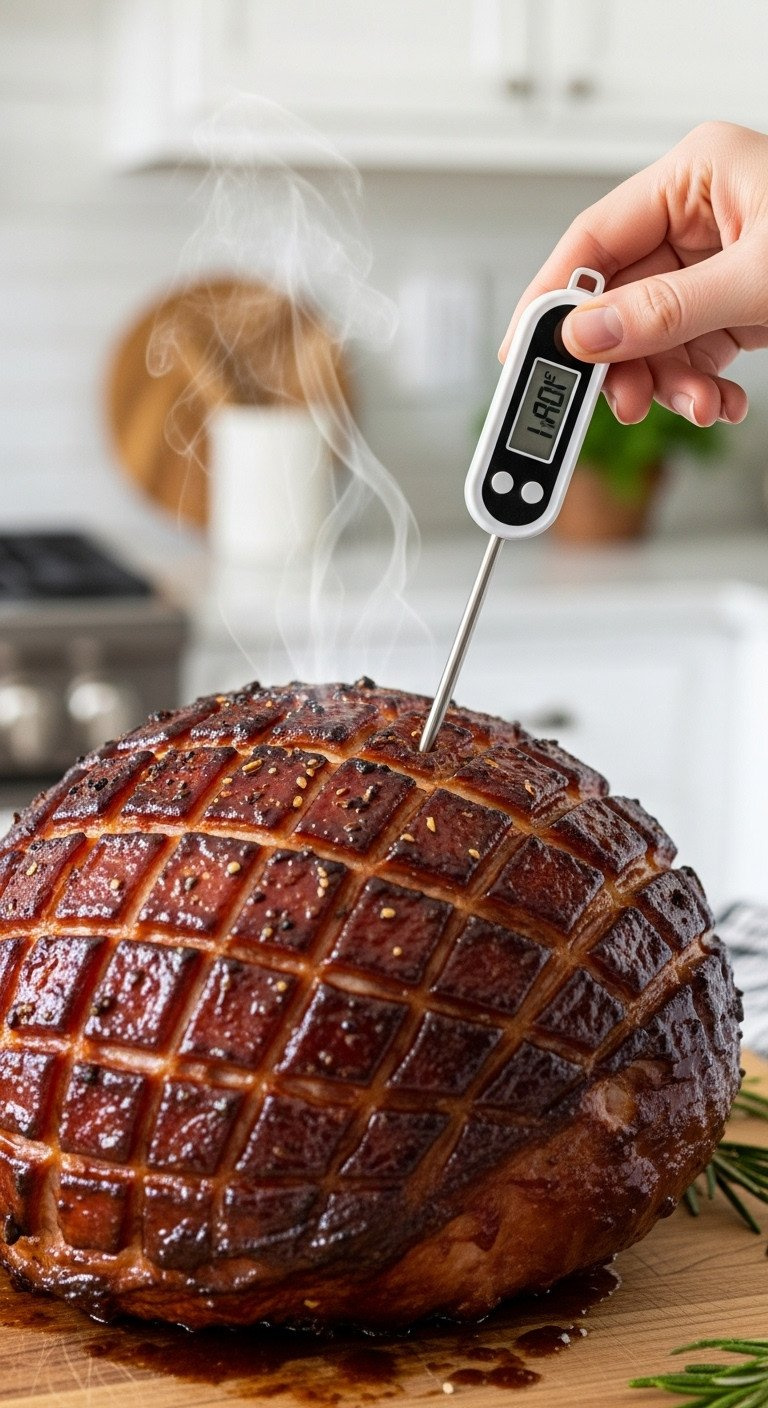
This is the most important secret to a juicy ham. Don’t skip it!
What You Need:
- An accurate digital instant-read meat thermometer. This is the one kitchen tool that is non-negotiable for this recipe.
Step-by-Step Directions:
- Know Your Target: Per USDA guidelines, a pre-cooked ham needs to reach an internal temperature of 140°F. An uncooked ham needs to reach 145°F.
- Insert Correctly: Towards the end of your cooking time, insert the thermometer into the thickest part of the ham, making sure not to touch the bone (the bone will be hotter and give a false reading).
- Pull it at Temperature: The moment the thermometer registers your target temperature, remove the ham from the oven. Every minute past this point is a risk for dry meat. Time-per-pound charts are only an estimate; the thermometer is the truth.
Pro-Tip: Remember carryover cooking! The internal temperature can rise another 5-10 degrees after you remove it from the oven, so pulling it right at 140°F is perfect.
7. Let It Rest: The Final, Crucial Step for Juiciness
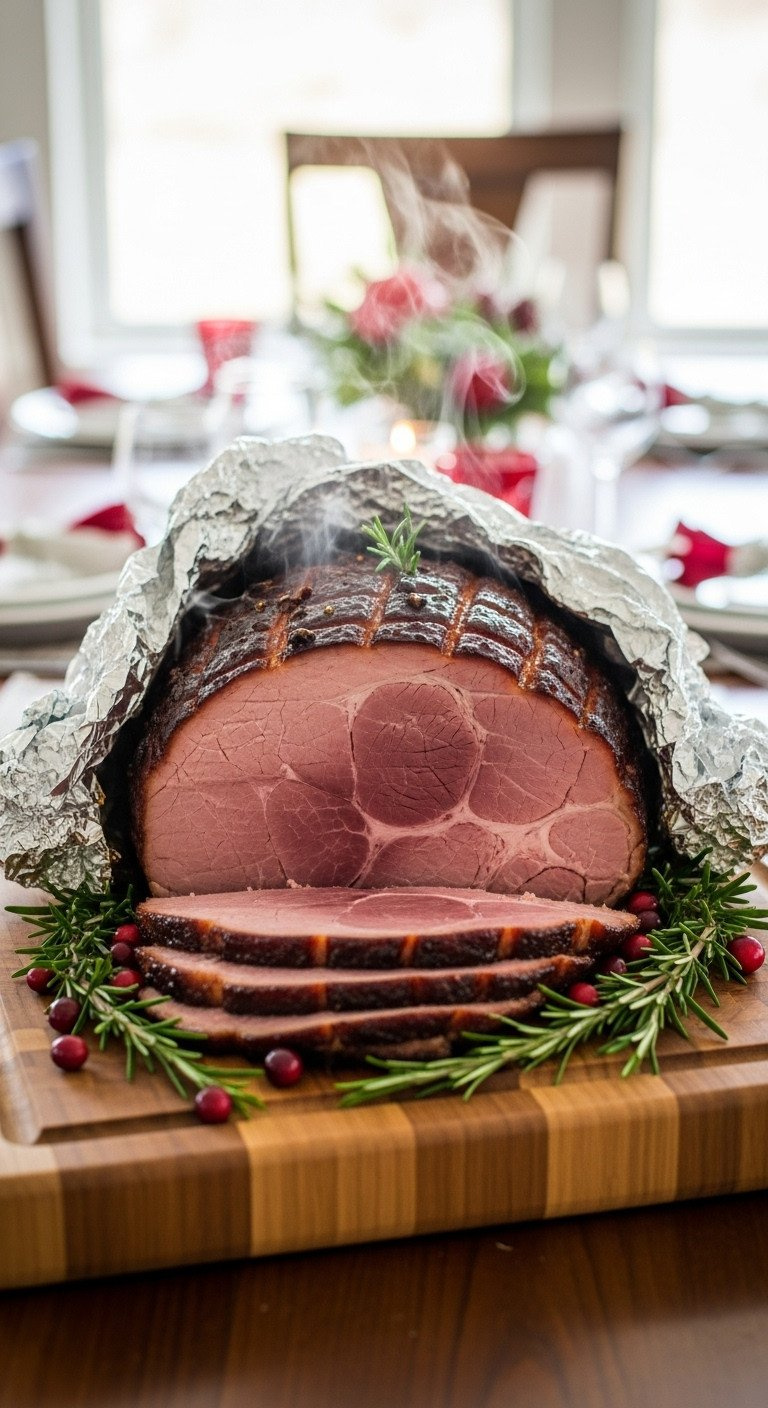
Don’t slice into it yet! Pin this reminder for a juicier ham.
Materials Needed:
- A large carving board, preferably with a juice groove.
- A large piece of aluminum foil.
Step-by-Step Directions:
- Transfer from Pan: As soon as the ham comes out of the oven, carefully transfer it from the hot roasting pan to your carving board.
- Tent Loosely with Foil: Cover the ham with a loose “tent” of aluminum foil. Don’t wrap it tightly, as this will steam the crust and make it soft.
- Wait Patiently: Let the ham rest for at least 15-20 minutes before you even think about carving it. A larger ham can rest for up to 30 minutes.
- Why it Works: This resting period allows the muscle fibers to relax and reabsorb all the delicious juices. If you cut into it immediately, all that moisture will pour out onto the cutting board, leaving you with dry meat.
Lesson Learned: The aroma is tempting, but slicing too early is the #1 mistake that ruins a perfectly cooked ham. Use the resting time to finish up your side dishes or make a quick pan gravy.

Key Takeaways: Your Quick Guide to a Perfect Holiday Ham
Here is a quick summary of the most important steps for a perfect holiday ham. Use this as a checklist when you’re in the kitchen.
- Let it Temper: Never cook a cold ham. Let it sit at room temperature for 1-2 hours for even cooking.
- Score the Fat: Make shallow, 1/4-inch deep diamond cuts in the fat cap for flavor and a beautiful finish.
- Simmer the Glaze: Always simmer your glaze ingredients in a saucepan first to dissolve the sugar and blend the flavors.
- Glaze at the End: Bake the ham plain first at 325°F. Only apply the glaze in the final 30-45 minutes of cooking at a higher heat (400°F).
- Use a Thermometer: This is non-negotiable. Cook to an internal temperature of 140°F for pre-cooked hams.
- Rest, Rest, Rest: Let the ham rest, tented with foil, for at least 15-20 minutes before carving to lock in the juices.
People Also Ask About Glazed Christmas Ham
How much ham do I need for 10 adults?
For 10 adults, you should plan on buying a 5-pound bone-in ham or a 3-4 pound boneless ham. The general rule is to calculate 1/2 pound per person for bone-in ham (which accounts for the bone weight) and 1/3 pound per person for boneless ham. It’s always a good idea to buy a little extra for delicious leftovers.
Should I put water in the pan when baking a ham?
Yes, adding about one cup of water, broth, or cider to the bottom of your roasting pan is a great idea. It creates a moist, steamy environment in the oven which helps prevent the ham from drying out. It also keeps the drippings from scorching on the bottom of the pan.
How do you fix a ham glaze that is too thin?
To fix a thin ham glaze, simply pour it into a small saucepan and simmer it over low heat for 5-10 minutes. This allows excess liquid to evaporate, reducing the glaze and thickening it to a perfect syrupy consistency. Be sure to stir occasionally to prevent it from scorching.
Can I make the Christmas ham glaze ahead of time?
Absolutely! You can make the glaze up to 3 days in advance. Prepare it as directed, let it cool completely, and then store it in an airtight container like a mason jar in the refrigerator. When you’re ready to use it, gently re-warm it in a saucepan over low heat until it’s pourable again.
Final Thoughts
Making a showstopper glazed Christmas ham doesn’t have to be a source of stress. The difference between a disappointing ham and an unforgettable one comes down to these few tested secrets. By tempering the meat, scoring the fat, timing your glaze, trusting your thermometer, and letting it rest, you are not just following a recipe—you are using a proven method for success.
You are now fully equipped to create a juicy, flavorful, and beautiful holiday centerpiece that will have your guests raving. Embrace the joy of holiday cooking, knowing you have the secrets to a perfect ham in your back pocket.
What’s your favorite side dish to serve with a holiday ham? Share your traditions in the comments below
Last update on 2026-06-04 at 02:20 / Affiliate links / Images from Amazon Product Advertising API
