As an Amazon Associate BakingBakewareSets.com earns from qualifying purchases.
11 Easy No Fail Halloween Treats For Your 2026 Party
Want to create spooky, delicious treats without the kitchen nightmare? You’ve imagined the perfect Halloween party spread, but the fear of complicated recipes and baking fails is real. It’s frustrating when your spooky creations look more sad than scary.
Easy Halloween treats are simple, spooky, and quick-to-prepare recipes, often no-bake, that use accessible ingredients and guarantee success for parties, kids, or last-minute fun. This guide delivers 11 tried-and-tested, no-fail options for your 2026 party. Get ready to impress your guests with minimal stress.
☰ Table of Contents ▼
show
Get Spooky, Stress-Free: Your Guide to 11 Easy No Fail Halloween Treats For Your 2026 Party
The pressure to create a memorable Halloween experience is on, but that doesn’t mean you need to spend hours on complex desserts that might not turn out. We understand the frustration of a baking project gone wrong, especially when you have a party to host or excited kids waiting. That’s why we’ve curated this list of spooky party food with one goal in mind: guaranteed success.
These 11 easy Halloween treats are more than just recipes; they are your secret weapon for a stress-free celebration. Each one has been tried and tested by our team for its simplicity, visual appeal, and delicious results. Whether you’re a beginner in the kitchen or a seasoned pro looking for quick Halloween snacks, you’ll find festive sweets that are both fun to make and frightfully good to eat for your 2026 Halloween party.
11 Easy No Fail Halloween Treats To Spook-ify Your 2026 Party
Ready to dive into a world of ghoulishly good desserts and snacks? This collection features a diverse range of kid-friendly, no-bake, and last-minute Halloween treats designed to delight everyone at your event. We’ve focused on foolproof methods and accessible ingredients, so you can spend less time worrying and more time enjoying the spooky fun.
Each of these 2026 Halloween treat ideas has been selected for its no-fail qualities, ensuring you get picture-perfect results every time. From creepy-crawly dips to monstrously cute sweets, here are 11 simple recipes to make your celebration a hit:
- Monster Rice Krispie Treats
- Spooky Spiderweb Dip
- Witch Finger Pretzels
- Ghostly Banana Pops
- Mummy Hot Dogs
- Oreo Graveyard Dirt Cups
- Vampire Bite Donuts
- Pumpkin Patch Brownies
- Candy Corn Fruit Parfaits
- Bewitched Brew Punch
- Eyeball Cake Pops
1. Monster Rice Krispie Treats
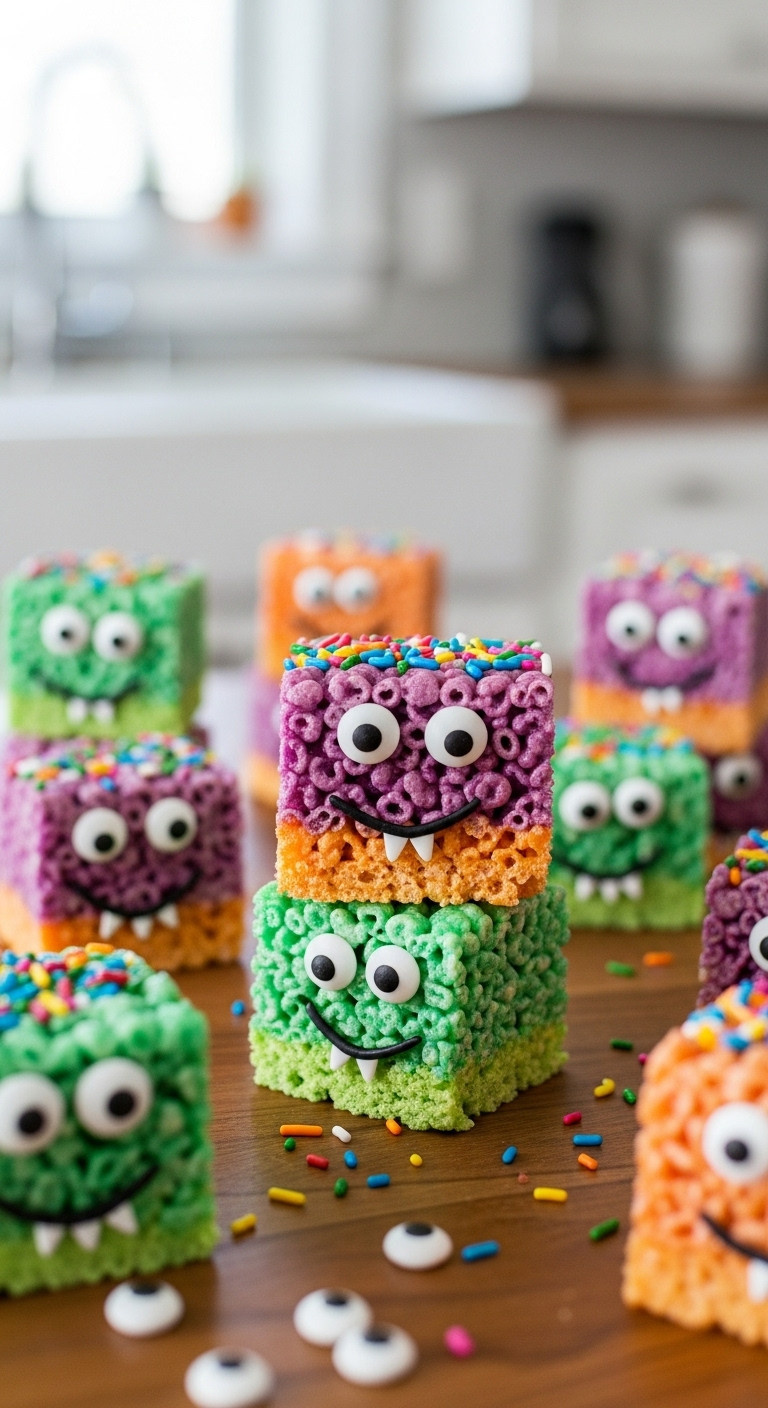
Pin this genius tips to your ‘Spooky Snacks’ board!
Ingredients Needed:
- 6 cups Rice Krispies cereal
- 1 (10 oz) bag mini marshmallows (fresh for best melting)
- 3 tablespoons unsalted butter
- Gel food coloring (green, purple, orange – specifically gel for vibrant hues)
- 1 (1 oz) package edible googly eyes (various sizes for character)
- Assorted Halloween sprinkles (optional, for extra texture)
- Non-stick cooking spray or parchment paper
Instructions:
- Grease a 9×13 inch baking dish with non-stick spray or line with parchment paper, leaving an overhang on the sides.
- In a large microwave-safe bowl, combine butter and marshmallows. Microwave on high for 1 minute, then stir. Continue microwaving in 30-second intervals, stirring after each, until marshmallows are completely melted and smooth (about 2-3 minutes total).
- Divide the melted marshmallow mixture evenly into 3 separate bowls. Add 2-3 drops of desired gel food coloring to each bowl (green, purple, orange) and stir until the color is evenly distributed.
- Quickly add 2 cups of Rice Krispies cereal to each colored marshmallow mixture and stir until fully coated.
- Press each colored mixture into the prepared baking dish, alternating colors or creating swirled patterns. Use a buttered spatula or wax paper to press firmly and evenly.
- Immediately scatter edible googly eyes and sprinkles over the still-warm treats, pressing them gently to adhere.
- Allow to cool completely for at least 1 hour at room temperature before cutting into squares and serving.
Pro-Tip: Use fresh marshmallows for optimal meltiness and avoid a hard, chewy treat. Press firmly but gently into the pan to ensure an even texture without crushing the cereal.

2. Spooky Spiderweb Dip (7-Layer Dip)
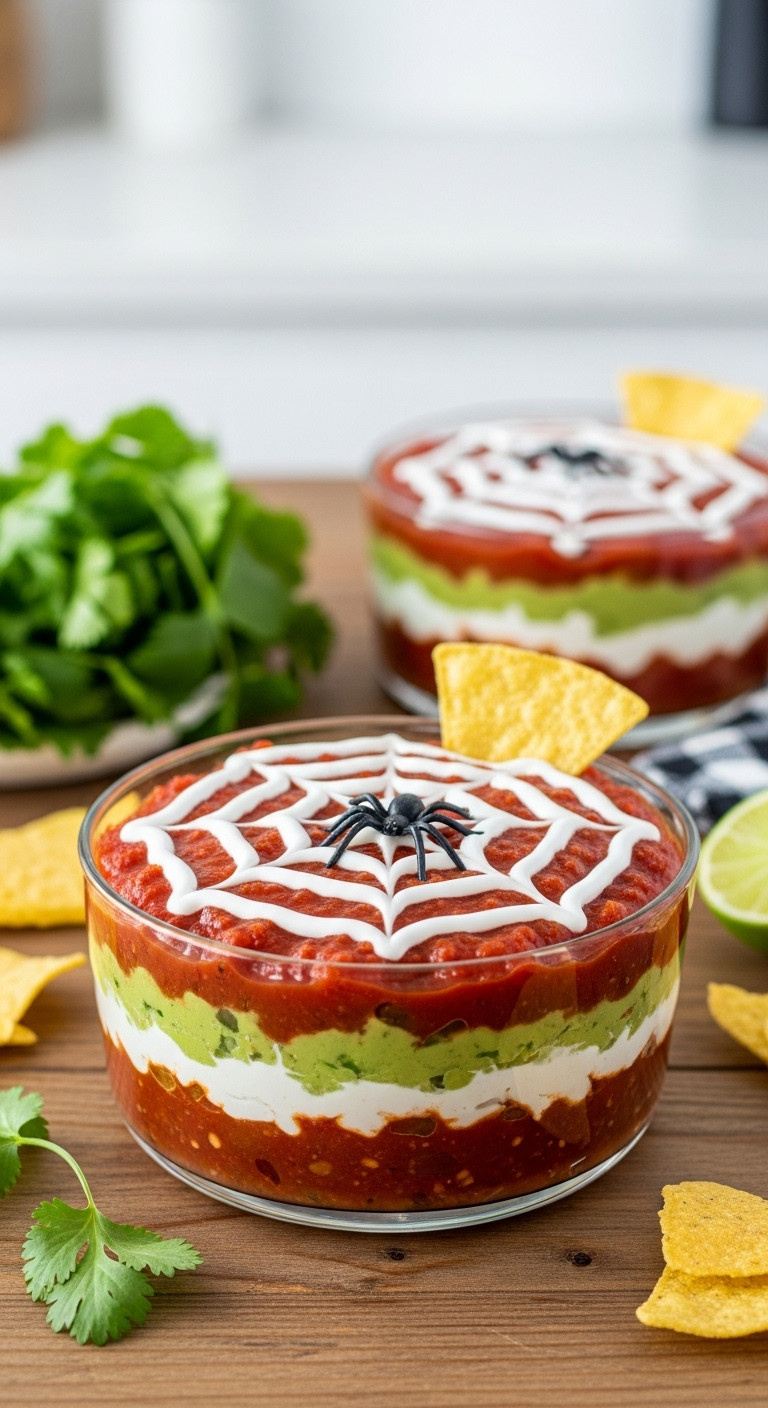
Save this clever organization idea!
Ingredients Needed:
- 1 (16 oz) can refried beans (smooth consistency works best for layering)
- 1 teaspoon taco seasoning (for beans)
- 1 cup prepared guacamole (or 2-3 ripe avocados, mashed with lime juice, salt, and cilantro)
- 1 cup sour cream (full-fat for piping consistency)
- 1/2 cup salsa (mild or medium, drained if very watery)
- 1 cup shredded cheddar cheese (or a Mexican blend)
- 1/4 cup chopped black olives (optional, for extra “spider” effect)
- Tortilla chips, for serving
- Small plastic spiders (for decoration, clearly label as non-edible)
- Piping bag with small round tip (or a Ziploc bag with corner snipped)
Instructions:
- In a small bowl, mix the refried beans with taco seasoning. Spread this mixture evenly as the first layer in a clear, shallow 8×8 inch square or round dish.
- Carefully spread the guacamole over the bean layer.
- Gently spread the salsa over the guacamole.
- Evenly spread the shredded cheese over the salsa layer.
- Fill a piping bag fitted with a small round tip (or a Ziploc bag with a tiny corner snipped) with the sour cream.
- Starting from the center of the dip, pipe concentric circles of sour cream outward, leaving about half an inch between each circle.
- Using a toothpick or skewer, drag lines from the center of the dip outward to the edge, creating a spiderweb pattern. Repeat this at 8-10 points around the circle.
- If desired, sprinkle chopped black olives around the edges or in a small “spider” shape.
- Place a plastic spider (or a few) on the web for a final spooky touch. Serve immediately with tortilla chips.
Pro-Tip: For the best spiderweb effect, ensure your sour cream is chilled and not too runny. If making ahead, store all layers except the sour cream and plastic spider in the fridge, then add the web and spider just before serving.

3. Witch Finger Pretzels
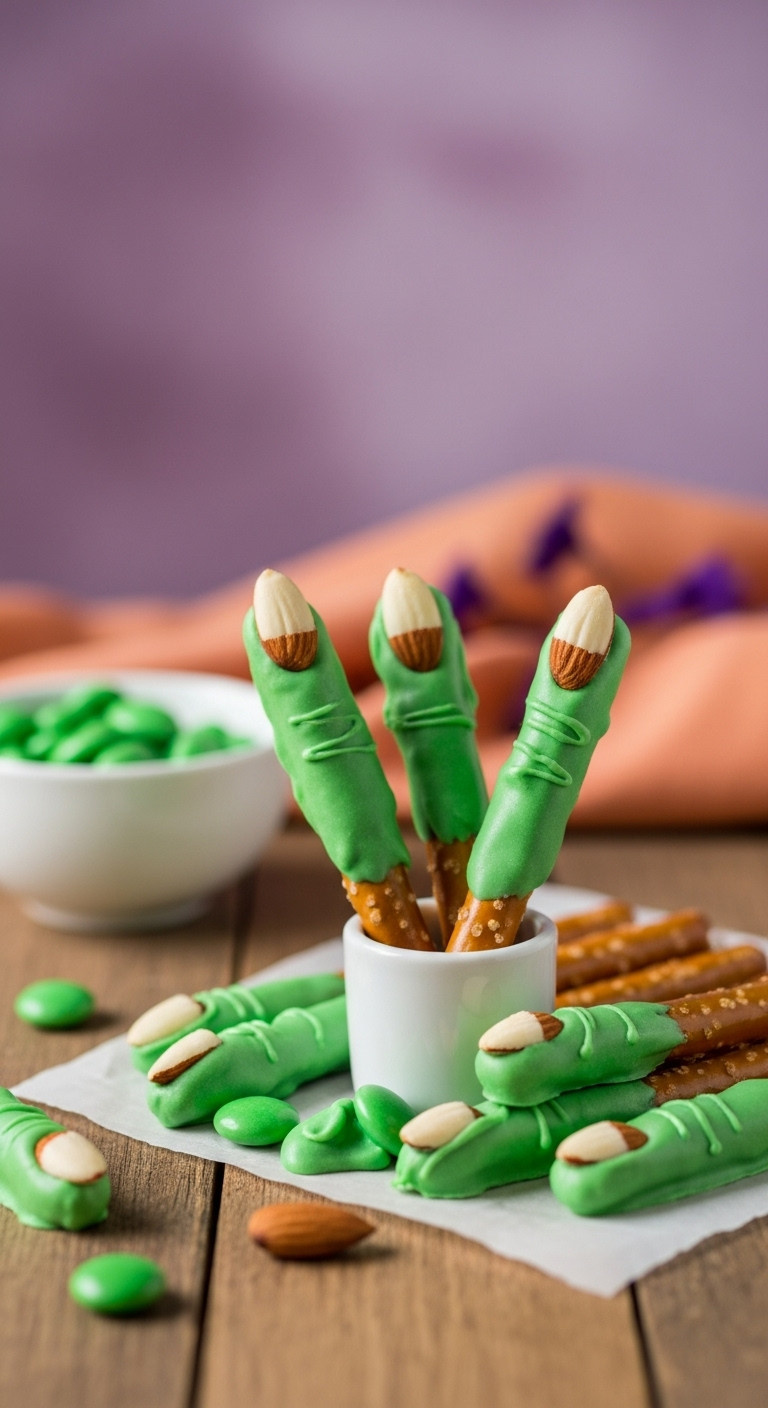
Don’t forget to pin this witchy snack!
Ingredients Needed:
- 1 bag pretzel rods (standard length)
- 1 (12 oz) bag green candy melts (high-quality for smooth melting)
- 1/2 cup almond slivers (sliced almonds)
- Parchment paper or wax paper
Instructions:
- Line a baking sheet with parchment paper or wax paper.
- Melt the green candy melts according to package directions. This usually involves microwaving in a microwave-safe bowl in 30-second intervals, stirring after each, until smooth. Be careful not to overheat.
- Dip each pretzel rod about two-thirds of the way into the melted green candy, allowing any excess to drip off.
- Immediately place an almond sliver onto the end of the green coating to resemble a fingernail.
- Lay the dipped pretzels on the prepared baking sheet.
- Repeat with the remaining pretzel rods.
- Allow the candy melts to set completely at room temperature or chill in the refrigerator for 10-15 minutes for faster setting.
Pro-Tip: Work in small batches of pretzels so the candy melts don’t harden too much before you can add the almond “fingernails.” If the candy starts to thicken, microwave for another 15 seconds, stirring well.

4. Ghostly Banana Pops
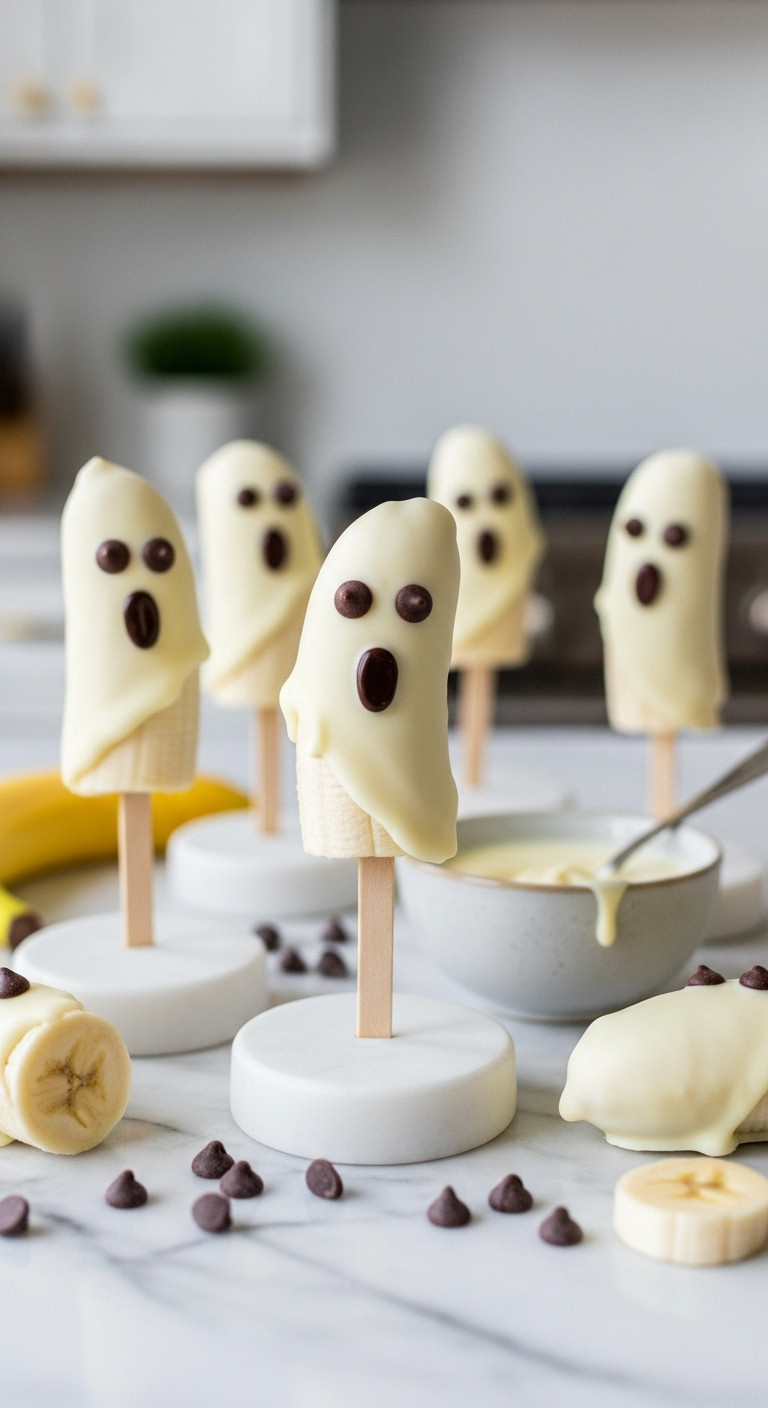
Save this healthy-ish Halloween treat!
Ingredients Needed:
- 4 ripe but firm bananas
- 8 popsicle sticks or wooden skewers
- 1 (10 oz) bag white chocolate melting wafers (or good quality white chocolate chips)
- 1/2 cup mini chocolate chips (for eyes and mouth)
- Parchment paper or wax paper
Instructions:
- Peel the bananas and cut each in half crosswise. Insert a popsicle stick into the cut end of each banana half.
- Place the banana halves on a parchment-lined baking sheet and freeze for at least 30 minutes, or until firm. This helps the chocolate adhere better.
- Melt the white chocolate melting wafers in a microwave-safe bowl according to package directions, typically in 30-second intervals, stirring until smooth.
- Dip each frozen banana half into the melted white chocolate, ensuring it’s fully coated. Let any excess chocolate drip off.
- Immediately place two mini chocolate chips for eyes and a few more for a ghostly mouth before the chocolate sets.
- Place the decorated banana pops back on the parchment-lined baking sheet.
- Freeze for at least 1-2 hours, or until the chocolate is fully set and the bananas are firm. Store in an airtight container in the freezer.
Pro-Tip: Freezing the bananas beforehand is crucial for the chocolate to set quickly and prevent the banana from becoming too soft. For a super smooth coating, add 1-2 teaspoons of coconut oil to your white chocolate while melting.
5. Mummy Hot Dogs
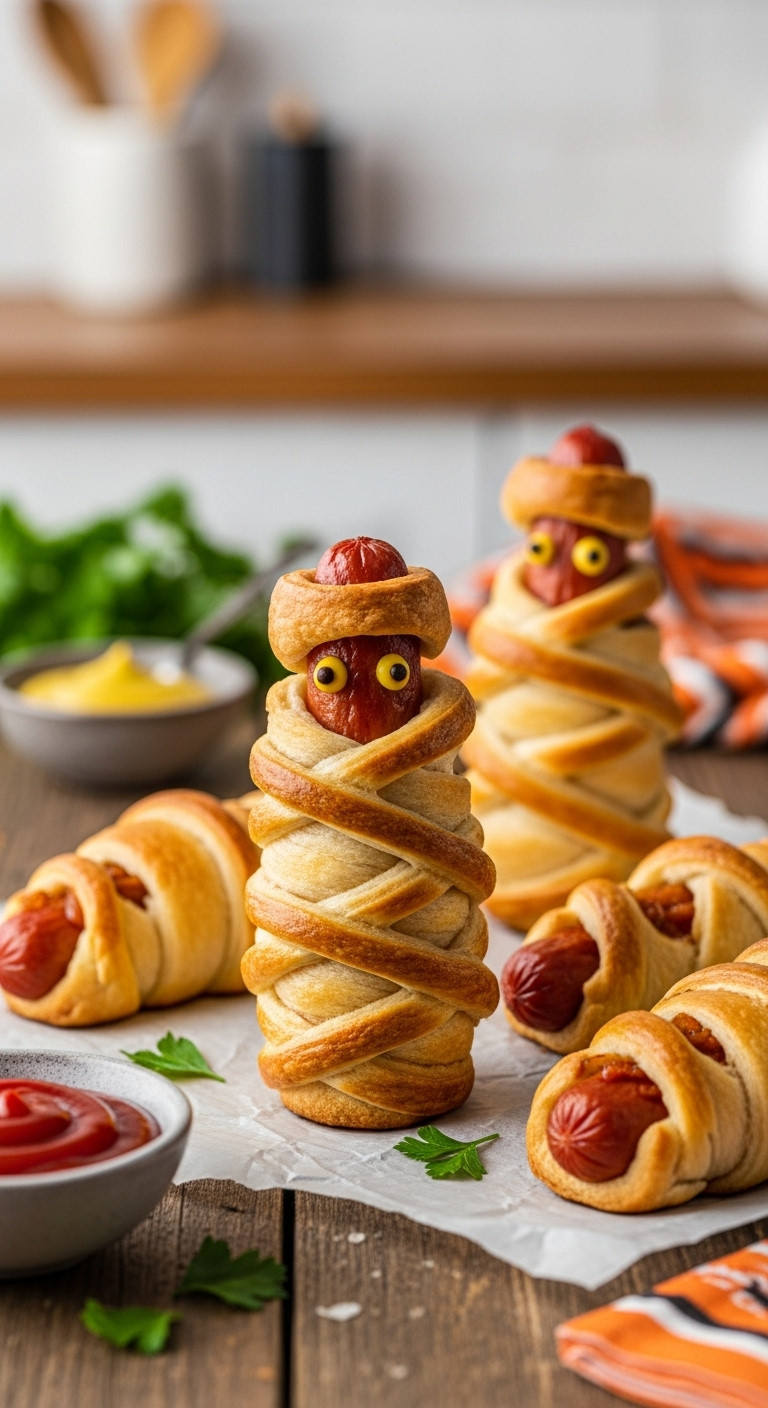
Pin this savory crowd-pleaser for your Halloween party!
Ingredients Needed:
- 1 (8 oz) can refrigerated crescent roll dough (store-brand works great)
- 8 regular-sized hot dogs (beef or pork, your preference)
- Mustard or ketchup (for drawing eyes)
- Optional: Small candy eyes (if you prefer edible eyes over condiment dots)
Instructions:
- Preheat your oven to 375°F (190°C). Line a baking sheet with parchment paper.
- Unroll the crescent roll dough and separate it into 8 triangles.
- Using a sharp knife or pizza cutter, cut each crescent roll triangle lengthwise into 3 thin strips.
- Starting at one end of a hot dog (leaving a small space for the “face”), wrap a strip of dough around the hot dog, stretching it slightly to resemble bandages. Continue wrapping, slightly overlapping the dough, until you reach the other end. Leave a small opening for the face and feet.
- Repeat with the remaining hot dogs and dough strips.
- Place the wrapped hot dogs on the prepared baking sheet.
- Bake for 12-15 minutes, or until the crescent dough is golden brown and the hot dogs are heated through.
- Carefully remove from the oven. Once slightly cooled, use mustard or ketchup (or attach candy eyes with a tiny dab of condiment) to draw two small dots for eyes on each “mummy.”
- Serve warm with extra ketchup and mustard for dipping.
Pro-Tip: For extra “aged” mummy bandages, brush the dough with a little egg wash before baking. If you want a uniform look, ensure the hot dogs are all the same length.

6. Oreo Graveyard Dirt Cups
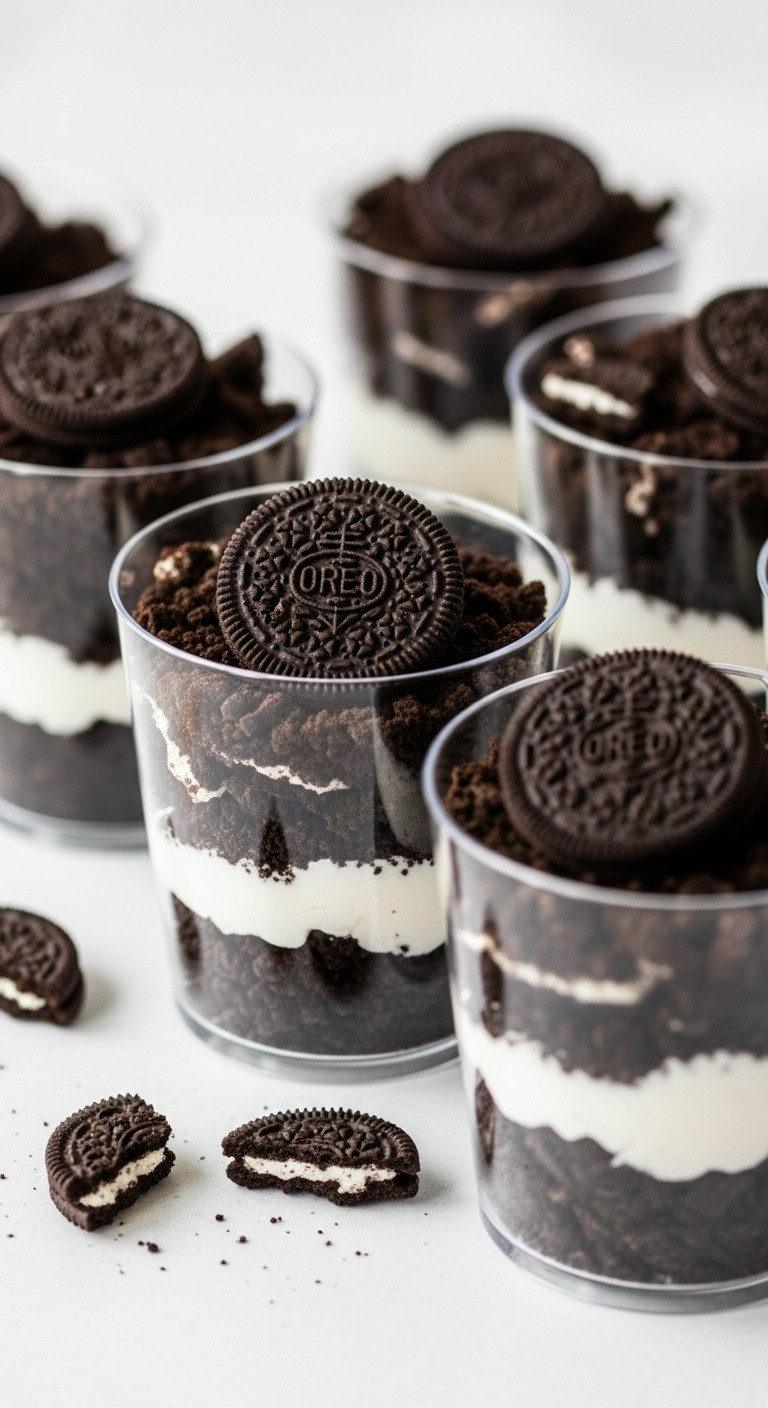
Save this classic spooky dessert for your next party!
Ingredients Needed:
- 1 (14.3 oz) package Oreo cookies (regular or double stuffed)
- 2 (3.9 oz) packages instant chocolate pudding mix (sugar-free for a lighter option)
- 4 cups cold milk (dairy or non-dairy, according to preference)
- 1 (8 oz) container whipped topping (thawed, such as Cool Whip)
- 1 bag gummy worms (assorted colors for realism)
- Optional: Milano cookies or shortbread cookies for “tombstones”
- Optional: Black edible food marker (for writing on “tombstones”)
- Clear plastic cups or small glass jars (about 8-10 oz size)
Instructions:
- Place Oreo cookies (filling included) in a food processor and pulse until finely crushed, resembling dirt. Alternatively, place in a Ziploc bag and crush with a rolling pin. Set aside.
- In a large bowl, whisk together the instant chocolate pudding mix and cold milk for 2 minutes until thickened. Let it stand for 5 minutes.
- Gently fold in the thawed whipped topping into the chocolate pudding mixture until fully combined.
- Begin assembling your dirt cups: Place a layer of crushed Oreos (about 1-2 tablespoons) at the bottom of each clear cup.
- Spoon a layer of chocolate pudding mixture over the Oreos.
- Place a few gummy worms on top of the pudding layer, letting some peek out over the edges of the cup.
- Repeat layers of Oreos and pudding, ending with a generous layer of crushed Oreos on top to look like fresh dirt.
- If using cookies for “tombstones,” write spooky messages like “R.I.P.” or “BOO!” with an edible food marker. Insert a “tombstone” cookie into the top layer of crushed Oreos in each cup.
- Refrigerate for at least 30 minutes before serving to allow the pudding to set completely.
Pro-Tip: For extra realism, slightly warm a few gummy worms and stretch them for a more “creepy-crawly” look before placing them in the cups. Using clear cups is key for showcasing the fun layers!

7. Vampire Bite Donuts

Pin this super simple no-bake Halloween tips!
Ingredients Needed:
- 1 dozen glazed donuts (store-bought for ultimate ease)
- 1 package vampire teeth candy (plastic or edible, ensure clarity if plastic)
- 1 tube red gel icing (for realistic “blood” drips)
Instructions:
- Unpackage your glazed donuts and arrange them on a serving platter.
- Carefully open the package of vampire teeth candy. For each donut, choose a pair of vampire teeth.
- Gently press a pair of vampire teeth into the side of each donut, creating a “bite” mark. Ensure the teeth are securely in place.
- Take your red gel icing and carefully squeeze a small amount just above and around the “bite” mark, letting it drip slightly to resemble blood.
- Repeat with all remaining donuts.
- Arrange the vampire bite donuts attractively on your platter and serve immediately.
Pro-Tip: If using plastic vampire teeth, consider placing a small piece of parchment paper under each donut to catch any excess red gel icing, making cleanup easier. Make sure to clearly communicate to guests if the teeth are not edible!

8. Pumpkin Patch Brownies
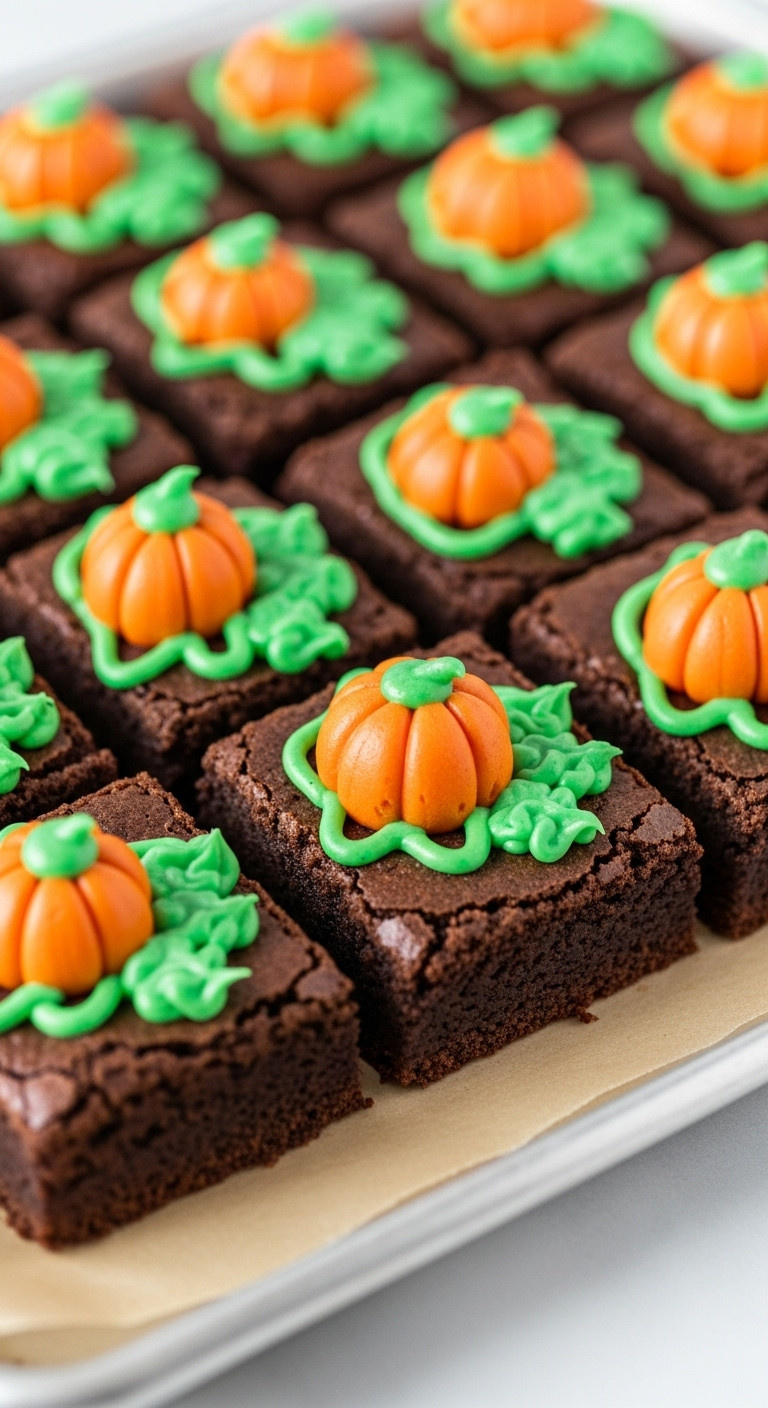
Pin this adorable Halloween dessert idea!
Ingredients Needed:
- 1 box (18.3 oz) brownie mix (plus ingredients called for on box, typically eggs, oil, water)
- 1 can (16 oz) vanilla frosting (white or light-colored)
- Green food coloring (gel for best color)
- 1 package candy pumpkins (mini size works best)
- Optional: Small amount of crushed Oreos for “dirt” effect
- Piping bag with a small round tip (or a Ziploc bag with corner snipped)
Instructions:
- Preheat oven and prepare brownie mix according to package directions. Pour batter into a greased 9×13 inch baking pan.
- Bake brownies as directed until a toothpick inserted into the center comes out with moist crumbs. Allow brownies to cool completely in the pan on a wire rack.
- Once cooled, cut the brownies into 12-16 squares.
- In a small bowl, mix a portion of the vanilla frosting with a few drops of green gel food coloring until desired shade of green is achieved for the “vines” and “leaves.” Leave some frosting white if you want.
- Fill a piping bag fitted with a small round tip (or a Ziploc bag with a tiny corner snipped) with the green frosting.
- For each brownie square, pipe a few squiggly “vines” and small “leaves” onto the top.
- Place 1-2 candy pumpkins on each brownie square amidst the green frosting to create miniature pumpkin patches.
- If desired, sprinkle a tiny amount of crushed Oreos around the pumpkins for a “dirt” effect.
Pro-Tip: Ensure the brownies are completely cooled before frosting, otherwise, the frosting will melt and run. Using gel food coloring gives a much more vibrant green than liquid food coloring.

9. Candy Corn Fruit Parfaits
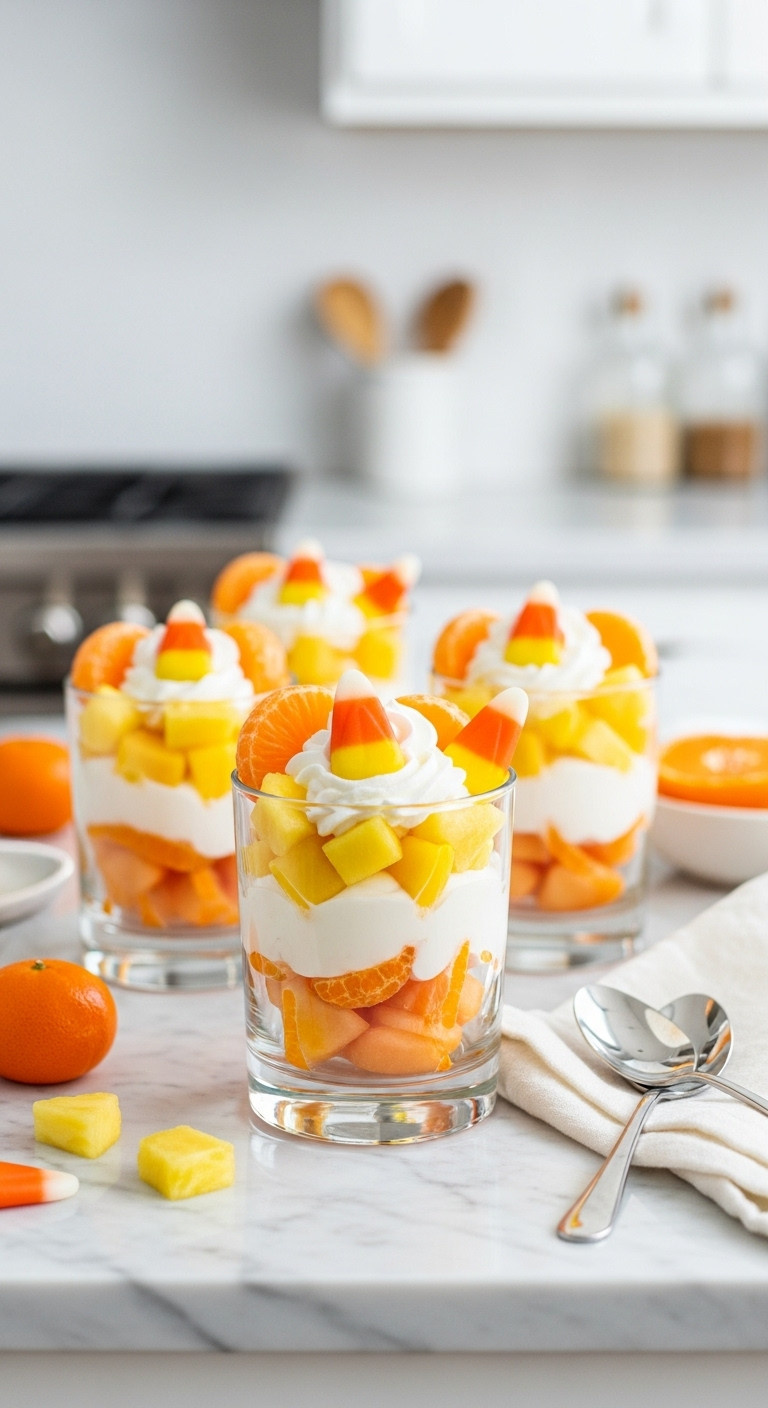
Save this fresh and vibrant Halloween treat idea!
Ingredients Needed:
- 1 (15 oz) can mandarin oranges (drained well, or fresh peeled mandarins)
- 1 (15 oz) can pineapple chunks (drained well, or fresh chopped pineapple)
- 1 (8 oz) container whipped topping (thawed Cool Whip, or plain Greek yogurt for healthier option)
- Clear dessert cups or small glass jars (about 6-8 oz size)
Instructions:
- Ensure all canned fruits are thoroughly drained to prevent soggy parfaits. If using fresh fruit, chop pineapple and peel mandarins.
- Start by layering the orange fruit (mandarin oranges) at the bottom of each clear dessert cup. Fill about one-third of the way.
- Next, add a layer of yellow fruit (pineapple chunks) on top of the orange layer. Fill another third of the cup.
- Top with a generous dollop of whipped topping or Greek yogurt for the white layer, filling to the top of the cup.
- Repeat layering for all cups.
- For an extra touch, you can place a single candy corn on top of each parfait just before serving (optional).
- Serve immediately or chill in the refrigerator for up to 2 hours.
Pro-Tip: For a more vibrant yellow layer, use chopped fresh mango. If using Greek yogurt, a touch of honey or maple syrup can add a hint of sweetness. Draining the fruit thoroughly is critical to prevent a watery bottom layer!

10. Bewitched Brew Punch
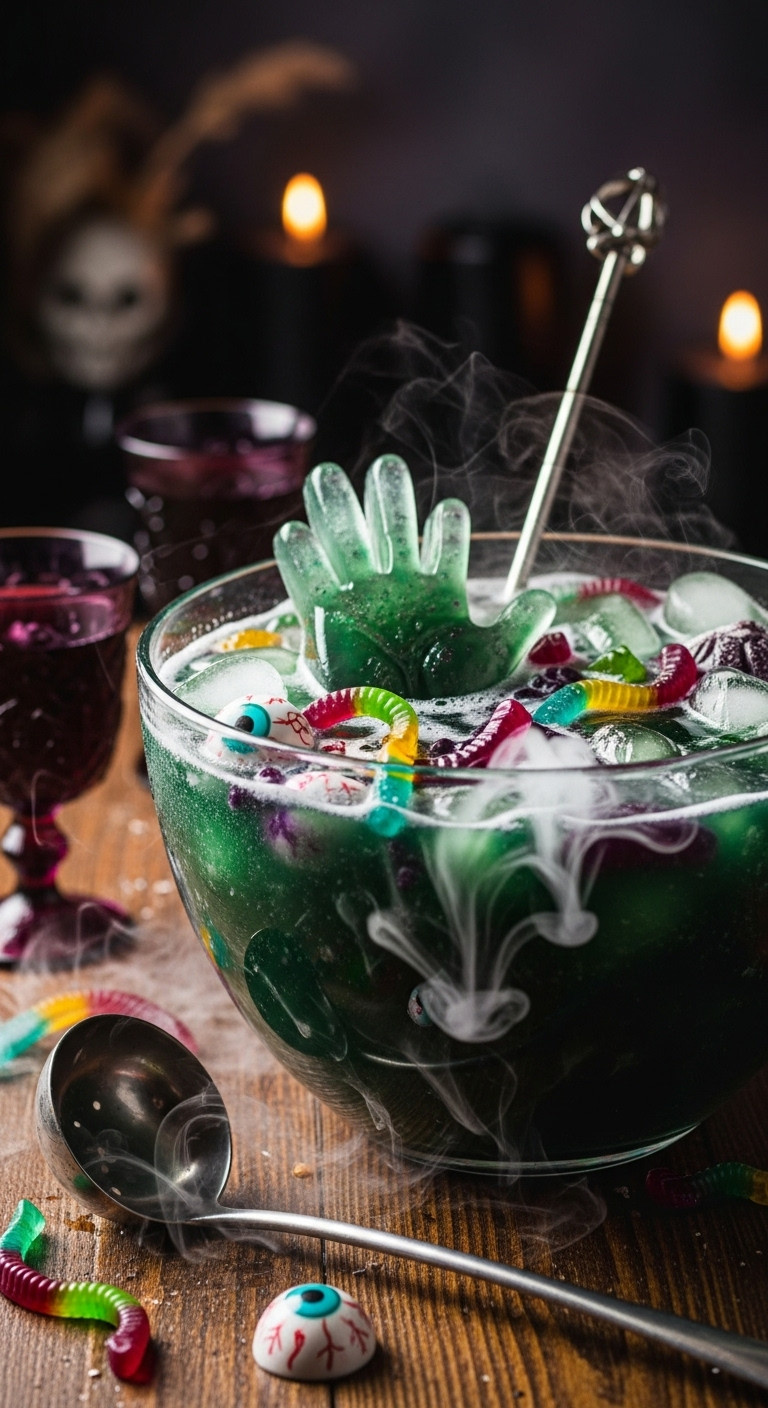
Pin this magical Halloween drink recipe to your board!
Ingredients Needed:
- 1 (2-liter) bottle lemon-lime soda (chilled)
- 1 (64 oz) bottle white grape juice (chilled)
- 1 (64 oz) bottle pineapple juice (chilled)
- Green or purple liquid food coloring (for desired brew color)
- 1 package gummy worms or gummy candies (for floating “creatures”)
- Optional: Plastic or edible candy eyeballs (for a ghoulish look)
- Optional: Dry ice (for a smoky effect – handle with extreme caution and never directly touch or ingest)
- Large punch bowl
Instructions:
- In a large punch bowl, combine the chilled lemon-lime soda, white grape juice, and pineapple juice.
- Add a few drops of green or purple liquid food coloring, stirring until you achieve your desired “bewitched brew” color. Start with a few drops and add more until you get a vibrant hue.
- Scatter gummy worms and/or candy eyeballs into the punch. Some will float, and some will sink, creating a creepy effect.
- If using dry ice: Place a small chunk of dry ice in a separate, smaller bowl (such as a metal bowl) inside the punch bowl, ensuring it does not come into direct contact with the punch itself or guests’ hands. Pour a small amount of warm water over the dry ice in its separate bowl to activate the fog effect. Replenish warm water as needed.
- Serve immediately in individual cups or goblets.
Pro-Tip: Freeze some gummy worms or plastic spiders in ice cubes overnight to create themed ice that won’t water down your punch. If using dry ice, ensure proper ventilation and always inform guests about its presence and safety.

11. Eyeball Cake Pops
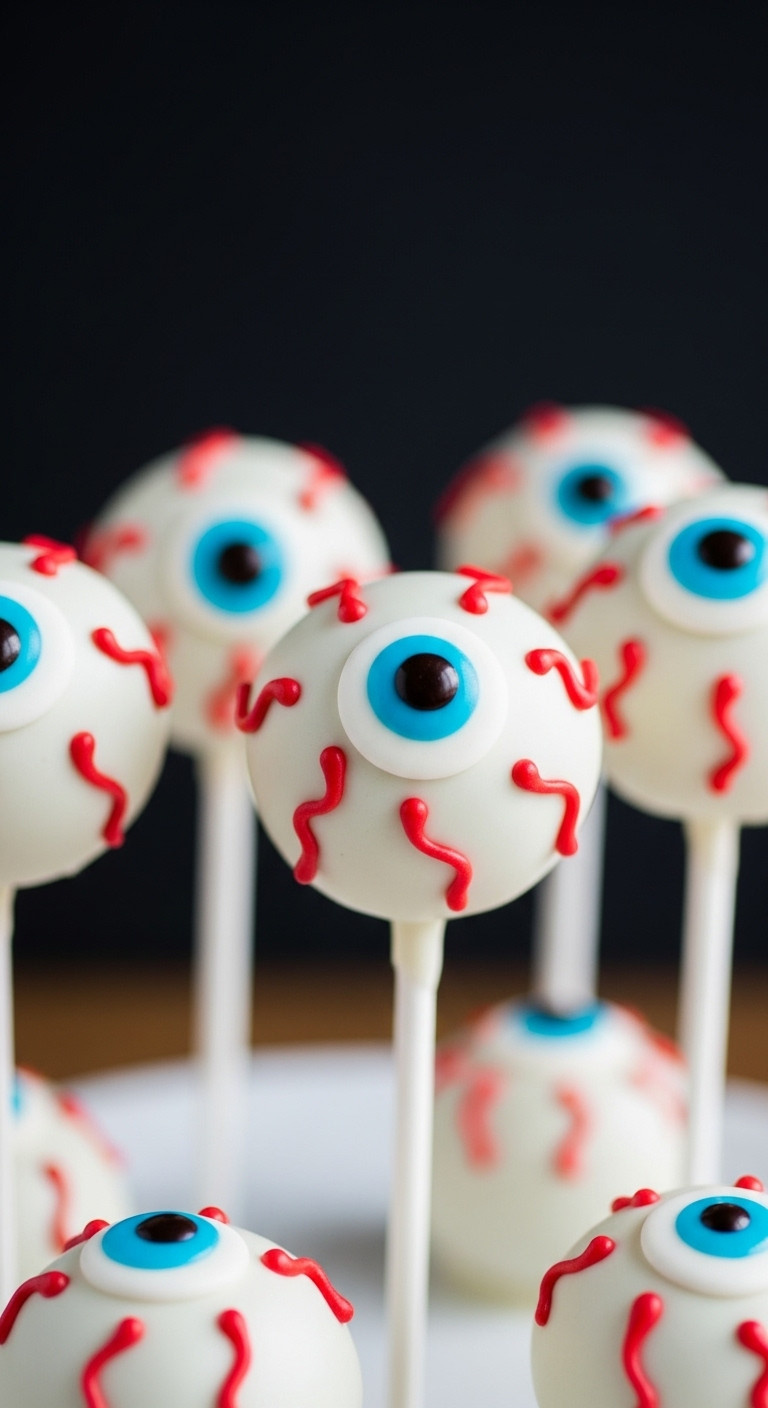
Pin this ghoulishly good cake pop idea!
Ingredients Needed:
- 1 box (15.25 oz) cake mix (plus ingredients called for on box, typically eggs, oil, water) – any flavor, vanilla or white works well
- 1 (16 oz) can vanilla frosting (white)
- 1 (12 oz) bag white candy melts (or vanilla flavored coating)
- 1 (12 oz) bag green or blue candy melts (for the iris)
- 1 tube black gel icing (for the pupil)
- 1 tube red gel icing (for the “veins”)
- Lollipop sticks or paper straws
- Styrofoam block or cake pop stand (for drying)
- Parchment paper
Instructions:
- Prepare and bake cake mix according to package directions in a 9×13 inch pan. Let cool completely.
- Once cooled, crumble the cake into a large bowl. Add about half of the can of vanilla frosting and mix with your hands until well combined and a dough-like consistency is formed. You should be able to roll it into a ball without it crumbling. Add more frosting if needed.
- Roll the cake mixture into 1-inch balls. Place on a parchment-lined baking sheet and chill in the refrigerator for at least 30 minutes.
- Melt the white candy melts in a microwave-safe bowl according to package directions. Dip the tip of a lollipop stick into the melted white candy, then insert it about halfway into a chilled cake ball. Repeat for all cake balls.
- Dip each cake pop into the melted white candy, tapping off any excess. Place the dipped pops into a Styrofoam block or cake pop stand to set. Let them set completely (about 15-20 minutes).
- Melt the green or blue candy melts. Using a small spoon or a piping bag with a tiny snipped corner, pipe a small circle in the center of each white cake pop for the iris. Let set.
- Once the iris is set, use the black gel icing to pipe a smaller dot in the center of the iris for the pupil.
- Finally, use the red gel icing to draw thin, squiggly “veins” radiating from the iris outward onto the white coating.
- Let all decorations set completely before serving.
Pro-Tip: Chilling the cake balls thoroughly before dipping is crucial to prevent them from falling off the stick. If your candy melts are too thick, add a teaspoon of coconut oil or shortening to thin them out.

Key Takeaways: Your Quick Guide to Easy No Fail Halloween Treats
- Prioritize No-Bake & Simple Assembly: Many “no-fail” treats require no oven, just mixing and decorating.
- Leverage Store-Bought Shortcuts: Pre-made doughs, cookies, and frostings dramatically cut down prep time.
- Focus on Visual Impact: Simple decorations like candy eyes and gel icing transform basic ingredients into spooky delights.
- Get Kids Involved Safely: Choose tasks like crushing cookies or placing decorations that are fun and low-risk.
- Plan Ahead for Success: Even with easy recipes, a little pre-planning prevents last-minute stress.
People Also Ask About Easy No Fail Halloween Treats
What are some really easy Halloween treats for beginners?
Easy Halloween treats for beginners often involve no-bake options or simple assembly. Look for recipes that use pre-made ingredients like store-bought cookies, donuts, or marshmallows, and focus on simple decorations like candy eyes, sprinkles, or quick frosting techniques. Examples include Monster Rice Krispie Treats, Ghostly Banana Pops, or Vampire Bite Donuts, all of which require minimal culinary skill and deliver impressive results.
How can I make Halloween treats kid-friendly and safe?
To ensure kid-friendly and safe Halloween treats, choose recipes with simple, recognizable shapes and vibrant colors. Involve children in easy tasks like mixing, decorating, or placing toppings. For safety, avoid small, hard candies or nuts that could be choking hazards for very young children. Always supervise kids in the kitchen and clearly label any allergens if serving a group.
What ingredients are essential for spooky Halloween treats?
Essential ingredients for spooky Halloween treats typically include gel food coloring (especially black, green, orange, red), edible googly eyes, various candies (gummy worms, candy corn), chocolate (for melting/dipping), and pre-made bases like Oreos, pretzels, or donuts. These items provide the vibrant colors and creepy elements needed to transform ordinary food into festive Halloween creations.
How far in advance can I prepare homemade Halloween treats?
Many homemade Halloween treats can be prepared 1-3 days in advance, especially no-bake options, cookies, or components like frosting. Store them in airtight containers at room temperature or in the refrigerator, depending on the ingredients. For optimal freshness and visual appeal, some final decorations (like delicate piping or fresh whipped cream) are best added just before serving.
Final Thoughts
Bringing a little spooky magic to your 2026 Halloween party or family gathering doesn’t have to be a nightmare in the kitchen. With these 11 easy, no-fail recipes, you’re equipped to create treats that are both delightfully eerie and delicious, guaranteeing smiles and maybe a few joyful screams. So grab your ingredients, embrace the spirit of the season, and let your creativity (and maybe a little green food coloring) flow!
What’s your go-to “no-fail” Halloween treat? Share your favorites in the comments below
Last update on 2026-06-12 at 11:00 / Affiliate links / Images from Amazon Product Advertising API
