As an Amazon Associate BakingBakewareSets.com earns from qualifying purchases.
11 Genius Unique Halloween Cookie Recipes for 2026
Tired of the same old pumpkin-shaped sugar cookies every October? You want to create spooky, fun treats that genuinely wow your guests and family. It’s frustrating when you can’t find creative ideas that are both impressive and actually achievable.
Enter the world of unique Halloween cookie recipes. These are baked goods that go beyond basic shapes, incorporating creative designs, unexpected flavors, and clever decorating tipss to become the star of your Halloween party. They are your ticket to becoming a holiday baking legend.
Unique Halloween cookie recipes go beyond simple shapes, incorporating creative designs like witch fingers, blood splatter, zombie eyes, or intricate spiderwebs, often with innovative color schemes or flavor combinations. In this guide, you’ll unearth 11 genius, tested recipes that are easy to follow and guaranteed to bewitch everyone who takes a bite. Get ready to bake your most memorable Halloween treats ever.
☰ Table of Contents ▼
show
When it comes to Halloween baking, breaking away from the standard fare can transform your celebration from simple to spooktacular. The key to truly memorable Halloween treats lies in creativity and a willingness to try something new. These curated and tested recipes are designed to be both distinctive and completely achievable, drawing on baking experience to ensure you can impress your guests without the stress. We’re moving beyond simple cut-outs and diving into clever designs, unique textures, and fun themes that capture the playful, spooky spirit of the holiday. Get ready to discover your new favorite Halloween tradition.
Looking for truly unique Halloween cookie recipes? This guide presents 11 genius ideas, from eerie Witch Finger Cookies to whimsical Meringue Ghosts and clever Blood Splatter Shortbread. Each recipe offers step-by-step instructions for creative, spooky, and delicious treats that cater to different tastes and skill levels. We’ve developed and tested each concept to ensure you get unique results, providing practical tips derived from extensive baking experience to help you overcome common challenges and create something truly special for your Halloween party.
Pin this genius tips to your ‘Dream Halloween’ board!
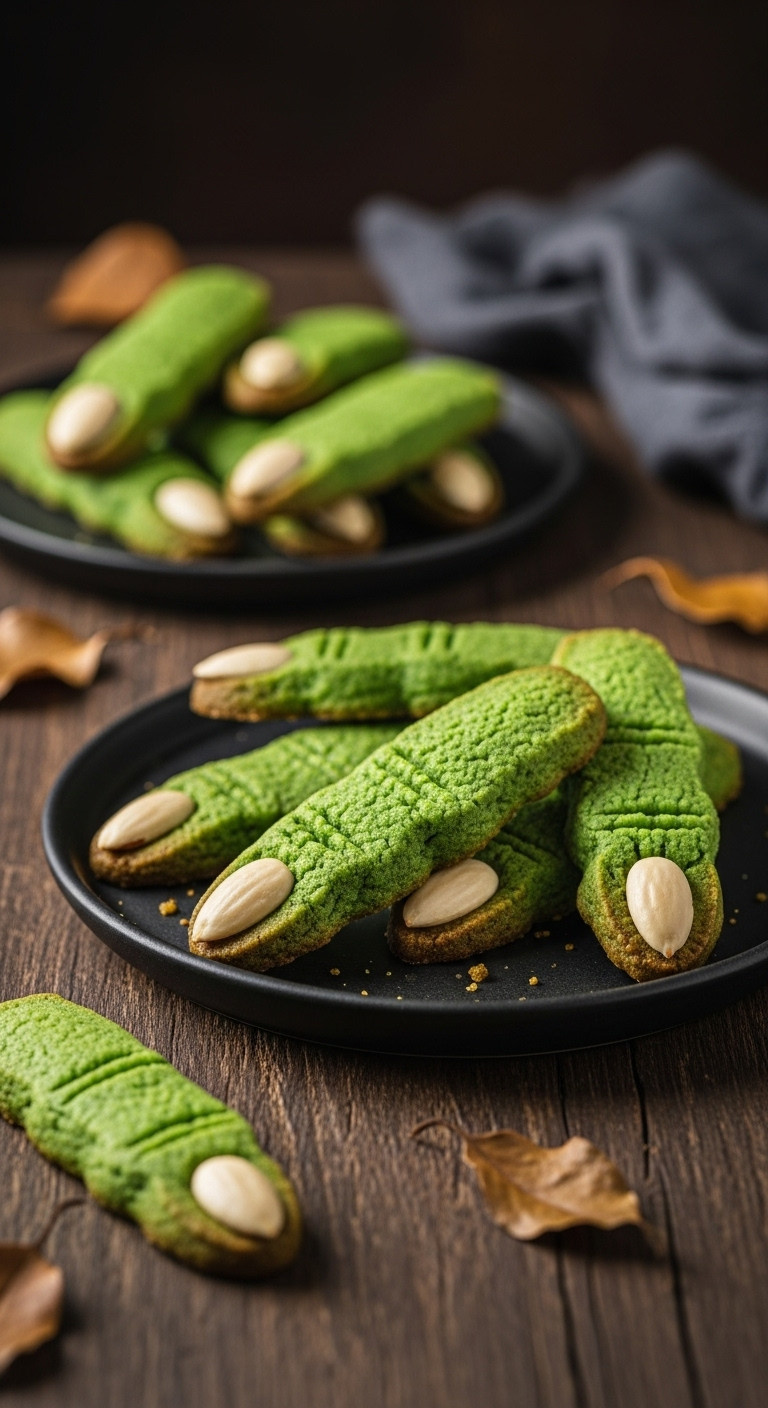
These buttery, crumbly shortbread cookies are a Halloween classic for a reason. Their spooky, realistic appearance makes them a standout treat at any party, and the almond “fingernail” adds a delightful crunch.
Ingredients Needed:
- 1 cup (2 sticks) unsalted butter, softened
- 1 cup powdered sugar
- 1 teaspoon vanilla extract
- 1/2 teaspoon almond extract
- 2 1/4 cups all-purpose flour
- 1/2 teaspoon salt
- Green gel food coloring (e.g., Wilton Leaf Green)
- 50-60 whole blanched almonds (for fingernails)
- Red gel food coloring (for “blood” if desired)
Step-by-Step Instructions:
- In a large bowl, cream together softened butter and powdered sugar until light and fluffy. Beat in vanilla and almond extracts.
- In a separate bowl, whisk together flour and salt. Gradually add the dry ingredients to the wet ingredients, mixing until just combined and a soft dough forms.
- Add green gel food coloring gradually, mixing until desired “witchy” green color is achieved. Avoid overmixing.
- Divide dough into 4 sections. Roll each section into a log, then cut into 1 1/2-inch pieces. Roll each piece into a 3-4 inch “finger” shape, pinching one end slightly for the knuckle.
- Press a blanched almond onto one end of each finger to create the “fingernail.” Using a sharp knife, make small indentations near the center to mimic knuckles.
- Chill cookies on a baking sheet lined with parchment paper for at least 30 minutes to prevent spreading.
- Preheat oven to 350°F (175°C). Bake chilled cookies for 10-12 minutes, or until edges are lightly golden.
- Carefully remove from oven and let cool completely on a wire rack. For an extra creepy touch, dab a tiny bit of red gel food coloring under the “nail” with a toothpick for “blood.”
Pro-Tip: For extra realistic knuckles, gently bend the finger shape slightly before baking. The chilling step is crucial to maintain the finger’s intricate shape.
Save this clever organization idea!
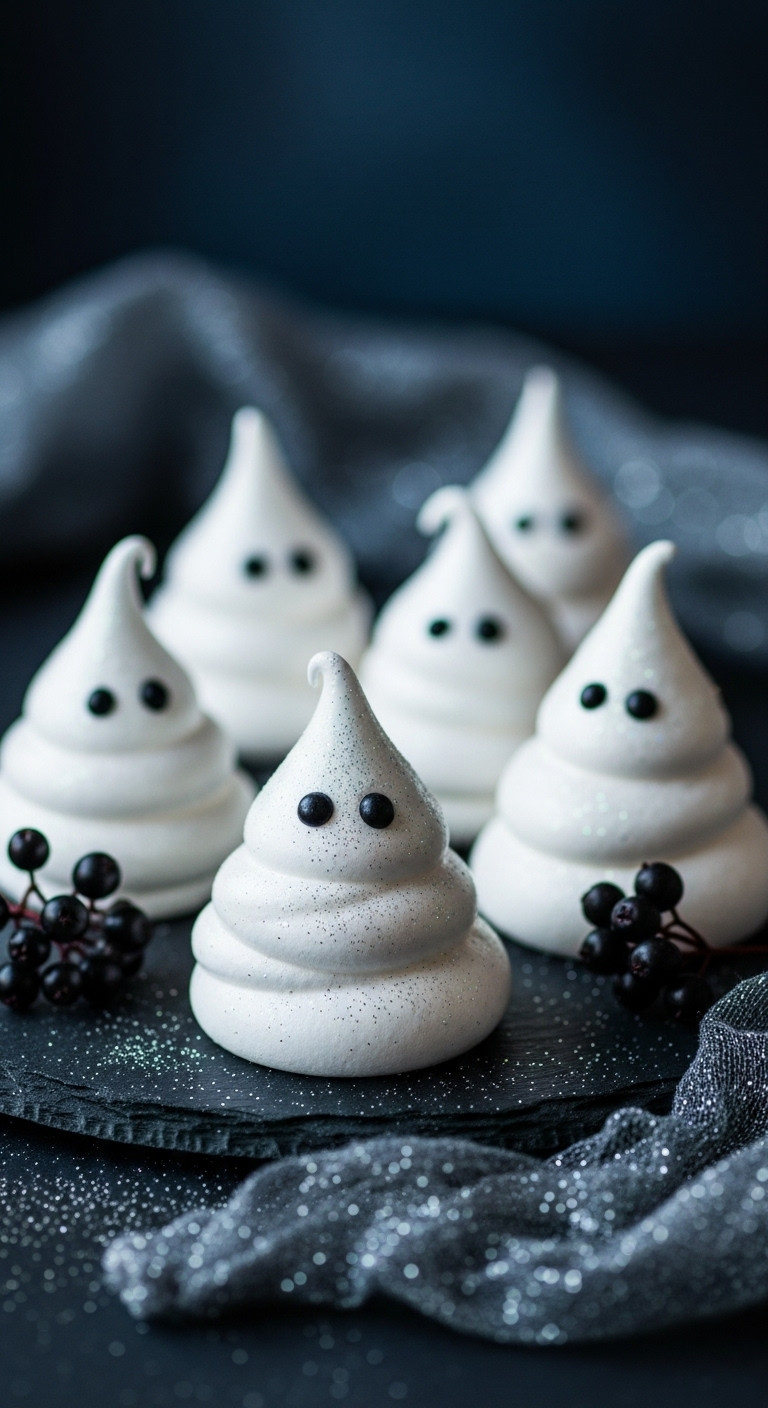
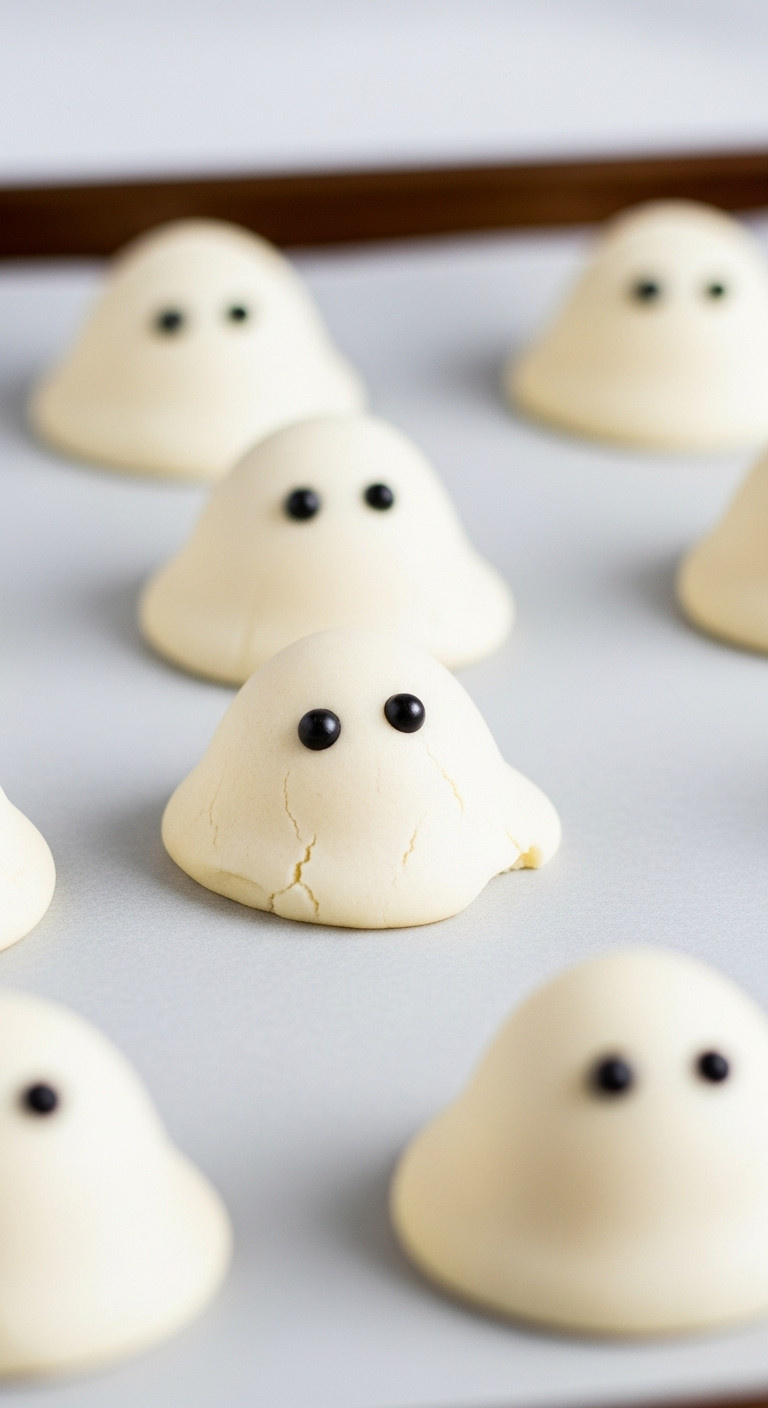
These light, airy, and crisp meringue cookies melt in your mouth. The addition of edible glitter gives them a magical, ethereal quality that elevates them from simple ghost treats to an elegant Halloween dessert.
Ingredients Needed:
- 4 large egg whites, at room temperature
- 1 cup granulated sugar
- 1/2 teaspoon cream of tartar (optional, helps stabilize meringue)
- 1/2 teaspoon vanilla extract
- Black edible marker or small candy eyes
- Edible silver luster dust or glitter (optional)
- Small, clean paintbrush (for luster dust)
Step-by-Step Instructions:
- Preheat oven to 200°F (95°C). Line two baking sheets with parchment paper.
- Ensure your mixing bowl and whisk attachment are completely clean and free of grease (this is crucial for meringue success).
- In the clean bowl, whisk egg whites on medium speed until foamy. Add cream of tartar (if using).
- Gradually add granulated sugar, about one tablespoon at a time, while continuing to whisk on high speed. Once all sugar is added, beat until stiff, glossy peaks form. Mix in vanilla extract.
- Transfer meringue to a large piping bag fitted with a large round tip (e.g., Wilton 1A or 1M).
- Pipe 2-inch tall ghost shapes onto the prepared baking sheets, swirling slightly at the top to create a “head.”
- Bake for 60-90 minutes, or until the meringues are firm and dry. Turn off the oven, prop the door open slightly, and let the meringues cool completely in the oven (at least 1 hour, or overnight). This prevents cracking.
- Once cool, use a black edible marker to draw two small eyes on each ghost. Alternatively, attach small candy eyes with a tiny dot of royal icing or melted chocolate.
- For an ethereal shimmer, lightly brush edible silver luster dust or glitter onto the ghosts using a clean, dry paintbrush.
Pro-Tip: Humidity is the enemy of meringue! Make these on a dry day, and store them in an airtight container at room temperature away from moisture.

Get ready for compliments with this blood-curdling idea!
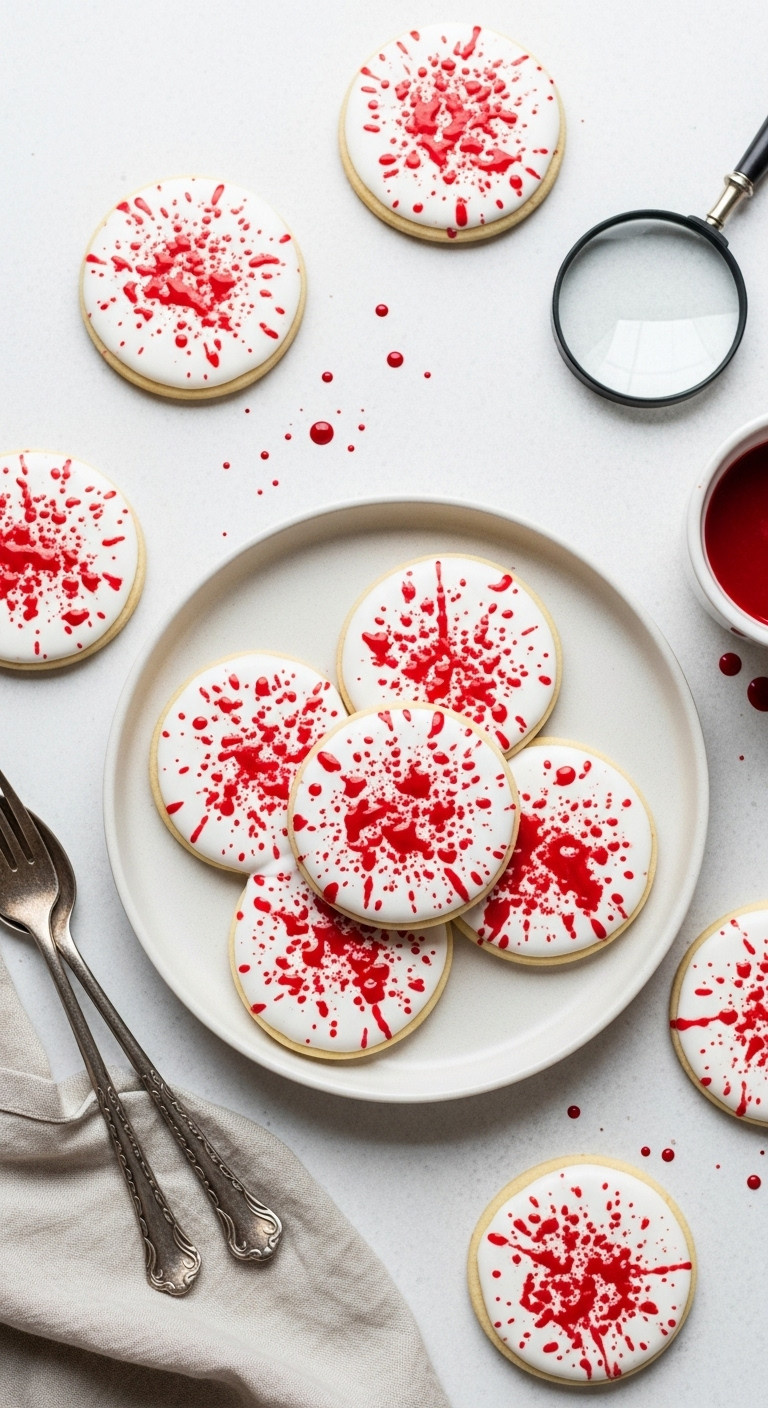
For a truly unique and scary Halloween treat, these blood splatter cookies are deceptively easy to make but deliver a huge visual impact. The crisp, white royal icing serves as the perfect canvas for the gory, random splatters.
Ingredients Needed:
- 1 batch no-spread sugar cookies (pre-baked and cooled)
- 1 batch royal icing (white, medium consistency for flooding)
- Red gel food coloring
- 1-2 tablespoons clear vanilla extract or vodka (for thinning red food coloring)
- Small, clean paintbrush or new toothbrush
- Parchment paper or newspaper to protect work surface
Step-by-Step Instructions:
- Prepare your no-spread sugar cookie dough. Roll out and cut into desired shapes (simple circles, rectangles, or even ghost shapes work best). Bake according to your recipe and let cool completely.
- Prepare white royal icing to a medium consistency, suitable for outlining and flooding cookies. Outline and flood each cookie with white icing and allow to dry completely (at least 6-8 hours, or overnight). The surface should be hard.
- Once the white icing is completely dry, prepare your “blood” splatter. In a small bowl, mix a few drops of red gel food coloring with 1-2 tablespoons of clear vanilla extract or vodka until you get a thin, paint-like consistency. The more liquid, the more ‘splattery’ it will be.
- Lay out plenty of parchment paper or newspaper to protect your work surface. Place the fully dried white-iced cookies on the protected surface.
- Dip your clean paintbrush or new toothbrush into the red “blood” mixture. Hold the brush/toothbrush over a cookie and gently tap it with your finger, flicking the bristles to create random splatters. Vary the distance and force for different splatter patterns.
- Repeat for all cookies, reloading your brush/toothbrush as needed. Let the “blood” splatters dry completely before handling or stacking.
Pro-Tip: Practice your splatter technique on a piece of parchment paper first to get a feel for how the ‘blood’ spreads. Wear old clothes or an apron!
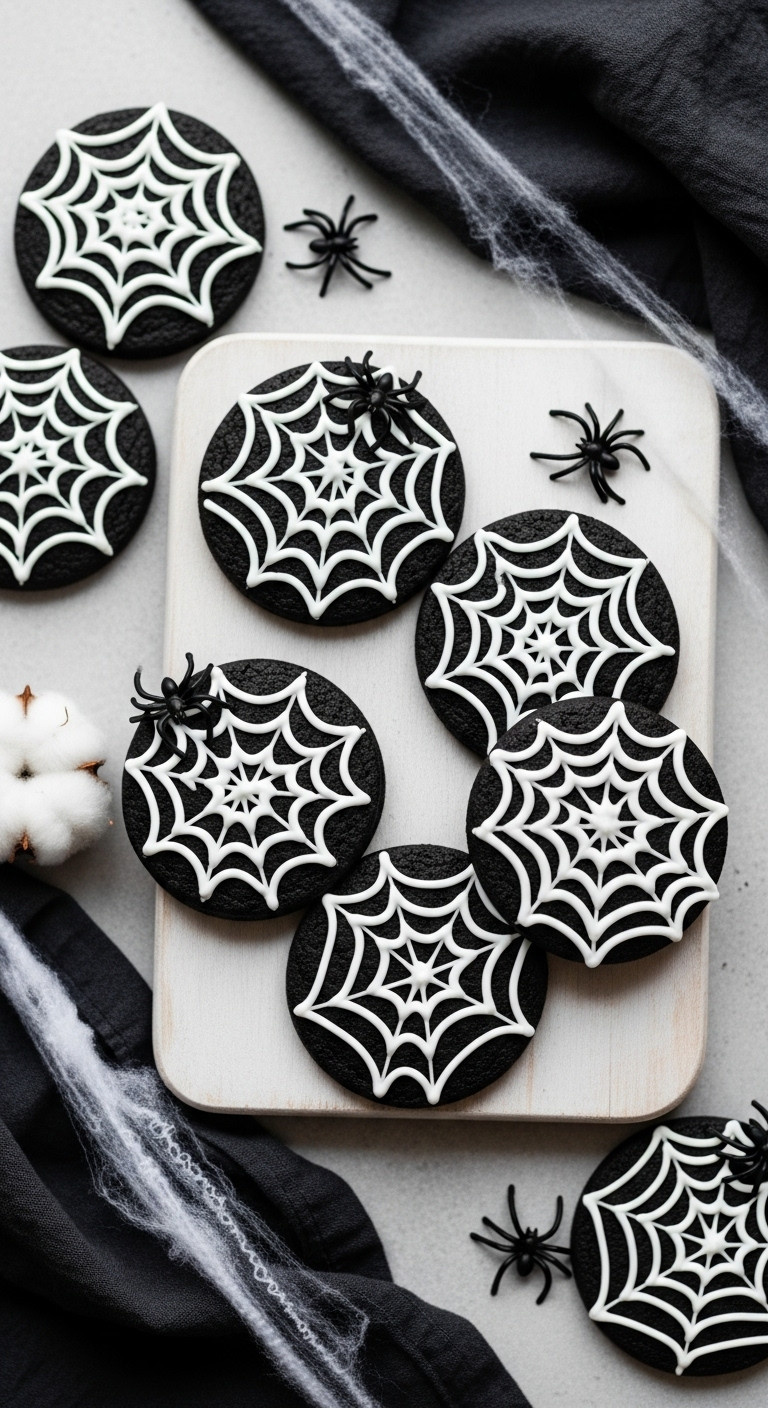
These cookies are a web of deliciousness! Save now!
These rich, chocolatey cookies get their deep, dark color from black cocoa powder, creating a stunning contrast with the intricate white royal icing spiderweb. They are a classic, sophisticated, and spooky addition to any Halloween celebration.
Ingredients Needed:
- 1 cup (2 sticks) unsalted butter, softened
- 1 1/2 cups granulated sugar
- 2 large eggs
- 1 teaspoon vanilla extract
- 2 1/4 cups all-purpose flour
- 3/4 cup black cocoa powder (e.g., King Arthur Baking)
- 1 teaspoon baking soda
- 1/2 teaspoon salt
- White royal icing (medium consistency for flooding, thin for piping)
- Small edible black spiders (optional)
Step-by-Step Instructions:
- In a large bowl, cream together softened butter and granulated sugar until light and fluffy. Beat in eggs one at a time, then stir in vanilla extract.
- In a separate bowl, whisk together flour, black cocoa powder, baking soda, and salt. Gradually add the dry ingredients to the wet ingredients, mixing until just combined and a dark dough forms.
- Divide dough in half, flatten into discs, wrap in plastic, and chill for at least 1 hour (or up to overnight).
- Preheat oven to 375°F (190°C). Roll out chilled dough on a lightly floured surface to 1/4-inch thickness. Cut into circles (or spider shapes if desired).
- Place cookies on baking sheets lined with parchment paper. Bake for 8-10 minutes, or until edges are set. Let cool completely on a wire rack.
- Prepare white royal icing. Outline the circular cookies with medium-consistency white icing. Then, immediately flood the interior with slightly thinner white icing. Use a scribe tool or toothpick to gently spread the icing to the edges. Let dry completely (6-8 hours).
- Once the white icing is dry, prepare a small amount of black royal icing (using black gel food coloring) to a thin piping consistency. Pipe 3-4 concentric circles on top of the white icing.
- Immediately, while the black icing is still wet, use a toothpick or scribe tool to drag lines from the center of the cookie outwards, creating the spiderweb effect. Repeat for all cookies.
- If using, place a small edible black spider on the web while the icing is still slightly wet to adhere. Allow to dry completely.
Pro-Tip: Using black cocoa powder gives a naturally dark, rich cookie without needing excessive food coloring. For perfect circles, use a round cookie cutter and ensure your dough is evenly chilled.

5. Whimsical Mummy Oatmeal Cream Pies
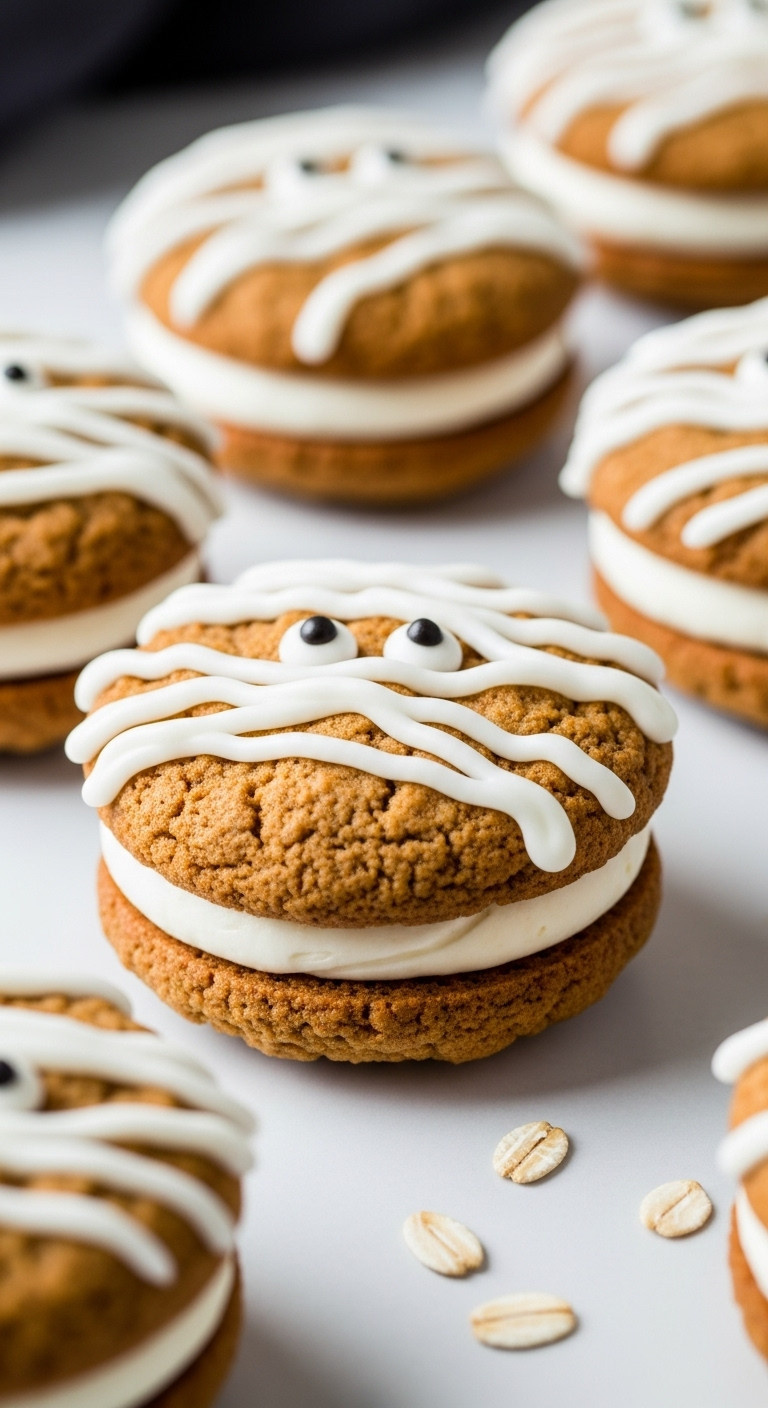
These mummy treats are too cute to SPOOK! Pin it!
This recipe offers a delicious and unique twist on a beloved classic. Soft, chewy oatmeal cookies are sandwiched with a sweet, creamy filling and decorated to look like adorable mummies, making them a perfect kid-friendly Halloween dessert.
Ingredients Needed:
- For Cookies:
- 1 cup (2 sticks) unsalted butter, softened
- 1 cup packed light brown sugar
- 1/2 cup granulated sugar
- 2 large eggs
- 1 teaspoon vanilla extract
- 1 1/2 cups all-purpose flour
- 1 teaspoon baking soda
- 1/2 teaspoon salt
- 1 1/2 cups old-fashioned rolled oats
- For Filling:
- 1/2 cup (1 stick) unsalted butter, softened
- 1/2 cup shortening (or all butter for richer taste)
- 3 cups powdered sugar
- 1 teaspoon vanilla extract
- 2-3 tablespoons milk or heavy cream
- Decorating:
- Small candy eyes
Step-by-Step Instructions:
- Preheat oven to 350°F (175°C). Line baking sheets with parchment paper.
- Make Cookies: In a large bowl, cream together butter, brown sugar, and granulated sugar until light and fluffy. Beat in eggs one at a time, then vanilla.
- In a separate bowl, whisk together flour, baking soda, and salt. Gradually add the dry ingredients to the wet, mixing until just combined. Stir in rolled oats.
- Drop dough by rounded tablespoons onto prepared baking sheets, leaving space between each. Bake for 10-12 minutes, or until edges are golden brown and centers are set. Let cool on baking sheets for 5 minutes before transferring to a wire rack to cool completely.
- Make Filling: In a large bowl, beat softened butter and shortening until creamy. Gradually add powdered sugar, mixing until well combined. Beat in vanilla extract and milk/cream until light and fluffy.
- Assemble Mummies: Match cooled cookies into pairs of similar size. Spread a generous amount of filling onto the flat side of one cookie, then top with the second cookie, pressing gently to form a sandwich.
- Transfer remaining filling to a piping bag fitted with a small round tip (or simply snip off the corner of a Ziploc bag). Pipe thin, horizontal lines across the top of each cookie sandwich, creating a “bandaged” mummy effect. Leave a small gap at the top center for the eyes.
- Carefully place two candy eyes in the gap, pressing gently to adhere. Allow filling to set before stacking or storing.
Pro-Tip: Don’t overbake the oatmeal cookies; they should be soft and chewy. For neater mummy “bandages,” ensure your filling is a firm, pipeable consistency.

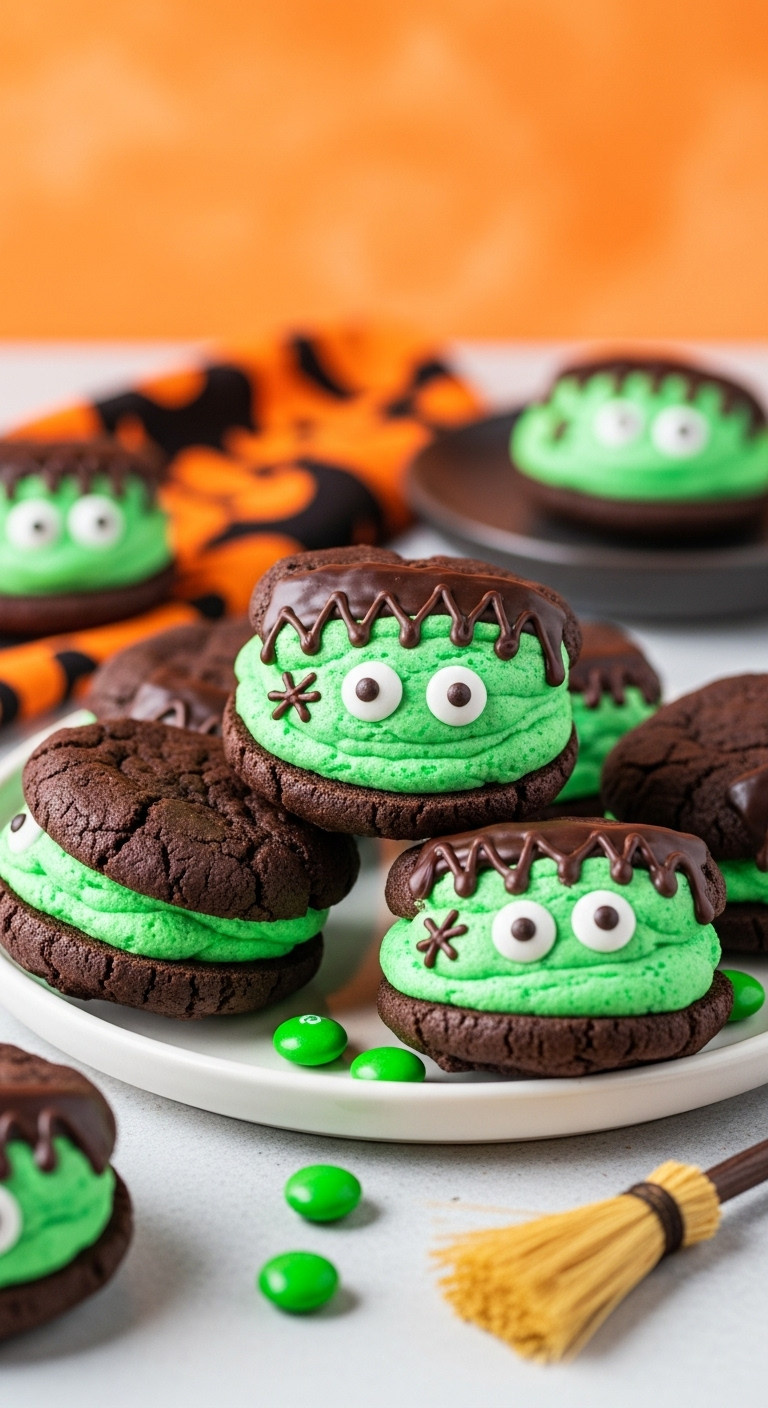
Bring Frankenstein to your party! Save this recipe now!
These fun, stuffed chocolate cookies are brought to life with a vibrant green cream cheese filling. Decorated with candy eyes and chocolate “stitches,” they are a creative and delicious tribute to Frankenstein’s monster that will appeal to both kids and adults.
Ingredients Needed:
- For Chocolate Cookies:
- 1 cup (2 sticks) unsalted butter, softened
- 1 1/2 cups granulated sugar
- 2 large eggs
- 1 teaspoon vanilla extract
- 2 cups all-purpose flour
- 3/4 cup unsweetened cocoa powder
- 1 teaspoon baking soda
- 1/2 teaspoon salt
- For Green Filling:
- 4 oz cream cheese, softened
- 1/2 cup (1 stick) unsalted butter, softened
- 2 cups powdered sugar
- 1/2 teaspoon vanilla extract
- Green gel food coloring
- For Decoration:
- Small candy eyes
- Black gel food coloring (optional, for “stitches”) or melted chocolate
Step-by-Step Instructions:
- Preheat oven to 350°F (175°C). Line baking sheets with parchment paper.
- Make Chocolate Cookies: In a large bowl, cream together butter and granulated sugar until light and fluffy. Beat in eggs one at a time, then vanilla.
- In a separate bowl, whisk together flour, cocoa powder, baking soda, and salt. Gradually add dry ingredients to wet, mixing until just combined.
- Drop dough by rounded tablespoons onto prepared baking sheets. Bake for 10-12 minutes. Let cool on baking sheets for 5 minutes, then transfer to a wire rack to cool completely.
- Make Green Filling: In a medium bowl, beat softened cream cheese and butter until smooth. Gradually add powdered sugar, then vanilla extract, mixing until fluffy.
- Add green gel food coloring until a vibrant Frankenstein green is achieved.
- Assemble & Decorate: Once cookies are completely cool, match them into pairs. Spread a generous amount of green filling onto the flat side of one cookie, then top with another, gently pressing to create a sandwich.
- Attach two candy eyes to the top of each “monster.” For stitches, melt a small amount of chocolate chips and drizzle lines across the forehead, or use black gel food coloring with a fine brush.
Pro-Tip: For perfectly round cookies, slightly chill the dough before baking. Ensure the cookies are fully cooled before adding the cream cheese filling to prevent melting.
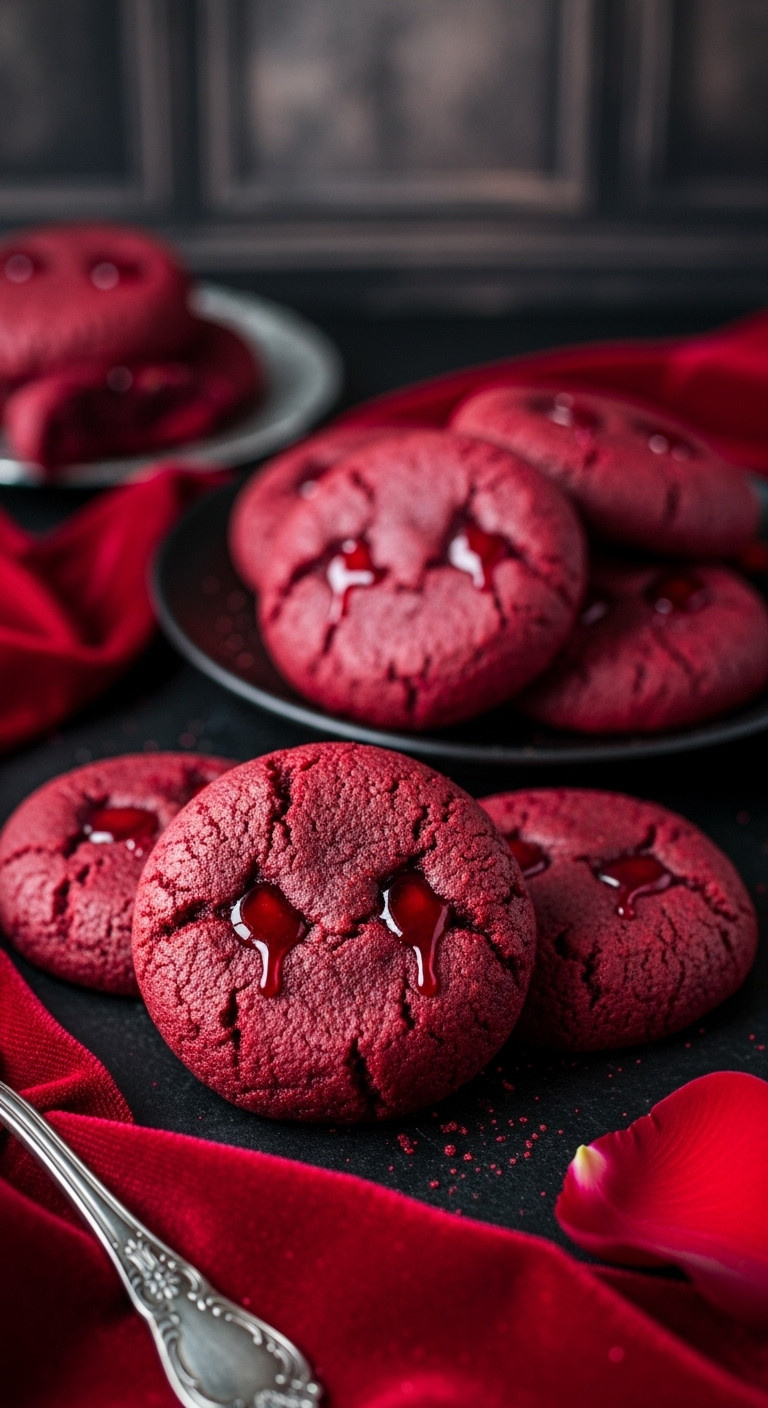
Take a bite out of these unique vampire treats! Save now!
These rich, soft red velvet cookies offer a dramatic and elegant Halloween treat. Two simple indentations filled with a glossy red “blood” glaze transform them into a sinister yet sophisticated dessert perfect for any vampire-themed party.
Ingredients Needed:
- For Red Velvet Cookies:
- 1 1/4 cups all-purpose flour
- 1/4 cup unsweetened cocoa powder
- 1 teaspoon baking soda
- 1/4 teaspoon salt
- 1/2 cup (1 stick) unsalted butter, softened
- 3/4 cup granulated sugar
- 1 large egg
- 1 teaspoon vanilla extract
- 1 tablespoon milk
- 1 tablespoon apple cider vinegar
- 1 teaspoon red gel food coloring (or more for deep red)
- For “Blood” Glaze:
- 1 cup powdered sugar
- 2-3 tablespoons milk
- Red gel food coloring
Step-by-Step Instructions:
- Preheat oven to 375°F (190°C). Line baking sheets with parchment paper.
- Make Red Velvet Cookies: In a medium bowl, whisk together flour, cocoa powder, baking soda, and salt.
- In a large bowl, cream softened butter and granulated sugar until light and fluffy. Beat in the egg and vanilla extract.
- In a small bowl, combine milk, apple cider vinegar, and red gel food coloring. Add to the wet ingredients and mix until well combined and a deep red color.
- Gradually add the dry ingredients to the wet ingredients, mixing until just combined to form a soft dough.
- Drop dough by rounded tablespoons onto prepared baking sheets. Bake for 8-10 minutes, or until edges are set. Use the back of a spoon to gently create two indentations on each warm cookie (these will be your “bite” marks). Let cool completely on a wire rack.
- Make “Blood” Glaze: In a small bowl, whisk powdered sugar and 2 tablespoons of milk until smooth. Add red gel food coloring until a dark, glossy red is achieved. Add more milk sparingly if needed for a pourable consistency.
- Using a small spoon or piping bag, fill the two indentations on each cooled cookie with the “blood” glaze. Let the glaze set for at least 30 minutes before handling or stacking.
Pro-Tip: The apple cider vinegar reacts with the baking soda to give red velvet its signature texture and helps enhance the red color. Ensure your food coloring is a deep red gel for the best “blood” effect.

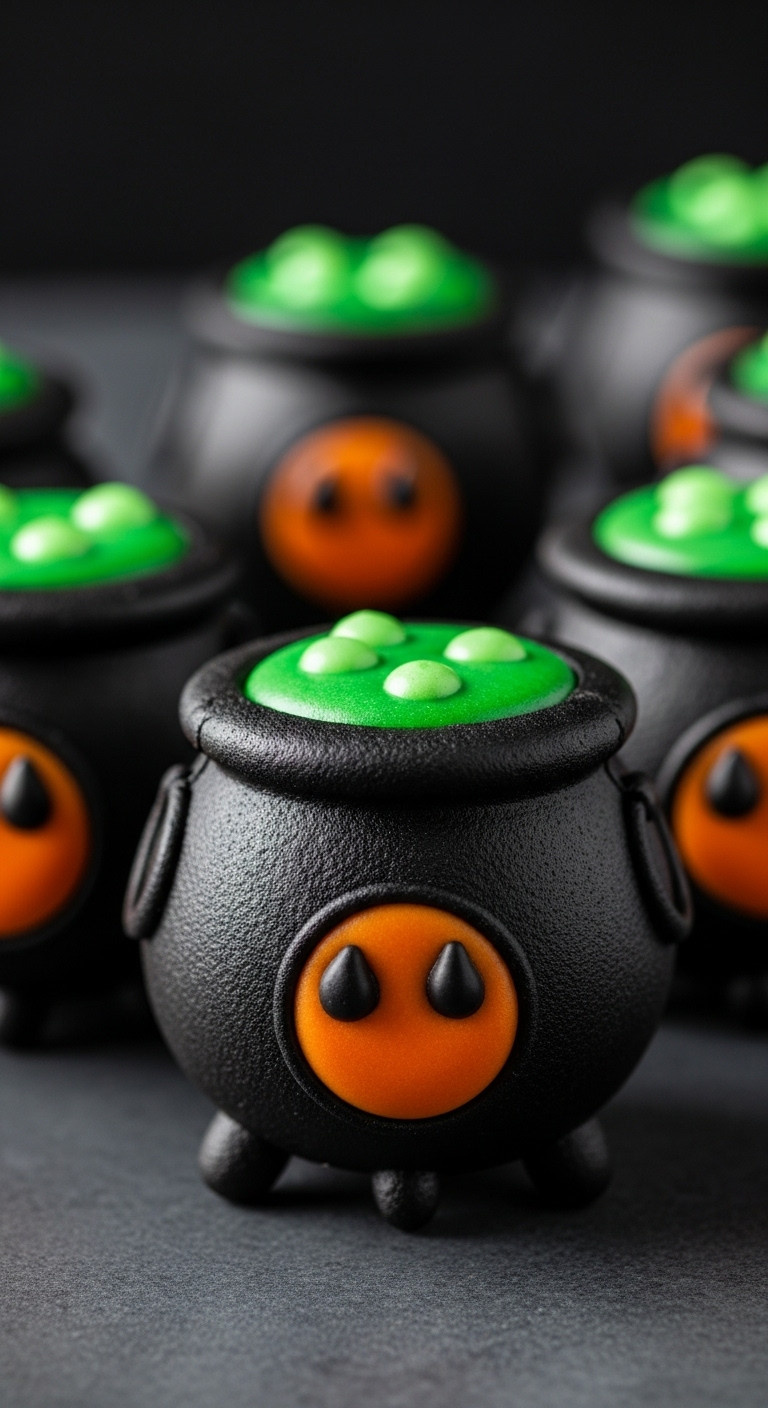
Cast a spell of deliciousness! Save this magical recipe!
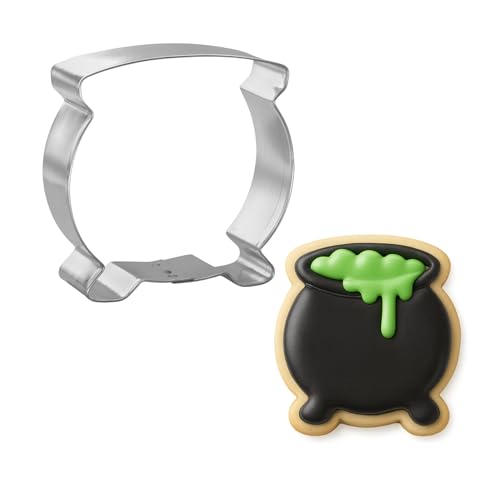
Create a truly magical effect with these cauldron cookies. The deep black cocoa cookie base holds a “glowing” center of melted hard candy, creating a stunning sugar glass effect that looks like a bubbling potion.
Ingredients Needed:
- 1 batch black cocoa sugar cookie dough (from Spiderweb recipe above, chilled)
- Hard candies (e.g., Jolly Ranchers or clear lollipops), separated by color (green or purple recommended)
- Cauldron-shaped cookie cutter (or a circle cutter and small rectangle for handles)
- Small edible sprinkles or nonpareils (for “bubbles” in the brew)
Step-by-Step Instructions:
- Preheat oven to 350°F (175°C). Line baking sheets with parchment paper.
- Roll out chilled black cocoa cookie dough to 1/4-inch thickness. Cut out cauldron shapes using a cookie cutter.
- Using a small round cutter or the back of a piping tip, cut out a circle from the center of each cauldron cookie – this will be where your “brew” goes. If making handles, attach small dough rectangles to the sides.
- Place the cauldron cookie cut-outs on prepared baking sheets.
- Unwrap hard candies and place them in a heavy-duty freezer bag. Crush them into small pieces using a rolling pin or meat mallet.
- Fill the hole in the center of each cookie with a single layer of crushed hard candies. You can add a few edible sprinkles on top of the crushed candy for “bubbles.”
- Bake for 8-10 minutes, or until the cookie edges are set and the candies have completely melted and become smooth.
- Carefully remove from oven. Let cool on the baking sheet for at least 15-20 minutes until the melted candy has completely hardened and cooled. Then, transfer to a wire rack.
Pro-Tip: Ensure the hard candies are crushed into small, even pieces for consistent melting. Don’t touch the melted candy while hot—it’s extremely sticky and can cause burns.
Watch these ghosts disappear (into your mouth)! Pin this fun idea!
This playful recipe offers a humorous visual twist on a classic ghost cookie. By intentionally letting some cookies spread and “melt” on the baking sheet, you create a fun “disappearing act” that’s sure to get a laugh.
Ingredients Needed:
- 1 batch standard sugar cookie dough (one that will spread a little for the “melted” effect)
- Ghost-shaped cookie cutter
- White royal icing or melted white chocolate
- Small candy eyes
Step-by-Step Instructions:
- Preheat oven to 350°F (175°C). Line baking sheets with parchment paper.
- Prepare a standard sugar cookie dough (one that is known to spread slightly, or don’t chill it as long). Roll out the dough to 1/4-inch thickness.
- Cut out ghost shapes using a cookie cutter. Place them on the prepared baking sheets, leaving a little extra space between them.
- For the “disappearing” effect, you’ll bake some ghosts normally and others for slightly longer, or gently press down on some before they are fully baked.
- Bake for 8-12 minutes. For a “disappearing” effect, you can bake some for the shorter time and remove, then for others, let them bake for an extra 2-3 minutes or until they start to flatten and spread slightly at the base, creating a “melted” look. You can also gently press the top of the ghosts with the back of a spoon halfway through baking to encourage spreading.
- Let the cookies cool completely on a wire rack.
- Once cool, if using royal icing, outline and flood the cookies white and let dry completely. If using melted white chocolate, simply dip the cookies or spread it on.
- While the white icing or chocolate is still wet (or immediately after applying), place two small candy eyes near the top of each ghost. The “melted” ones will look like they’re sinking!
Pro-Tip: This recipe is forgiving! Embrace the spread for the “melted” effect. If your dough is too “no-spread,” try adding a tiny bit more butter or not chilling as long.
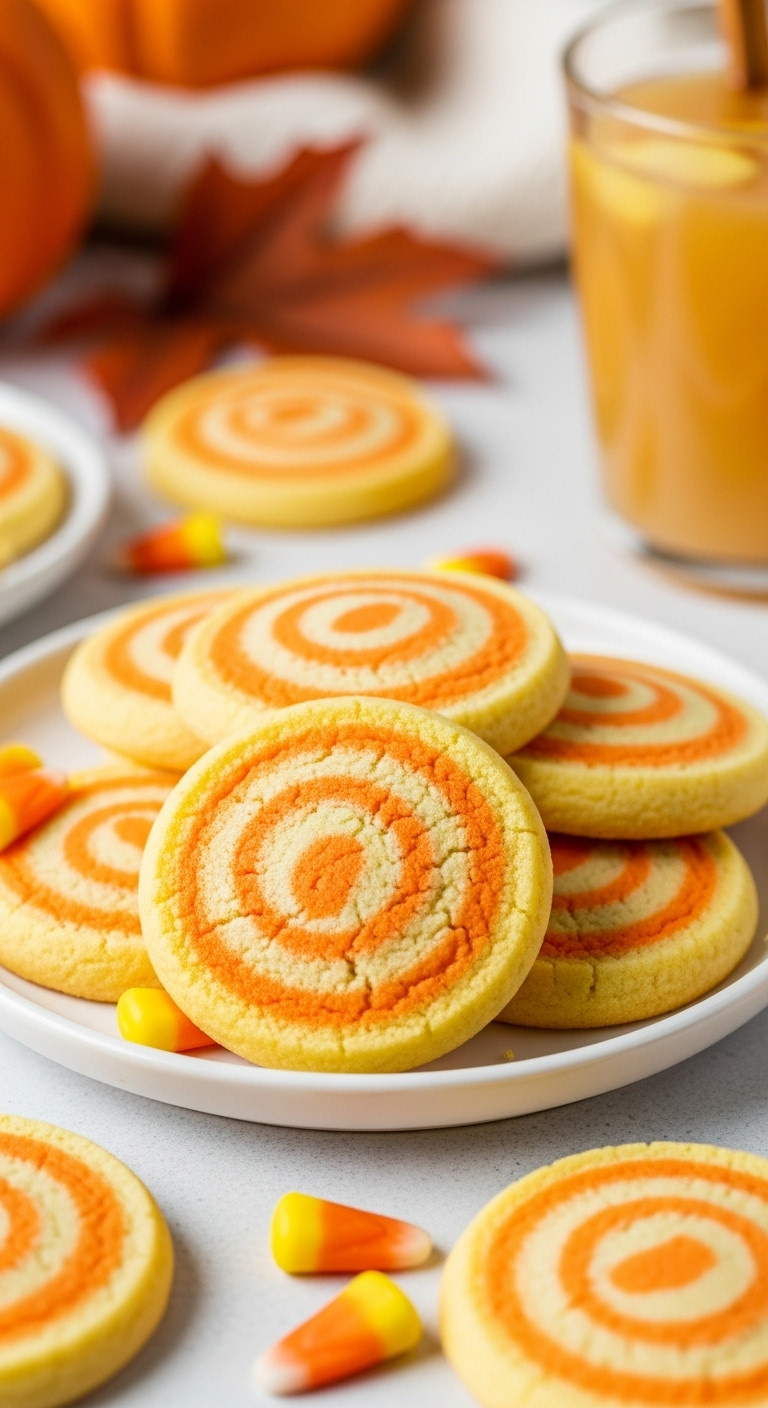
Swirls of sweetness! Pin this colorful cookie idea!
Capture the iconic colors of Halloween’s most divisive candy in a delicious sugar cookie. By layering and rolling colored doughs, you can create a beautiful swirl pattern that’s festive, colorful, and far more crowd-pleasing than actual candy corn.
Ingredients Needed:
- 1 batch no-spread sugar cookie dough (prepare this, then divide into three portions)
- Yellow gel food coloring
- Orange gel food coloring
Step-by-Step Instructions:
- Prepare your favorite no-spread sugar cookie dough. Divide the dough into three equal portions. Leave one portion plain (white).
- To the second portion, add yellow gel food coloring and mix until a vibrant yellow is achieved.
- To the third portion, add orange gel food coloring and mix until a bright orange is achieved.
- Flatten each colored dough portion into a rectangle (approximately 6×8 inches) and chill for 15-20 minutes.
- Once chilled, stack the three rectangles of dough on top of each other: white on the bottom, then orange, then yellow on top. Gently press them together.
- Roll the stacked dough layers into a tight log, starting from one of the longer sides. Wrap the log tightly in plastic wrap and chill for at least 1 hour (or up to overnight) until firm.
- Preheat oven to 375°F (190°C). Line baking sheets with parchment paper.
- Unwrap the chilled dough log. Using a sharp knife, slice the log into 1/4-inch thick rounds. Place cookies on prepared baking sheets.
- Bake for 8-10 minutes, or until edges are lightly golden and cookies are set. Let cool on baking sheets for 5 minutes before transferring to a wire rack to cool completely.
Pro-Tip: Ensure your dough is properly chilled at each step; this is crucial for maintaining distinct color layers and preventing excessive spreading.

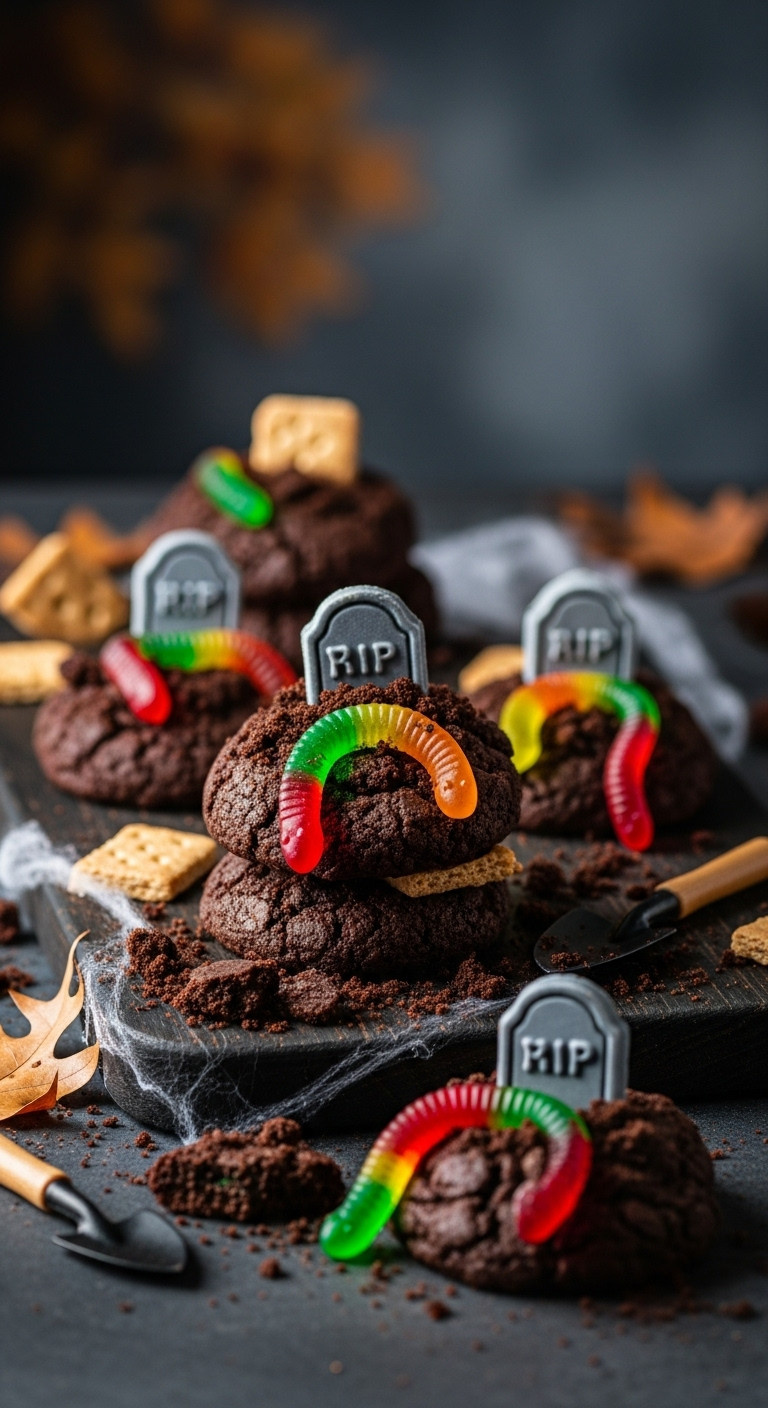
Dig into these deliciously spooky cookies! Pin for your next Halloween party!
This is less a single cookie and more of a fun, interactive dessert experience. Crumbled chocolate cookies create a “grave dirt” base from which colorful gummy worms emerge, offering a delightfully ghoulish treat that’s perfect for a party.
Ingredients Needed:
- 1 batch of your favorite chocolate cookies (e.g., chocolate sugar cookies or rich chocolate drop cookies), baked and cooled
- 1/2 cup chocolate frosting (store-bought or homemade)
- 1 package gummy worms
- Optional: Small chocolate wafer cookies or graham crackers (for “tombstones”), black edible marker
Step-by-Step Instructions:
- Bake your chosen chocolate cookies according to their recipe. Allow them to cool completely.
- Once cooled, use a food processor or a Ziploc bag and rolling pin to crush the chocolate cookies into “dirt” crumbs. You want a mix of fine crumbs and slightly larger pieces for texture.
- If making tombstones: Using a black edible marker, write “RIP” or other spooky messages on small chocolate wafer cookies or graham crackers.
- Spread a thin layer of chocolate frosting onto a serving plate or individual dessert cups/ramekins. This will act as the “glue” for your grave dirt.
- Sprinkle a generous layer of the chocolate cookie crumbs (“grave dirt”) over the frosting, pressing gently so it adheres.
- Arrange gummy worms on top of the “grave dirt,” poking some partially into the crumbs to make them look like they’re crawling out of the ground.
- If using, stand the “tombstones” upright in the “grave dirt” by pressing them gently into the crumbs or a small dab of frosting.
- Serve immediately or chill for a short period.
Pro-Tip: For extra rich “grave dirt,” use a mix of chocolate cookies and crushed Oreo cookies (without the cream filling).

Creating unique Halloween cookies is all about combining a solid baking foundation with a dash of spooky creativity. To ensure your treats are the talk of the party, keep these core principles in mind.
* Choose a unique theme: Go beyond basic shapes with creative concepts like “witch fingers” or “blood splatter.”
* Master decorating basics: Practice royal icing consistencies for clean outlines and smooth floods.
* Incorporate clever twists: Use edible glitter, sugar glass, or unexpected fillings to elevate standard cookies.
* Embrace contrasting colors: Dark cookies with vibrant icing or bright candies create visual impact.
* Plan ahead: Chill dough thoroughly and allow ample drying time for decorated cookies.
Unique Halloween cookies often feature innovative designs, unexpected flavor combinations, or clever visual tricks that go beyond simple pumpkin or ghost cut-outs. This includes cookies that tell a story (like a grave dirt scene), incorporate advanced decorating techniques like sugar glass or blood splatters, or use creative twists on classic recipes like Frankenstein-stuffed cookies. The goal is to surprise and delight with distinctive visual impact and taste.
Beginners can achieve impressive unique designs by focusing on simpler base cookies and mastering a few key decorating tipss. Utilize pre-made items like candy eyes or gummy worms, choose techniques like simple frosting “bandages” for mummies, or try the “blood splatter” method which is more about technique than precision. Gel food coloring provides vibrant hues with minimal effort. Don’t be afraid to embrace charming imperfections!
No-spread sugar cookie dough and shortbread dough are generally the best choices for maintaining intricate unique Halloween shapes. These doughs are designed to hold their form during baking, preventing spreading that can distort details like witch fingers or delicate cauldron handles. Ensure the dough is thoroughly chilled before baking for optimal results.
To prevent cookies from spreading, ensure your butter is cold, don’t overmix the dough, and chill the cut-out shapes thoroughly before baking. For icing bleeding, allow each layer of royal icing to dry completely (several hours) before applying the next. If colors still bleed, a small amount of clear vanilla extract or vodka in your food coloring can help the color dry faster and set more vibrantly.
Beyond vanilla and chocolate, consider adding unique flavor combinations like spiced pumpkin, black sesame for a striking dark color, or even a hint of cardamom or cayenne pepper for an unexpected kick. Matcha can create an eerie green hue with an earthy flavor, while a touch of espresso powder can deepen chocolate flavors, adding a sophisticated twist to your spooky treats.
Final Thoughts
This Halloween, dare to ditch the ordinary and embrace the extraordinary with these 11 genius unique cookie recipes. Each idea offers a chance to infuse your celebrations with creativity, flavor, and a touch of spooky fun, guaranteeing smiles and gasps of delight from all your guests. From gory and ghoulish to whimsical and wonderful, your baking will be the talk of the season.
Which of these unique Halloween cookie recipes will you conjure up first this 2026? Share your spooktacular creations in the comments below
Last update on 2026-06-20 at 12:01 / Affiliate links / Images from Amazon Product Advertising API
