As an Amazon Associate BakingBakewareSets.com earns from qualifying purchases.
A Proven Thanksgiving Timeline And Recipes For A Crowd
Feeling that familiar pre-holiday panic? You’re not alone. The joy of hosting a big Thanksgiving can quickly get buried under a mountain of to-do lists and timing charts.
A Thanksgiving meal for a crowd is a massive project, but it doesn’t have to be stressful. The secret isn’t about working harder in the kitchen; it’s about having a smarter, proven plan that breaks the work into manageable pieces.
The key to a stress-free Thanksgiving is a detailed 4-day prep timeline. By choosing make-ahead recipes and planning your schedule, you can minimize day-of cooking and actually enjoy the holiday you’ve worked so hard to create. This guide will give you the exact timeline and foolproof recipes to make it happen.
☰ Table of Contents ▼
show
Feeling Overwhelmed by Hosting a Big Thanksgiving? Here’s Your Stress-Free Plan.
The vision is beautiful: a table filled with delicious food, surrounded by family and friends. The reality of getting there, however, can feel like a high-stakes culinary puzzle. Juggling oven space, coordinating cooking times, and wondering if you’ve made enough food is enough to create serious holiday anxiety. But it absolutely doesn’t have to be this way.
After years of hosting for 20+ people, I’ve learned that a great Thanksgiving isn’t about cooking harder, it’s about planning smarter. This is the exact timeline I use every year to deliver a hot, delicious feast without the last-minute chaos. A great plan eliminates 90% of the stress.
The key to a stress-free Thanksgiving for a crowd is a solid plan. Focus on a detailed 4-day prep timeline, choose make-ahead recipes, calculate food quantities in advance, and utilize appliances like slow cookers to free up crucial oven space on the big day.
Your Proven 4-Day Thanksgiving Timeline & Master Plan
This is where the magic happens. Instead of a frantic, one-day cooking marathon, we’re going to spread the work out over four days. This proven prep schedule turns a monumental task into a series of simple, achievable steps. It’s the ultimate strategy for oven space management and your own sanity.
Thanksgiving Cooking Timeline:
* Sunday: Finalize your menu and create a detailed shopping list organized by store section. This is also the day to move your frozen turkey from the freezer to the refrigerator to start the thawing process. According to USDA food safety guidelines, a turkey needs about 24 hours of thawing time for every 4-5 pounds.
* Monday: Go grocery shopping. Get everything you need in one big trip to avoid last-minute store runs.
* Tuesday: Time to make anything that holds well. This is the perfect day to make your homemade cranberry sauce and bake any desserts like pies or the crust for your no-bake dessert. You can also chop all your aromatic vegetables (onions, celery, carrots) and store them in airtight containers in the fridge.
* Wednesday: This is your busiest prep day. Assemble all your casseroles (stuffing, green bean, sweet potato) without the final toppings, cover them, and refrigerate. Brine the turkey. Set the table completely—linens, plates, silverware, and all.
* Thursday: The big day! Your main job is to cook the turkey. While it rests, you’ll bake the casseroles. Use this time to make the gravy with the fresh pan drippings and gently reheat any sides. Because you did the heavy lifting on Wednesday, today is all about execution and timing.
9 Delicious, Make-Ahead Thanksgiving Recipes For A Crowd
Now for the food! A successful Thanksgiving menu for a large group relies on recipes that are not only delicious but also incredibly reliable. Every recipe on this list has been selected for its crowd-pleasing flavor, scalability, and make-ahead potential. Each one includes specific instructions for preparing it in advance and reheating it perfectly, so you can serve a hot and amazing meal with confidence.
1. Creamy Make-Ahead Mashed Potatoes (Slow Cooker Method)
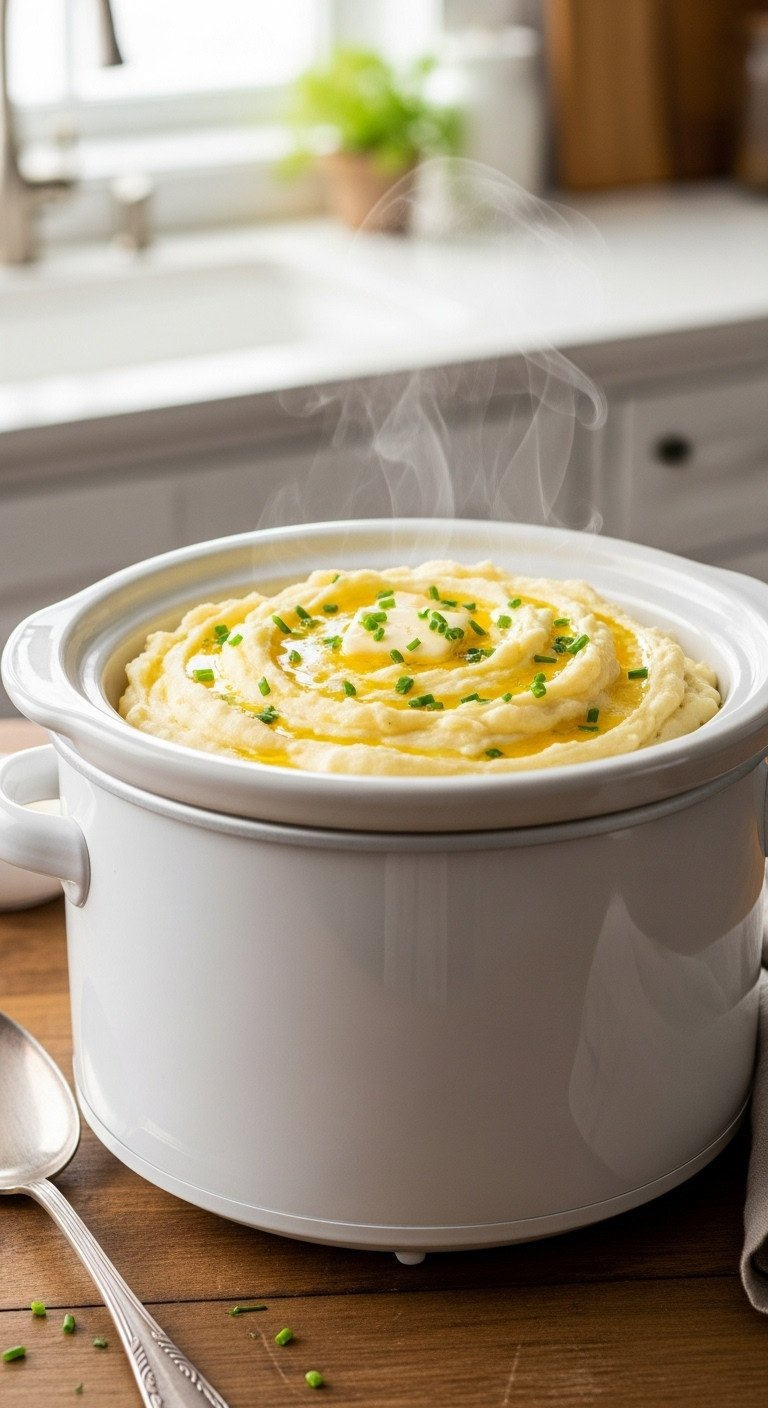
Save this foolproof potato recipe to your holiday board!
H4: Ingredients Needed:
- 10 lbs Russet potatoes, peeled and quartered
- 2 cups whole milk, warm
- 1 lb (4 sticks) unsalted butter, softened and divided
- 16 oz cream cheese, softened
- 2 tbsp salt
- 1 tsp black pepper
- Fresh chives, for garnish
- A large 8-quart slow cooker for keeping warm
H4: Step-by-Step Directions:
- Place peeled and quartered potatoes in a large stockpot and cover with cold, salted water. Bring to a boil and cook for 15-20 minutes, or until fork-tender.
- Drain the potatoes thoroughly and return them to the hot pot for 1 minute to evaporate any remaining moisture.
- Mash the potatoes using a potato ricer or masher until smooth.
- Add the warm milk, 3 sticks of butter, cream cheese, salt, and pepper. Mix until fully combined and creamy.
- Make-Ahead Tip: At this point, you can cool and refrigerate the potatoes in a covered dish for up to 2 days.
- To serve, transfer potatoes to the slow cooker. Set to ‘low’ and heat for 2-3 hours, stirring occasionally. Before serving, stir in the remaining stick of butter. Garnish with chives.
Pro-Tip: Always warm your milk and butter before adding them to the hot potatoes. This keeps the potatoes from getting gummy and ensures a creamier texture.

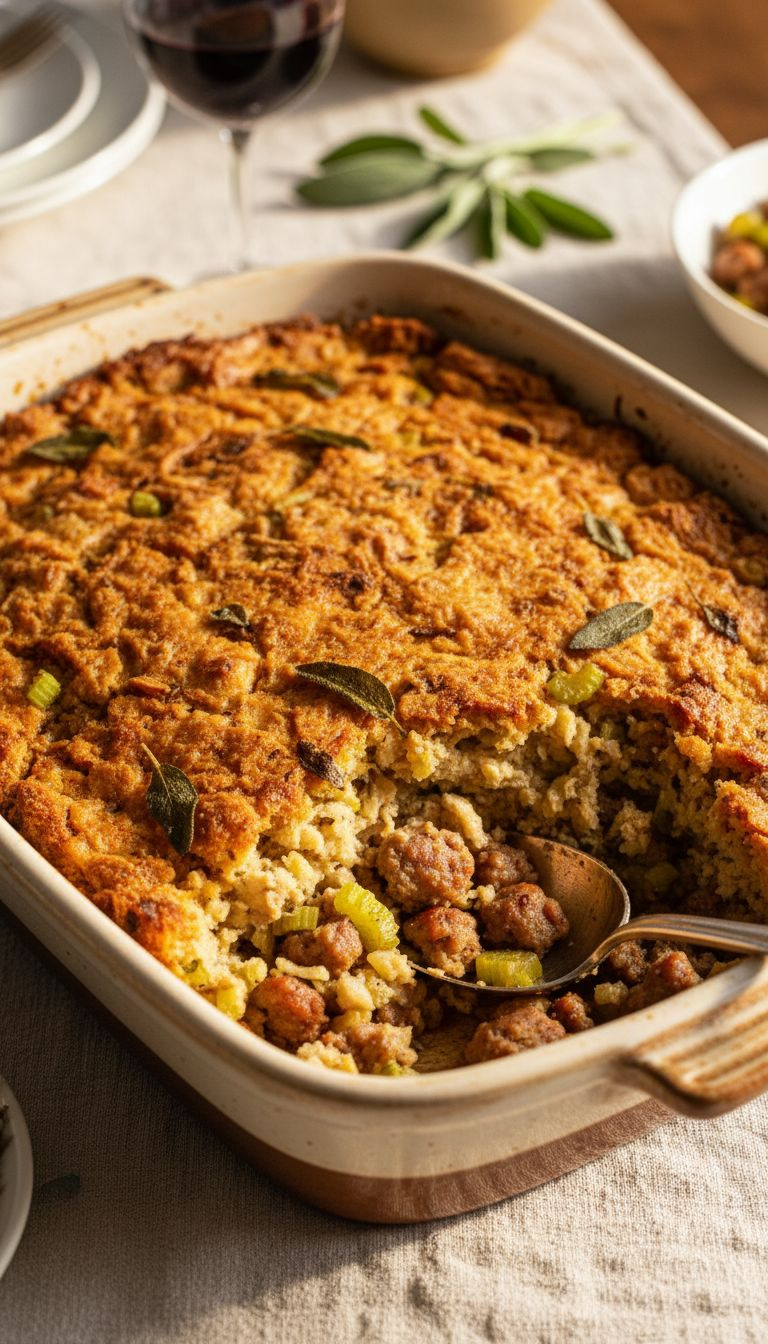
2. Classic Sage and Sausage Stuffing For a Crowd

Pin the ultimate classic stuffing recipe for your feast!
H4: Ingredients Needed:
- 2 (14 oz) bags of seasoned stuffing cubes
- 2 lbs bulk pork sausage
- 4 tbsp unsalted butter
- 4 cups chopped yellow onion
- 4 cups chopped celery
- 2 tbsp fresh chopped sage
- 8 cups low-sodium chicken broth
- 4 large eggs, lightly beaten
- A sturdy 9×13 inch ceramic baking dish
H4: Step-by-Step Directions:
- Preheat oven to 375°F. Spread stuffing cubes on two large baking sheets and bake for 10-15 minutes until lightly toasted. Transfer to a very large bowl.
- In a large skillet, cook the sausage over medium-high heat until browned. Drain the fat and add the sausage to the bowl with the bread cubes.
- In the same skillet, melt the butter. Add the onion and celery and cook until softened, about 10 minutes. Stir in the sage and cook for 1 more minute.
- Add the vegetable mixture to the bread and sausage. Pour in 6 cups of the chicken broth and the beaten eggs, tossing gently to combine. Add more broth if it seems too dry.
- Make-Ahead Tip: At this stage, you can transfer the stuffing to your baking dish, cover tightly, and refrigerate for up to 2 days.
- When ready to bake, let the stuffing sit at room temperature for 30 minutes. Bake, covered, for 30 minutes. Uncover and bake for another 20-25 minutes, until golden brown and heated through.
Lesson Learned: Don’t pack the stuffing into the dish too tightly. Keeping it slightly loose allows it to bake evenly and develop a better texture.

3. Crowd-Pleasing Green Bean Casserole From Scratch
Save this ‘from-scratch’ green bean casserole that everyone will rave about!
H4: Ingredients Needed:
- 4 lbs fresh green beans, trimmed
- 8 tbsp unsalted butter
- 2 lbs cremini mushrooms, sliced
- 1 large onion, finely chopped
- 4 cloves garlic, minced
- 1/2 cup all-purpose flour
- 4 cups whole milk
- 2 cups chicken broth
- 2 tsp Worcestershire sauce
- 2 (6 oz) containers of store-bought crispy fried onions
H4: Step-by-Step Directions:
- Blanch the green beans in a large pot of boiling salted water for 5 minutes. Immediately transfer to an ice bath to stop the cooking, then drain well.
- In a large, oven-safe skillet or Dutch oven, melt the butter. Add mushrooms and cook until browned. Add onion and cook until soft. Stir in garlic until fragrant.
- Sprinkle the flour over the vegetables and cook for 1 minute. Gradually whisk in the milk and broth until smooth. Bring to a simmer and cook until thickened, about 5-8 minutes.
- Stir in the Worcestershire sauce, salt, and pepper. Remove from heat. Gently fold in the blanched green beans and half of the crispy onions.
- Make-Ahead Tip: Transfer the mixture to a 9×13 baking dish, cool, cover, and refrigerate for up to 2 days.
- To bake, preheat oven to 375°F. Top the casserole with the remaining crispy onions. Bake for 25-30 minutes, until bubbly and golden.
Pro-Tip: Pat the green beans completely dry after blanching. Excess water can make the sauce thin.

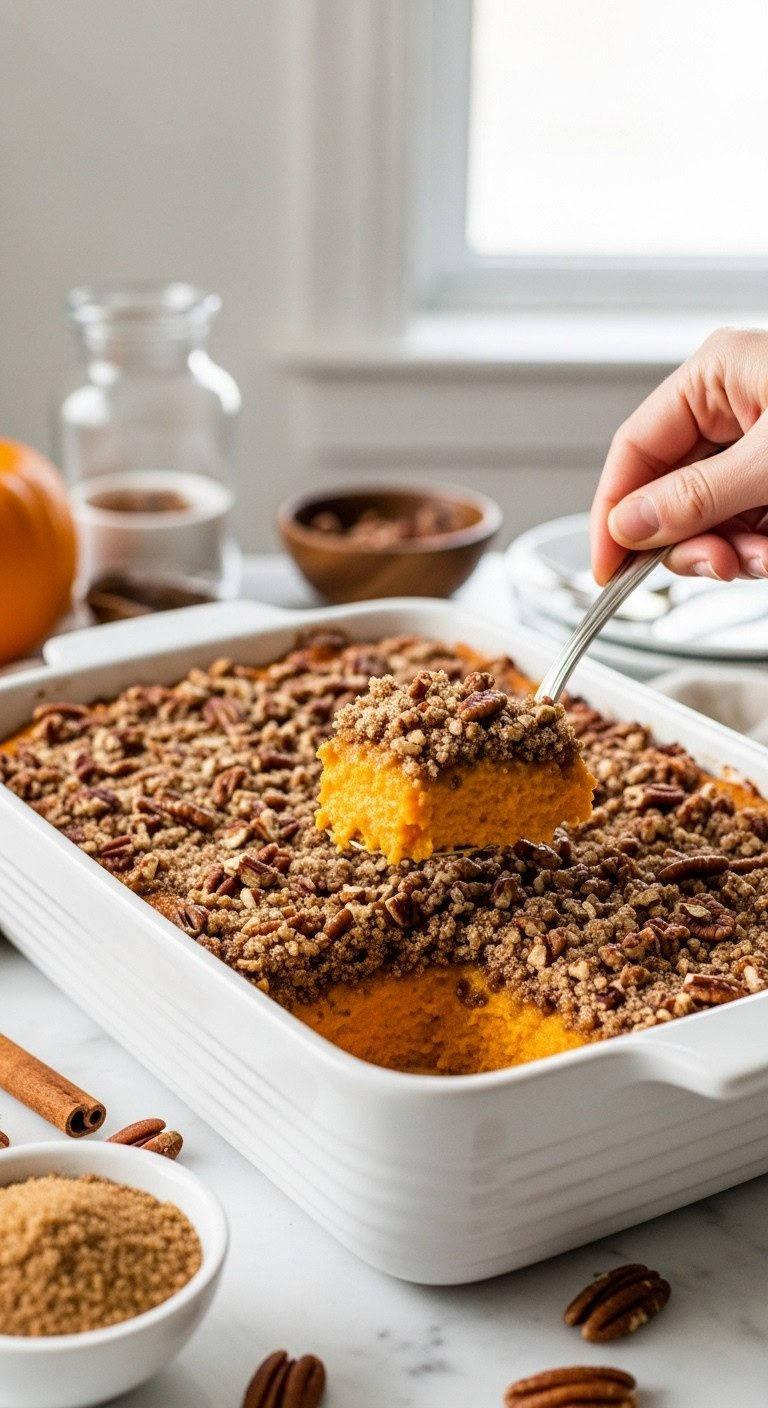
4. Brown Sugar & Pecan Sweet Potato Casserole
Pin this must-have sweet potato casserole for the perfect holiday side!
H4: Ingredients Needed:
- 8 lbs sweet potatoes
- 1 cup unsalted butter, melted
- 1 cup milk
- 1 cup packed brown sugar
- 4 large eggs, beaten
- 2 tsp vanilla extract
- 1 tsp cinnamon
- For the Topping:
- 1 cup all-purpose flour
- 1 cup packed brown sugar
- 1 cup unsalted butter, cold and cubed
- 2 cups chopped pecans
- A high-powered food processor for smooth potatoes
H4: Step-by-Step Directions:
- Pierce sweet potatoes all over with a fork. Bake at 400°F for 45-60 minutes, until very tender. Let cool slightly, then scoop the flesh into a large bowl, discarding the skins.
- Mash the sweet potato flesh until smooth. Add the melted butter, milk, 1 cup brown sugar, eggs, vanilla, and cinnamon. Beat until well combined.
- Spread the sweet potato mixture into a greased 9×13 inch baking dish.
- Make-Ahead Tip: The filling can be prepared, covered, and refrigerated for up to 3 days. Prepare the topping separately and store it in an airtight container in the fridge.
- To make the topping, combine flour and 1 cup brown sugar in a bowl. Cut in the cold butter with a pastry blender or your fingers until it resembles coarse crumbs. Stir in the chopped pecans.
- When ready to bake, preheat oven to 350°F. Sprinkle the topping evenly over the sweet potato mixture. Bake for 30-35 minutes, until the topping is golden brown and the filling is hot.
Pro-Tip: For an ultra-smooth filling, whip the cooked sweet potatoes and other ingredients with an electric hand mixer.
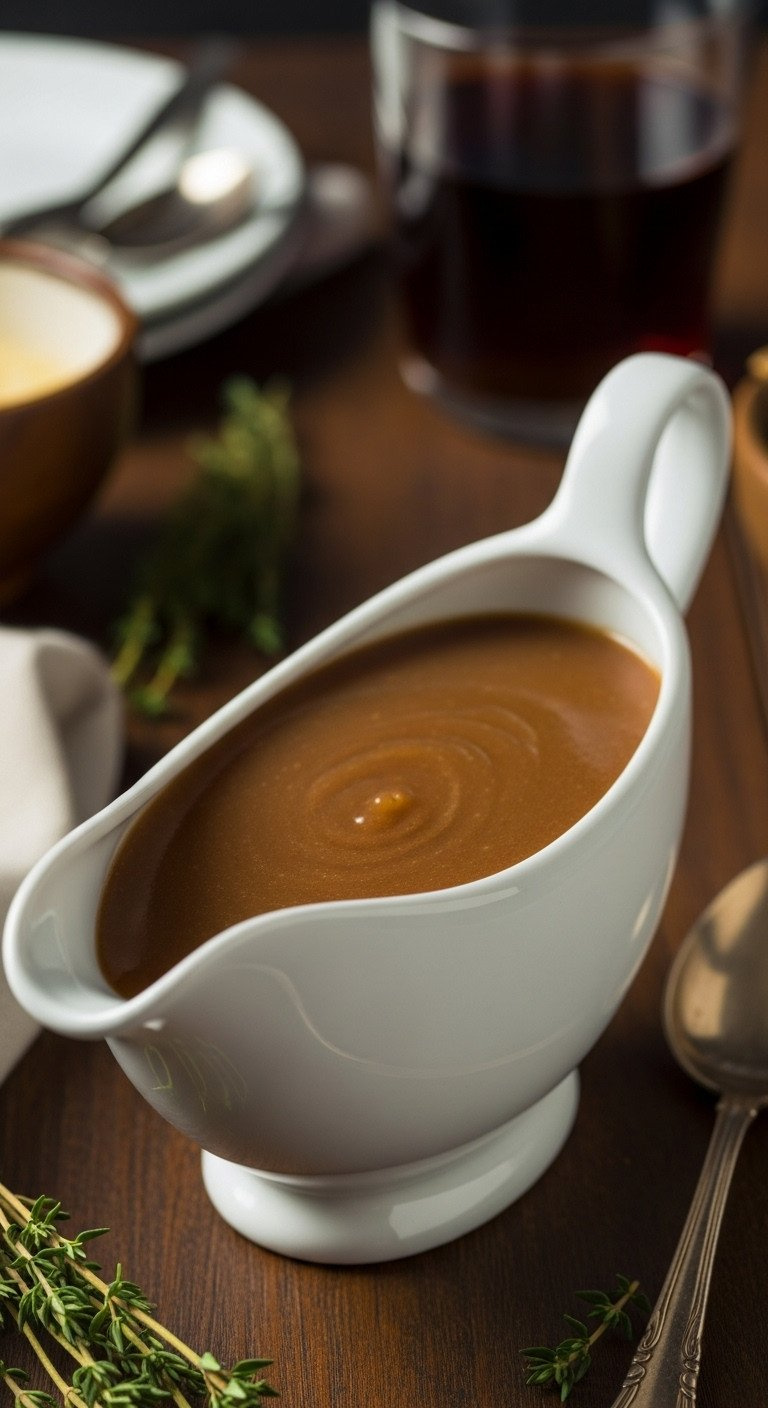
5. Foolproof Turkey Gravy (That You Can Make Ahead!)
Never have lumpy gravy again! Save this make-ahead recipe.
H4: Ingredients Needed:
- 8 tbsp (1 stick) unsalted butter
- 1 cup all-purpose flour
- 8 cups high-quality turkey or chicken stock, warm
- Turkey neck and giblets (optional, for flavor)
- 2 sprigs fresh thyme
- Salt and pepper to taste
- Pan drippings from your roasted turkey
- A fat separator for perfect drippings
H4: Step-by-Step Directions:
- Make the Base Ahead (Up to 3 days): In a large saucepan, melt the butter over medium heat. Whisk in the flour and cook, stirring constantly, for 5-7 minutes until it forms a light brown paste (a roux).
- Gradually whisk in the warm stock until completely smooth. Add the turkey neck, giblets, and thyme.
- Bring to a simmer and cook for 20 minutes, stirring occasionally, until the gravy has thickened. Season with salt and pepper.
- Strain the gravy through a fine-mesh sieve into a container, discarding the solids. Cool, cover, and refrigerate.
- On Thanksgiving Day: After roasting your turkey, pour all the pan drippings into a fat separator.
- Reheat the gravy base in a saucepan over medium heat. Whisk in about 1/2 to 1 cup of the defatted turkey drippings from the bottom of the separator.
- Bring to a simmer and adjust seasoning if needed. Serve hot.
Lesson Learned: The secret to lump-free gravy is adding the liquid to the roux gradually while whisking constantly. Don’t rush this step!

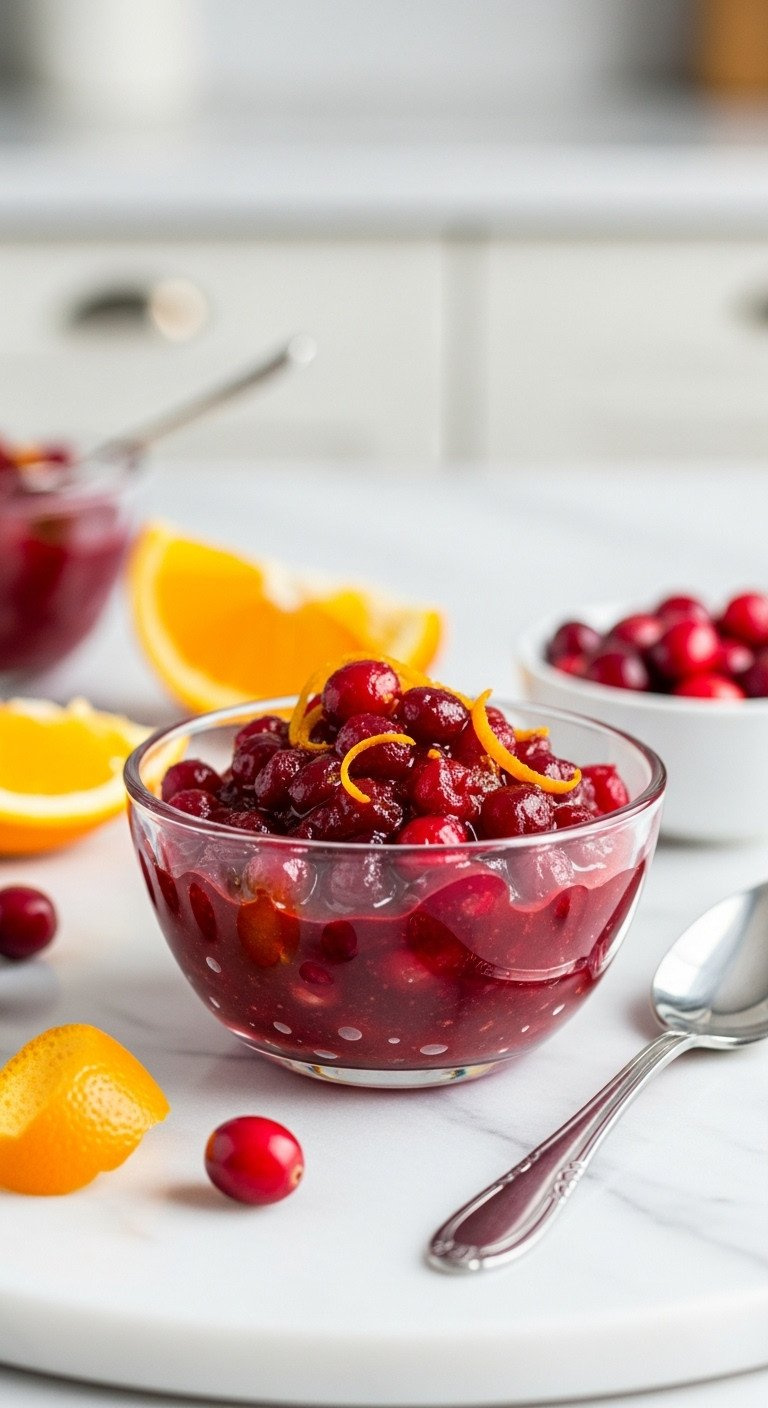
6. 15-Minute Homemade Cranberry Orange Sauce
Ditch the can! Pin this super easy, 15-minute cranberry sauce recipe.
H4: Ingredients Needed:
- 2 (12 oz) bags of fresh cranberries
- 2 cups granulated sugar
- Zest and juice of 2 large oranges
- 1 cup water
- Pinch of salt
- A microplane zester for fine orange zest
H4: Step-by-Step Directions:
- Rinse the cranberries thoroughly.
- In a medium saucepan, combine the sugar, orange zest, orange juice, and water. Bring to a boil over medium-high heat, stirring until the sugar dissolves.
- Add the cranberries and the pinch of salt. Return to a simmer.
- Cook, stirring occasionally, for 10-12 minutes. You will hear the cranberries start to pop. The sauce is done when most of the berries have burst and the sauce has thickened.
- Remove from heat and let it cool completely. The sauce will continue to thicken as it cools.
- Make-Ahead Tip: This can be made up to a week in advance! Store it in an airtight container in the refrigerator.
Pro-Tip: For a deeper flavor, add a cinnamon stick to the saucepan while the sauce simmers. Just remember to remove it before serving.

7. No-Bake Pumpkin Lush Dessert for a Crowd
Save this incredible no-bake dessert to free up your oven on Thanksgiving!
H4: Ingredients Needed:
- Crust: 2 cups all-purpose flour, 1 cup chopped pecans, 1 cup cold unsalted butter.
- Cream Cheese Layer: 16 oz cream cheese (softened), 2 cups powdered sugar, 16 oz whipped topping (like Cool Whip), thawed and divided.
- Pumpkin Layer: 2 (3.4 oz) boxes of instant vanilla pudding mix, 1 (29 oz) can pumpkin puree, 3 cups cold milk, 2 tsp pumpkin pie spice.
- A 9×13 glass baking dish with a lid for easy storage.
H4: Step-by-Step Directions:
- For the crust: Preheat oven to 350°F. Mix flour and pecans. Cut in cold butter until crumbly. Press firmly into the bottom of a 9×13 dish. Bake for 15-20 minutes until lightly browned. Cool COMPLETELY. (This is the only baking step and can be done days ahead).
- For the cream cheese layer: In a large bowl, beat the softened cream cheese and powdered sugar until smooth. Fold in half (8 oz) of the thawed whipped topping. Spread evenly over the cooled crust.
- For the pumpkin layer: In another bowl, whisk together the instant pudding mix, pumpkin puree, cold milk, and pumpkin pie spice for 2 minutes. It will be thick. Carefully spread this over the cream cheese layer.
- For the top layer: Spread the remaining half (8 oz) of the whipped topping over the pumpkin layer.
- Make-Ahead Tip: This dessert must be made ahead. Cover and refrigerate for at least 6 hours, but it’s even better if made the day before. This allows the layers to set perfectly. Garnish with a sprinkle of cinnamon or extra pecans just before serving.
Lesson Learned: Ensure your crust is 100% cooled before adding the cream cheese layer, otherwise, it will melt and create a mess.

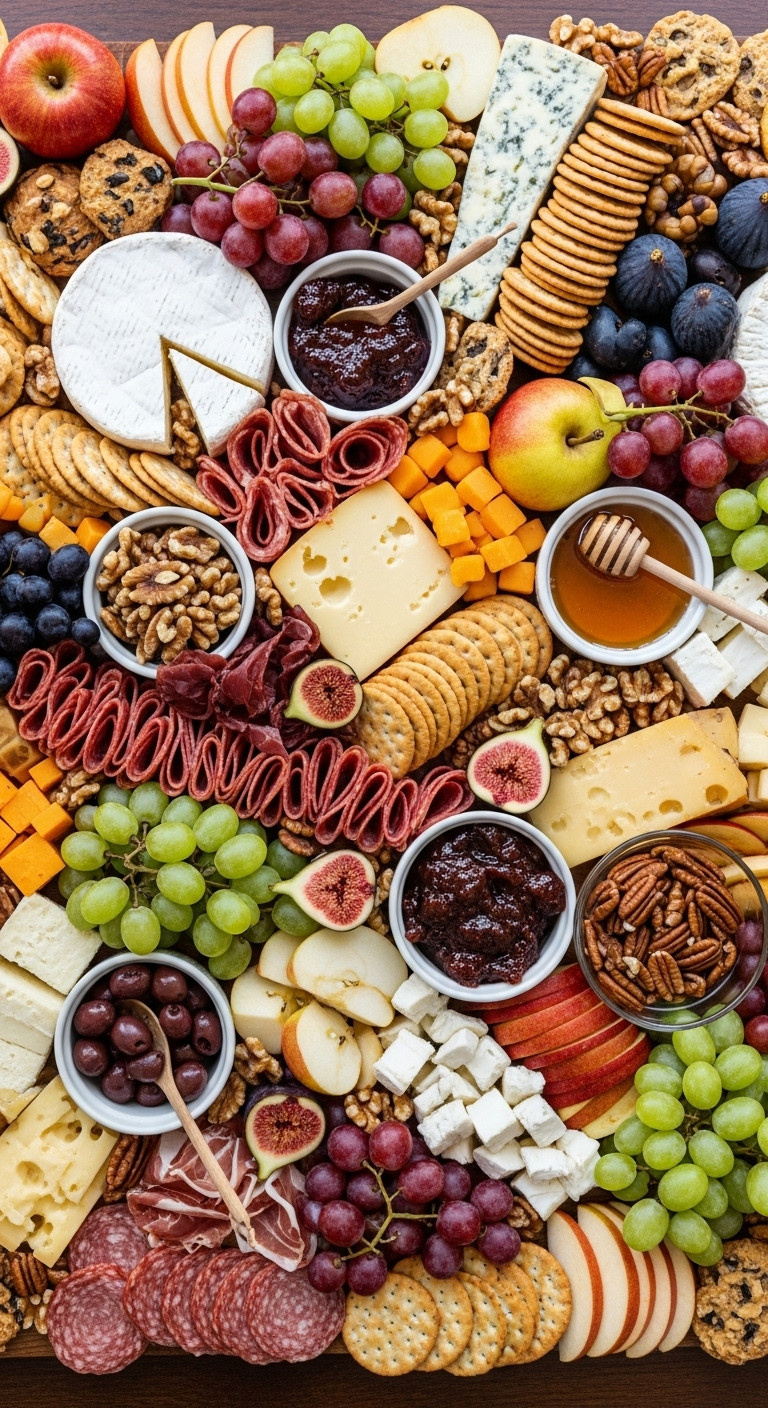
8. The Ultimate 10-Minute Thanksgiving Appetizer Board

Save this easy appetizer idea that requires zero cooking!
H4: Materials Needed:
- An extra-large wooden board or serving platter
- Cheeses (3-5 types): A soft cheese (brie or camembert), a hard cheese (aged cheddar or manchego), a crumbly cheese (goat cheese or blue cheese).
- Meats (2-3 types): Salami, prosciutto, capicola.
- Crackers & Bread (3-4 types): Buttery crackers, seeded crackers, water crackers, sliced baguette.
- Fruits (3-4 types): Grapes, figs, sliced apples, sliced pears, pomegranate seeds.
- Salty & Briny: Assorted olives, cornichons, marinated artichoke hearts.
- Nuts & Sweets: Walnuts, pecans, marcona almonds, a small bowl of honey, fig jam.
- A quality cheese knife set for serving.
H4: Step-by-Step Directions:
- The Day Before: Wash and dry all fruit. Slice any hard cheeses. Make your dips or purchase jams.
- 15 Minutes Before Guests Arrive: Place your largest items on the board first—the wheels of cheese and small bowls for olives and jams.
- Create a “salami river” by folding salami slices and snaking them across the board to create visual interest. Drape prosciutto in loose piles.
- Fan out crackers in multiple locations around the cheeses.
- Fill in all the large gaps with big clusters of grapes and sliced fruit.
- Fill the final small gaps with handfuls of nuts and smaller fruits like figs. Garnish with a few sprigs of fresh rosemary for a festive look.
Pro-Tip: To prevent sliced apples and pears from browning, toss them lightly in a bit of lemon juice before adding them to the board.

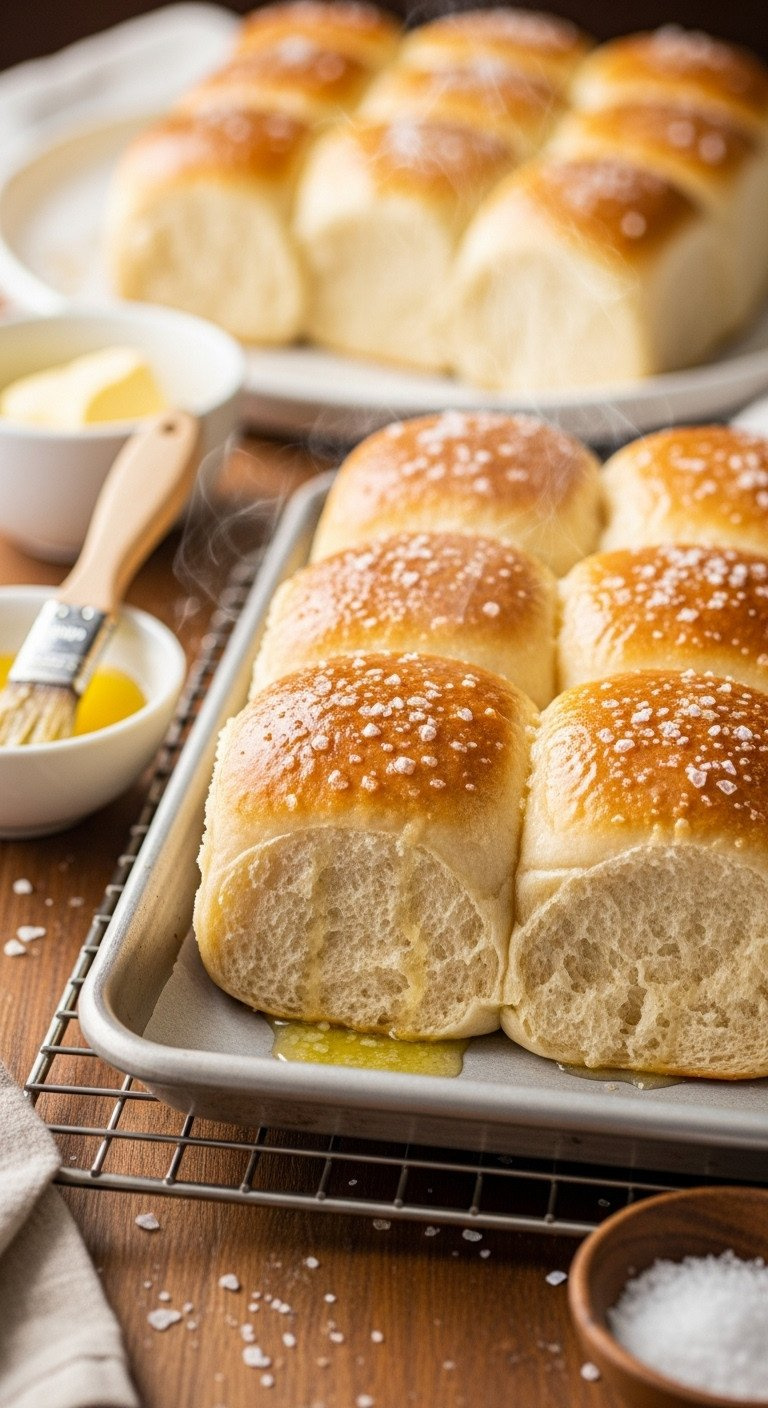
9. Easy Parker House Dinner Rolls For a Crowd
Pin the recipe for the softest, most buttery dinner rolls ever!
H4: Ingredients Needed:
- 1 cup whole milk
- 1/2 cup water
- 1/2 cup unsalted butter, plus more for brushing
- 1/2 cup granulated sugar
- 2 1/4 tsp active dry yeast (1 packet)
- 5 cups all-purpose flour
- 2 tsp salt
- 2 large eggs, beaten
- Flaky sea salt for topping
- A stand mixer with a dough hook for easy kneading
H4: Step-by-Step Directions:
- In a saucepan, heat the milk, water, butter, and sugar until the butter is melted and the mixture is warm (about 110°F).
- Pour the warm mixture into the bowl of a stand mixer. Sprinkle the yeast over top and let it sit for 5-10 minutes until foamy.
- With the mixer on low, add the flour, salt, and beaten eggs. Knead with the dough hook for 5-7 minutes until the dough is smooth and elastic.
- Place the dough in a greased bowl, cover, and let it rise in a warm place for 1-2 hours, or until doubled in size.
- Make-Ahead Tip: After the first rise, you can punch the dough down, cover it tightly, and refrigerate for up to 3 days.
- When ready to bake, divide the dough into 24-30 equal pieces. Roll each into a ball and place them close together in a greased 9×13 inch pan. Cover and let rise for another hour.
- Preheat oven to 375°F. Brush the tops of the rolls with melted butter. Bake for 15-20 minutes, until golden brown. Brush with more melted butter and sprinkle with flaky sea salt immediately after they come out of the oven.
Lesson Learned: Don’t overheat your milk mixture. If it’s too hot, it will kill the yeast and your rolls won’t rise. A digital thermometer is your best friend here.

Key Takeaways: Your Quick Guide to a Stress-Free Thanksgiving
- Plan Ahead: Your timeline is your best friend. A written plan eliminates 90% of holiday stress. Start planning and shopping the week before.
- Embrace Make-Ahead: Choose recipes that can be fully or partially prepared 1-3 days in advance. Your Wednesday should be your busiest prep day, not Thursday.
- Use All Your Appliances: Don’t rely solely on the oven. Use slow cookers to keep sides warm, the stovetop for sauces, and choose no-bake options for desserts.
- Rest The Turkey: A 30-40 minute rest for the turkey is non-negotiable for juicy meat. Use this time to reheat your sides in the now-available oven.
- Accept Help: If guests offer to bring a dish or help with cleanup, say yes! Thanksgiving is about community, not martyrdom.
People Also Ask About Cooking Thanksgiving For a Crowd
How much turkey do I need for a large group?
A safe rule is to plan for 1.5 pounds of bone-in turkey per person. This generous portion accounts for the weight of the bones and ensures you’ll have delicious leftovers. For 20 guests, aim for a 30-pound turkey, or even better, two smaller 15-pound turkeys which will cook more evenly and quickly.
What’s the best way to keep food hot on a buffet?
The best method is to use slow cookers on the “warm” setting for dishes like mashed potatoes, stuffing, and gravy. For casseroles, you can use a clean, empty cooler as a makeshift warming chest—place the hot, foil-wrapped dishes inside for up to 2 hours. Also, warming your serving plates and bowls with hot water before filling them makes a big difference.
How do I manage cooking everything with only one oven?
Strategic scheduling is key. Cook your turkey first. While it’s resting for 30-40 minutes (which is essential), you can slide your casseroles and side dishes into the hot oven. Plan a menu that includes stovetop dishes, slow cooker recipes, and items served at room temperature (like cranberry sauce or a salad) to minimize oven dependency.
What can I realistically make three days before Thanksgiving?
You can make more than you think! Three days out is perfect for making your cranberry sauce, any salad dressings, and pie crusts. You can also make the entire base for your make-ahead gravy. Getting these smaller tasks done early clears your schedule for bigger tasks later in the week.
Final Thoughts
Remember, the goal of Thanksgiving is not to create a “perfect” meal, but a joyful memory. This plan is your toolkit to ensure you’re a relaxed, present host who gets to enjoy the day just as much as your guests. You are fully equipped to handle the challenge and create a wonderful, delicious feast.
What’s the one dish that absolutely must be on your Thanksgiving table? Share your family’s favorite in the comments below
Last update on 2026-06-13 at 07:00 / Affiliate links / Images from Amazon Product Advertising API
