As an Amazon Associate BakingBakewareSets.com earns from qualifying purchases.
11 Easy Christmas Pie Recipes That Look Simply Stunning
Feeling that familiar holiday baking panic creep in? You want to bring a showstopper dessert, but the thought of complex recipes adds more stress to your already-long to-do list. It feels like you have to choose between a beautiful dessert and your own sanity.
Easy Christmas pie recipes are your solution: these are foolproof desserts that combine simple, stress-free methods with stunning, festive results. This guide is built for busy people who want to create holiday magic without spending all day in the kitchen. We’ll show you how to make gorgeous pies that look—and taste—like you’re a seasoned pro.
☰ Table of Contents ▼
show
Feeling Overwhelmed by Holiday Baking? These Stunning Pies Are Your Answer
The pressure to create a perfect holiday meal can feel immense. Between the main course, the side dishes, and coordinating family, who has time for a complicated, multi-step dessert? It’s easy to feel like you’re one forgotten ingredient away from a full-blown kitchen crisis. But what if the secret to a stunning Christmas dessert wasn’t about complexity, but about clever simplicity?
As someone who has juggled countless holiday meals, I’ve learned that the secret isn’t complicated recipes—it’s foolproof ones that look like you spent all day on them. These are my tested favorites. The best easy Christmas pie recipes combine simple preparation with festive flavors. Look for no-bake options, recipes using store-bought crusts, or forgiving rustic styles like galettes. This list includes stunning yet simple classics like pecan and apple, plus no-bake wonders like peppermint and chocolate, designed to deliver that “wow” moment without the stress.
11 Easy Christmas Pie Recipes That Look Simply Stunning
Ready to find your new holiday go-to? This collection of 11 easy Christmas pie recipes is curated to give you options, no matter your skill level or time constraints. We have everything from no-bake marvels for the ultra time-crunched to simplified classics for the traditionalists at your table. Each recipe has been selected for its foolproof method and stunning results, ensuring you can bake with confidence this holiday season. Every recipe includes clear, simple steps and a pro-tip to guarantee success.
1. No-Bake White Chocolate Peppermint Pie
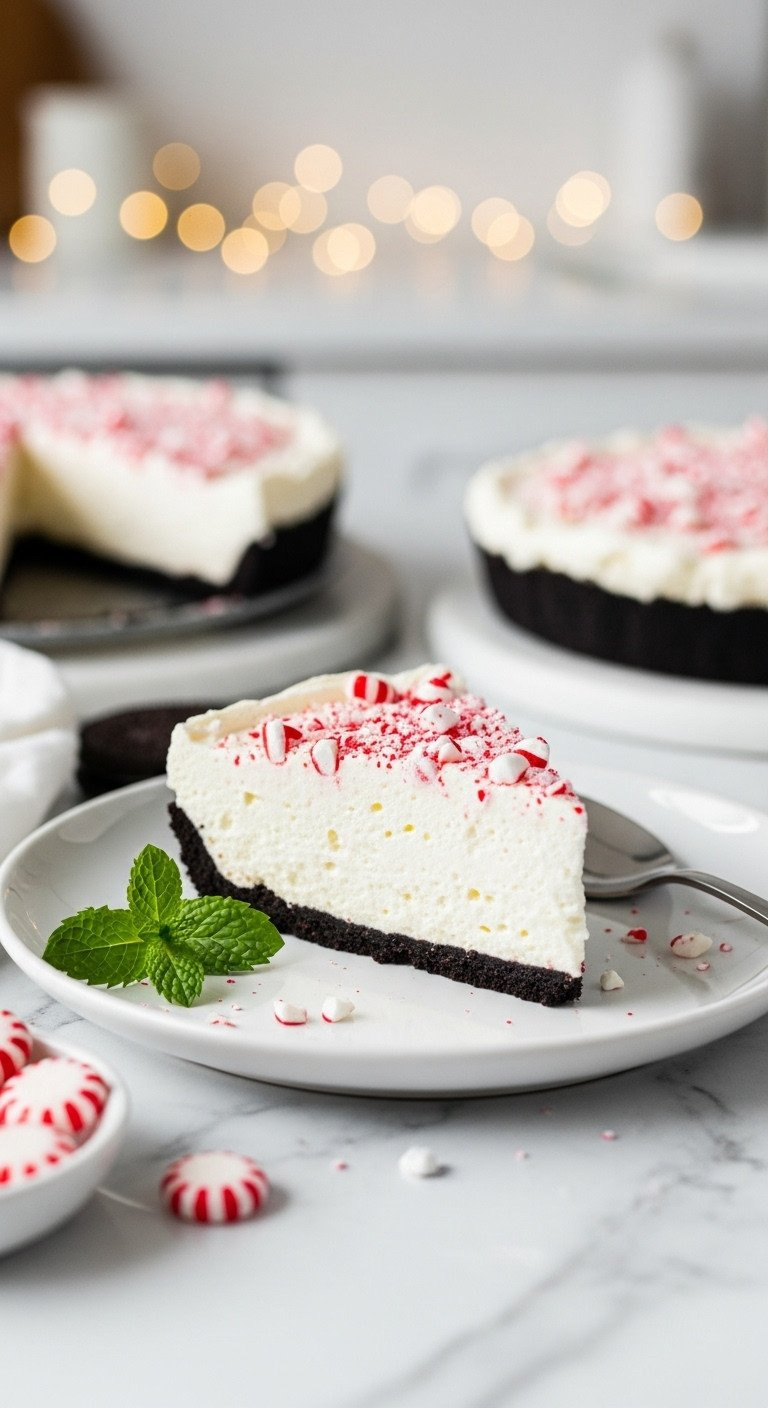
Pin this effortless holiday showstopper to your ‘Christmas Desserts’ board!
This pie is the ultimate holiday hero: no oven required, stunningly festive, and addictively delicious. The cool, creamy white chocolate filling gets a festive kick from peppermint, all nestled in a crunchy, chocolatey Oreo crust. It’s the perfect make-ahead dessert for when you need a guaranteed win.
Ingredients:
- 24 Oreo cookies, finely crushed
- 6 tablespoons unsalted butter, melted
- 8 ounces high-quality white chocolate, chopped
- 8 ounces cream cheese, softened to room temperature
- 1/2 cup powdered sugar
- 1 teaspoon peppermint extract
- 1 1/2 cups heavy cream, cold
- 1/2 cup crushed peppermint candies, for topping
Instructions:
- Make the Crust: In a bowl, mix the finely crushed Oreo cookies with the melted butter until well combined. Press the mixture firmly into the bottom and up the sides of a 9-inch pie plate. Chill in the freezer for 15 minutes.
- Melt White Chocolate: In a microwave-safe bowl, melt the white chocolate in 30-second intervals, stirring in between, until smooth. Let it cool slightly for 5 minutes.
- Create the Filling: In a large bowl, beat the softened cream cheese and powdered sugar with an electric mixer until smooth and creamy. Beat in the cooled white chocolate and peppermint extract.
- Whip the Cream: In a separate bowl, whip the cold heavy cream until stiff peaks form. Gently fold half of the whipped cream into the cream cheese mixture until just combined, then fold in the remaining half.
- Assemble and Chill: Spoon the filling into the chilled Oreo crust and spread evenly. Refrigerate for at least 6 hours, or preferably overnight, until firm.
- Decorate: Before serving, sprinkle the top generously with crushed peppermint candies.
- Pro-Tip: For clean slices, run a sharp knife under hot water and wipe it dry before each cut. This melts the chocolate just enough for a perfect slice every time.

2. Classic Pecan Pie with a Simple Twist
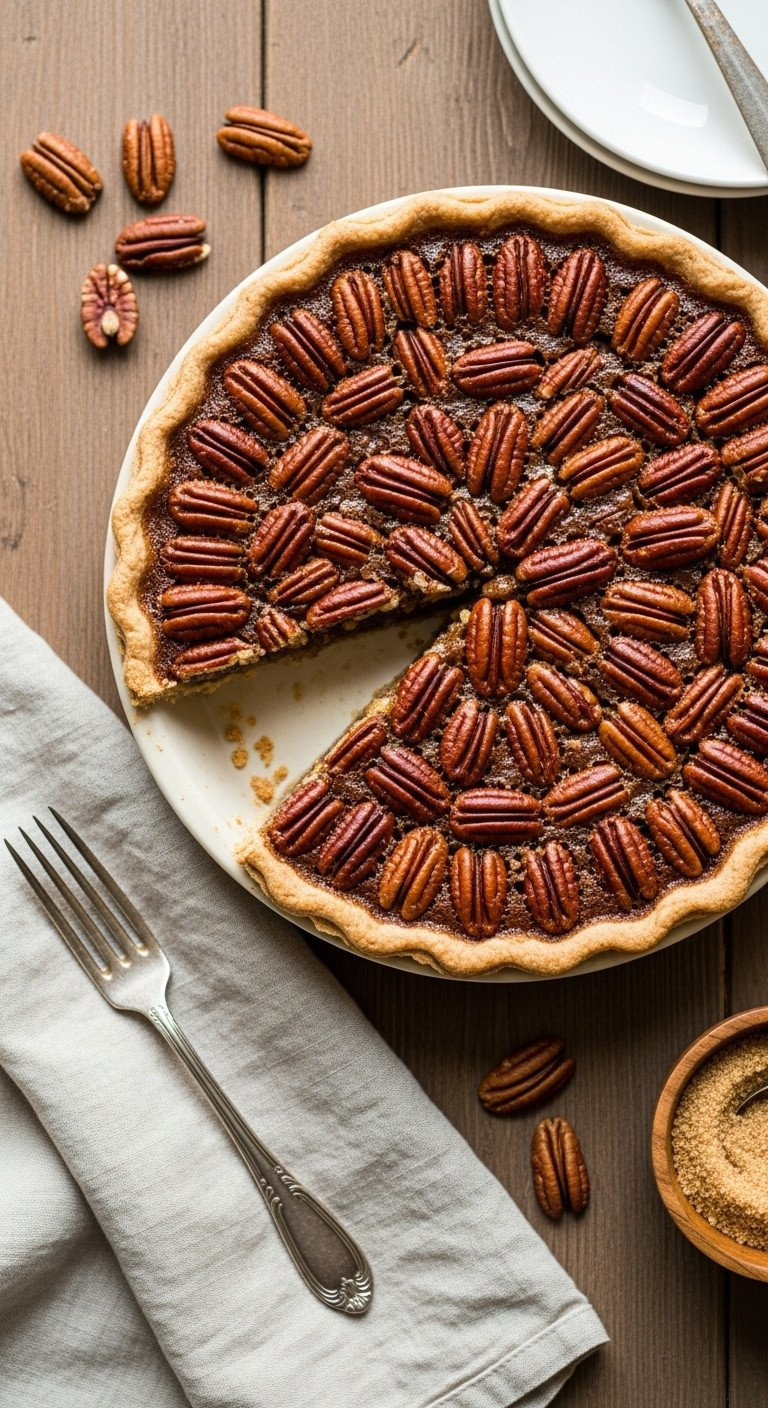
Save this foolproof classic for your holiday table!
Pecan pie is a Southern Christmas staple, but it can be intimidating. This recipe simplifies it down to the essentials, using a store-bought crust and a secret ingredient that makes the classic flavor even better. It’s the sweet, nutty, gooey pie you love, made effortlessly.
Ingredients:
- 1 (9-inch) unbaked pie crust, store-bought or homemade
- 1 cup light corn syrup
- 1/2 cup packed light brown sugar
- 3 large eggs, lightly beaten
- 1/4 cup unsalted butter, melted
- 1 teaspoon vanilla extract
- 1/4 teaspoon salt
- The Twist: 1 teaspoon finely grated orange zest
- 1 1/2 cups high-quality pecan halves
Instructions:
- Prepare Oven and Crust: Preheat your oven to 350°F (175°C). Place your unbaked pie crust into a 9-inch pie plate and crimp the edges.
- Mix the Filling: In a large bowl, whisk together the corn syrup, brown sugar, and lightly beaten eggs until well combined.
- Add Flavors: Stir in the melted butter, vanilla extract, salt, and the secret ingredient: orange zest.
- Add Pecans: Gently stir in the pecan halves.
- Fill and Bake: Pour the filling into the prepared pie crust.
- Bake: Bake on the center rack for 50 to 60 minutes. The pie is done when the center is just set (it should jiggle only slightly when gently shaken).
- Cool: Let the pie cool completely on a wire rack for at least 2 hours before slicing. This is crucial for the filling to set properly.
- Lesson Learned: Don’t skip the orange zest! It doesn’t make the pie taste like oranges; it just brightens the flavor and cuts through the sweetness, making it taste richer and more complex.

3. Foolproof Eggnog Custard Pie
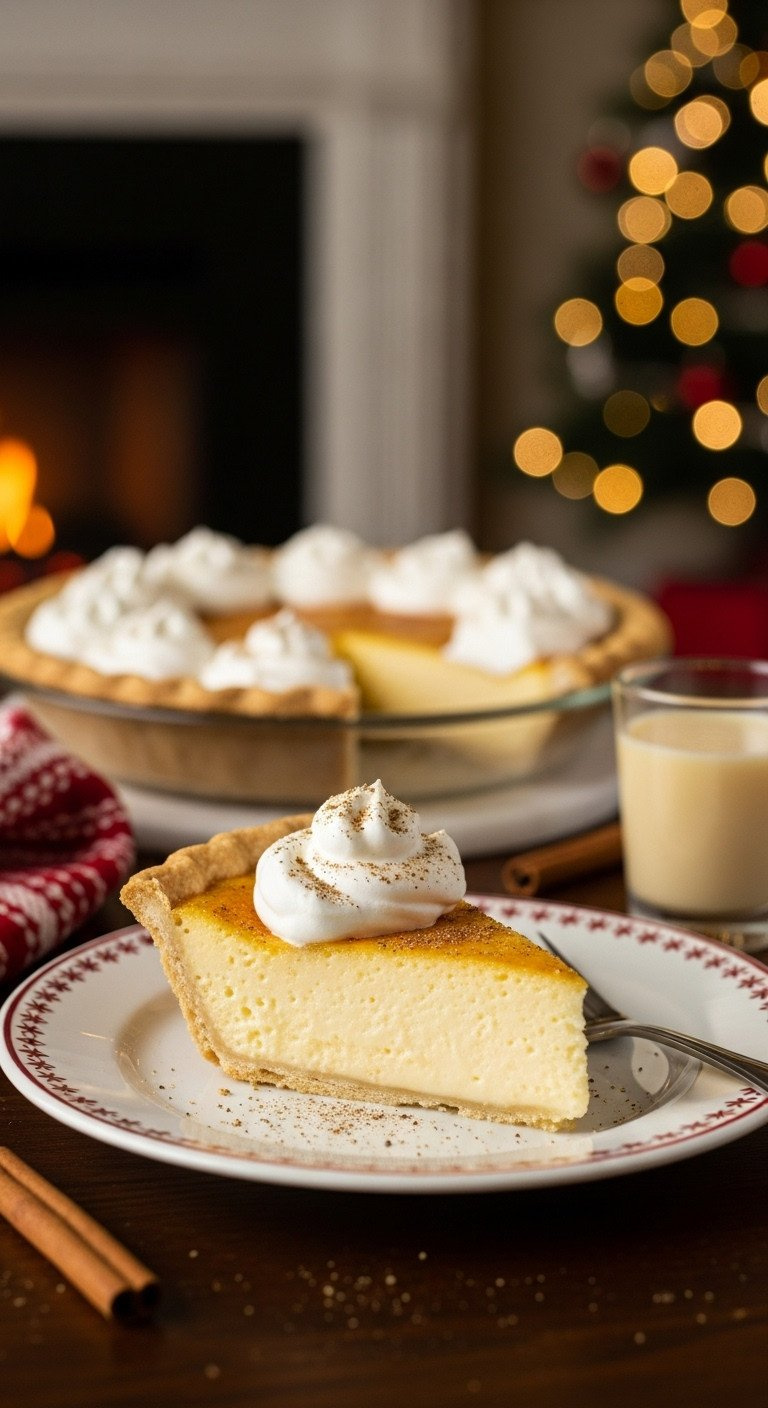
Pin this creamy, dreamy taste of Christmas!
Capture the quintessential flavor of Christmas in this silky, elegant custard pie. Using store-bought eggnog is the ultimate shortcut to achieving that classic spiced flavor without any fuss. It’s a creamy, dreamy dessert that’s surprisingly easy to make.
Ingredients:
- 1 (9-inch) pie crust, blind-baked and cooled
- 3 large eggs
- 1/2 cup granulated sugar
- 2 cups good-quality, full-fat eggnog
- 1/4 teaspoon ground nutmeg, plus more for dusting
- 1 teaspoon vanilla extract
- Optional: 2 tablespoons rum or bourbon
- For topping: Sweetened whipped cream
Instructions:
- Preheat Oven: Preheat your oven to 350°F (175°C).
- Blind-Bake Crust: Prepare and blind-bake your 9-inch pie crust until lightly golden. Let it cool completely. A pre-baked store-bought crust works perfectly here.
- Mix Filling: In a large bowl, whisk the eggs and sugar together until pale and slightly thickened.
- Combine Liquids: Slowly whisk in the eggnog, nutmeg, vanilla, and rum/bourbon (if using) until the mixture is smooth.
- Fill and Bake: Place the cooled pie shell on a baking sheet (to catch any spills). Carefully pour the eggnog filling into the crust.
- Bake: Bake for 40-50 minutes, or until the edges are set and the center has a slight jiggle. Do not overbake.
- Cool Completely: Let the pie cool on a wire rack for at least 1 hour, then transfer to the refrigerator to chill for at least 4 hours before serving. This pie must be served cold.
- Serve: Top with a dollop of whipped cream and a fresh dusting of nutmeg.
- Pro-Tip: Baking the pie on a preheated baking sheet not only catches spills but also helps the bottom of the crust stay crisp by providing a blast of direct heat.
4. Rustic Apple-Cinnamon Galette
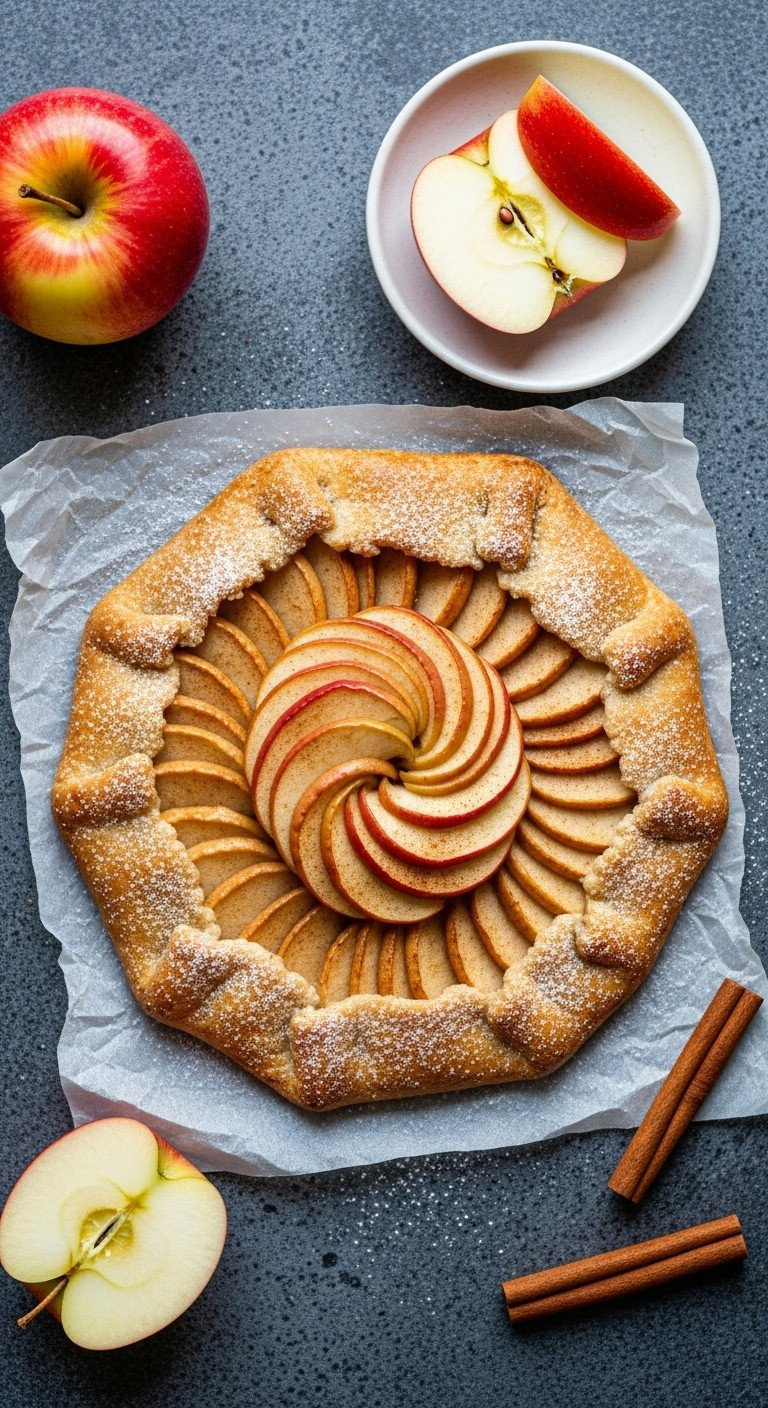
The easiest, most forgiving apple pie you’ll ever make. Pin it now!
A galette is a fancy name for a rustic, free-form pie. It delivers all the flavor of a classic apple pie with none of the fuss. There’s no crimping, no lattice work, and no pie dish required. Its imperfections are part of its charm, making it the perfect choice for beginner bakers.
Materials Needed:
- 1 sheet refrigerated pie dough (store-bought)
- 3 medium apples (a mix of Granny Smith and Honeycrisp is best), cored and thinly sliced
- 2 tablespoons all-purpose flour
- 1/4 cup granulated sugar
- 1 teaspoon ground cinnamon
- Juice of half a lemon
- 2 tablespoons cold unsalted butter, cut into small pieces
- 1 egg, beaten (for egg wash)
- 1 tablespoon coarse sugar, for sprinkling
Step-by-Step Directions:
- Preheat and Prep: Preheat oven to 400°F (200°C). Let the pie dough sit at room temperature for 10 minutes. Unroll it onto a parchment-lined baking sheet.
- Mix Filling: In a large bowl, gently toss the sliced apples with the flour, sugar, cinnamon, and lemon juice.
- Assemble the Galette: Arrange the apple slices in an overlapping pattern in the center of the dough, leaving a 2-inch border all around.
- Fold the Crust: Gently fold the border of the dough up and over the edges of the apple filling, pleating it as you go. It doesn’t have to be perfect—that’s the beauty of a rustic galette!
- Dot with Butter: Scatter the small pieces of cold butter over the apples.
- Finish and Bake: Brush the folded crust with the beaten egg and sprinkle the entire galette with the coarse sugar.
- Bake: Bake for 30-35 minutes, or until the crust is deep golden brown and the apple filling is bubbly.
- Cool: Let it cool on the baking sheet for at least 15 minutes before slicing and serving, perhaps with a scoop of vanilla ice cream.
- Lesson Learned: Don’t slice your apples too thick. Thin slices (about 1/8-inch) cook more evenly and are easier to arrange. A simple mandoline slicer makes this task effortless.

5. Sparkling Cranberry-Ginger Slab Pie
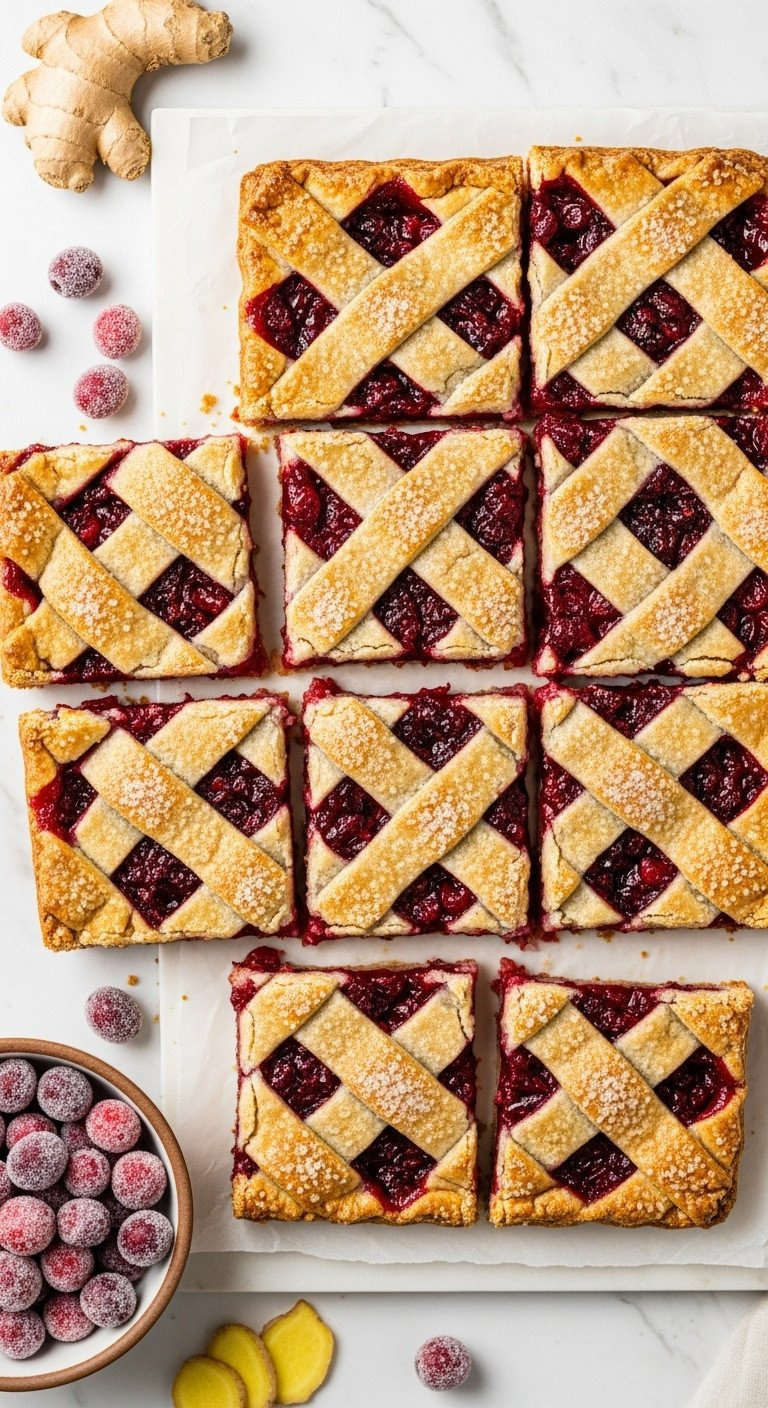
The perfect pie for a party! Pin this crowd-pleasing recipe.
Baking for a crowd? A slab pie is your answer. It’s baked in a rectangular jelly roll pan, making it easy to slice and serve to many. This version features a tart, festive cranberry filling with a warm kick from crystallized ginger, all under a simple, sparkling lattice crust.
Materials Needed:
- 2 boxes refrigerated pie dough (4 crusts total)
- 4 cups fresh or frozen cranberries
- 1 1/2 cups granulated sugar
- 1/4 cup cornstarch
- 1/4 cup finely chopped crystallized ginger
- Zest and juice of 1 orange
- 1 egg, beaten with 1 tablespoon of water
- Coarse sugar for sprinkling
Step-by-Step Directions:
- Preheat Oven: Preheat oven to 400°F (200°C).
- Prepare the Crust: Press two sheets of pie dough into the bottom and up the sides of a 10×15-inch jelly roll pan.
- Make the Filling: In a large saucepan, combine cranberries, sugar, cornstarch, ginger, orange zest, and juice. Cook over medium heat, stirring frequently, until the cranberries begin to pop and the mixture thickens, about 8-10 minutes. Let it cool for 15 minutes.
- Fill the Pie: Pour the cooled filling into the prepared crust and spread evenly.
- Create Lattice Top: Cut the remaining two sheets of pie dough into 1-inch strips. Weave the strips over the filling to create a lattice top. Trim and crimp the edges.
- Finish and Bake: Brush the lattice with the egg wash and sprinkle generously with coarse sugar.
- Bake: Bake for 30-40 minutes, or until the crust is golden brown and the filling is bubbly.
- Cool: Let the slab pie cool completely in the pan before cutting into squares.
- Pro-Tip: Don’t have a jelly roll pan? You can make two regular 9-inch pies with this recipe instead. Just divide the filling and lattice top between two pie plates.
6. 5-Ingredient Pumpkin Cream Pie
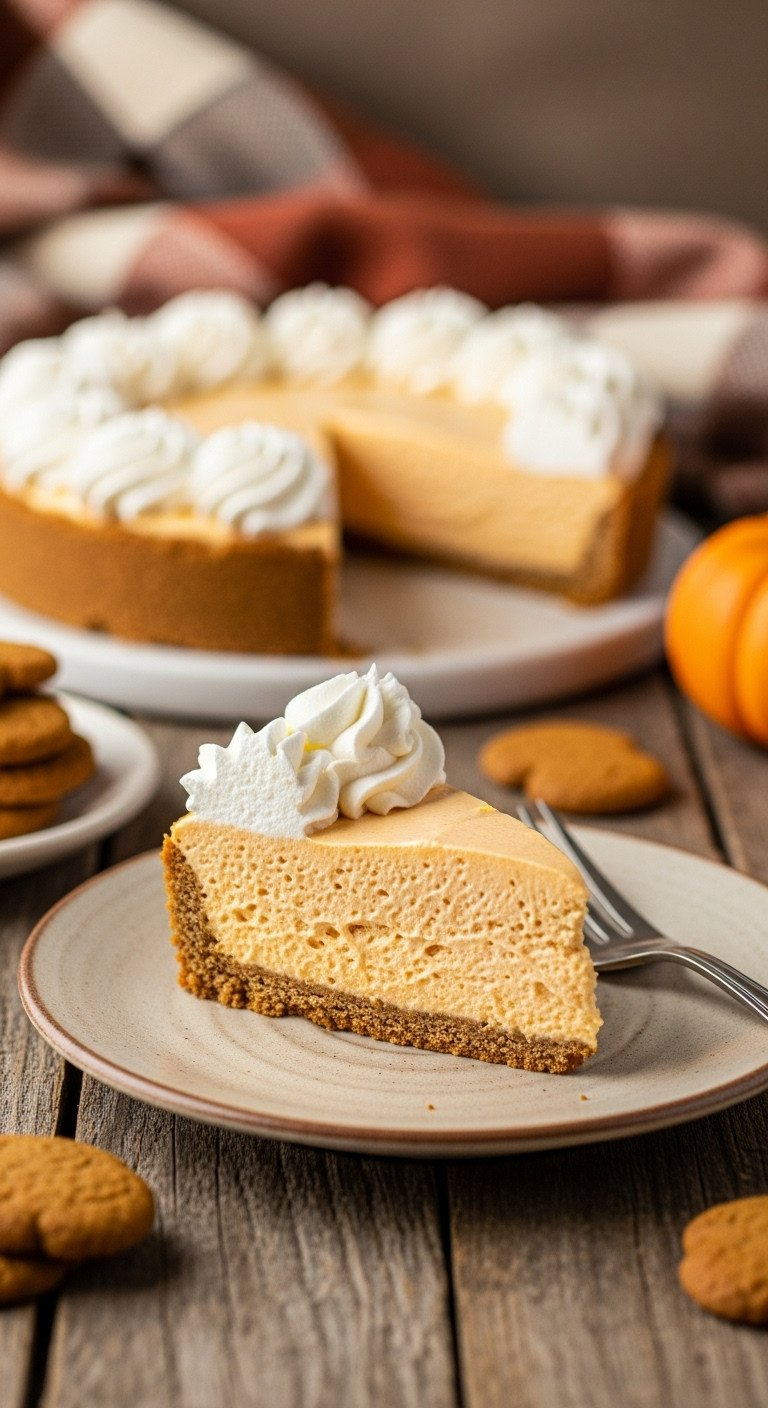
Easiest pumpkin pie ever. Save this 5-ingredient wonder!
It truly doesn’t get easier than this. If you can whisk ingredients in a bowl, you can make this light, fluffy, no-bake pumpkin pie. It’s a modern, creamy take on the classic that comes together in minutes and is perfect for a last-minute dessert.
Ingredients:
- 1 (9-inch) pre-made gingersnap or graham cracker pie crust
- 1 (15-ounce) can pure pumpkin puree (not pie filling)
- 1 (3.4-ounce) box instant vanilla pudding mix
- 1 teaspoon pumpkin pie spice
- 1 (8-ounce) container frozen whipped topping, thawed
Instructions:
- Combine Ingredients: In a large bowl, whisk together the pumpkin puree, the dry instant vanilla pudding mix, and the pumpkin pie spice until smooth and well combined.
- Fold in Topping: Gently fold the thawed whipped topping into the pumpkin mixture until no streaks remain.
- Fill Crust: Spoon the pumpkin cream filling into the pre-made crust and spread it out evenly.
- Chill: Refrigerate the pie for at least 4 hours, or until the filling is firm and set.
- Serve: Garnish with additional whipped cream and a sprinkle of pumpkin pie spice if desired.
- Pro-Tip: Make sure you buy pure pumpkin puree, NOT pumpkin pie filling. The pie filling is already sweetened and spiced, which will make this dessert far too sweet.

7. Christmas Tree Hand Pies
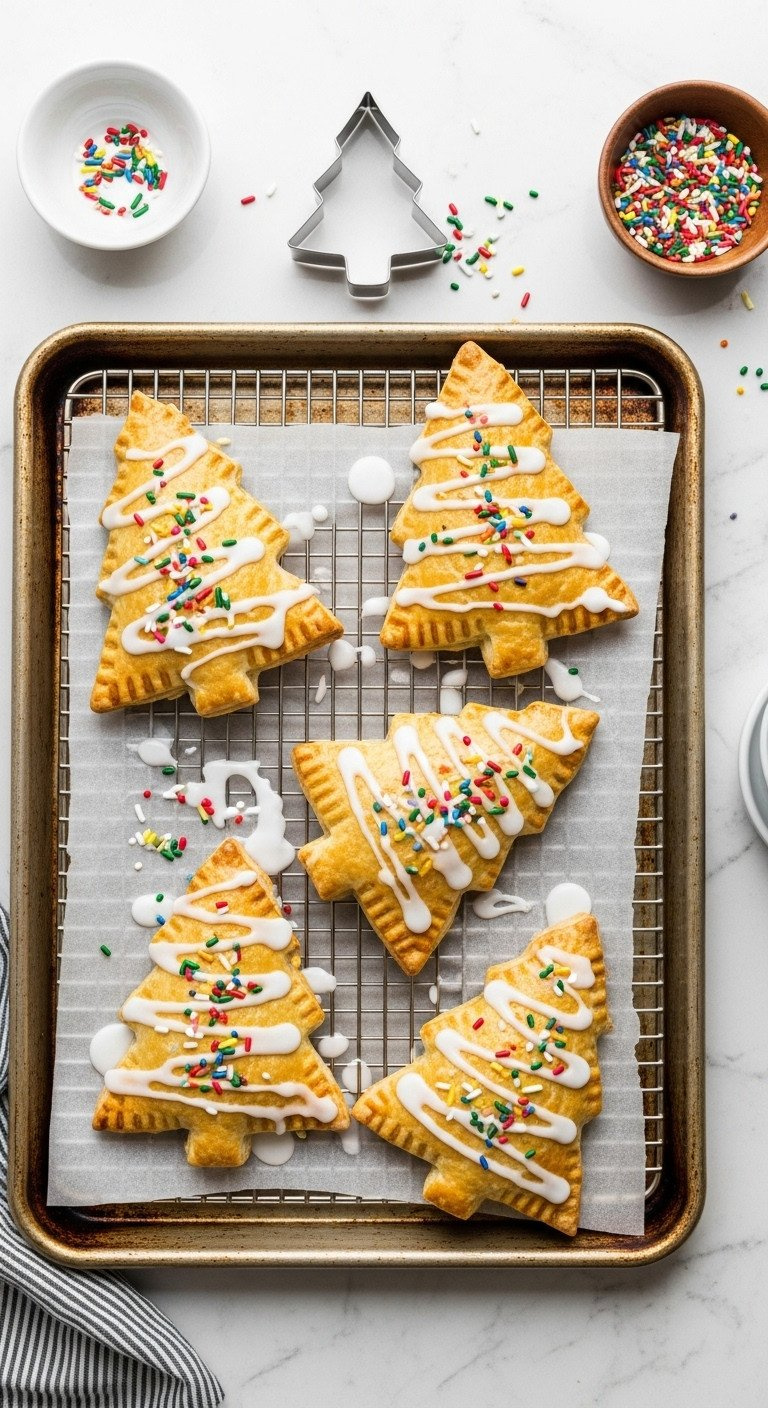
A perfect holiday baking project with kids! Pin this fun idea.
These adorable, individual pies are as fun to make as they are to eat. Using store-bought puff pastry and a cookie cutter, you can create these festive treats with minimal effort. They’re perfect for a party, a potluck, or a fun afternoon baking session with the kids.
Materials Needed:
- 1 box (2 sheets) frozen puff pastry, thawed
- 1 (21-ounce) can cherry or apple pie filling
- 1 large egg, beaten
- For the glaze: 1 cup powdered sugar, 2-3 tablespoons milk, festive sprinkles
- A 4-inch Christmas tree cookie cutter
Step-by-Step Directions:
- Preheat and Prep: Preheat oven to 400°F (200°C). Line a large baking sheet with parchment paper.
- Cut Shapes: Unfold the puff pastry sheets on a lightly floured surface. Use the cookie cutter to cut out as many tree shapes as you can (you’ll need two per pie).
- Fill the Pies: Place half of the tree cutouts on the prepared baking sheet. Spoon about 1 tablespoon of pie filling into the center of each, leaving a 1/2-inch border.
- Assemble: Brush the border of each filled tree with the beaten egg. Place a second tree cutout on top and press the edges firmly with a fork to seal.
- Bake: Brush the tops of the hand pies with the remaining egg wash and use a knife to cut a small slit in the top of each to allow steam to escape. Bake for 15-20 minutes, or until golden brown and puffed.
- Cool and Decorate: Let the hand pies cool on the baking sheet for a few minutes before transferring to a wire rack. Once cooled, whisk together the powdered sugar and milk to create a glaze. Drizzle it over the hand pies and immediately add sprinkles.
- Lesson Learned: Don’t overfill the hand pies! It’s tempting, but too much filling will ooze out during baking and make a sticky mess. One heaping tablespoon is the perfect amount.

8. Salted Caramel Dutch Apple Pie

Upgrade your apple pie game. Pin this decadent recipe!
Take your apple pie to the next level with two easy upgrades: a buttery crumb topping and a luscious salted caramel drizzle. This Dutch apple pie (or apple crumble pie) is wonderfully textured and rich, and using jarred caramel sauce makes it incredibly simple to add a layer of decadence.
Ingredients:
- 1 (9-inch) unbaked pie crust
- 6 medium baking apples, peeled, cored, and sliced
- 1/2 cup jarred salted caramel sauce
- For the Crumb Topping:
- 1 cup all-purpose flour
- 1/2 cup packed light brown sugar
- 1/2 teaspoon ground cinnamon
- 1/2 cup (1 stick) cold unsalted butter, cubed
Instructions:
- Preheat Oven: Preheat oven to 375°F (190°C). Press your pie crust into a 9-inch pie plate.
- Prepare Apples: In a large bowl, toss the sliced apples with half of the salted caramel sauce until evenly coated. Pour the apples into the pie crust.
- Make Crumb Topping: In a separate bowl, combine the flour, brown sugar, and cinnamon. Using a pastry blender or your fingers, cut in the cold butter until the mixture resembles coarse crumbs.
- Top the Pie: Sprinkle the crumb mixture evenly over the apples.
- Bake: Place the pie on a baking sheet to catch drips. Bake for 45-55 minutes, or until the topping is golden brown and the filling is bubbly.
- Add More Caramel: Let the pie cool for at least 30 minutes. Just before serving, warm the remaining salted caramel sauce and drizzle it over the top.
- Pro-Tip: For the best texture, make sure your butter for the crumb topping is very cold. This ensures it stays in small pieces, which melt during baking to create a crisp, buttery topping instead of a greasy one.

9. Coconut Cream Dream Pie
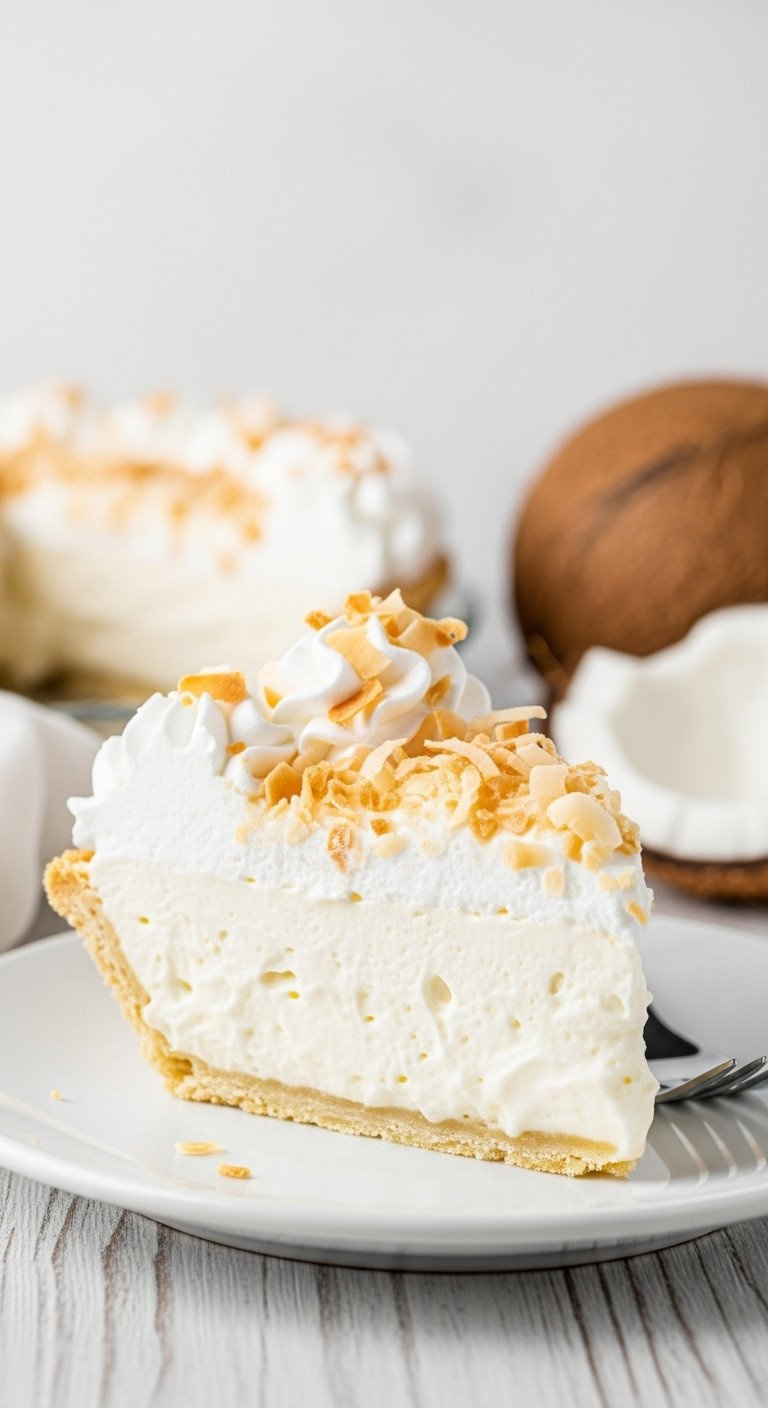
A tropical escape for your holiday table. Pin this classic!
This pie is a creamy, dreamy classic that feels like a tropical vacation. A rich, coconut-infused pudding filling is set in a crisp, pre-baked crust and topped with mounds of whipped cream and crunchy toasted coconut. It’s a make-ahead marvel that always gets rave reviews.
Ingredients:
- 1 (9-inch) pie crust, blind-baked and cooled
- 2/3 cup granulated sugar
- 1/4 cup cornstarch
- 1/4 teaspoon salt
- 3 cups whole milk
- 4 large egg yolks
- 2 tablespoons unsalted butter
- 1 teaspoon vanilla extract
- 1 cup sweetened shredded coconut, plus more for toasting
- For topping: 1 cup heavy cream, 2 tbsp powdered sugar, toasted coconut
Instructions:
- Make Pudding: In a medium saucepan, whisk together sugar, cornstarch, and salt. Gradually whisk in the milk until smooth. Whisk in the egg yolks.
- Cook Filling: Cook over medium heat, whisking constantly, until the mixture thickens and comes to a boil. Boil for 1 minute, still whisking.
- Finish Filling: Remove from heat and stir in the butter, vanilla, and 1 cup of shredded coconut.
- Chill: Pour the hot filling into the cooled, baked pie crust. Place plastic wrap directly on the surface of the filling to prevent a skin from forming. Refrigerate for at least 4 hours until completely firm.
- Toast Coconut: Spread extra coconut on a baking sheet and toast at 350°F for 5-7 minutes, watching carefully, until golden.
- Top and Serve: Before serving, whip the heavy cream and powdered sugar until stiff peaks form. Spread over the chilled pie and garnish with the toasted coconut.
- Lesson Learned: Whisking constantly is not a suggestion, it’s a requirement! Custard fillings can scorch on the bottom very easily, so keep it moving for a silky smooth result.

10. Gingerbread Cream Pie with Molasses Drizzle
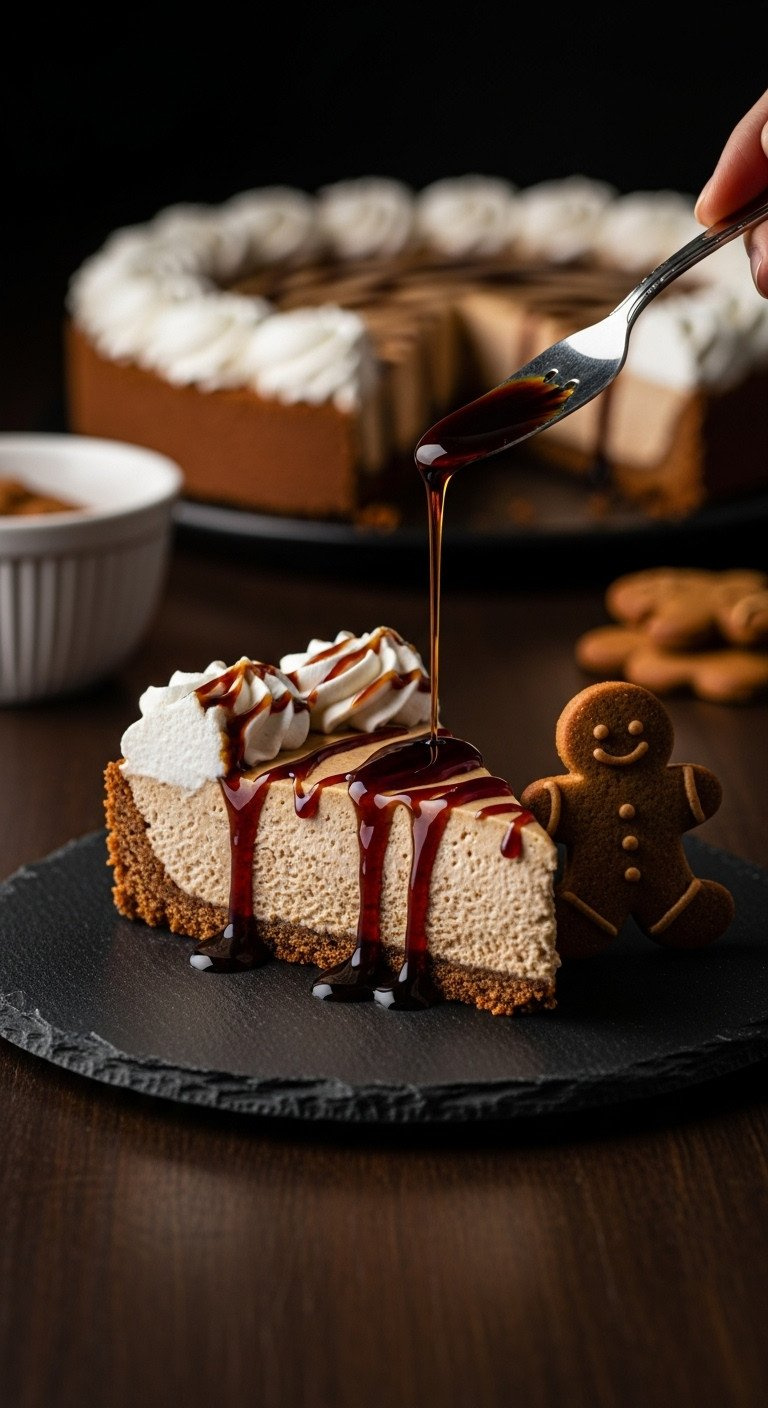
The ultimate Christmas flavor in a pie! Save this unique recipe.
If you love the flavor of gingerbread cookies, you will adore this pie. It’s a no-bake wonder with a tangy cream cheese base that’s perfectly spiced with ginger, cinnamon, and rich molasses. Set in a spicy gingersnap crust, it’s a unique and festive dessert that’s incredibly simple to whip up.
Ingredients:
- 1 (9-inch) pre-made gingersnap pie crust
- 8 ounces cream cheese, softened
- 1/2 cup packed dark brown sugar
- 1/4 cup molasses
- 1 teaspoon ground ginger
- 1/2 teaspoon ground cinnamon
- 1/4 teaspoon ground cloves
- 1 (8-ounce) container frozen whipped topping, thawed
- For Garnish: Whipped cream and extra molasses
Instructions:
- Beat Cream Cheese: In a large bowl, beat the softened cream cheese with an electric mixer until light and fluffy.
- Add Flavors: Beat in the dark brown sugar, molasses, ginger, cinnamon, and cloves until fully combined and smooth. Scrape down the sides of the bowl as needed.
- Fold in Topping: Gently fold in the thawed whipped topping until the mixture is uniform in color and no streaks remain.
- Fill and Chill: Spoon the gingerbread filling into the gingersnap crust and spread evenly.
- Set the Pie: Refrigerate for at least 6 hours, or overnight, until the pie is firm.
- Serve: Top with dollops of whipped cream and an artistic drizzle of molasses just before serving.
- Pro-Tip: To make drizzling the molasses easier and less messy, pour some into a small zip-top bag, snip off a tiny corner, and use it like a piping bag.

11. Chocolate French Silk Pie (Easy Method)

The richest, silkiest chocolate pie, made simple. Pin for later!
Traditional French Silk Pie can be fussy. This easy method delivers that same incredibly rich, silky, mousse-like chocolate filling without any of the hassle (or raw eggs). It’s a supremely elegant and decadent dessert that no one will ever guess was so simple to make.
Ingredients:
- 1 (9-inch) pie crust, blind-baked and cooled
- 1 cup heavy whipping cream
- 8 ounces high-quality semi-sweet chocolate, chopped
- 8 ounces cream cheese, softened
- 1 cup powdered sugar
- 1 teaspoon vanilla extract
- For topping: Sweetened whipped cream and chocolate shavings
Instructions:
- Melt Chocolate: In a small saucepan over low heat, heat 1/2 cup of the heavy cream until it just begins to simmer. Pour the hot cream over the chopped chocolate in a heatproof bowl. Let it sit for 5 minutes, then stir until smooth. Let the ganache cool.
- Make Filling Base: In a large bowl, beat the softened cream cheese with an electric mixer until perfectly smooth. Beat in the powdered sugar, then the vanilla extract.
- Combine: Add the cooled (but still liquid) chocolate ganache to the cream cheese mixture and beat until fully incorporated and silky smooth.
- Whip Cream: In a separate chilled bowl, beat the remaining 1/2 cup of heavy cream until stiff peaks form.
- Lighten Filling: Gently fold the whipped cream into the chocolate mixture until no white streaks remain. This makes the filling light and airy.
- Fill and Chill: Pour the filling into the cooled pie crust. Refrigerate for at least 6 hours, or overnight, until very firm.
- Serve: Top with generous swirls of whipped cream and chocolate shavings before serving.
- Lesson Learned: The quality of chocolate is everything in this recipe. Use a good quality baking chocolate bar (like Ghirardelli or Guittard), not chocolate chips, for the smoothest, most luxurious flavor and texture.

Key Takeaways: Your Holiday Pie-Making Cheat Sheet
Feeling ready to tackle that holiday dessert? Keep these simple strategies in mind for guaranteed success and minimal stress.
- No-Bake is Your Best Friend: For the ultimate stress-saver, choose a no-bake recipe like the White Chocolate Peppermint or Gingerbread Cream Pie. They can be made a day or two in advance.
- Embrace Store-Bought Crusts: A high-quality store-bought refrigerated or frozen pie crust is the single biggest time-saver. No one will know the difference!
- Cool Completely for Clean Slices: This is non-negotiable for custard and cream pies. Rushing the cooling time will result in a soupy mess. Allow at least 4 hours of chilling.
- Plan Ahead: Most pies can be prepared at least one day in advance. Fruit and pecan pies keep well at room temperature, while cream and custard pies must be refrigerated.
- Simple Garnishes are Stunning: A dollop of whipped cream, a sprinkle of cinnamon, a drizzle of caramel, or a scattering of toasted coconut can make any simple pie look elegant.
People Also Ask About Easy Christmas Pies
What is the absolute easiest pie to make for Christmas?
The easiest Christmas pies are no-bake varieties with a pre-made crust. A 5-Ingredient Pumpkin Cream Pie or a No-Bake Chocolate Pie are foolproof options. They only require mixing and chilling, completely eliminating the stress of baking, making them perfect for true beginners or last-minute needs.
Can I make my Christmas pie a few days ahead of time?
Yes, many pies are perfect for making ahead! Pecan pies and most fruit pies can be baked 1-2 days in advance and stored, covered, at room temperature. Cream pies and custard pies (like pumpkin or eggnog) should be made the day before and stored in the refrigerator.
How do I keep my bottom pie crust from getting soggy?
The best way to prevent a soggy bottom is to blind-bake your crust before adding a wet filling. For double-crust pies, placing your pie plate on a preheated baking sheet on the lowest oven rack helps crisp the bottom crust effectively.
What are some simple ways to make a pie look festive?
You don’t need fancy skills to decorate a pie beautifully. Sprinkle coarse sugar on a crust before baking for a sparkle. Use a small, festive cookie cutter on extra dough to create a centerpiece. A simple garnish of sugared cranberries, a dusting of powdered sugar, or swirls of whipped cream can instantly make a pie look stunning.
Final Thoughts
This holiday season, give yourself the gift of a stress-free dessert. Choose one of these simple yet stunning recipes, and spend less time worrying in the kitchen and more time making memories. You’ve got this!
Which of these easy Christmas pie recipes are you most excited to try? Let me know in the comments below
Last update on 2026-06-22 at 05:00 / Affiliate links / Images from Amazon Product Advertising API
