As an Amazon Associate BakingBakewareSets.com earns from qualifying purchases.
Fun Christmas Baking For Kids 11 Easy Stress Free Ideas
Dreaming of magical Christmas baking memories? But are you picturing a flour-covered kitchen and a toddler meltdown instead?
Christmas baking for kids is a cherished family tradition meant to create joy. You’re not alone in worrying that the reality will be more stress and mess than sweet memories. This is a common challenge we’ve observed.
Christmas baking with kids is about creating joyful memories, not perfect cookies. This guide offers 11 simple, stress-free recipes and essential parent tips for safety, managing mess, and ensuring everyone has fun, turning potential chaos into a cherished holiday tradition.
☰ Table of Contents ▼
show
Want Magical Baking Memories (Without the Meltdown)?
We’ve all been there. You see a picture of perfectly decorated gingerbread men and imagine a heartwarming afternoon with your little ones, filled with laughter and festive music. But the reality of baking with children can often involve spilled ingredients, short attention spans, and a level of kitchen chaos you weren’t prepared for. The desire for a perfect holiday memory can quickly clash with the stress of the mess.
But what if you could have the magical moment without the meltdown?
The secret is to shift your focus from the product to the process. It’s not about making Pinterest-perfect cookies; it’s about the fun of stirring, the excitement of sprinkling, and the pride on their faces. We’ve designed this guide with that goal in mind. All 11 of these ideas are kid-tested and parent-approved in our own kitchen to be genuinely easy, fun, and designed for happy memories.
Fun Christmas Baking For Kids: 11 Easy Stress-Free Ideas
Ready to find the perfect festive project? Each of these 11 ideas has been chosen from years of experience to maximize fun and minimize mess. We’ve focused on recipes that highlight the parts kids love most—mixing, assembling, decorating, and, of course, tasting! From no-bake wonders to simple decorating stations, these are your foolproof recipes for holiday fun.
We’ve included our best pro-tips to guarantee a happy baking session for you and your little helpers.

Pin this adorable no-bake idea for a quick holiday activity!
These cute reindeer are one of the simplest Christmas treats for kids to make. With no oven required, even toddlers can get involved in assembling their own little herd of delicious, peanut butter reindeer cookies.
Ingredients Needed:
- Peanut-shaped sandwich cookies (like Nutter Butters)
- Melting chocolate wafers or chocolate chips
- Small pretzel twists
- Edible candy eyeballs
- Red candy-coated chocolates (like M&M’s) for the nose
- A tablespoon of coconut oil (optional, for thinning chocolate)
Step-by-Step Directions:
- Break pretzels in half to create “antler” shapes. Set aside.
- Melt the chocolate in a microwave-safe bowl in 30-second intervals, stirring until smooth.
- Dip a cookie into the melted chocolate, covering it completely. Use a fork to lift it out, letting excess chocolate drip off.
- Place the chocolate-covered cookie on a sheet of parchment paper.
- While the chocolate is still wet, gently press two pretzel “antlers” into the top of the cookie.
- Add two candy eyeballs and one red candy nose.
- Let the cookies set completely in the refrigerator for about 10-15 minutes.
The most fun job for little kids is placing the eyes and nose! Have them ready in small bowls for easy grabbing.

2. Melted Snowman Chocolate Bark

Save this easy chocolate bark idea for a fun snow day!
This Christmas chocolate bark is a perfect project because there’s no way to get it wrong! Kids love creating the little puddles of melted snowmen, and every piece turns out unique and charming.
Ingredients Needed:
- 1 bag (12 oz) of quality white chocolate melting wafers or chips
- Mini chocolate chips
- Edible candy eyeballs
- Orange sprinkles (jimmies work best for a “carrot” look)
- Optional: Mini peanut butter cups or chocolate hats
Step-by-Step Directions:
- Line a baking sheet with parchment paper.
- Melt the white chocolate in a microwave-safe bowl in 30-second intervals, stirring until completely smooth.
- Pour the melted chocolate onto the prepared baking sheet and spread it into an even layer with a spatula.
- Now for the fun part! Let the kids create “puddles” of melted snowmen. In various spots, add two candy eyes, a few mini chocolate chips below for buttons, and an orange sprinkle for a nose.
- Let the bark set at room temperature for about an hour or in the refrigerator for 20 minutes until firm.
- Once hardened, break the bark into pieces.
Don’t spread the chocolate too thin, or the bark will be too fragile. Aim for about 1/4 inch thickness.
3. Christmas Rice Krispie Treat Shapes
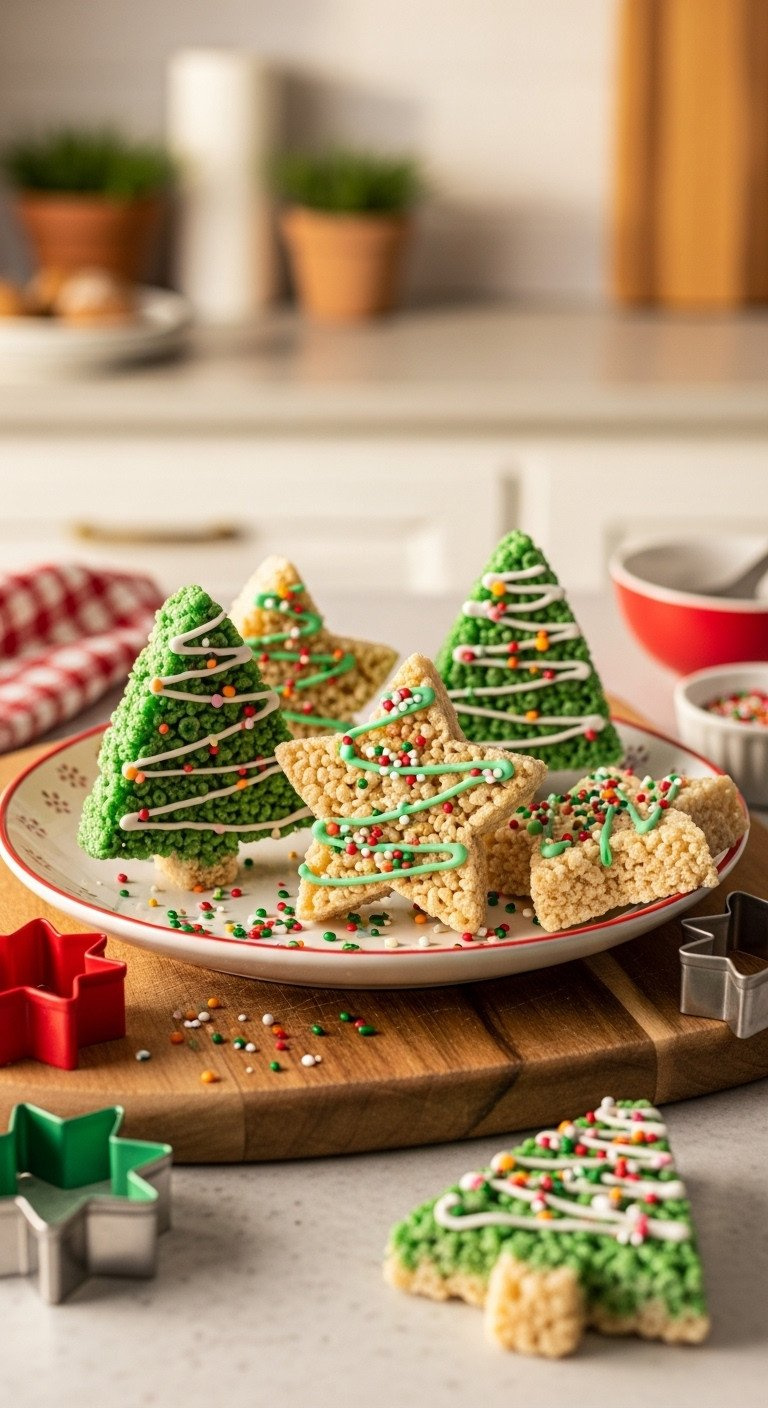
Pin this classic kid-friendly recipe with a festive twist!
Everyone loves Rice Krispie treats! This holiday version uses green food coloring and cookie cutters to turn a classic no-bake recipe into a fun Christmas activity with a delicious, festive result.
Ingredients Needed:
- 6 cups Rice Krispies cereal
- 1 bag (10 oz) mini marshmallows
- 3 tablespoons butter
- Green food coloring
- Assorted Christmas sprinkles
- A tube of white cookie icing
- Christmas-themed cookie cutters (metal works best)
Step-by-Step Directions:
- In a large pot, melt the butter over low heat. Add the marshmallows and stir until completely melted. Remove from heat.
- Add a few drops of green food coloring and stir until you have an even color.
- Working quickly, stir in the Rice Krispies cereal until well-coated.
- Press the mixture firmly into a buttered 13×9 inch pan. Use a buttered spatula or a piece of wax paper to press down evenly.
- Let the treats cool for at least 30 minutes.
- Use cookie cutters to cut out festive shapes.
- Let the kids decorate their shapes with a drizzle of icing and plenty of sprinkles!
Spray your cookie cutters with non-stick cooking spray before each cut. This prevents the sticky treats from getting stuck inside!

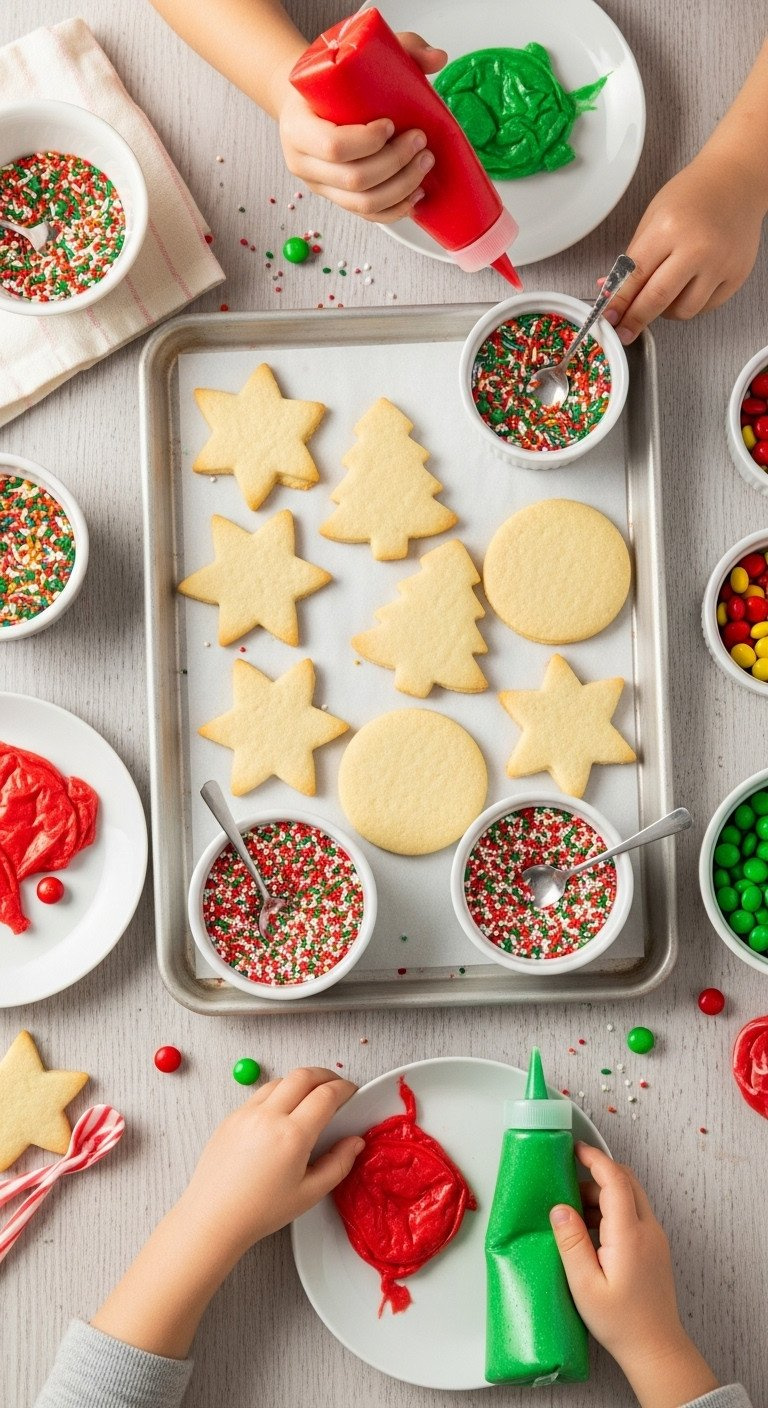
Save this brilliant idea for a low-stress cookie decorating party!
This is the ultimate hack for fun Christmas baking. Skip the stress of making dough from scratch and jump straight to the best part: decorating! Using store-bought cookie dough and setting up a “station” makes this a simple, creative project.
Materials Needed:
- 1 roll of pre-made refrigerated sugar cookie dough (the ultimate time-saver!)
- All-purpose flour for rolling
- Kid-friendly squeeze bottles for icing
- 2-3 tubes of store-bought cookie icing (in red, green, white)
- A muffin tin for holding sprinkles
- A wide assortment of Christmas sprinkles, nonpareils, and colored sugars
Step-by-Step Directions:
- Bake the sugar cookies according to the package directions. Let them cool completely. This is a great step for an adult to do ahead of time.
- Set up the Station: This is the key to stress-free fun. Fill each cup of a muffin tin with a different type of sprinkle.
- Warm the icing tubes in a bowl of warm water for a minute to soften them, then squeeze the icing into the easy-to-use bottles.
- Arrange the cooled cookies on a large tray or parchment-lined table.
- Place the sprinkle-filled muffin tin and icing bottles in the center.
- Let the kids go wild! The squeeze bottles are much easier for little hands to control than piping bags.
Put a cheap plastic tablecloth under the decorating area. When you’re done, you can just fold it up and toss the mess away!

5. Pretzel Wreath Treats

Pin this sweet and salty treat idea—so easy and festive!
These pretzel wreath treats look impressive but are surprisingly simple to assemble. Kids love the no-bake process of dipping pretzels and arranging them into little green circles, creating a perfect sweet and salty Christmas candy.
Ingredients Needed:
- 1 bag of mini pretzel twists
- 1 bag (12 oz) of white chocolate melting wafers
- Green gel food coloring
- Red mini M&M’s or similar small red candies
Step-by-Step Directions:
- Line a large baking sheet with parchment paper.
- Melt the white chocolate in a microwave-safe bowl until smooth.
- Add a few drops of green gel food coloring and stir until you achieve a festive wreath color.
- Dip each pretzel into the green chocolate, ensuring it’s fully coated. Lift out with a fork.
- Arrange 5-6 coated pretzels in a small circle on the parchment paper to form a wreath shape.
- Before the chocolate sets, place a few red candies at the bottom of each wreath to look like a bow or holly berries.
- Let the wreaths set completely in the fridge for about 15 minutes.
Work in small batches. The chocolate will start to set, so only arrange a few wreaths at a time to ensure the red candies stick properly.

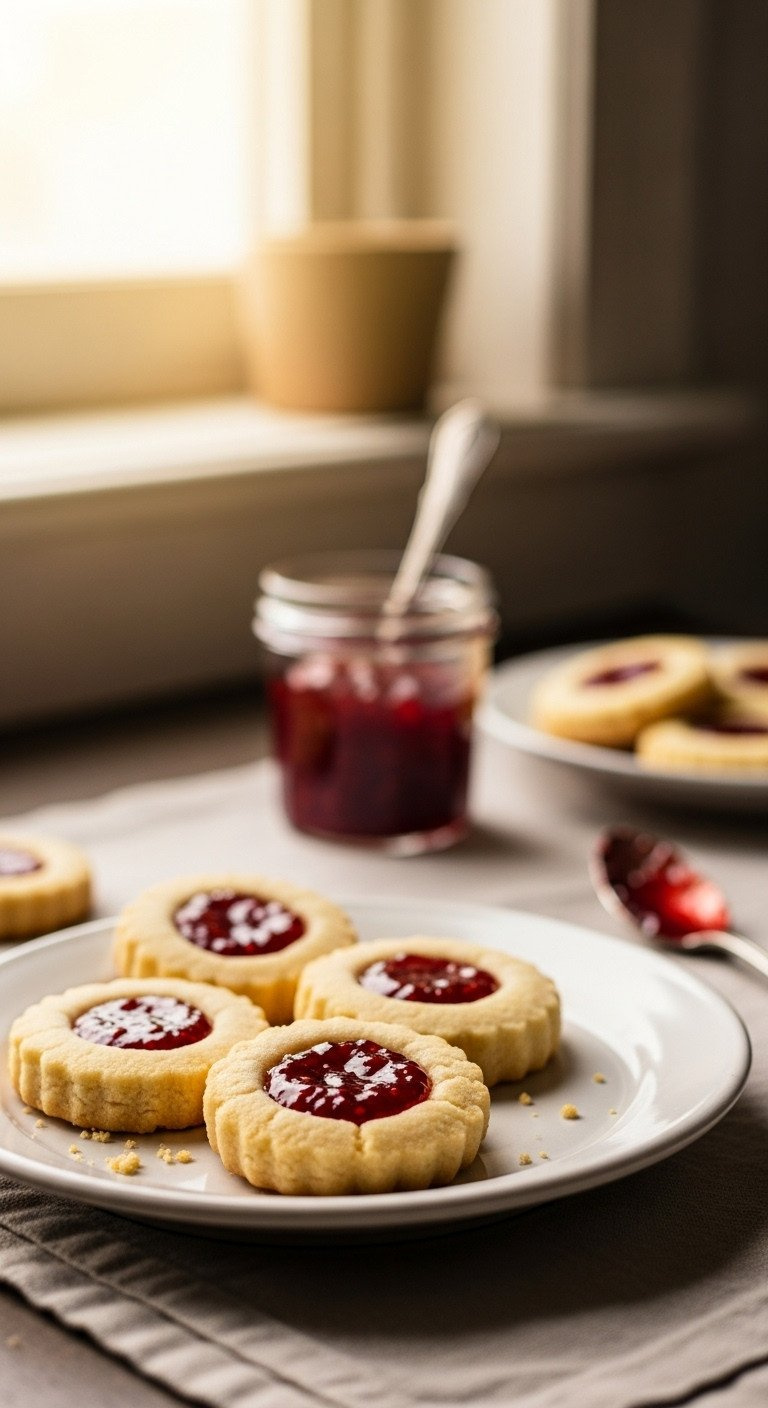
Save this timeless Christmas cookie recipe that’s perfect for little helpers!
This classic Christmas cookie is built for little hands. The forgiving, buttery dough is easy to handle, and the best part—making the “thumbprint”—is a fun and foolproof job that kids absolutely love.
Ingredients Needed:
- 1 cup unsalted butter, softened
- 1/2 cup granulated sugar
- 1 large egg yolk
- 1 teaspoon vanilla extract
- 2 cups all-purpose flour
- 1/4 teaspoon salt
- 1/2 cup raspberry or strawberry jam
Step-by-Step Directions:
- Preheat your oven to 350°F (175°C). Line baking sheets with parchment paper.
- In a large bowl, beat the softened butter and sugar together until light and fluffy.
- Beat in the egg yolk and vanilla extract.
- Gradually add the flour and salt, mixing on low speed until just combined.
- Let the kids roll the dough into 1-inch balls and place them on the baking sheets.
- Now, the best part! Have them use their thumb (or the back of a small measuring spoon) to press an indentation into the center of each ball.
- Fill each indentation with a small amount of jam.
- Bake for 12-15 minutes, or until the edges are lightly golden. Let cool on the pan for a few minutes before moving to a wire rack.
If the dough is too sticky for kids to roll, chill it in the fridge for 30 minutes. It makes it much easier to handle.

7. Candy Cane Marshmallow Pops

Pin this super simple, 3-ingredient treat idea!
With just three simple ingredients, these no-bake marshmallow pops are a quick and easy win. They are fun to eat on a stick, and kids will have a blast with the task of crushing the candy canes.
Ingredients Needed:
- 1 bag of large marshmallows
- 1 bag (12 oz) white chocolate melting wafers
- 1 box of candy canes (about 10-12)
- Lollipop sticks or sturdy paper straws
Step-by-Step Directions:
- Line a baking sheet with wax or parchment paper.
- Unwrap the candy canes, place them in a sturdy zip-top bag, and let the kids crush them with a rolling pin or the back of a spoon. Pour the crushed pieces onto a plate.
- Carefully push a lollipop stick into the bottom of each marshmallow.
- Melt the white chocolate in a deep, microwave-safe mug or bowl.
- Dip a marshmallow into the melted chocolate, twirling to coat it about three-quarters of the way up.
- Immediately roll the chocolate-covered marshmallow in the crushed candy canes.
- Place the finished pop on the prepared baking sheet to set. You can stand them up in a block of styrofoam if you have one.
The most satisfying job for a kid is crushing the candy canes! Just double-bag them to prevent any sharp pieces from poking through.

8. Oreo Christmas Ornaments

Save this clever cookie hack for a super fast decorating session!
This is one of the best no-bake Christmas cookie hacks. Transform a simple store-bought Oreo into a dazzling, edible ornament with melted chocolate, sprinkles, and a candy “cap.”
Materials Needed:
- 1 package of Oreo cookies
- 1 bag of white or colored candy melts (red and green are great)
- Christmas-themed sprinkles
- Mini peanut butter cups or Rolo candies, unwrapped
- A bit of extra melted chocolate to act as “glue”
Step-by-Step Directions:
- Line a baking sheet with parchment paper.
- Melt the candy melts according to package directions.
- Dip an Oreo cookie into the melted chocolate, covering it completely. Use a fork to lift it out and tap off the excess.
- Place the dipped cookie on the parchment paper.
- While the chocolate is still wet, let the kids cover it with their favorite Christmas sprinkles.
- Let the cookies set for about 10 minutes.
- Once set, put a small dab of melted chocolate on the bottom of a Rolo or mini peanut butter cup and stick it to the top of the Oreo to create the ornament “cap.”
- Let everything set completely before serving.
For a fun variation, use different colored candy melts. Kids love choosing which color to dip their cookie in!

9. Graham Cracker “Gingerbread” Houses

Pin this genius gingerbread house hack—all the fun, none of the frustration!
Get all the joy of decorating a gingerbread house with none of the structural engineering stress. Using graham crackers as a base and strong royal icing as “glue” creates a simple, stable canvas for all the candy decorations.
Materials Needed:
- 1 box of graham crackers
- Royal icing (store-bought tube or a simple homemade recipe: powdered sugar, meringue powder, water)
- A small cardboard milk carton (optional, as a base)
- A plate or cardboard square for the base
- A variety of small candies for decorating: gumdrops, mini candy canes, sprinkles, M&M’s
Step-by-Step Directions:
- The secret to a sturdy house is strong “glue.” Royal icing works best because it hardens like cement. Prepare your icing and put it in a piping bag or a zip-top bag with the corner snipped.
- For the easiest assembly: Use a clean, empty small milk carton as a frame. “Glue” graham cracker squares to all four sides.
- For the roof, “glue” two more graham cracker squares together to form a peak and attach them to the top.
- Let the main structure dry for at least 30 minutes before decorating. This is crucial to prevent collapse!
- Once the house is stable, give the kids small bowls of candy and let them decorate. Use the royal icing to stick on all the fun details.
- Finish with a heavy “snowfall” of icing on the roof!
Don’t rush the drying time for the main structure. Put it in the fridge to speed it up. A stable house is a happy house!

10. Christmas Popcorn Snack Mix

Save this ultimate Christmas movie night snack mix!
This holiday snack mix is the perfect big-batch recipe for a Christmas party or movie night. It combines sweet and salty flavors and is incredibly easy for kids to help assemble and mix.
Ingredients Needed:
- 8 cups of popped popcorn (plain, lightly salted)
- 2 cups mini pretzels
- 1 cup Christmas-colored M&M’s (red and green)
- 1 cup mini marshmallows
- 1 bag (12 oz) white chocolate melting wafers
- Christmas sprinkles (optional)
Step-by-Step Directions:
- Spread the popcorn, pretzels, M&M’s, and marshmallows in an even layer on a large parchment-lined baking sheet.
- Melt the white chocolate in the microwave until smooth.
- Using a spoon, drizzle the melted white chocolate all over the snack mix on the baking sheet.
- If using, immediately add the Christmas sprinkles while the chocolate is wet.
- The best part for kids: let them gently toss and mix everything together with their clean hands!
- Let the mix sit for about 30 minutes until the chocolate has completely hardened.
- Break apart and store in an airtight container.
Make sure your popcorn has cooled completely before adding the chocolate, otherwise, you’ll melt your M&M’s and marshmallows into a gooey mess.

11. Chocolate-Dipped Pretzel Rods

Pin this classic, easy treat—perfect for gifts!
Chocolate-dipped pretzel rods are a classic for a reason: they are simple, delicious, and a perfect canvas for creative decorating. This is a fantastic activity for kids and results in beautiful edible gifts for teachers, neighbors, and family.
Materials Needed:
- 1 bag of pretzel rods
- Assorted melting chocolates (milk, dark, and white wafers work great)
- A variety of Christmas-themed sprinkles, nonpareils, and colored sugars
- Tall, narrow glasses for dipping
Step-by-Step Directions:
- Line a baking sheet with parchment or wax paper.
- Pour your sprinkles onto separate plates for easy rolling.
- Melt your different chocolates in separate tall, narrow glasses or mugs (this makes dipping the long rods much easier).
- Give a child a pretzel rod and let them dip it into the chocolate, using a spoon to help coat it about two-thirds of the way up.
- Let the excess chocolate drip off for a moment.
- Before the chocolate sets, hold the pretzel rod over a plate of sprinkles and let the child spoon or shake the sprinkles onto the wet chocolate.
- Lay the decorated pretzel rod on the prepared baking sheet to set completely.
To get a clean drizzle effect, melt a contrasting color of chocolate, put it in a small zip-top bag, snip a tiny corner, and let the kids drizzle it over the already-set pretzel rods.

Key Takeaways: Your Quick Guide to Fun Christmas Baking
| Tip Category | Key Takeaway | Why It Matters |
|---|---|---|
| Preparation is Everything | “Mise en Place”: Measure all ingredients before kids join in. | Prevents mess, stress, and keeps short attention spans focused on the fun parts. |
| Focus on the Fun | Choose No-Bake or Decorating: Prioritize recipes where kids do the most engaging steps. | The goal is a fun activity, not a baking lesson. Decorating is always a win! |
| Embrace Imperfection | Process Over Product: Let go of perfection. A lopsided cookie made with love is the goal. | This removes pressure from both parent and child, ensuring the experience stays positive. |
| Safety First | Adults Handle Heat: Clearly define jobs. Adults always manage the oven and hot pots. | Establishes clear, simple safety rules that protect everyone and build good kitchen habits. |
People Also Ask About Christmas Baking For Kids
What is the best age to start Christmas baking with a child?
You can start as early as age 2 or 3 with simple, no-bake tasks. The key is to match the job to their skill level. Toddlers are great at stirring, sprinkling, and sensory play. Preschoolers (ages 4-5) can help with measuring and rolling. The focus should always be on simple, engaging steps.
How do you prevent a huge mess when baking with kids?
Preparation is your best defense against mess. Before you begin, cover your work surface with a cheap plastic tablecloth. Pre-measure all ingredients into small bowls (this is the single best tip!). Use a large, deep mixing bowl to contain splashes, and keep a damp cloth handy for immediate wipe-ups.
No-bake cookies and simple decorating projects are the easiest options. Treats like No-Bake Reindeer Cookies or decorating store-bought sugar cookies remove complicated steps. For baking, Thumbprint Cookies are fantastic because the main kid-friendly step—making the thumbprint—is fun and foolproof.
Final Thoughts
This holiday season, remember that the “secret ingredient” in any Christmas baking with kids is joy. The sprinkles might end up all over the floor, the snowman cookies might look a little lopsided, but the laughter and the memories you create in the kitchen will be perfectly sweet.
What’s your family’s favorite, can’t-miss Christmas treat to make together? Share your traditions in the comments below
Last update on 2026-06-15 at 04:00 / Affiliate links / Images from Amazon Product Advertising API
