As an Amazon Associate BakingBakewareSets.com earns from qualifying purchases.
11 Genius Peppermint Desserts For A Festive Holiday
Is there any scent more magical than peppermint at Christmas? It’s the instant signal that the most wonderful time of the year has arrived.
A peppermint dessert is a sweet treat where the cool, bright flavor of mint is the star. You’re looking for that perfect recipe to share, one that captures the festive spirit without being too complicated. You need something reliable, delicious, and guaranteed to bring holiday cheer.
Peppermint desserts are a cornerstone of holiday baking because their cool flavor perfectly contrasts the rich ingredients common in festive treats. This classic pairing with chocolate evokes nostalgia and signals the start of the Christmas season. In this guide, you’ll discover 11 genius recipes that are festive, foolproof, and absolutely delicious.
☰ Table of Contents ▼
show
Why Do Peppermint Desserts Make the Holidays Feel So Magical?
There’s a reason the crisp, cool aroma of peppermint instantly transports us to a winter wonderland. It’s a flavor deeply woven into our most cherished holiday traditions. From the iconic red and white swirl of a candy cane hanging on the tree to the rich combination of chocolate and mint in a steaming mug of hot cocoa, peppermint is the official taste of Christmas joy. The cool sensation provides a perfect, refreshing balance to the rich, creamy, and decadent foods we indulge in during the holiday season. Making these festive peppermint desserts isn’t just about baking; it’s about creating joyful, nostalgic memories with every bite. This curated list for 2026 features the absolute best, most impressive, yet achievable peppermint recipes to make your season bright.
11 Genius Peppermint Desserts For A Festive Holiday
Get ready to fill your kitchen with the scent of Christmas! We’ve gathered 11 foolproof peppermint dessert ideas that are tested, perfected, and guaranteed to impress your family and friends. This collection covers every skill level and occasion, from easy no-bake treats perfect for a last-minute party to a stunning chocolate peppermint layer cake that will be the star of your dessert table. Whether you’re a fan of classic peppermint bark or chewy cookies, you’ll find a new holiday favorite here.
1. The Ultimate Classic Peppermint Bark
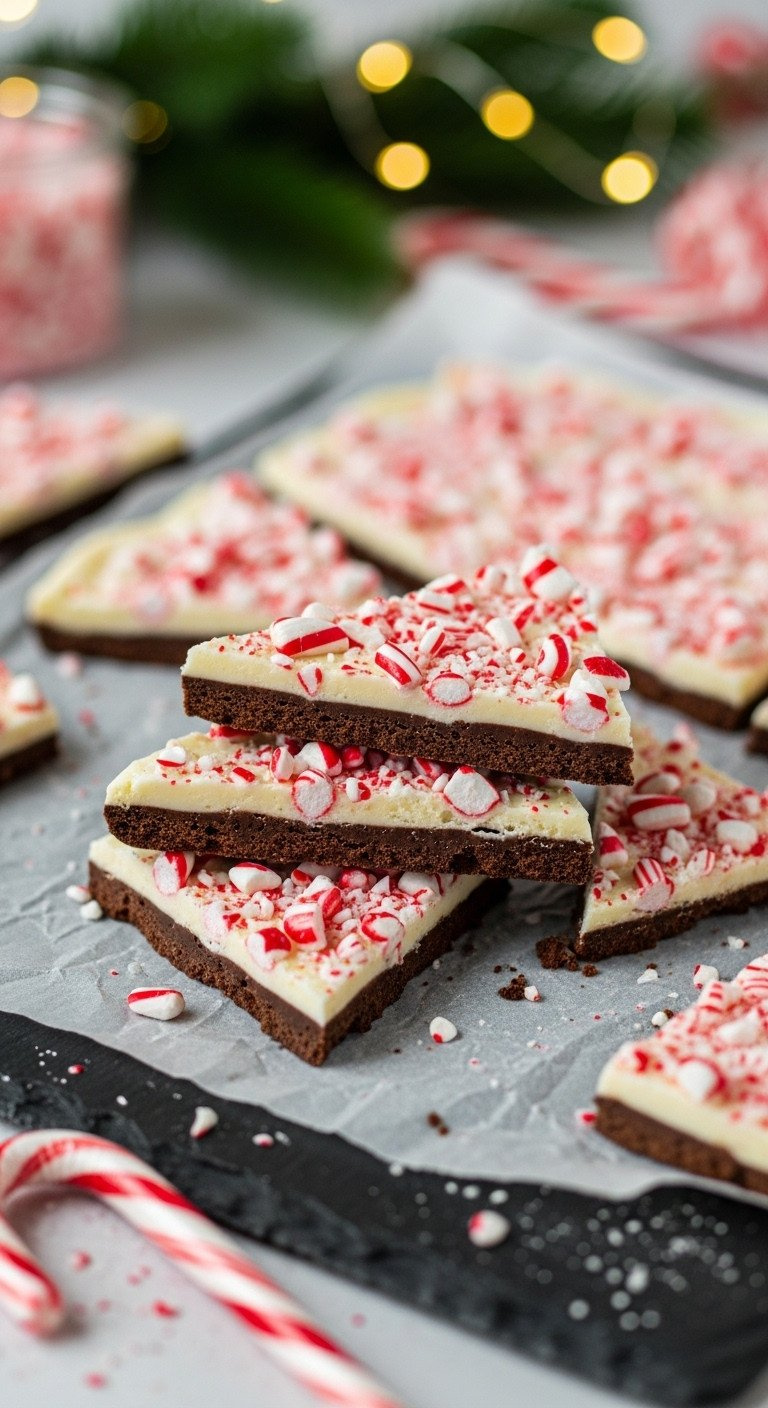
Pin this foolproof recipe to your ‘Christmas Treats’ board!
Ingredients Needed:
- 12 oz high-quality semi-sweet chocolate chips or wafers (for easy melting)
- 12 oz high-quality white chocolate chips or wafers
- 1/2 tsp pure peppermint extract (or 1/4 tsp peppermint oil)
- 1/2 cup crushed candy canes or peppermint candies
- A large, rimmed baking sheet lined with a silicone baking mat or parchment paper
Step-by-Step Directions:
- Prepare your station by lining a large baking sheet with parchment paper or a silicone mat. Have your crushed candy canes ready.
- Gently melt the semi-sweet chocolate in a double boiler or in the microwave at 50% power in 30-second intervals, stirring until smooth.
- Pour the melted dark chocolate onto the prepared baking sheet and use an offset spatula to spread it into a thin, even layer.
- Let the dark chocolate layer set at room temperature for about 20-30 minutes, or until it’s mostly firm but still slightly tacky to the touch.
- Gently melt the white chocolate using the same method. Once smooth, stir in the peppermint extract.
- Pour the melted white chocolate over the dark chocolate layer, spreading it evenly.
- Immediately sprinkle the crushed candy canes evenly over the white chocolate layer. Gently press them in with your hand if needed.
- Let the bark set completely at cool room temperature for at least 2 hours (or in the fridge for 30 minutes if you’re in a hurry). Once hardened, break it into pieces.
Pro-Tip: For perfectly glossy bark that snaps, use oil-based peppermint flavoring in your chocolate, as alcohol-based extracts can sometimes cause it to “seize” or thicken.

2. Decadent Peppermint Mocha Brownies
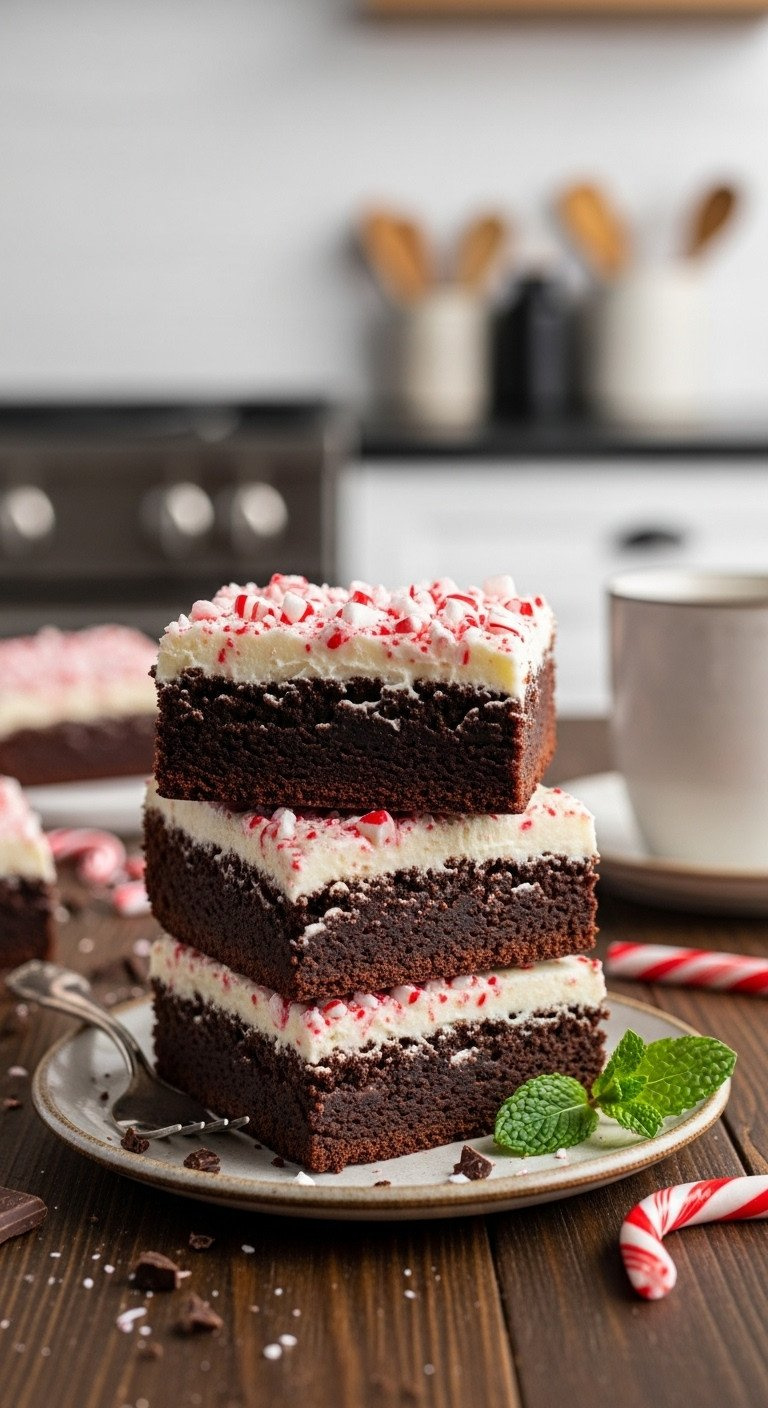
Save this indulgent brownie recipe for your holiday baking list!
Ingredients Needed:
- For the Brownies:
- 1 cup unsalted butter, melted
- 2 cups granulated sugar
- 4 large eggs
- 1 tsp vanilla extract
- 1/2 tsp peppermint extract
- 1 cup all-purpose flour
- 3/4 cup Dutch-processed cocoa powder
- 1 tsp espresso powder
- 1/2 tsp salt
- For the Frosting:
- 4 oz cream cheese, softened
- 1/4 cup unsalted butter, softened
- 2 cups powdered sugar
- 1/2 tsp peppermint extract
- 1-2 tbsp milk or cream
- Crushed candy canes for topping
Step-by-Step Directions:
- Preheat your oven to 350°F (175°C) and grease and line an 8×8 inch baking pan with parchment paper.
- In a large bowl, whisk together the melted butter and granulated sugar until well combined.
- Beat in the eggs one at a time, followed by the vanilla and peppermint extracts.
- In a separate bowl, whisk together the flour, cocoa powder, espresso powder, and salt.
- Gradually add the dry ingredients to the wet ingredients, mixing until just combined. Do not overmix.
- Pour the batter into the prepared pan and spread evenly. Bake for 30-35 minutes, or until a toothpick inserted into the center comes out with moist crumbs.
- Let the brownies cool completely in the pan.
- To make the frosting, beat the softened cream cheese and butter until smooth. Gradually beat in the powdered sugar, then the peppermint extract and 1 tbsp of milk. Add more milk if needed to reach a spreadable consistency.
- Spread the frosting over the cooled brownies and sprinkle with crushed candy canes. Chill for 20 minutes to set before cutting.
Pro-Tip: Using espresso powder doesn’t make the brownies taste like coffee; it just deepens and enhances the chocolate flavor for an incredibly rich result.

3. No-Bake Peppermint Oreo Truffles
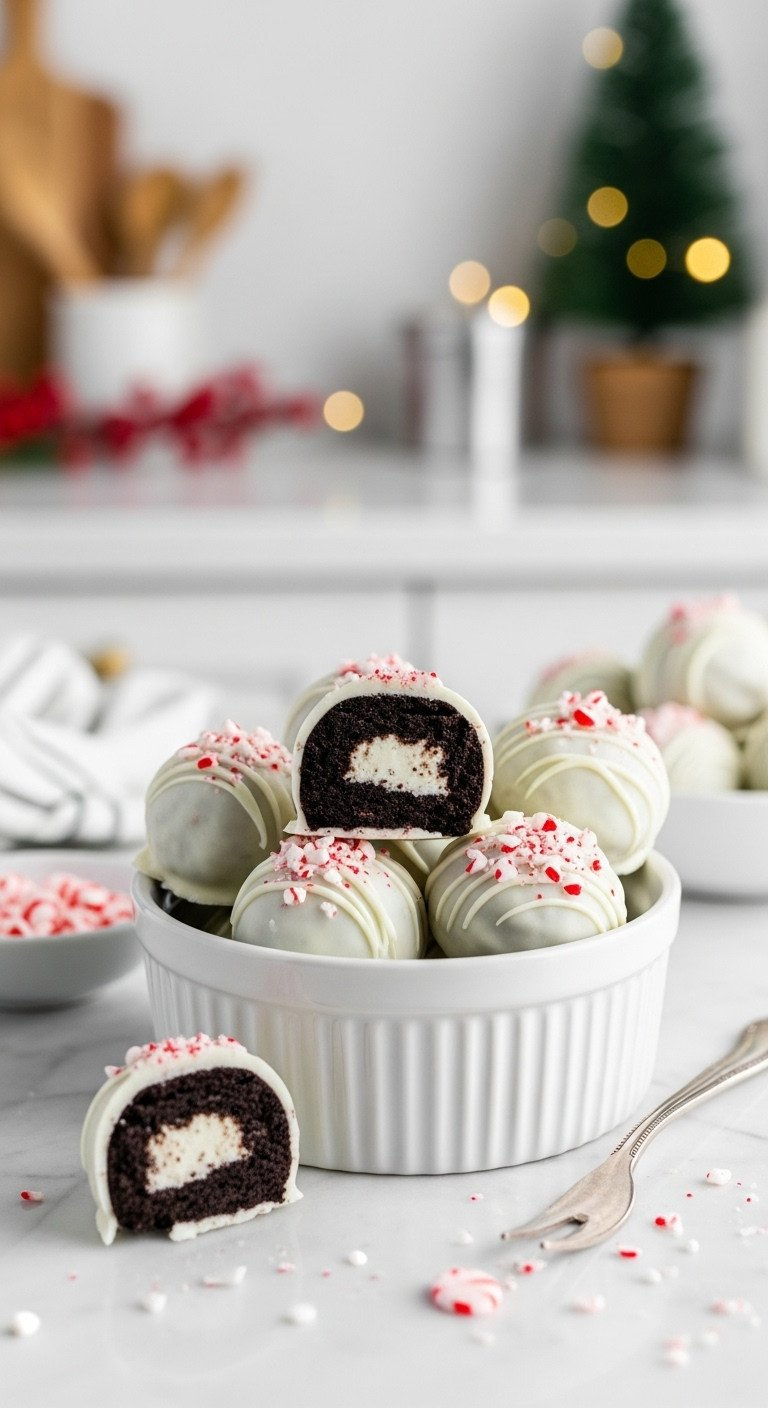
Need a last-minute treat? Pin this easy no-bake recipe!
Materials Needed:
- 1 package (about 36) Oreo cookies (regular, not Double Stuf)
- 8 oz full-fat cream cheese, softened to room temperature
- 1/2 tsp pure peppermint extract
- 16 oz white chocolate melting wafers or chopped white chocolate
- Finely crushed candy canes for garnish
- Food processor for crushing cookies
Step-by-Step Directions:
- Place the entire package of Oreo cookies into a food processor and pulse until they form fine crumbs.
- Set aside 2 tablespoons of the crumbs for garnish later.
- In a medium bowl, use a hand mixer to beat the softened cream cheese until smooth. Add the remaining Oreo crumbs and the peppermint extract, and mix until well combined.
- Use a small cookie scoop to portion the mixture and roll it into 1-inch balls. Place the balls on a parchment-lined baking sheet.
- Freeze the Oreo balls for at least 30 minutes until firm. This is crucial for easy dipping.
- Melt the white chocolate wafers in the microwave in 30-second intervals, stirring until smooth.
- Dip each frozen Oreo ball into the melted white chocolate, turning to coat completely. Lift out with a fork, allowing excess chocolate to drip off.
- Place the dipped truffles back on the parchment paper and immediately sprinkle with crushed candy canes before the chocolate sets.
- Refrigerate for at least 15 minutes to allow the chocolate to harden completely.
Lesson Learned: Don’t skip the freezing step! Firm, cold truffle balls are much easier to dip and won’t fall apart in the warm chocolate.


The perfect cookie for Santa! Pin this soft-baked recipe.
Ingredients Needed:
- 2 1/4 cups all-purpose flour
- 1 tsp baking soda
- 1/2 tsp salt
- 1 cup unsalted butter, softened
- 3/4 cup granulated sugar
- 1/2 cup packed brown sugar
- 2 large eggs
- 1 tsp vanilla extract
- 1 tsp peppermint extract
- 1 1/2 cups white chocolate chips
- 1/2 cup crushed peppermint candies or candy canes
Step-by-Step Directions:
- In a medium bowl, whisk together the flour, baking soda, and salt.
- In a separate large bowl, using a stand mixer or hand mixer, beat the softened butter, granulated sugar, and brown sugar until light and fluffy (about 2-3 minutes).
- Beat in the eggs one at a time, then stir in the vanilla and peppermint extracts.
- Gradually add the dry ingredients to the wet ingredients, mixing on low speed until just combined.
- Gently stir in the white chocolate chips and crushed peppermint candies.
- Cover the dough and chill in the refrigerator for at least 1 hour. This is key for thick, chewy cookies.
- Preheat oven to 375°F (190°C). Line baking sheets with parchment paper.
- Scoop rounded tablespoons of chilled dough onto the prepared baking sheets, about 2 inches apart.
- Bake for 9-11 minutes, or until the edges are lightly golden. The centers will look slightly underbaked.
- Let the cookies cool on the baking sheet for 5 minutes before transferring them to a wire rack to cool completely.
Pro-Tip: For that perfect bakery-style look, gently press a few extra white chocolate chips and pieces of crushed candy cane onto the tops of the dough balls right before baking.

5. Festive Peppermint Swirl Fudge
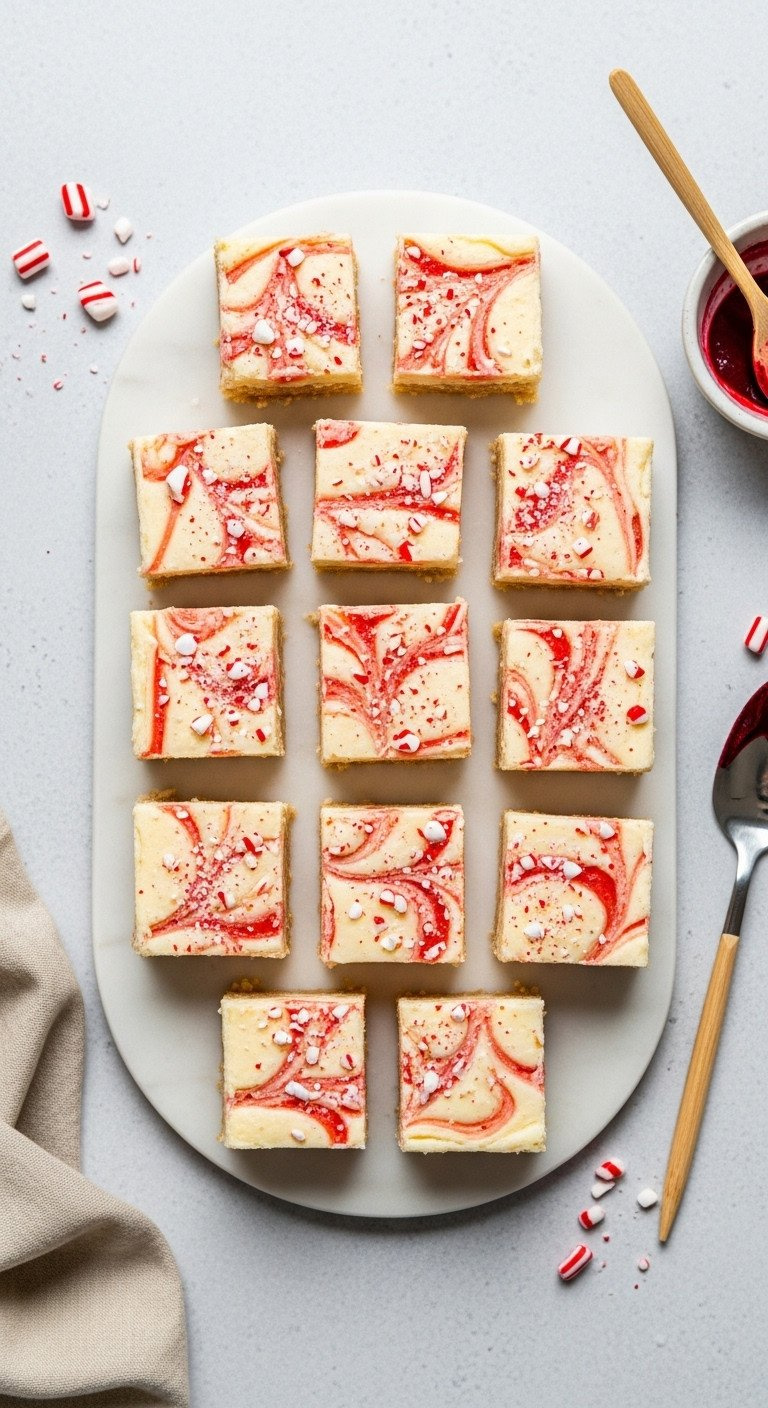
This fudge is the perfect edible gift! Pin this easy recipe.
Materials Needed:
- 3 cups high-quality white chocolate chips
- 1 can (14 oz) sweetened condensed milk
- 1/4 cup unsalted butter, cubed
- 1 jar (7 oz) marshmallow creme
- 1 tsp pure peppermint extract
- 1/4 tsp salt
- 4-5 drops of red gel food coloring
- An 8×8 inch baking pan lined with foil or parchment paper
Step-by-Step Directions:
- Line an 8×8 inch pan with foil, leaving an overhang on the sides to easily lift the fudge out later. Lightly grease the foil.
- In a medium saucepan, combine the white chocolate chips, sweetened condensed milk, and butter.
- Cook over low heat, stirring constantly, until the chips are completely melted and the mixture is smooth.
- Remove from heat and immediately stir in the marshmallow creme, peppermint extract, and salt until well combined.
- Pour the fudge mixture into the prepared pan and spread evenly.
- Working quickly before the fudge sets, drop small dots of red gel food coloring over the surface.
- Use a toothpick or a wooden skewer to gently drag through the red dots, creating a swirled pattern. Don’t overmix.
- Let the fudge cool at room temperature for at least 4 hours, or until firm. You can also refrigerate it to speed up the process.
- Once set, use the foil overhang to lift the fudge from the pan. Cut into small squares.
Pro-Tip: For the most vibrant swirls, use gel-based food coloring. Liquid food coloring can alter the fudge’s texture and won’t produce as sharp of a color contrast.

6. Easy Peppermint Cream Cheese Dip
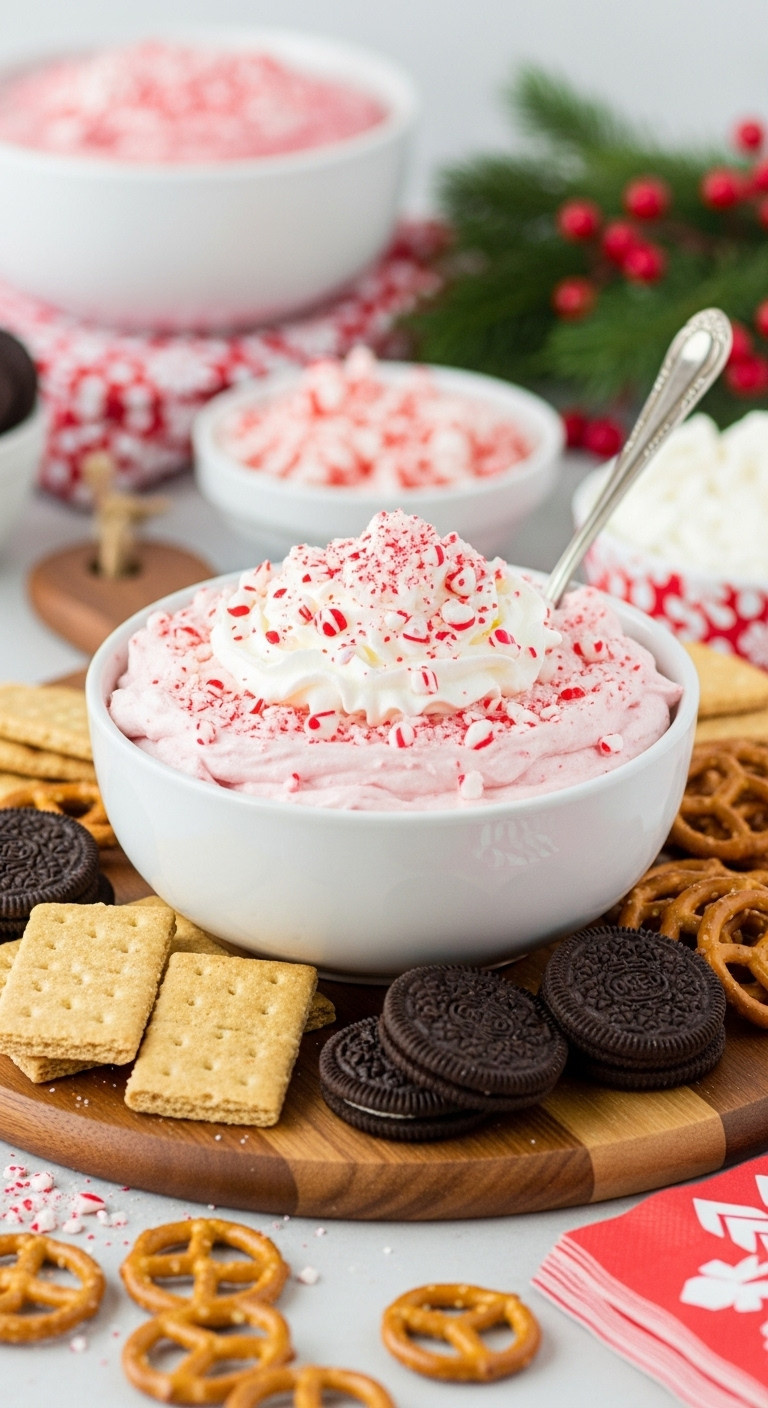
The easiest party appetizer! Save this 5-minute dip recipe.
Materials Needed:
- 8 oz cream cheese, softened to room temperature
- 1 jar (7 oz) marshmallow creme or fluff
- 1 container (8 oz) frozen whipped topping (like Cool Whip), thawed
- 1/2 tsp peppermint extract
- 1/4 cup finely crushed peppermint candies
- For Serving: Chocolate graham crackers, Oreos, pretzels, vanilla wafers, apple slices
Step-by-Step Directions:
- In a medium bowl, use a hand mixer to beat the softened cream cheese until it’s completely smooth and free of lumps.
- Add the marshmallow creme and peppermint extract to the bowl and beat again until well combined.
- Gently fold in the thawed whipped topping and most of the crushed peppermint candies with a spatula until just combined. Be careful not to deflate the whipped topping.
- Transfer the dip to a serving bowl.
- Garnish with the remaining crushed peppermint candies right before serving. Serve with your favorite dippers.
Pro-Tip: Make this dip up to 24 hours in advance, but wait to add the crushed peppermint topping until just before you serve it to keep the candy pieces crunchy and prevent the color from bleeding.
7. Showstopper Chocolate Peppermint Layer Cake
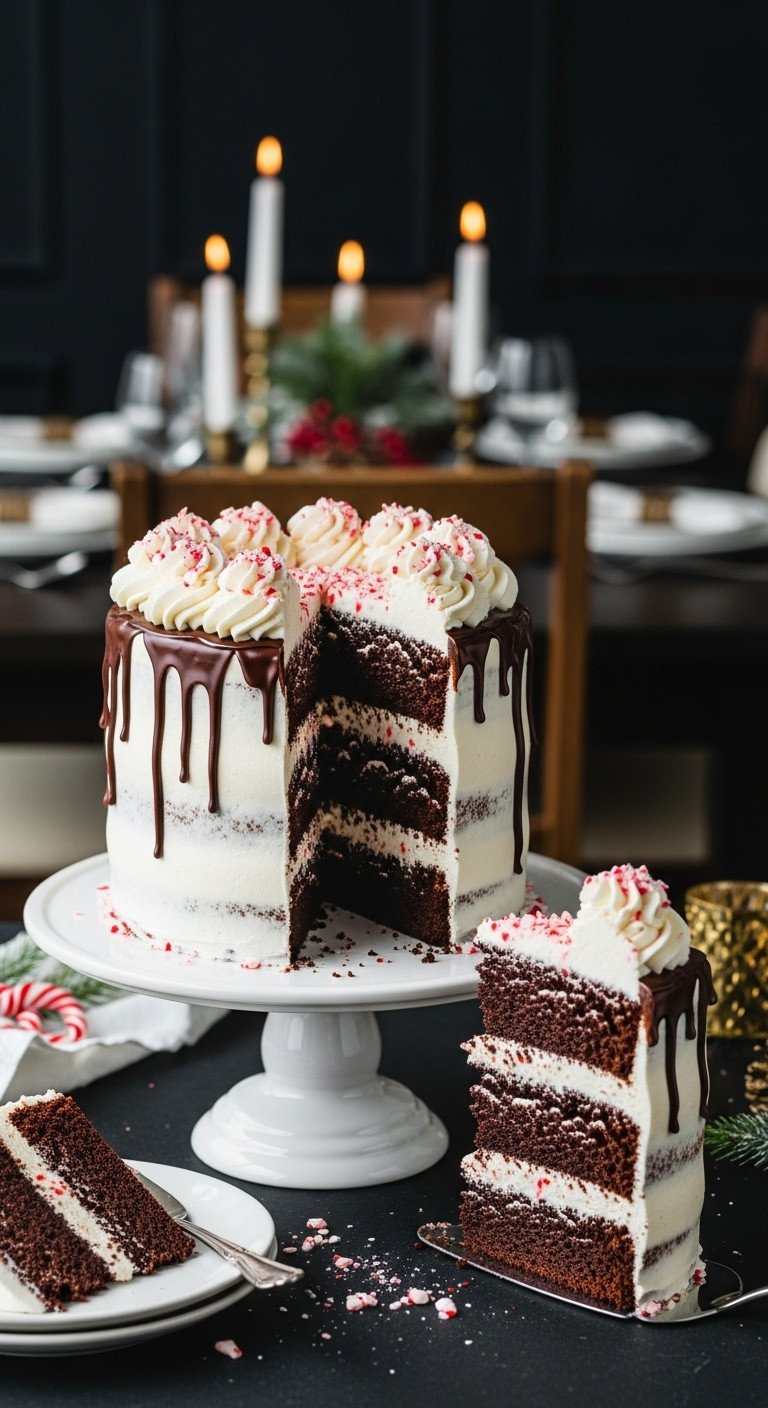
Pin this stunning cake recipe for your Christmas dinner centerpiece!
Ingredients Needed:
- For the Cake: Your favorite chocolate cake recipe (enough for three 8-inch round pans) or a high-quality box mix prepared according to package directions.
- For the Peppermint Buttercream:
- 2 cups (4 sticks) unsalted butter, softened
- 6-7 cups powdered sugar
- 1/4 cup heavy cream or milk
- 2 tsp peppermint extract
- 1 tsp vanilla extract
- Pinch of salt
- For the Ganache Drip:
- 4 oz semi-sweet chocolate, finely chopped
- 1/2 cup heavy cream
Step-by-Step Directions:
- Bake three 8-inch round chocolate cake layers and let them cool completely. Level the tops with a serrated knife if needed.
- To make the buttercream, beat the softened butter in a stand mixer with the paddle attachment until creamy.
- With the mixer on low, gradually add 6 cups of powdered sugar. Then add the heavy cream, peppermint extract, vanilla extract, and salt.
- Increase the speed to medium-high and beat for 3-5 minutes until light and fluffy. Add more powdered sugar if it’s too thin, or more cream if it’s too thick.
- Place one cake layer on a cake stand. Top with a generous layer of buttercream. Repeat with the second and third cake layers.
- Apply a thin “crumb coat” of frosting to the outside of the cake and chill for 30 minutes.
- Frost the entire cake with the remaining buttercream until smooth.
- To make the ganache, place the chopped chocolate in a heatproof bowl. Heat the heavy cream until it just begins to simmer, then pour it over the chocolate. Let it sit for 5 minutes, then whisk until smooth.
- Let the ganache cool for 10-15 minutes until it’s slightly thickened but still pourable. Drizzle it around the top edge of the chilled cake, allowing it to drip down the sides.
- Decorate the top with leftover buttercream swirls and crushed candy canes.
Pro-Tip: For the perfect drip consistency, your ganache should be like room temperature corn syrup. If it’s too hot it will run right off the cake; if it’s too cold it won’t drip at all.

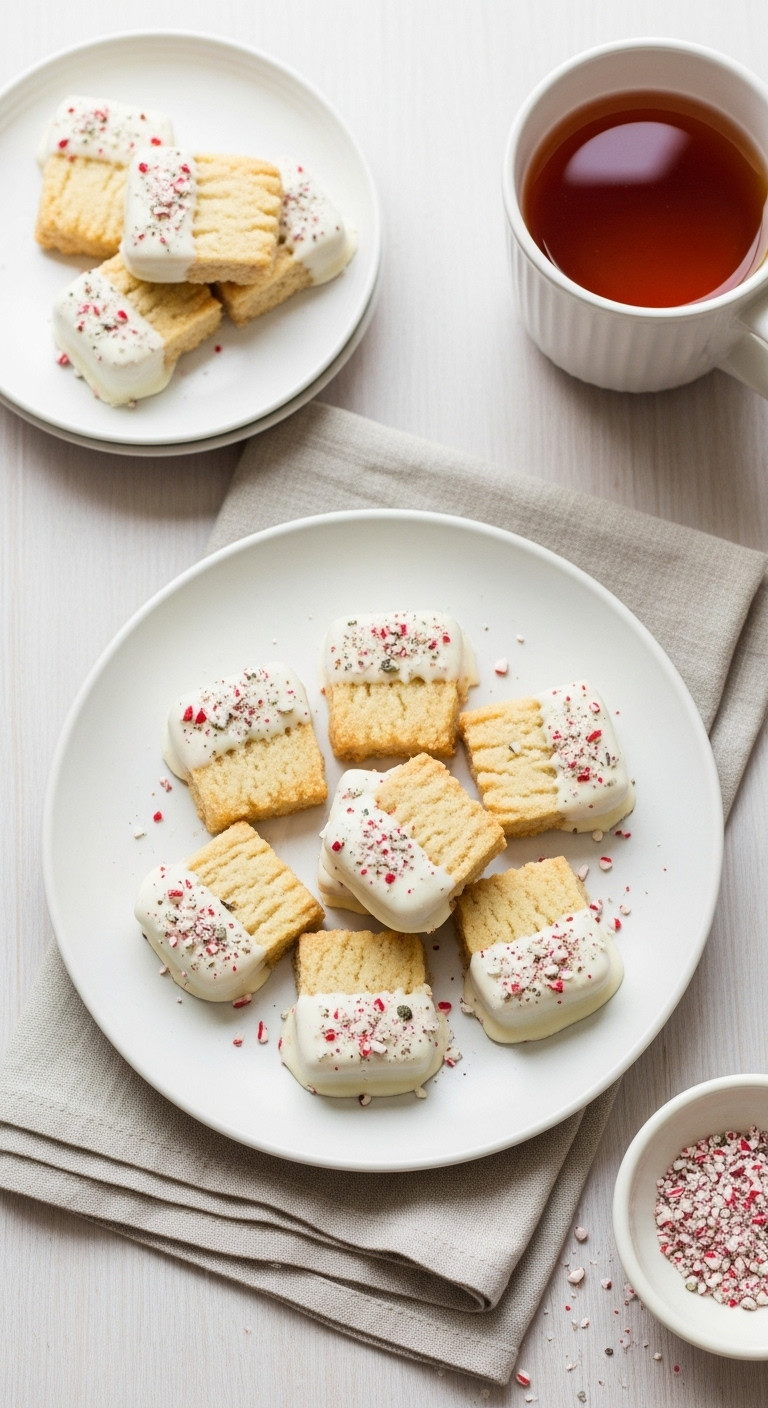
Buttery, melt-in-your-mouth goodness! Pin this shortbread recipe.
Ingredients Needed:
- 1 cup unsalted butter, softened to room temperature
- 1/2 cup powdered sugar
- 1 tsp vanilla extract
- 1/2 tsp peppermint extract
- 1 3/4 cups all-purpose flour
- 1/4 cup cornstarch
- 1/4 tsp salt
- 6 oz white chocolate melting wafers
- 2 tbsp finely crushed candy canes
Step-by-Step Directions:
- In a large bowl, beat the softened butter and powdered sugar until creamy and smooth.
- Mix in the vanilla and peppermint extracts.
- In a separate bowl, whisk together the flour, cornstarch, and salt.
- Gradually add the dry ingredients to the butter mixture, mixing on low speed until a soft dough forms.
- Form the dough into a disk, wrap it in plastic wrap, and chill for at least 30 minutes.
- Preheat oven to 350°F (175°C).
- On a lightly floured surface, roll the chilled dough out to 1/4-inch thickness. Cut into small squares or rectangles.
- Place the cookies on a parchment-lined baking sheet and bake for 12-15 minutes, or until the edges are just barely golden.
- Let the cookies cool completely on a wire rack.
- Melt the white chocolate wafers. Dip half of each cooled shortbread cookie into the chocolate.
- Place the dipped cookies back on the parchment paper and immediately sprinkle the chocolate with finely crushed candy canes. Let set until the chocolate is firm.
Pro-Tip: The cornstarch is the secret to incredibly tender, melt-in-your-mouth shortbread. Don’t skip it!

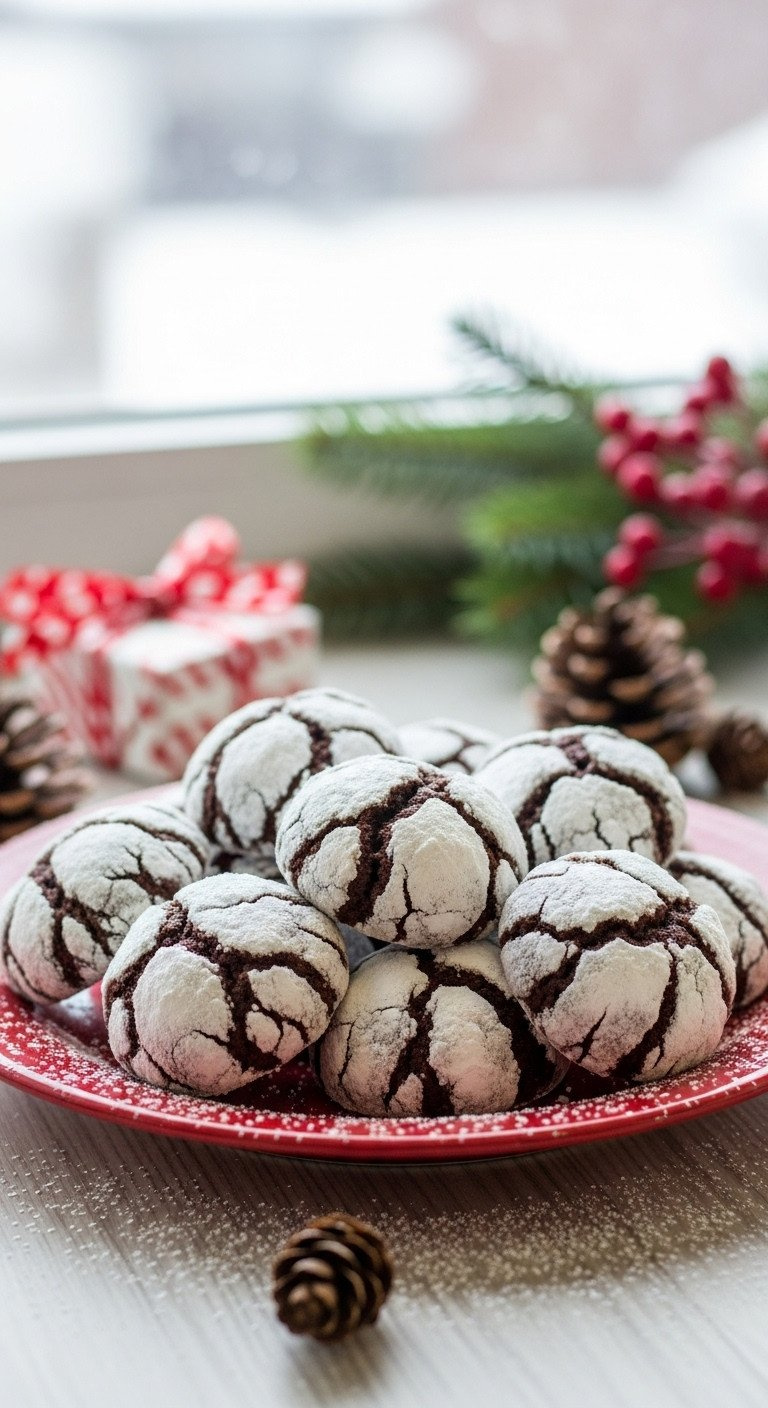
A delicious gluten-free option! Pin this fudgy cookie recipe.
Ingredients Needed:
- 1 cup granulated sugar
- 1/2 cup vegetable oil
- 1/2 cup unsweetened cocoa powder
- 2 large eggs
- 1 tsp vanilla extract
- 1 tsp peppermint extract
- 1 1/4 cups 1-to-1 gluten-free baking flour blend (that contains xanthan gum)
- 1 tsp baking powder
- 1/4 tsp salt
- 1/2 cup powdered sugar, for rolling
Step-by-Step Directions:
- In a large bowl, whisk together the granulated sugar, vegetable oil, and cocoa powder until combined.
- Beat in the eggs one at a time, then stir in the vanilla and peppermint extracts.
- In a separate bowl, whisk together the gluten-free flour, baking powder, and salt.
- Add the dry ingredients to the wet ingredients and mix until a soft dough forms.
- Cover the bowl and chill the dough for at least 2 hours, or until firm enough to handle.
- Preheat oven to 350°F (175°C). Line baking sheets with parchment paper.
- Place the powdered sugar in a small, shallow bowl.
- Scoop tablespoon-sized balls of chilled dough, roll them between your palms until smooth, and then roll each ball generously in the powdered sugar to coat completely.
- Place the coated dough balls on the prepared baking sheets, about 2 inches apart.
- Bake for 10-12 minutes. The cookies will puff up and crinkle. Let them cool on the baking sheet for a few minutes before moving to a wire rack.
Lesson Learned: Chilling the sticky dough is absolutely mandatory for this recipe. It makes it possible to roll the cookies without creating a huge mess.

10. DIY Peppermint Hot Cocoa Bombs

The viral trend you have to try! Pin this how-to for later.
Materials Needed:
- 2-3 sphere-shaped silicone molds (2.5-inch diameter)
- 12 oz good-quality dark or semi-sweet chocolate melting wafers
- 1/2 cup high-quality hot cocoa mix
- 1/2 cup mini marshmallows
- 1/4 cup finely crushed peppermint candies
- 2 oz white chocolate wafers for drizzling (optional)
Step-by-Step Directions:
- Make sure your silicone molds are completely clean and dry.
- Melt the dark chocolate wafers until smooth.
- Spoon a layer of melted chocolate into each half-sphere mold, using the back of the spoon to coat the entire inside surface.
- Chill the molds in the freezer for 5-7 minutes until the chocolate is firm.
- Apply a second coat of chocolate, paying special attention to the rims to ensure they are thick enough. Chill again until completely hardened.
- Carefully remove the chocolate half-spheres from the molds.
- Fill half of the spheres with 1 tbsp of hot cocoa mix, a sprinkle of crushed peppermints, and a few mini marshmallows.
- To seal the bombs, warm a clean, empty plate. Briefly place the rim of an empty chocolate half-sphere on the warm plate to melt the edge, then immediately place it on top of a filled half to seal them together.
- Allow the sealed spheres to set.
- If desired, melt the white chocolate wafers and drizzle over the finished bombs, then sprinkle with more crushed peppermint.
Pro-Tip: Wear food-safe gloves when handling the chocolate spheres to avoid leaving fingerprints on the shiny surface.
11. Crunchy Peppermint Meringue Kisses
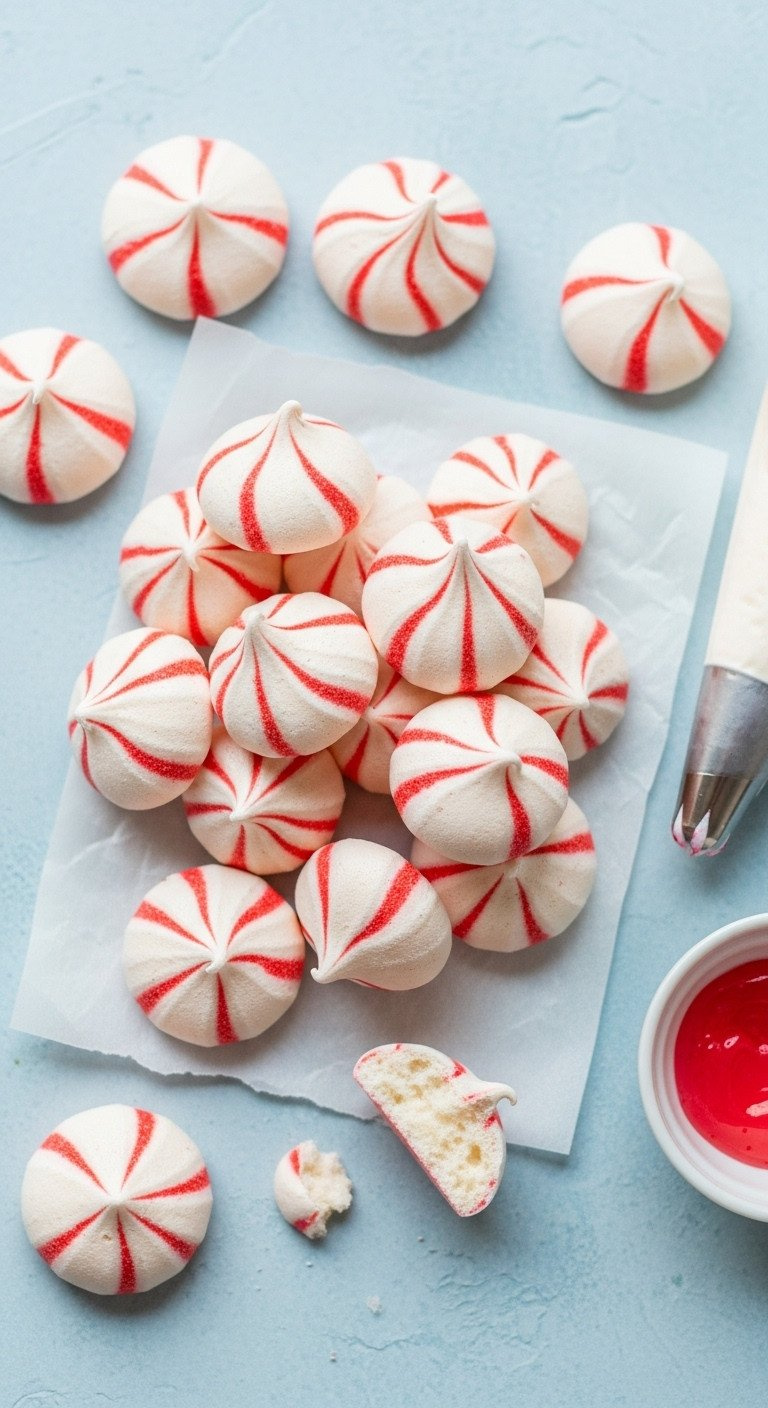
Light as air and so festive! Pin this meringue cookie recipe.
Materials Needed:
- 4 large egg whites, at room temperature
- 1/4 tsp cream of tartar
- 1 cup superfine (caster) sugar
- 1/2 tsp peppermint extract
- Red gel food coloring
- A piping bag fitted with a large star tip
Step-by-Step Directions:
- Preheat your oven to 225°F (110°C). Line two baking sheets with parchment paper.
- Ensure your mixing bowl and beater are completely clean and free of any grease.
- In a large bowl, use an electric mixer to beat the room temperature egg whites on medium speed until foamy.
- Add the cream of tartar and continue to beat until soft peaks form.
- With the mixer still running, add the superfine sugar one tablespoon at a time, waiting about 15 seconds between additions.
- Once all the sugar is added, increase the speed to high and beat for 5-7 minutes, until the meringue is very thick, glossy, and forms stiff, upright peaks. Beat in the peppermint extract.
- To create the stripes, use a small, clean paintbrush to paint 3-4 vertical stripes of red gel food coloring on the inside of your piping bag.
- Carefully spoon the meringue into the prepared piping bag.
- Pipe small, 1-inch “kiss” shapes onto the prepared baking sheets.
- Bake for 60-75 minutes, or until the meringues are dry to the touch and easily lift off the parchment paper.
- Turn the oven off, prop the door open slightly, and let the meringues cool completely in the oven for at least 1 hour.
Pro-Tip: Meringue is very sensitive to humidity. For the best results, make these on a dry day. Any moisture in the air can make them sticky and prevent them from crisping up properly.

Key Takeaways: Your Quick Guide to Peppermint Baking
- Choose the Right Peppermint: Use oil-based peppermint for melted chocolate to prevent seizing; use alcohol-based extract for batters and frostings.
- Embrace No-Bake Options: For a quick and easy treat, no-bake recipes like Classic Peppermint Bark or Oreo Truffles are foolproof winners.
- Chill Your Cookie Dough: For thick, chewy cookies that don’t spread too thin (like the White Chocolate Peppermint Cookies), always chill the dough for at least an hour.
- Don’t Fear the Showstopper: A beautiful layer cake looks intimidating, but it’s just three simple components: a good chocolate cake, fluffy peppermint buttercream, and an easy ganache drip.
- Garnish Last: For the best texture and appearance, add crushed candy cane toppings just before serving to prevent them from getting sticky or bleeding color.
People Also Ask About Peppermint Desserts
What is the difference between peppermint oil and peppermint extract?
The main difference is their base and concentration. Peppermint extract is a mix of peppermint oil, alcohol, and water, making it less potent and ideal for batters and frostings. Peppermint oil is pure, concentrated essential oil, which is 3-4 times stronger and best for fat-based ingredients like melted chocolate, as it won’t cause it to seize.
How do you store peppermint bark so it doesn’t separate?
Store peppermint bark in an airtight container at a cool, consistent room temperature. Avoid the refrigerator, which can cause condensation and make the layers separate or “bloom.” The key to preventing separation during making is to pour the white chocolate layer on when the dark chocolate layer is set but still slightly tacky.
How do you keep crushed candy canes from getting sticky?
Humidity is the main cause of sticky candy canes. To prevent this, always add your crushed candy cane topping right before the dessert is set or, even better, just before serving. Storing the finished dessert in a well-sealed, airtight container can also help protect it from moisture in the air.
Can I make peppermint desserts gluten-free?
Yes, many peppermint desserts are easily adaptable. No-bake treats like bark and fudge are often naturally gluten-free (check ingredient labels). For baked goods like cookies or brownies, you can typically substitute a high-quality 1-to-1 gluten-free baking flour blend that contains xanthan gum.
Final Thoughts
Baking during the holidays is about more than just making food; it’s about creating moments of joy and connection with the people you love. The classic flavor of peppermint paired with rich chocolate is the perfect way to do just that. With these 11 tested and perfected recipes, there’s a festive treat for every baker and every occasion.
Which of these peppermint treats are you most excited to try this holiday season? Let me know in the comments below
Last update on 2026-06-11 at 14:00 / Affiliate links / Images from Amazon Product Advertising API
