As an Amazon Associate BakingBakewareSets.com earns from qualifying purchases.
Red Velvet Desserts: 11 Easy & Ultimate Recipes for 2026
Do you dream of baking a truly show-stopping dessert that captivates with vibrant color and irresistible flavor? Many home bakers struggle to find diverse, reliable red velvet recipes that go beyond the ordinary cake.
Red Velvet desserts are iconic sweet treats characterized by a mild cocoa flavor, a uniquely moist and velvety crumb, and a signature, tangy cream cheese frosting. The vibrant scarlet color, often achieved through food coloring or natural cocoa reactions, makes it a festive choice, particularly popular during holidays and special occasions.
Drawing from comprehensive analysis of current data and proven methodologies, this guide establishes the primary entity of red velvet desserts. Here, you’ll discover 11 ultimate, easy-to-follow red velvet recipes, equipping you to bake impressive red velvet confections for any event in 2026.
☰ Table of Contents ▼
show
Why Red Velvet Desserts Are The Ultimate Sweet Treat for 2026
Red velvet desserts stand apart in the confectionery world, offering a unique blend of visual appeal and complex flavor. Their vibrant red hue, deep and inviting, instantly signals celebration and indulgence. Beyond its striking appearance, the experience of a red velvet dessert is characterized by its uniquely moist and velvety crumb, a texture that melts in your mouth. This decadent quality, combined with a subtle cocoa flavor, creates a truly irresistible treat. The magic truly happens when this rich texture is perfectly paired with a tangy, creamy signature cream cheese frosting.
What makes traditional red velvet so distinctive? The classic formula leverages the natural acidity of buttermilk and white vinegar, which reacts with the cocoa powder and baking soda. Historically, this reaction would deepen the reddish pigments in the cocoa, lending a unique reddish-brown tint and contributing to the cake’s tender structure. While modern red velvet often uses food gel for its vibrant scarlet red velvet color, the core scientific principles of acid-base reaction remain crucial for the authentic velvety texture. Many expert red velvet recipes emphasize this chemical balance, ensuring both a gorgeous appearance and a delightful eating experience. This guide promises to deliver 11 diverse, tested, and ultimate red velvet recipes, offering both easy red velvet desserts for novices and ultimate variations for experienced bakers, all perfect for 2026‘s festive occasions.
11 Ultimate Red Velvet Dessert Recipes You Need To Bake Now
Red velvet desserts extend far beyond the traditional layer cake, offering a spectacular array of sweet treats to satisfy any craving or occasion. From chewy cookies to decadent cheesecakes, the versatility of red velvet baking ideas knows no bounds. This comprehensive list offers some of the best red velvet recipes, ensuring you have a perfect option whether you’re seeking quick red velvet satisfaction or an elaborate, festive red velvet showstopper. These recipes demonstrate how to make homemade red velvet desserts that are not only delicious but also visually stunning. Get ready to explore desserts beyond cake and fulfill your sweet cravings with these enticing red velvet dessert recipes.
1. Bake the Ultimate Classic Red Velvet Layer Cake
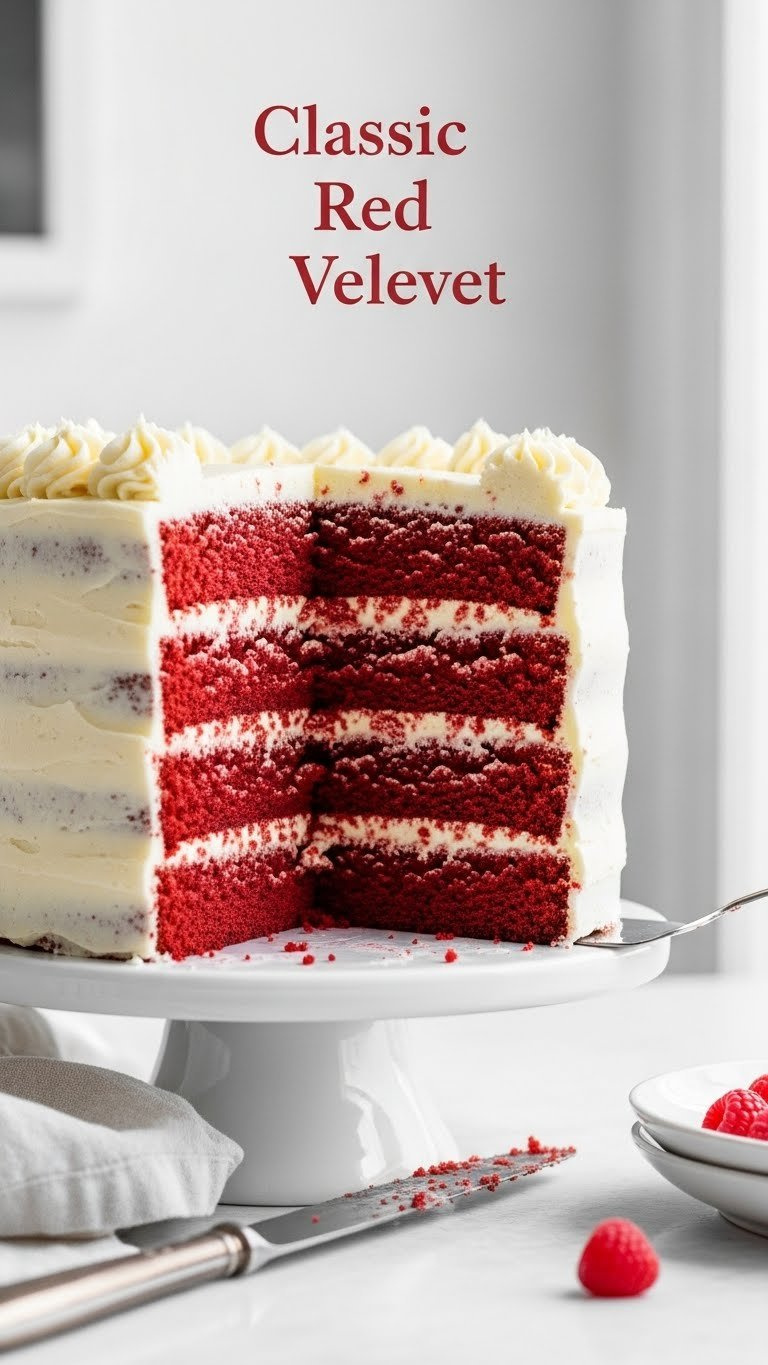
Pin this elegant, classic recipe to your ‘Holiday Baking’ board!
This recipe is the foundation for all red velvet understanding. Learning how to make red velvet cake from scratch ensures a homemade red velvet dessert with the ideal moist red velvet texture. The success of this classic red velvet cake hinges on precise measurements and a deep understanding of ingredient interactions.
Ingredients & Tools
- 2 1/2 cups All-Purpose Flour (measured accurately)
- 1 cup Unsalted Butter (softened to room temperature)
- 1 tablespoon high-quality Cocoa Powder
- 1 teaspoon Baking Soda (freshly purchased)
- 1 cup Buttermilk (requires natural acidity for color)
- 2 teaspoons Pure Vanilla Extract
- 1 teaspoon White Vinegar
- Red Food Gel (for vibrant scarlet red velvet)
- 3 8-inch Non-Stick Cake Pans
Instructions
- Combine dry ingredients: Sift flour, cocoa powder, and salt together in a large bowl.
- Mix wet ingredients: Cream butter and sugar until light and fluffy using a stand mixer. Add eggs one at a time.
- Tint batter: Whisk the buttermilk, vanilla, and red food gel until color is evenly distributed.
- Alternate additions: Incorporate the dry mixture and the buttermilk mixture into the creamed batter, alternating between the two.
- Activate leavening: Stir in the vinegar and baking soda mixture quickly, then divide the batter evenly among the three prepared 8-inch cake pans.
- Bake: Bake at 350°F for 28-32 minutes, checking for doneness with a toothpick.
- Cool and Frost: Allow the layers to cool completely before applying the signature cream cheese frosting.
Pro-Tip: In my experience as a pastry chef, using buttermilk that is slightly past its prime, which has higher acidity, enhances the reaction with the cocoa powder, contributing to a deeper, more luxurious color and an ultra-moist red velvet crumb texture. This is part of the original, traditional red velvet formula.

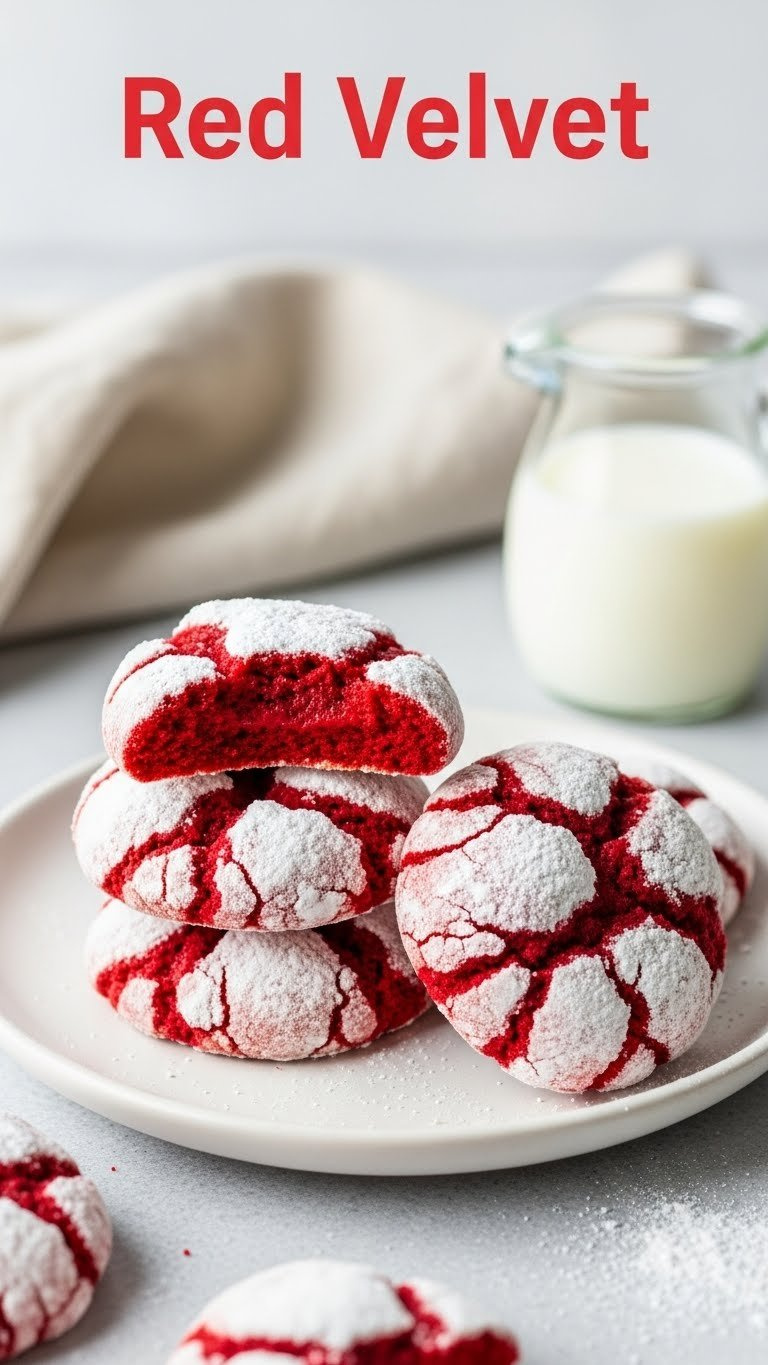
Save this quick and simple red velvet cookie recipe for your next party!
If you’re wondering, “Can you make red velvet cookies with cake mix?”, the answer is a resounding yes! These simple red velvet crinkle cookies are a quick red velvet treat that delivers big on flavor and visual appeal. Achieving soft and chewy red velvet crinkle cookies is surprisingly easy, making them perfect for beginners.
Supplies Needed
- 1 box Best Red Velvet Cake Mix (high quality brand recommended)
- 2 Large Eggs
- 1/2 cup Vegetable Oil
- 1 teaspoon Vanilla Extract
- 1/2 cup Granulated Sugar
- 1 cup Powdered Sugar (essential for the crinkle)
Instructions
- Combine ingredients: In a large bowl, mix the red velvet cake mix, eggs, oil, and vanilla extract until a soft dough forms.
- Chill dough: Cover the dough and chill in the refrigerator for at least 30 minutes (or up to 2 hours) to firm it up.
- Roll balls: Scoop the dough into 1-inch balls using a small cookie scoop.
- Coat for crinkle: Roll each ball first in the granulated sugar, ensuring full coverage, then roll generously in the powdered sugar.
- Bake: Place the coated balls two inches apart on a prepared baking sheet and bake at 350°F for 9-11 minutes. Do not overbake to maintain soft red velvet texture.
- Cool: Let the cookies cool completely on the baking sheet before serving.
Pro-Tip: To prevent the powdered sugar from dissolving, use a double-coating technique (granulated sugar first, then powdered sugar). Also, ensure your baking tray is cool when the dough is placed on it to avoid unevenly baked red velvet cookies.

3. Assemble an Elegant Red Velvet Trifle
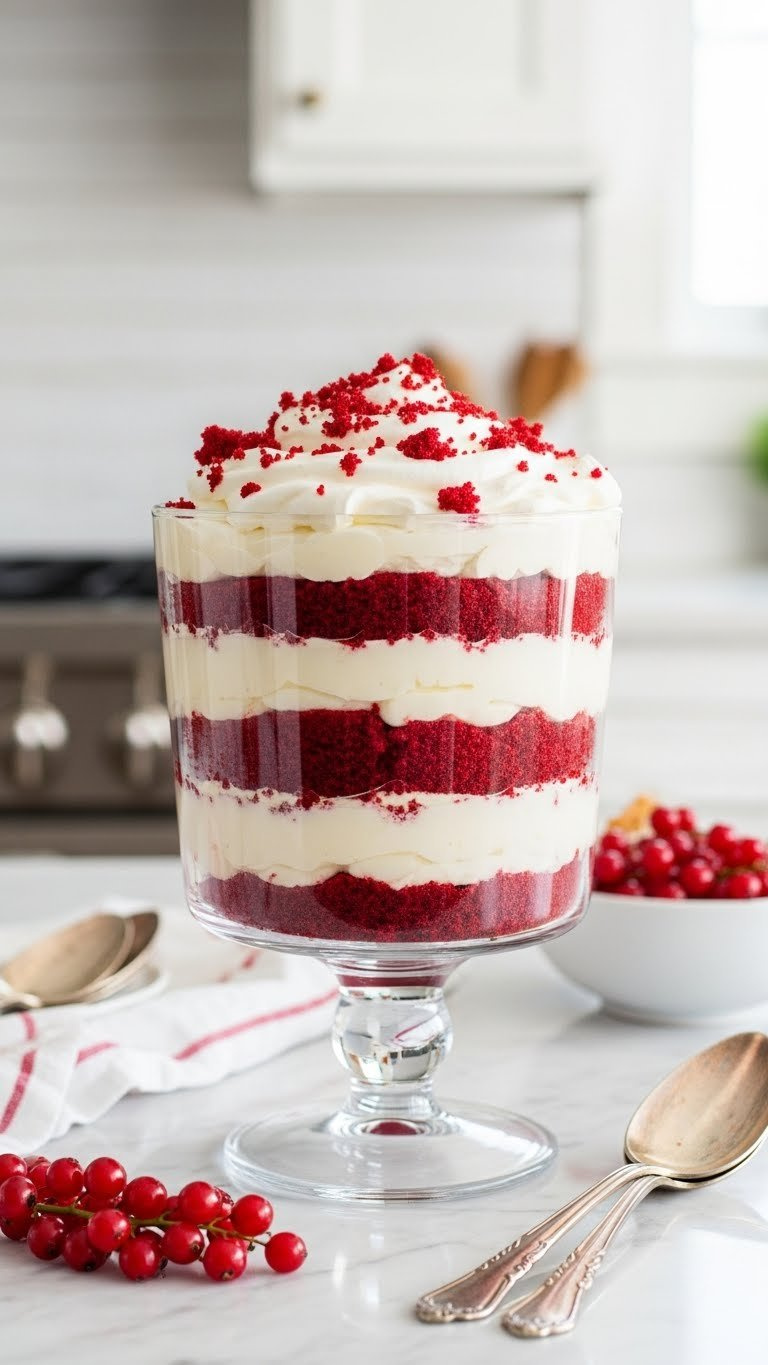
Need a showstopper dessert? Pin this decadent red velvet trifle!
Assembling a red velvet trifle is a fantastic way to create a decadent red velvet dessert with minimal baking fuss, perfect for Valentine’s Day or other holiday baking. This elegant red velvet creation layers moist red velvet cake, rich cream cheese filling, and fluffy whipped cream for an impressive presentation. Learning to layer red velvet ingredients effectively ensures a stunning and delicious result.
Supplies Needed
- 1 Standard Red Velvet Cake (pre-baked and cubed)
- 16 oz Cream Cheese (full-fat, softened)
- 1 cup Powdered Sugar
- 2 cups Heavy Whipping Cream (cold)
- 1/2 cup Granulated Sugar
- 1 Large Glass Trifle Bowl (showcase layers)
Instructions
- Prepare Filling: Beat the softened cream cheese with powdered sugar and vanilla until fluffy and creamy.
- Whip Cream: In a separate, chilled bowl, whip the heavy cream and granulated sugar until stiff peaks form. Gently fold 1/3 of the whipped cream into the cream cheese mixture to create a lighter, pipeable filling.
- Layer Cake: Place a layer of cubed red velvet cake at the bottom of the trifle bowl.
- Add Filling: Spread a layer of the cream cheese filling over the cake pieces.
- Repeat: Repeat the layering process (cake, filling) until the bowl is full, ensuring the final layer is the cream cheese filling or whipped cream.
- Garnish and Chill: Top with remaining whipped cream and red velvet crumbs. Chill for at least 4 hours before serving to allow the flavors to infuse.
Pro-Tip: Use day-old cake cubes or slightly drier red velvet cake for the trifle base. The moisture from the cream cheese filling will soak into the cake while chilling, ensuring the finished trifle has the perfect, moist red velvet texture without becoming soggy.

4. Create Moist Red Velvet Cake Pops
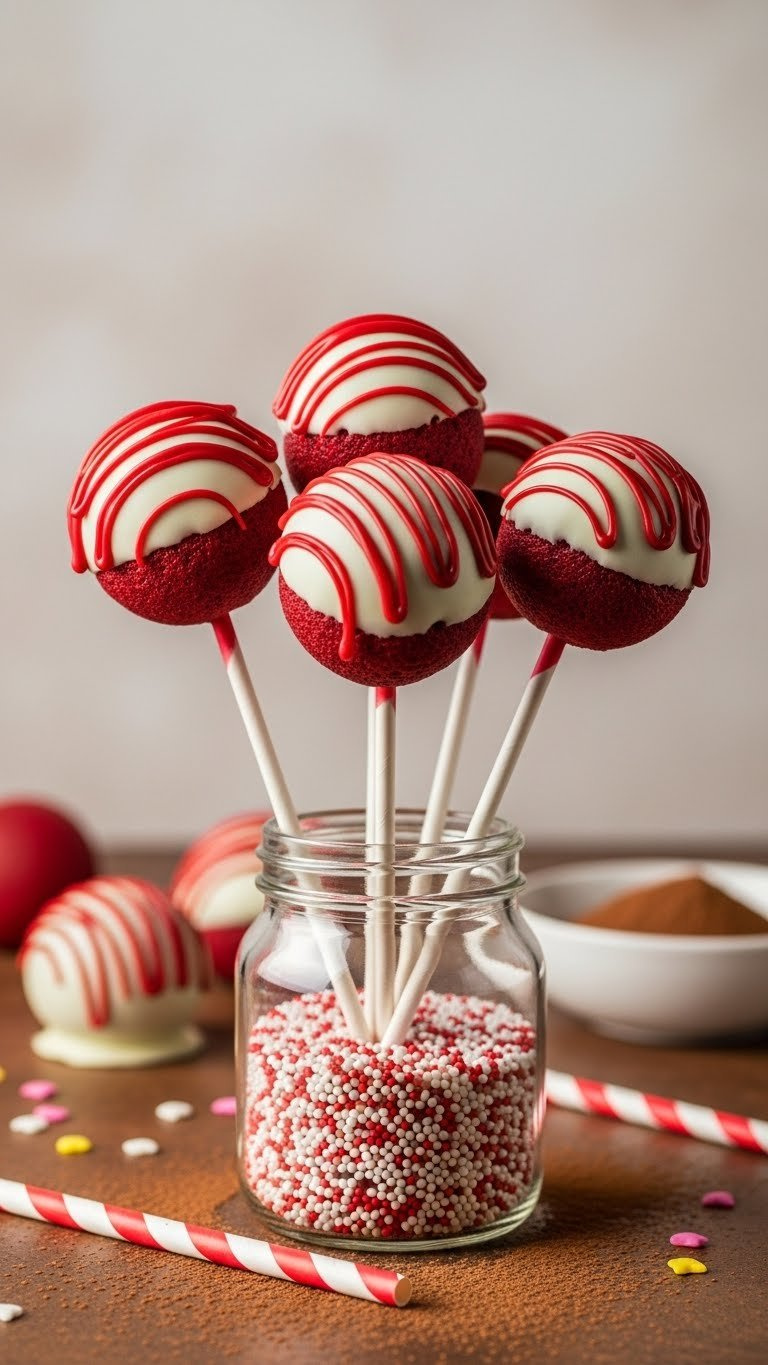
These festive red velvet cake pops transform into party treats! Pin for your next event!
Red velvet cake pops are ideal festive red velvet cake pops for holiday gatherings, transforming leftover cake into delightful, bite-sized confections. Learning to roll red velvet cake balls perfectly is key, as is ensuring a smooth, crack-free chocolate coating. Addressing solutions for crumbly cake balls and achieving a professional finish makes these a popular party food.
Supplies Needed
- 1 batch of Crumbled Red Velvet Cake (or 1 box Red Velvet Cake Mix prepared)
- 1/2 cup Signature Cream Cheese Frosting (for binding)
- 16 oz White Melting Wafers (high quality for smooth dipping)
- 1 tablespoon Coconut Oil (optional, for thinning coating)
- Cake Pop Sticks
- Cake Pop Stand or Styrofoam Block
Instructions
- Form Dough: Combine the crumbled red velvet cake with the cream cheese frosting until a manageable, uniform dough forms.
- Roll and Chill: Roll the mixture into 1-inch balls. Place them on a lined sheet and chill in the freezer for 15 minutes.
- Prepare Sticks: Melt a small amount of white chocolate coating. Dip the tip of each cake pop stick into the melted chocolate, then insert it halfway into the chilled cake ball. Freeze for 5 minutes.
- Melt Coating: Melt the remaining white wafers, adding coconut oil if necessary to achieve a thin consistency.
- Dip Pops: Dip each cake pop quickly into the melted coating, tapping off excess chocolate gently.
- Decorate and Set: Stand the finished pops upright in the stand until the coating is fully set. Decorate with sprinkles or chocolate drizzles before hardening.
Pro-Tip: The secret to smooth dipping is coating consistency. If the white chocolate is too thick, the coating will crack when the cake pops are removed from the stick. Use a neutral oil (like coconut) to thin the chocolate, ensuring a flawless, professional finish.

5. Whip Up Decadent Red Velvet Cheesecake
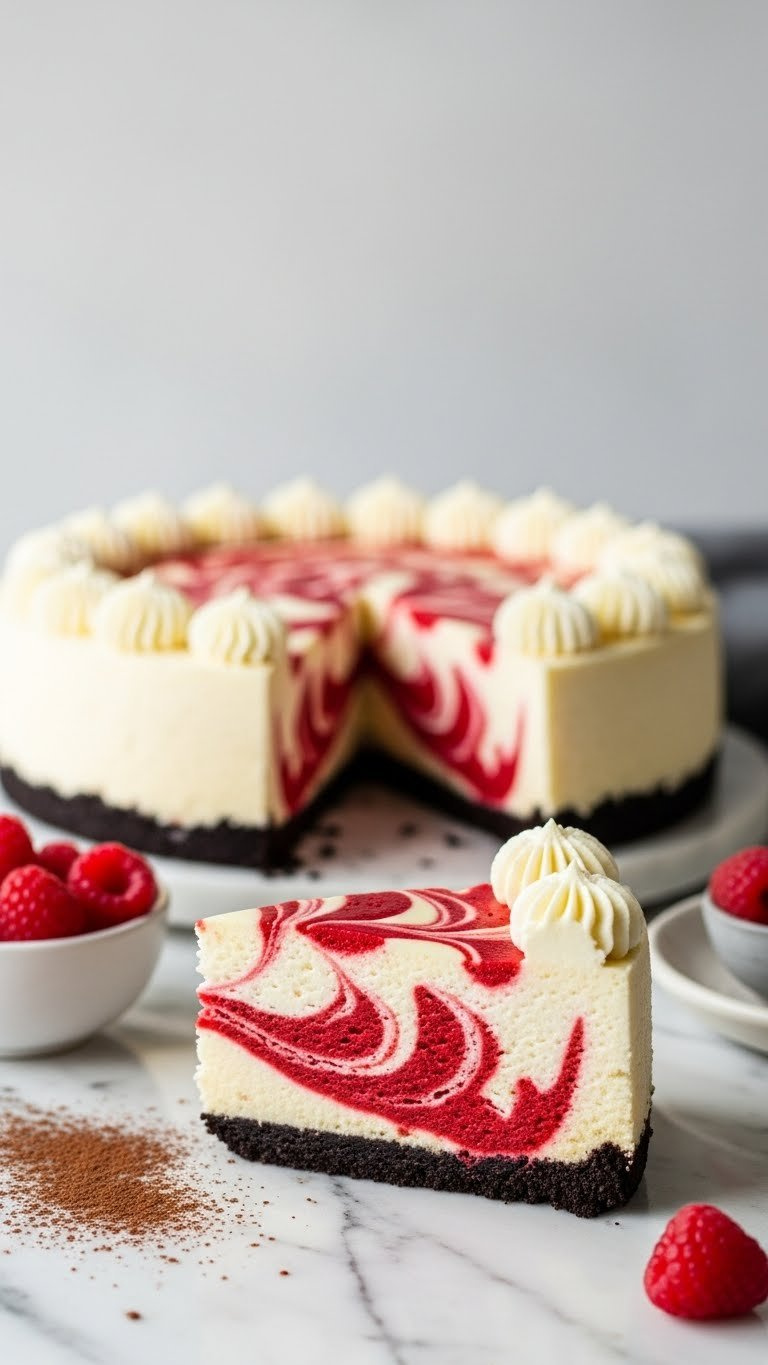
Bake the best red velvet cheesecake recipe with cream cheese frosting! Pin this ultimate guide.
The best red velvet cheesecake recipe with cream cheese frosting combines the richness of cheesecake with the signature red velvet flavor. Achieving a crack-free cheesecake requires careful technique, particularly when learning to chill red velvet cheesecake properly. This recipe focuses on creating a decadent, rich filling with a beautiful red velvet swirl, showcasing the creamy red velvet attribute.
Ingredients
- 1 1/2 cups Chocolate Sandwich Cookie Crumbs (for crust)
- 4 (8 oz) blocks Full-Fat Cream Cheese (crucial for texture)
- 1 cup Granulated Sugar
- 1 teaspoon Vanilla Extract
- 4 Large Eggs
- 1/2 cup Reserved Red Velvet Cake Batter (or equivalent mix)
Instructions
- Prepare Crust: Press the cookie crumbs mixed with butter into a 9-inch springform pan. Bake for 8 minutes and cool.
- Mix Filling: Beat the cream cheese, sugar, and vanilla extract until ultra-smooth, scraping the bowl often. Beat in eggs one at a time, mixing only until combined.
- Swirl Batter: Pour most of the cream cheese filling over the crust. Gently swirl the reserved red velvet batter into the top of the filling using a knife or skewer.
- Water Bath: Wrap the springform pan securely in heavy-duty aluminum foil. Place the wrapped pan in a larger roasting pan and fill the outer pan with boiling water halfway up the side of the springform pan (crucial for crack prevention).
- Bake: Bake at 325°F for 60-75 minutes. Turn off the oven, crack the door, and allow the cheesecake to cool slowly inside the oven for 1 hour.
- Chill: Remove the cheesecake and let it cool completely on a wire rack before chilling it in the refrigerator for at least 6 hours.
Pro-Tip: The most common cause of cracking is rapid temperature change. Always bake the red velvet cheesecake in a water bath, and use the slow cooling technique in the turned-off oven. This ensures the best textural science results.

6. Make Quick Red Velvet Poke Cake
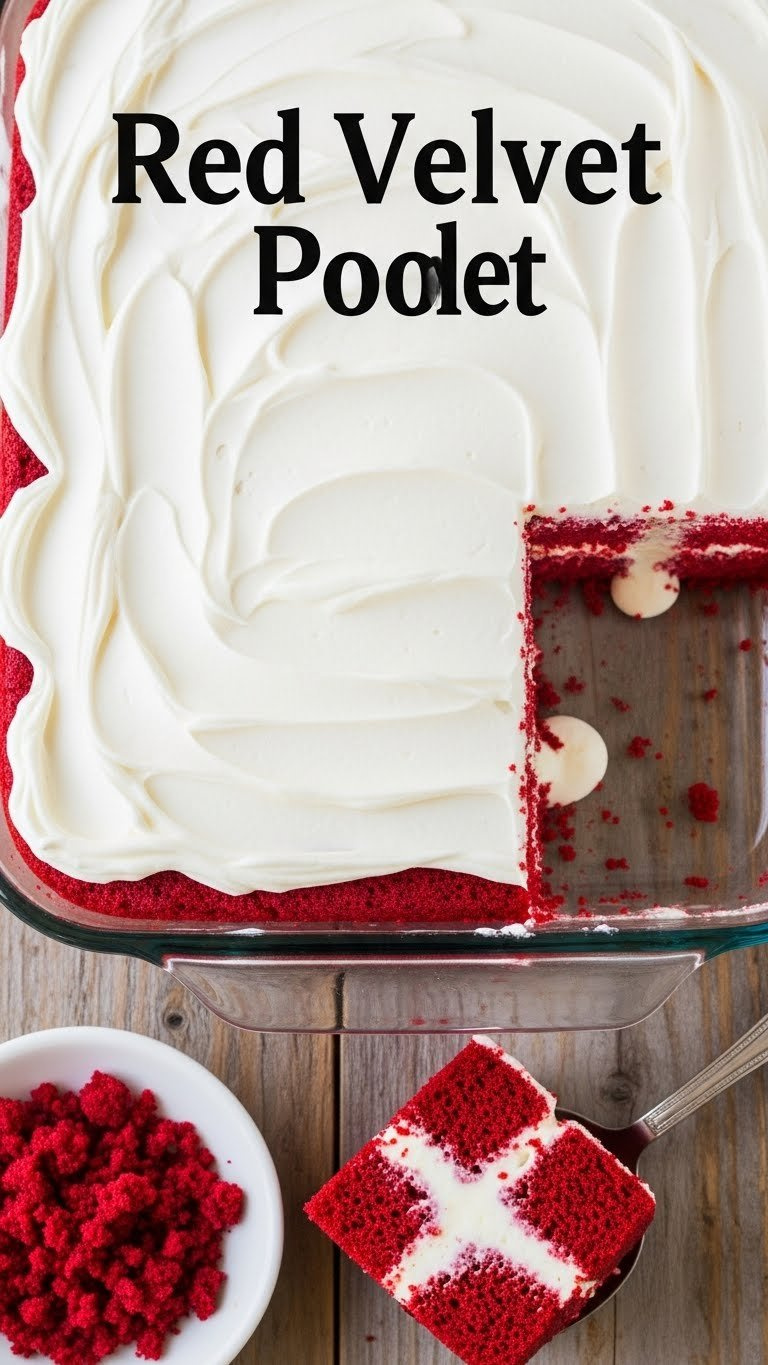
Need a quick dessert? Pin this easy and delicious Red Velvet Poke Cake!
A quick red velvet poke cake is an excellent answer to “what’s a good red velvet poke cake recipe?” This easy red velvet dessert uses cake mix as a shortcut, allowing you to create an ultra-moist cake by infusing a creamy sauce into poked holes. This method ensures maximum moist red velvet results every time.
Ingredients
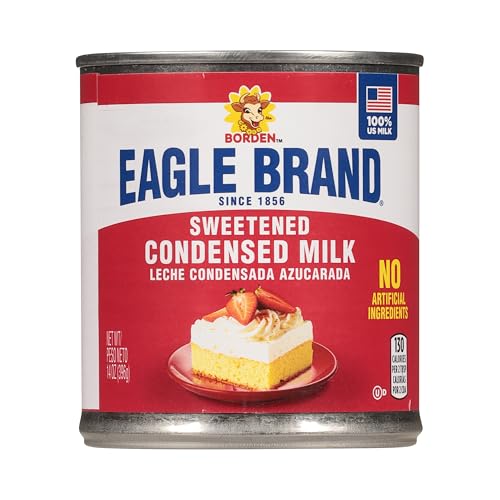
- 1 box Red Velvet Cake Mix (plus ingredients listed on box)
- 1 (14 oz) can Sweetened Condensed Milk (or alternative filling)
- 8 oz Cream Cheese (softened)
- 1 cup Powdered Sugar
- 1 teaspoon Vanilla Extract
Instructions
- Bake Cake: Prepare the red velvet cake mix according to the package directions and bake in a 9×13 pan. Let cool for 15 minutes.
- Poke Holes: Use the handle of a wooden spoon or a large fork to generously poke holes all over the warm cake, spaced about one inch apart.
- Prepare Filling: Whisk the softened cream cheese, condensed milk, powdered sugar, and vanilla extract until completely smooth to create the sauce.
- Pour Sauce: Slowly pour the entire sauce mixture evenly over the poked holes in the cake, allowing the liquid to sink in.
- Chill and Frost: Chill the cake for at least 2 hours. Once chilled, spread a layer of light, creamy frosting over the top and serve.
Pro-Tip: For the most effective moisture infusion, poke the holes while the cake is still warm (but not hot) to allow the sauce to penetrate the crumb before it fully sets. This is key to achieving a truly moist red velvet texture.
7. Roll Homemade Red Velvet Brownies with White Chocolate Swirl
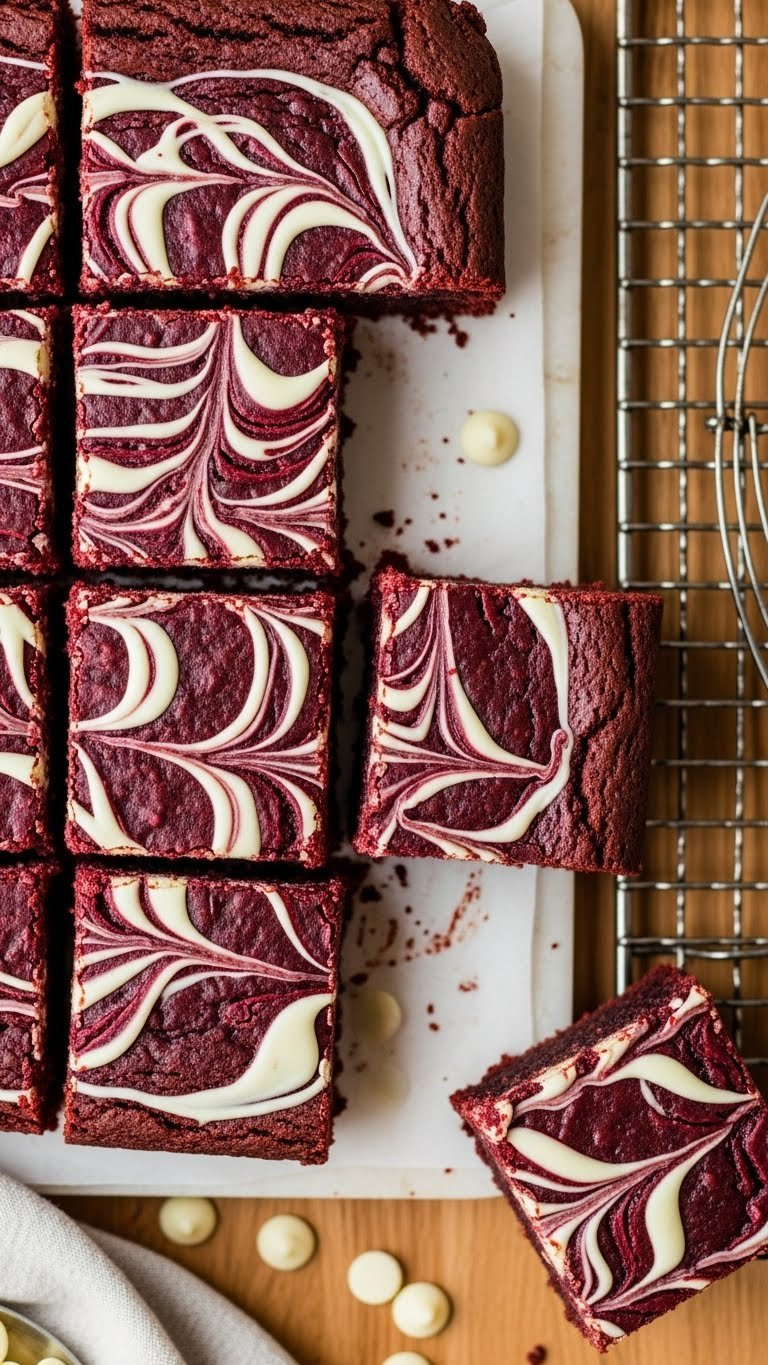
Roll out these rich, homemade red velvet brownies! Pin the recipe for fudgy perfection!
Homemade red velvet brownies with white chocolate chips are a decadent twist on a classic. These red velvet brownies offer a denser, richer texture than cake, making them a quick and simple red velvet cookie bar for parties. The key is to balance the rich red velvet with a complementary flavor like white chocolate.
Ingredients
- 1 cup Unsalted Butter (melted)
- 1 1/2 cups Granulated Sugar
- 2 Large Eggs
- 1 teaspoon Vanilla Extract
- 1 tablespoon Vinegar
- 2 tablespoons Cocoa Powder
- Red Food Gel
- 1 cup All-Purpose Flour
- 1/2 cup White Chocolate Chips
Instructions
- Whisk Wet Ingredients: In a bowl, whisk together the melted butter and sugar. Add the eggs, vanilla, vinegar, and red food gel.
- Combine Dry: Sift in the cocoa powder, flour, and salt. Mix until just combined. Do not overmix.
- Bake Prep: Pour the batter into a parchment-lined 8×8 metal baking pan.
- Swirl: Melt the white chocolate chips and drizzle lines across the top of the batter. Use a butter knife to gently swirl the chocolate into the red velvet batter.
- Bake: Bake at 350°F for 30-35 minutes. They should be set on the edges but slightly soft in the center.
- Cool: Cool completely on a wire rack before cutting. Using a plastic knife provides a cleaner cut.
Pro-Tip: The key to a truly fudgy brownie is the melted butter and high fat content. Never use softened butter here. Also, for the perfect vibrant red velvet color, use gel food coloring, not liquid.
7. Make Red Velvet Cupcakes With Cream Cheese Frosting
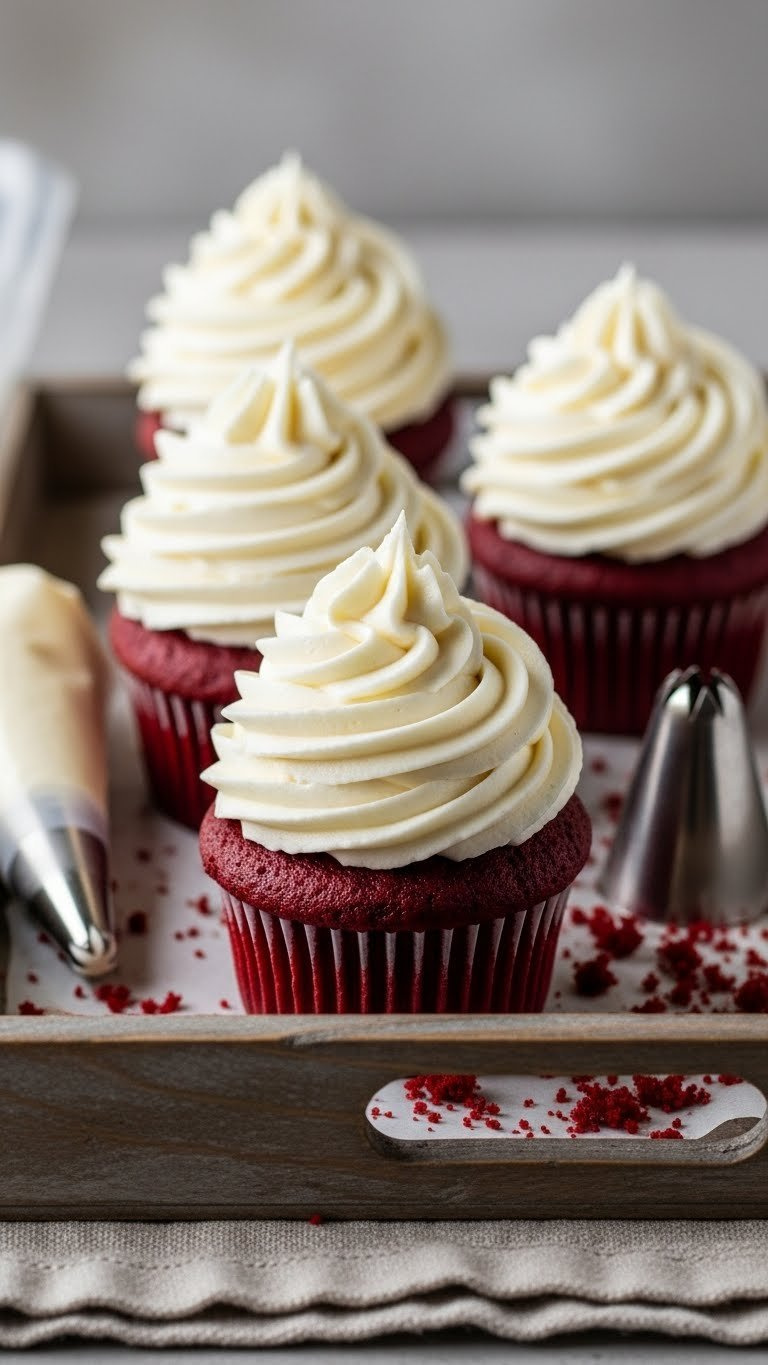
Step-by-step guide to making perfect red velvet cupcakes! Pin this recipe for the ultimate frosting.
Learning how to make red velvet cupcakes is an essential skill for any baker, offering individual portions of this beloved classic. The key to perfect red velvet cupcakes lies in a moist crumb and a stable, pipeable cream cheese frosting. Mastering how to pipe frosting designs elevates these from simple treats to elegant party desserts.
Supplies Needed
- 1 standard recipe Red Velvet Batter (from scratch or box)
- 1 standard batch Cream Cheese Frosting
- Cupcake Liners (festive design recommended)
- Standard 12-cup Muffin Pan
- Piping Bag and Large Star Tip (for elegant piping)
Instructions
- Prep Muffin Pan: Line the muffin pan with cupcake liners.
- Fill Liners: Fill each liner no more than 2/3 full to prevent overflowing and browning red velvet cake issues.
- Bake: Bake at 350°F for 18-20 minutes, or until a toothpick inserted comes out clean.
- Cool: Transfer the cupcakes immediately to a wire rack to cool completely. Cooling on the rack prevents the bottoms from becoming soggy.
- Frost: Fill a piping bag fitted with a large star tip (like Wilton 1M) with the prepared cream cheese frosting. Pipe a tall, generous swirl onto each cooled cupcake.
- Garnish: Garnish with red velvet crumbs or festive sprinkles.
Pro-Tip: Overmixing the batter after adding flour develops too much gluten, which results in dry red velvet cake solution issues. Mix until just combined, even if small streaks of flour remain, to achieve the ultimate moist red velvet crumb.

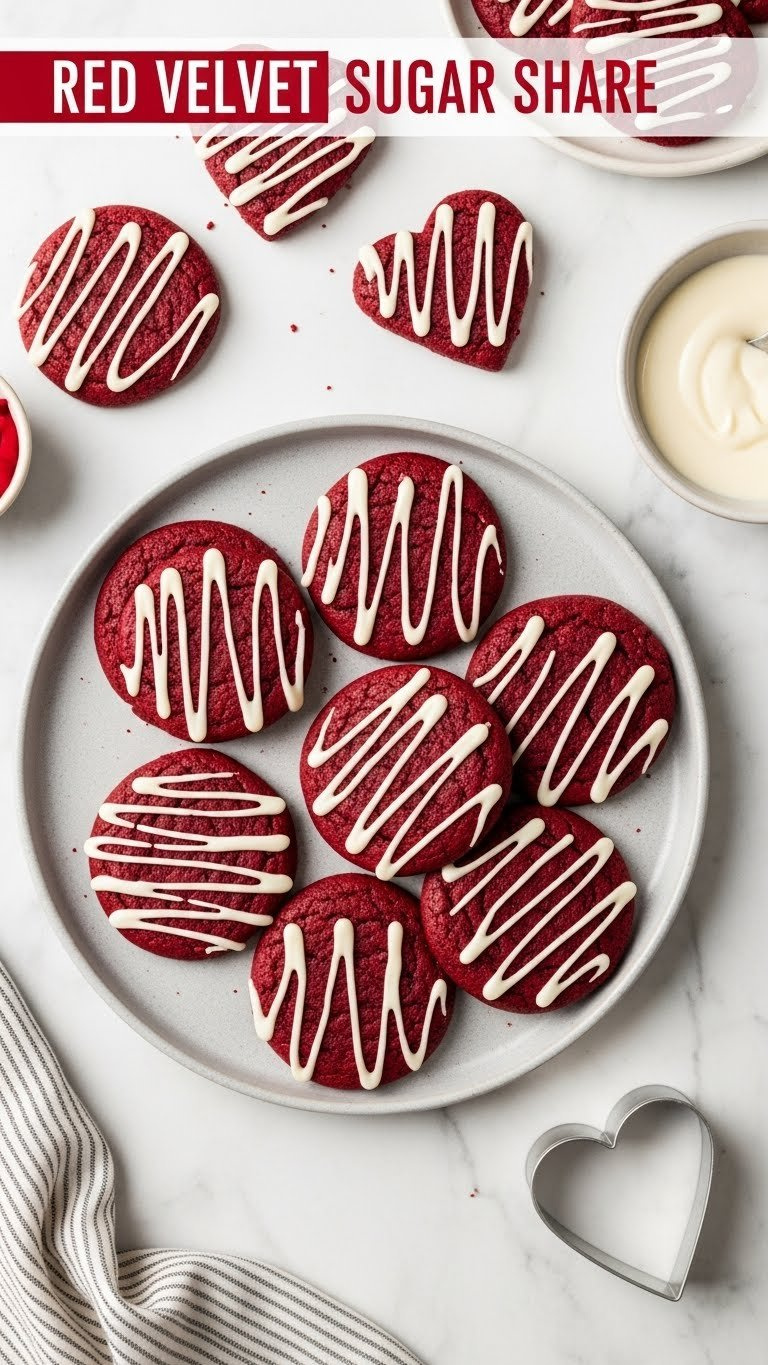
Need a quick party treat? Pin these easy-to-cut red velvet sugar cookies!
Red velvet cookies, specifically chewy red velvet sugar cookies, offer a simple red velvet option that’s perfect for festive occasions. These simple red velvet treats can be rolled and cut into fun shapes for Valentine’s Day or holiday gatherings. The key to avoiding tough red velvet cookies is proper dough handling and chilling.
Supplies Needed
- 2 cups All-Purpose Flour
- 1 cup Granulated Sugar
- 1/2 teaspoon Baking Powder
- 1/4 teaspoon Salt
- 1/2 cup Unsalted Butter (cold, cubed)
- 1 Large Egg
- 1 teaspoon Vanilla Extract
- Red Food Gel (for color)
- Cookie Cutters (various sizes)
Instructions
- Mix Dry Ingredients: Whisk flour, sugar, baking powder, and salt.
- Cut in Butter: Use a pastry blender or stand mixer to cut in the cold butter until the mixture resembles coarse sand.
- Add Wet Ingredients: Add the egg, vanilla extract, and red food gel. Mix until a cohesive dough forms.
- Chill Dough: Wrap the dough and chill for at least 1 hour (essential for handling).
- Roll and Cut: Roll the chilled dough to 1/4 inch thickness. Cut out desired shapes using cookie cutters.
- Re-Chill and Bake: Place the cut dough on a baking sheet, chill for 10 minutes, then bake at 350°F for 8-10 minutes.
- Decorate: Once cooled, decorate with a simple powdered sugar glaze or melted white chocolate drizzle.
Pro-Tip: If the dough becomes sticky while rolling, roll it between two sheets of parchment paper instead of adding more flour. Adding excess flour will lead to tough red velvet cookies.

9. Prepare Red Velvet Whoopie Pies
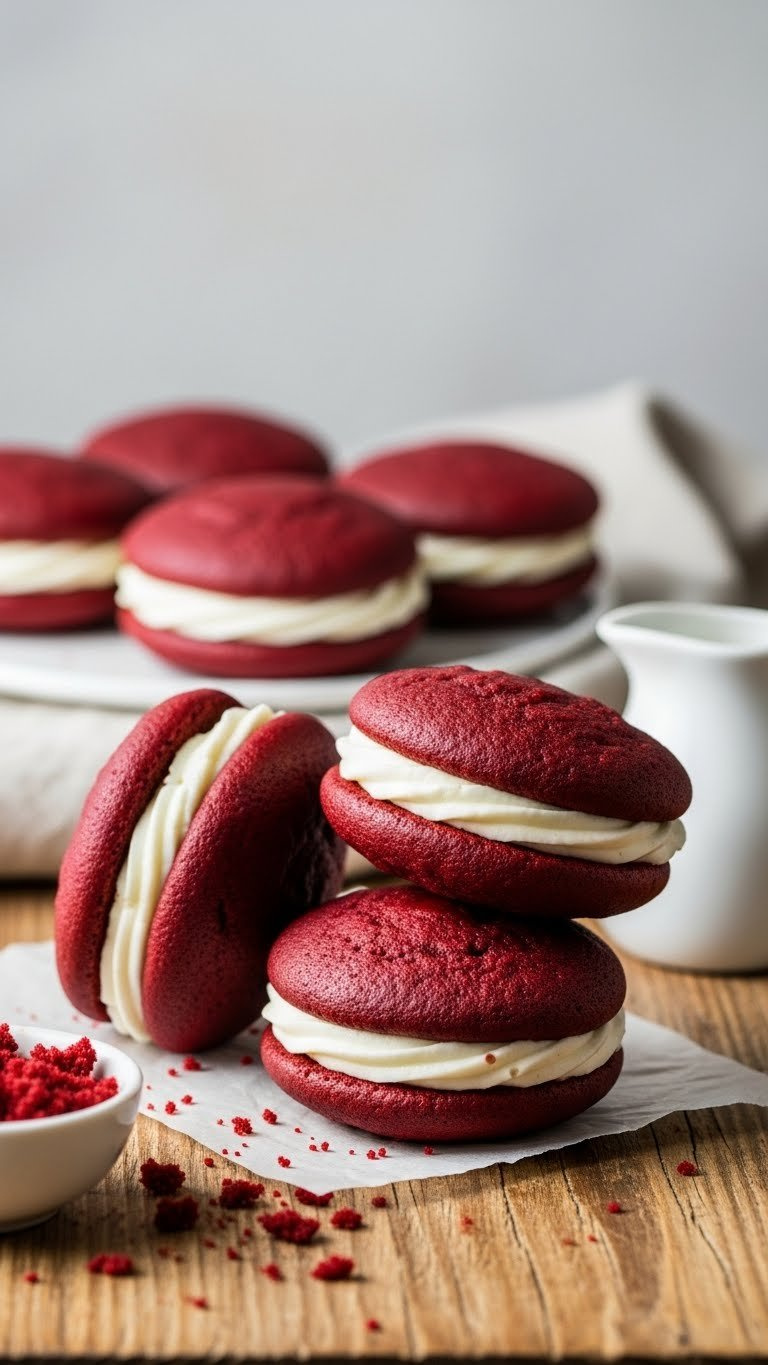
Whip up these unique red velvet whoopie pies! Pin for a fun twist on a classic.
Red velvet whoopie pies offer a delightful alternative to traditional red velvet cake or cookies. They feature a dense, cake-like exterior paired with a generous signature cream cheese filling, making them unique sweet treats. Mastering the technique of how to combine dry ingredients for the perfect batter consistency is key to avoiding red velvet flatness issues.
Supplies Needed
- 1 standard recipe Red Velvet Cake Batter (thicker consistency required)
- 1 batch Signature Cream Cheese Filling (must be thick and stable)
- Baking Sheets
- Parchment Paper
- Large Round Piping Tip (or scoop)
Instructions
- Prepare Batter: Adjust the standard cake batter to be slightly thicker (less liquid or more flour/cocoa powder) to prevent excessive spreading.
- Pipe Shells: Use a large piping bag fitted with a round tip (or a scoop) to drop uniform 1.5-inch circles of batter onto a parchment-lined baking sheet. Ensure generous spacing.
- Bake: Bake at 350°F for 10-12 minutes. The edges should be set, and the centers should spring back lightly when touched.
- Cool: Cool completely before handling. Ensure flat bottoms for easy assembly.
- Fill Pies: Match pairs of the cooled red velvet shells. Spread or pipe a generous layer of thick cream cheese filling onto the flat side of one shell.
- Assemble: Gently top with the second shell, pressing lightly to secure the red velvet whoopie pie.
Pro-Tip: If you notice your shells spreading too much, chill the piped batter for 10 minutes before baking. Also, use a slightly firmer cream cheese filling (less milk/cream in the recipe) to ensure the filling holds up and doesn’t squeeze out the sides when pressed.

10. Scoop Individual Red Velvet Mug Cake
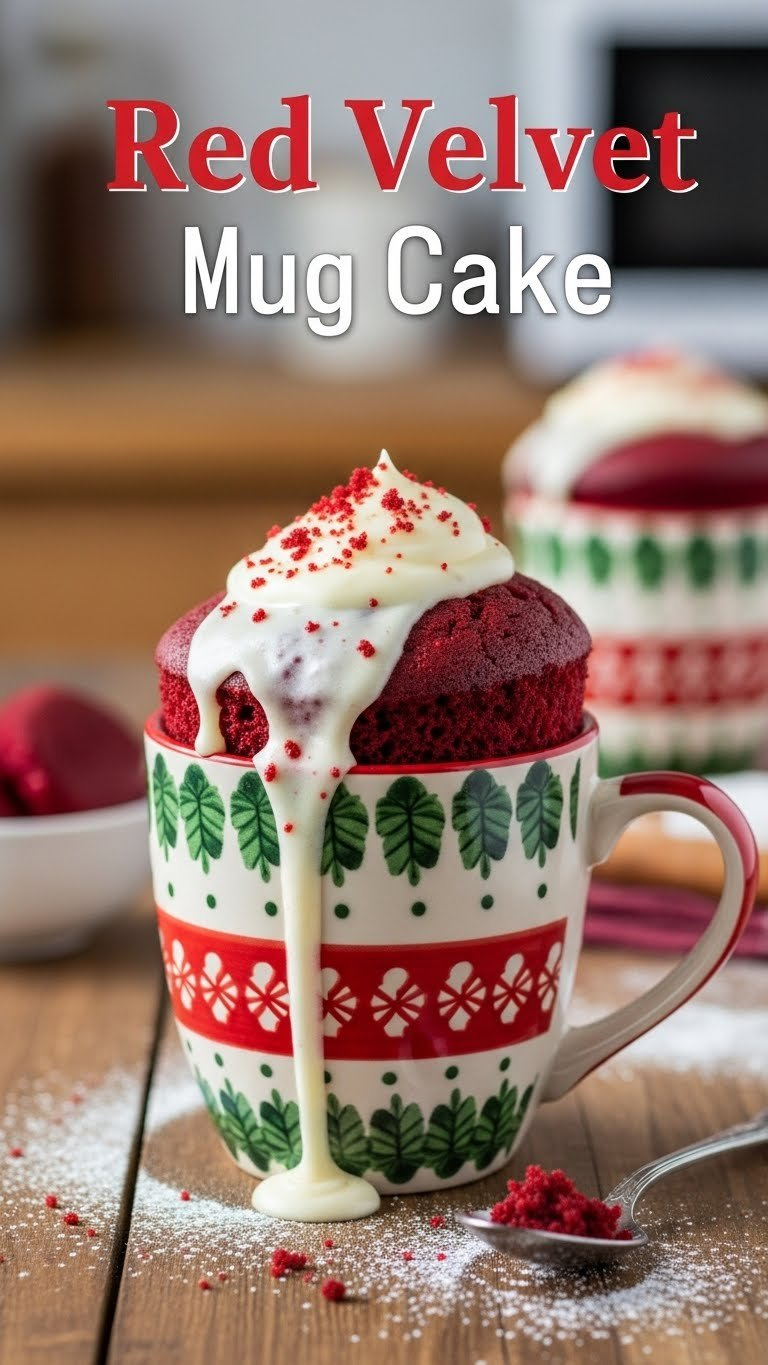
Perfect for a single serving craving! Pin this simple red velvet mug cake recipe microwave hack!
A simple red velvet mug cake recipe microwave is the ultimate quick red velvet treat for individual cravings. This easy red velvet dessert is ideal when you need a moist, flavorful cake in minutes. The mug cake uses microwave technology to deliver a single-serving confection, making it a fast and convenient option.
Supplies Needed
- 4 tablespoons All-Purpose Flour
- 4 tablespoons Granulated Sugar
- 1/4 teaspoon Baking Powder
- 1 tablespoon Cocoa Powder
- 1/4 teaspoon Red Food Gel
- 3 tablespoons Buttermilk (or substitute)
- 1 tablespoon Vegetable Oil
- 1 standard size Ceramic Mug (microwave-safe)
Instructions
- Mix Dry: In the ceramic mug, whisk together the flour, sugar, baking powder, and cocoa powder.
- Add Wet: Stir in the red food gel, buttermilk, and vegetable oil until just combined. Do not overmix.
- Microwave: Microwave on high for 70 to 90 seconds. The cooking time will vary by microwave wattage; it should look set on the top but slightly sticky in the center.
- Cool Slightly: Let the mug cake cool for 1 minute before adding a dollop of cream cheese frosting.
- Serve: Serve warm immediately for the best moist red velvet experience.
Pro-Tip: The greatest challenge with mug cakes is overcooking, which makes the cake tough. Always start with 70 seconds and check. It is better to have it slightly gooey than rubbery.

11. Roll Individual Red Velvet Lava Cakes with Gooey Center
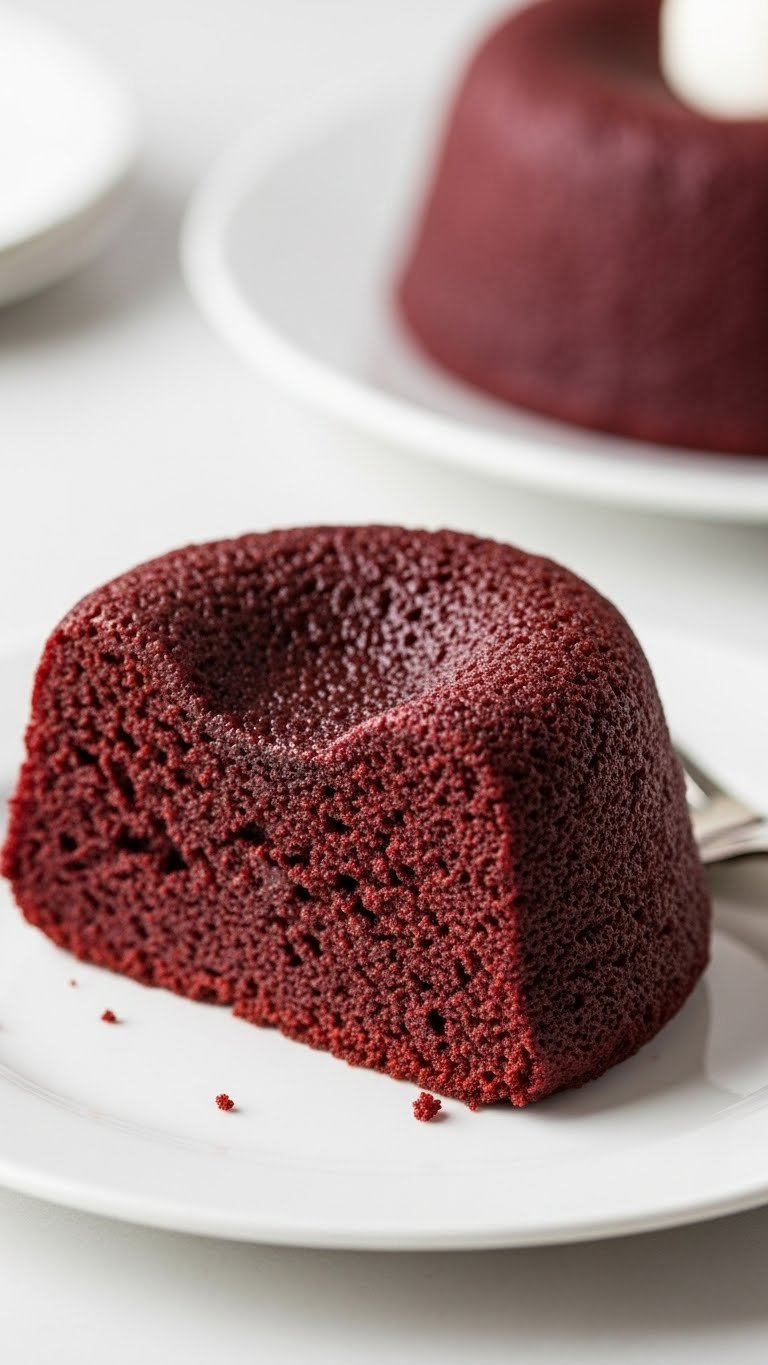
Pin this decadent recipe for individual red velvet lava cakes with gooey centers!
Red velvet lava cakes with gooey centers are an elegant red velvet dessert that impresses with every spoonful. This recipe requires precision baking to ensure a molten white chocolate core, providing a delightful textural contrast. The goal is a perfectly baked exterior with a vibrant red, gooey center, making it a visually striking and decadent red velvet treat.
Supplies Needed
- 4 oz White Chocolate (high-quality melting bar)
- 4 oz Unsalted Butter
- 1/4 cup Granulated Sugar
- 2 Large Eggs (plus 2 egg yolks)
- 2 tablespoons All-Purpose Flour
- 1 tablespoon Cocoa Powder
- 1 teaspoon Vanilla Extract
- Red Food Gel
- 4 Small Ceramic Ramekins
Instructions
- Prep Ramekins: Grease the ramekins thoroughly with butter, then dust lightly with a mixture of flour and cocoa powder to ensure easy release.
- Melt Base: Melt the white chocolate and butter together until smooth.
- Mix Batter: Whisk the eggs, yolks, sugar, and vanilla until pale. Gently fold in the melted chocolate mixture, then fold in the flour, cocoa, and red food gel until just combined.
- Bake: Pour the batter into the prepared ramekins. Bake at 425°F for 12-14 minutes. The edges should be firm, but the center should look soft and jiggly.
- Unmold and Serve: Let cool for 1 minute, then carefully invert the ramekins onto serving plates. The center should flow out immediately.
- Garnish: Dust with powdered sugar and serve immediately with vanilla ice cream.
Pro-Tip: The success of the molten center relies on the high oven heat and short baking time. Never guess the timing; use the lower end of the time frame for a guaranteed gooey red velvet center. If the batter is overcooked, you risk dry red velvet cake solution issues.
Key Takeaways: Your Quick Guide to Perfect Red Velvet Baking
- The Signature Moist Texture is Dependent on Buttermilk and Vinegar. – The acid in buttermilk and vinegar reacts with the baking soda and cocoa to create the tender, velvety texture characteristic of authentic red velvet.
- Always Use Food Gel for Vibrant Color. – Liquid food coloring dilutes the batter and results in a pale red velvet color. Use high-quality gel food coloring for the desired vibrant scarlet hue.
- Precision is Crucial for Cream Cheese Frosting Stability. – Use full-fat cream cheese and ensure all dairy ingredients are properly tempered to avoid a runny cream cheese frosting remedy issue; the ratio of butter to cream cheese dictates stability.
- Avoid Overmixing Red Velvet Batter. – Mixing too much after adding the flour will develop excess gluten, leading to a tough and dry red velvet cake solution. Mix until just combined.
- The Diversity of Red Velvet Goes Beyond Cake. – Explore popular variations like red velvet cookies, red velvet cheesecake, and red velvet brownies to fulfill different occasions and time constraints.
- Use Water Baths and Slow Cooling for Cheesecakes and Cakes. – Preventing rapid temperature changes (especially in cheesecakes) is the professional baking tip for preventing cracks and ensuring perfect texture.
- Utilize Action Keywords for Recipe Success. – Always mix red velvet batter gently, roll red velvet cake balls uniformly, and frost red velvet cake when completely cool for the best results.
FAQs About baking recipes desserts red velvet
What is the difference between red velvet cake and chocolate cake?
Red Velvet cake is fundamentally a delicate butter cake with a subtle cocoa flavor, whereas chocolate cake is defined by an intense, robust chocolate presence. The primary distinction lies in the acidic ingredients (buttermilk and vinegar) used in red velvet, which activate the minimal cocoa powder, historically yielding a reddish-brown tint and creating the signature tender crumb. Chocolate cake typically uses more cocoa and neutral liquids, leading to a darker, richer chocolate profile.
Why is red velvet cake red?
Historically, the mild red color in classic red velvet was achieved naturally by the reaction between acidic buttermilk, vinegar, and natural, non-Dutch-processed cocoa powder. This reaction deepens the reddish hues in the cocoa. Today, to achieve the vibrant scarlet color popular in modern red velvet desserts, concentrated red food gel coloring is added, particularly for visual appeal in festive red velvet treats.
How to get a vibrant red velvet color?
To ensure a truly vibrant red velvet color, it is crucial to use high-quality red food gel coloring rather than liquid food coloring, and avoid browning during the baking process. Gel coloring provides concentrated pigment without altering the recipe’s liquid balance. Furthermore, keeping the oven temperature consistent and using clean cake pans prevents the edges from browning excessively, preserving the vibrant hue.
Yes, you can easily make delicious, quick red velvet cookies using a boxed red velvet cake mix, making them simple red velvet desserts perfect for beginners. The mix already contains most of the dry ingredients and color. Typically, you only need to combine the mix with oil and eggs, and then roll the dough in powdered sugar before baking for a chewy red velvet cookie result.
What frosting goes with red velvet?
The definitive, signature frosting for red velvet desserts is a rich, tangy cream cheese frosting. The bright tanginess of the cream cheese perfectly balances the subtle cocoa and sweetness of the cake, enhancing the overall flavor profile. While some recipes use white chocolate ganache or simple buttercream, the traditional and preferred choice for authentic red velvet is the cream cheese variety.
How to store red velvet desserts?
Due to the cream cheese component in the frosting, most red velvet desserts, especially cakes, cheesecakes, and cupcakes, must be stored in an airtight container in the refrigerator. The cream cheese frosting is perishable and should not be left at room temperature for more than two hours. Cakes can be stored this way for up to 5 days, maintaining their moist red velvet texture.
What are some easy red velvet desserts?
Some of the easiest red velvet dessert variations include mug cakes (made quickly in the microwave), crinkle cookies (often made with cake mix), and red velvet cake pops (using pre-baked or leftover cake). These options require minimal baking skills and time, fulfilling the desire for quick red velvet satisfaction. They are often ideal for beginners learning basic baking techniques.
Why add vinegar to red velvet cake?
Vinegar is added to red velvet cake batter to provide the acid necessary to activate the baking soda (leavening agent) and to react with the cocoa powder. This chemical reaction creates the optimal rise, tenderizing the crumb for that velvety texture, and ensuring the subtle cocoa flavor is present. It is a vital component of the classic red velvet formulas.
Can I freeze red velvet cake?
Yes, red velvet cake freezes exceptionally well, particularly when frozen unfrosted and wrapped tightly. To freeze a moist red velvet cake, cool it completely, wrap individual layers tightly in plastic wrap followed by aluminum foil, and place in the freezer for up to three months. Thaw overnight in the refrigerator before applying the cream cheese frosting.
How do you make red velvet cake balls?
To make red velvet cake balls (or cake pops), you first crumble baked red velvet cake, mix it with a binder like cream cheese frosting to form a dense dough, and then roll the mixture into uniform balls. The balls are then chilled and dipped in melted chocolate coating. Using a minimal amount of frosting is key to avoiding solutions for crumbly cake balls.
Final Thoughts on Red Velvet Desserts
Red velvet desserts are more than just a passing trend; they are a timeless classic celebrated for their unique flavor profile and festive, elegant presentation. By utilizing the comprehensive list of 11 easy and ultimate recipes provided here, you are now equipped with the expert red velvet recipes and necessary baking science to master everything from the traditional layer cake to the decadent red velvet cheesecake and the quick red velvet poke cake. Remember the essential professional baking tips: use precise measurements, favor food gel for a vibrant scarlet color, and respect the role of buttermilk and vinegar in achieving that signature moist red velvet crumb. We encourage you to start with the simple red velvet treats, then graduate to the more advanced techniques, transforming your kitchen into a home bakery.
Which of these 11 easy and ultimate red velvet dessert recipes will you try first for your next holiday gathering or special occasion? Let us know in the comments below!
Last update on 2026-06-14 at 20:00 / Affiliate links / Images from Amazon Product Advertising API
