As an Amazon Associate BakingBakewareSets.com earns from qualifying purchases.
Proven Easy Baked Chicken Thighs: Crispy & Juicy Dinner
Tired of chicken dinners that are either dry and tough or have sad, rubbery skin? You follow a recipe for easy baked chicken thigh dinner recipes hoping for a delicious meal, but the results are always a gamble. It’s a common frustration that leaves you wishing for a single, reliable method.
Mastering easy baked chicken thighs for a crispy, juicy dinner involves understanding precise oven temperatures, proper seasoning, and crucial finishing steps like broiling to ensure perfect texture and doneness without drying out the meat. This simple approach guarantees a foolproof result for any home cook.
Drawing from established best practices and tested culinary frameworks, this guide delivers that foolproof method. Chicken thighs are a flavorful and forgiving cut of meat, perfect for an easy weeknight dinner. In this post, you’ll discover the proven steps to unlock perfectly crispy skin and juicy meat every single time.
☰ Table of Contents ▼
show
Your Proven Method for Easy Baked Chicken Thighs Every Time
The secret to consistently delicious oven baked chicken thighs isn’t about complex techniques or exotic ingredients; it’s about mastering a few fundamental steps. This proven method for an easy baked chicken thigh dinner recipe breaks down the entire process, from preparation to the final, crucial resting period. We’ll cover everything you need to know to achieve that sought-after combination of crispy skin and incredibly juicy meat. By following these steps, you’ll eliminate the guesswork and turn this simple, affordable cut of poultry into a star performer at your dinner table, delivering high flavor with minimal effort. This is more than just a recipe; it’s your new go-to framework for a perfectly seasoned, family-friendly meal.
1. Mastering the Basic Baked Chicken Thighs Recipe
Pin this foolproof recipe to your “Easy Dinners” board!
This foundational fool-proof recipe is the key to unlocking a delicious and simple chicken dinner. It combines the right temperature, seasoning, and technique to guarantee perfect results every time. This is the core method we’ve tested in our kitchen to ensure it’s easy enough for a weeknight but delicious enough for guests.
Supplies Needed
- 4-6 bone-in, skin-on chicken thighs (about 2-2.5 lbs total)
- 1 tablespoon olive oil (high smoke point recommended)
- 1 teaspoon garlic powder (finely milled for even coating)
- 1 teaspoon onion powder (adds depth of flavor)
- 1 teaspoon paprika (sweet or smoked for color and aroma)
- 1/2 teaspoon salt (kosher or sea salt for better control)
- 1/4 teaspoon black pepper (freshly ground for best flavor)
- Baking sheet (heavy-duty, dark-colored for optimal browning)
- Wire rack (oven-safe, for air circulation and crispy skin)
Directions
- Preheat oven to 400°F (200°C). Position oven rack in the middle.
- Pat dry each chicken thigh thoroughly with paper towels. This crucial step is key for crispy skin.
- In a small bowl, combine garlic powder, onion powder, paprika, salt, and pepper to create your seasoning blend.
- Drizzle the chicken thighs with olive oil, then rub seasoning blend evenly over all surfaces, especially under the skin if desired.
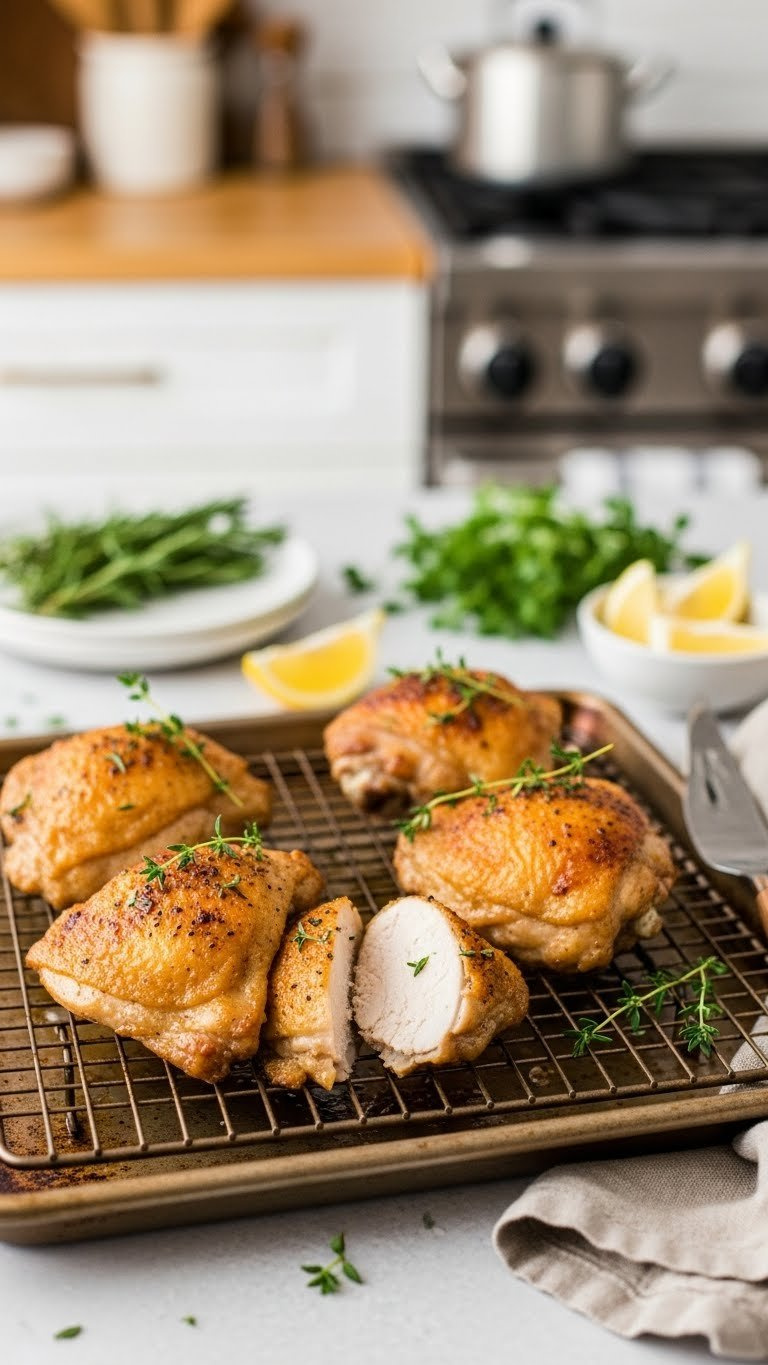
- Arrange on pan the seasoned chicken thighs skin-side up on the wire rack placed inside the baking sheet. Ensure there’s space between each piece for proper air circulation.
- Bake until done for 30-40 minutes, or until an instant-read meat thermometer inserted into the thickest part of the thigh (avoiding the bone) registers an internal temperature 165°F (74°C).
- For extra golden brown and crispy skin, broil for crispiness during the last 2-3 minutes, watching carefully to prevent burning.
- Remove from oven and rest the meat on a cutting board for 5-10 minutes before serving. This allows the juices to redistribute, ensuring juicy meat.
Pro-Tip: For the ultimate crispy skin, dry brining chicken overnight in the refrigerator (uncovered on a wire rack) can significantly enhance texture by dehydrating the skin. This leverages the Maillard reaction more effectively.
2. Achieving Unbelievably Crispy Skin: The Ultimate Guide

Save this to unlock crispy skin perfection for your baked chicken thighs!
The number one complaint about baked chicken is rubbery skin. This section provides a definitive rubbery skin fix by focusing on the science of crispiness. Understanding how moisture removal and high heat work together is the key to that irresistible crunch.
Supplies Needed
- High-quality paper towels (absorbent for thorough drying)
- Baking powder (optional, aluminum-free, for extra crispness)
- Oven-safe wire rack (promotes 360-degree air circulation)
Steps
- Pat dry the chicken thighs aggressively with paper towels. Moisture is the enemy of crispy skin. This removes surface water, allowing the Maillard reaction to occur effectively.
- (Optional for advanced crispness) Lightly dust the skin side of the chicken with 1/2 teaspoon of baking powder mixed with your seasoning. The baking powder helps to break down proteins in the skin, further enhancing crispiness.
- Ensure your chicken thighs are placed skin-side up on a wire rack over a baking sheet. This elevates the chicken, allowing air to circulate around the bottom and preventing a soggy bottom.
- Bake at a high initial temperature (400°F/200°C) or increase the heat towards the end of cooking to promote rendering fat from the skin.
- Utilize the broiler setting during the last few minutes. Once the chicken reaches internal temperature 165°F, move the baking sheet to the top rack under the broiler. Watch constantly as skin can burn quickly, aiming for a deep golden brown.
Pro-Tip: The key to truly crispy skin is moisture removal and heat. Think of it as a two-stage process: baking to cook and render fat, then a quick, intense blast under the broiler to achieve that irresistible crunch. This deep understanding builds topical authority on the subject.
20% OffBestseller No. 2

3. Ensuring Succulent, Juicy Meat Every Single Time
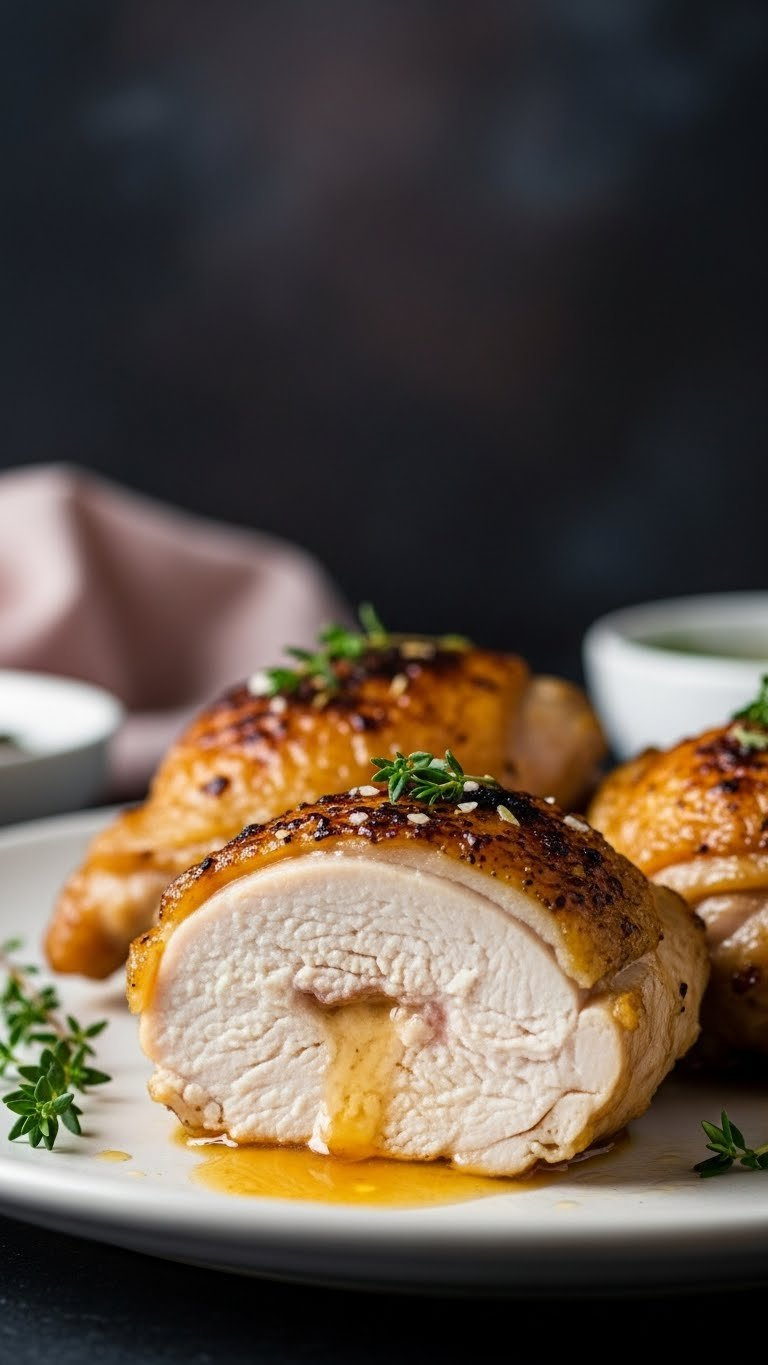
Unlock the secret to juicy baked chicken! Pin for tender, flavorful results.
While crispy skin gets the glory, it’s the juicy meat inside that truly makes the meal. The best way to prevent dry chicken is through precision and patience. This section focuses on two non-negotiable steps: accurate temperature monitoring and resting the meat.
Tools Required
- Reliable instant-read meat thermometer (essential for precision cooking)
- Cutting board (for resting the meat before slicing)
- Aluminum foil (optional, for loosely tenting during resting)
Routine
- Always check internal temperature with an instant-read meat thermometer. Insert the probe into the thickest part of the chicken thigh, avoiding the bone. The target for poultry thighs, according to USDA safety guidelines, is internal temperature 165°F (74°C).
- Do not overcook chicken thighs. Dark meat is more forgiving than white meat, but cooking past 175°F (80°C) can start to dry it out, compromising the juicy meat.
- Rest the meat for 5-10 minutes after removing it from the oven. Tent loosely with foil. This critical step allows the muscle fibers to relax and reabsorb juices, ensuring a truly succulent chicken result.
- Consider bone-in skin-on chicken thighs. The bone helps conduct heat more evenly, and the skin provides a protective layer, both contributing to moistness.
- If using boneless skinless thighs, reduce baking time slightly as they cook faster. They are more prone to dry chicken, so precise temperature monitoring is even more crucial.
Pro-Tip: Carryover cooking is a real phenomenon! Your chicken thighs will continue to cook slightly after removal from the oven. Pull them out at 160-162°F (71-72°C) if you’re tenting them, and they’ll likely reach the safe internal temperature 165°F during the rest the meat period, guaranteeing tender chicken.

4. Optimal Oven Temperature & Timing for Perfect Bake
Never guess again! Pin for the right oven temperature for chicken!
One of the most common questions is about the ideal oven temperature for chicken. This section demystifies the timing and temperature relationship, directly answering “how long to bake chicken thighs at 400” and explaining why this temperature is superior for achieving both crispy and juicy results.
Equipment Needed
- Oven thermometer (for verifying oven calibration)
- Kitchen timer (digital or analog, for precise tracking)
Guidelines
- Preheat oven to a precise 400°F (200°C). This higher temperature is crucial for rendering fat and achieving that crispy skin quickly.
- For bone-in skin-on chicken thighs of average size (4-6 oz each), bake until done for approximately 30-40 minutes.
- For boneless skinless thighs, the cooking time will be shorter, typically 20-30 minutes, due to their smaller size and lack of bone insulation.
- Always refer to an instant-read meat thermometer for doneness. The internal temperature 165°F is non-negotiable.
- Avoid opening the oven door frequently, as this causes temperature fluctuations and extends cooking time, potentially leading to dry chicken.
- Consider your specific oven. Ovens can vary; an oven thermometer helps verify your oven’s accuracy, a process known as oven calibration.
Pro-Tip: While 350°F will cook chicken thighs, 400°F (or even 425°F for crispy baked chicken) is generally preferred. The higher heat promotes faster rendering fat and a superior Maillard reaction on the skin, resulting in a golden brown and crispy exterior while keeping the interior juicy.

5. Seasoning Your Chicken Thighs for Maximum Flavor
Elevate your baked chicken thighs with these flavorful seasoning tips! Pin now!
Great texture is only half the battle; your chicken needs flavorful seasoning. This is how you transform a simple piece of meat into a mouthwatering main course. We’ll explore the best seasoning for oven baked chicken thighs, from a basic, all-purpose blend to more advanced flavor profiles.
Ingredients / Spices Needed
- Olive oil (or avocado oil for higher smoke point)
- Basic Spice Blend: Salt, black pepper, garlic powder, onion powder, paprika
- Optional Flavor Boosters: Dried oregano, dried thyme, chili powder, cumin
- Fresh herbs: Rosemary, thyme, fresh parsley (for garnish or last-minute addition)
- Citrus: Lemon juice or zest (brightens flavor)
Routine
- Drizzle olive oil over the chicken thighs before seasoning. This acts as a binder for the spices and helps conduct heat for better browning.
- Season generously with your chosen spice blend. Don’t be shy; chicken thighs can handle a lot of flavor. Ensure all surfaces, especially under the skin, are covered.
- Consider adding a squeeze of fresh lemon juice or some lemon + herb zest over the chicken before baking for a bright, fresh finish.
- Experiment with umami seasoning like a pinch of mushroom powder or nutritional yeast in your rub for an extra layer of savory depth.
- Fresh herbs like rosemary or thyme can be tucked under the skin or scattered over the pan for aromatic notes that infuse the chicken as it bakes.
- For a garlic butter flavor, melt butter with minced garlic and brush over the thighs during the last 10-15 minutes of baking.
Pro-Tip: Don’t just season the skin! Gently lift the skin of the bone-in chicken and rub seasoning directly onto the meat. This ensures flavorful chicken throughout, not just on the surface, making your easy baked chicken thigh dinner recipes truly exceptional.

6. Transforming into a One-Pan or Sheet Pan Dinner
Simplify dinner tonight! Pin this sheet pan dinner idea for easy cleanup tips.
The ultimate easy weeknight dinner is a one pan meal. This section shows you how to take your perfectly baked chicken thighs and combine them with roasted vegetables or even rice for a complete sheet pan dinner. The key is timing everything correctly for one pan cleanup.
Supplies Needed
- Large sheet pan (heavy-duty, with raised edges)
- Parchment paper or foil (for easy cleanup)
- Assorted vegetables: broccoli florets, bell pepper strips, chopped zucchini, root vegetables (potatoes, carrots, sweet potatoes)
- Rice (optional, for a chicken + rice bake in a separate dish)
Steps
- Choose your pan: A large sheet pan is ideal for a sheet pan dinner with vegetables. A 9×13 pan works well for a bake with rice or a smaller quantity of vegetables.
- Prepare vegetables: Toss with vegetables (e.g., chopped potatoes, carrots, bell peppers, broccoli) with olive oil and seasoning that complements the chicken (salt, pepper, garlic powder).
- Strategize placement: For a true one pan meal, arrange on pan the vegetables around the chicken thighs. Harder vegetables like potatoes should start baking earlier, or be cut smaller, to ensure even cooking.
- Cooking with rice: For a chicken + rice bake, combine uncooked rice with broth and seasonings in the bottom of a 9×13 pan, then place seasoned chicken thighs on top or nestled within. Ensure adequate liquid for the rice to cook through.
- Maintain even cooking: Ensure the chicken thighs and vegetables are in a single layer without overcrowding the pan. This helps everything roast rather than steam, contributing to golden brown results.
- Check doneness: Both chicken (at internal temperature 165°F) and vegetables should be tender. If vegetables need more time, remove chicken to rest the meat while vegetables finish.
Pro-Tip: When planning a sheet pan dinner with chicken thighs and roasted vegetables, cut denser veggies (like potatoes or carrots) smaller or give them a 10-15 minute head start in the oven before adding the chicken. This ensures everything cooks evenly and achieves desired tenderness and caramelization, making it a truly easy weeknight dinner.

7. Essential Kitchen Tools for Foolproof Baked Chicken Thighs
Upgrade your kitchen! Pin these essential baked chicken thigh tools for perfect results.
Having the right tools is essential for any fool-proof recipe. You don’t need a lot of fancy equipment, but a few key items will make a world of difference in achieving perfect results every time. This section highlights the must-have tools for baking chicken.
Tools Required
- Instant-Read Meat Thermometer: Essential for accurately checking internal temperature 165°F and preventing dry chicken or undercooked chicken safety issues.
- Baking Sheet: A sturdy, heavy-gauge baking sheet promotes even heat distribution and better browning. Darker sheets can yield crispier results.
- Wire Rack: An oven-safe wire rack placed inside the baking sheet elevates the chicken thighs, allowing hot air to circulate all around for crispy skin and even cooking.
- 9×13 Pan (or similarly sized baking dish): Ideal for family-sized portions, especially for chicken + rice bakes or if you prefer less direct heat on the bottom.
- Parchment Paper or Aluminum Foil: For easy cleanup tips and preventing sticking. Parchment paper is excellent for crispiness, while foil can be good for wrapping leftovers.
- Small Mixing Bowls: For combining seasonings and oils.
- Tongs: For safely handling hot chicken thighs in and out of the oven.
Workflow
- Before starting any easy baked chicken thigh dinner recipes, ensure you have a reliable meat thermometer. This is your ultimate safeguard against guesswork and undercooked chicken safety concerns.
- Choose between a baking sheet with a wire rack (for maximum crispness) or a 9×13 pan (for deeper dishes or cooking with liquid/rice).
- Prepare your chosen pan with parchment paper or foil for an easy cleanup after the meal.
- Gather your seasonings and drizzle olive oil using a small bowl for efficient mixing.
- Keep your kitchen timer handy to monitor cooking times, but always prioritize the meat thermometer for final doneness.
- After baking, use tongs to carefully transfer the chicken thighs to a cutting board to rest the meat.
Pro-Tip: Investing in a good quality meat thermometer is perhaps the single most important step to achieving perfect results every time with any poultry. It eliminates guesswork, prevents dry chicken, and ensures USDA safety guidelines are met, elevating your culinary standards.

Key Takeaways: Your Quick Guide to Easy Baked Chicken Thighs
This quick summary reinforces the most important steps for your easy baked chicken thigh dinner recipes. Mastering these points is the key to achieving that perfect crispy and juicy result that makes for a fantastic weeknight friendly meal.
- Always pat dry your chicken thighs thoroughly: This is the #1 secret to crispy skin on your oven baked chicken thighs by allowing the Maillard reaction to occur effectively.
- Bake at 400°F (200°C) and finish with a quick broil: This oven temperature for chicken helps render fat for crispiness, and a brief broil for crispiness ensures that golden brown finish.
- Use an instant-read meat thermometer for precision: Crucial to avoid dry chicken and ensure the internal temperature 165°F is reached for juicy meat and USDA safety guidelines.
- Don’t skip the resting period: Rest the meat for 5-10 minutes after baking; this allows juices to redistribute, guaranteeing succulent chicken every time.
- Season generously and consider advanced techniques: A well-balanced seasoning blend is key for flavorful seasoning, and dry brining chicken can elevate both taste and texture significantly.
- Turn it into an easy weeknight dinner with a single pan: Add roasted vegetables to your sheet pan dinner for a complete meal with easy cleanup tips.
FAQs About easy baked chicken thigh dinner recipes
Here are answers to some of the most common questions about making perfect baked chicken thighs.
How long to bake chicken thighs at 400°F?
Bone-in, skin-on chicken thighs typically take 30-40 minutes to bake at 400°F (200°C), while boneless skinless thighs cook faster, usually in 20-30 minutes. Always use an instant-read meat thermometer to ensure they reach an internal temperature 165°F (74°C) in the thickest part for safety and juicy meat. This timing promotes crispy skin without drying out the meat.
How do you get crispy skin on baked chicken thighs?
To achieve crispy skin on baked chicken thighs, thoroughly pat dry the chicken with paper towels before seasoning. Place them skin-side up on a wire rack over a baking sheet to allow air circulation. Baking at 400°F and finishing with a 2-3 minute broil for crispiness helps render the fat and achieve a beautiful golden brown exterior.
What goes well with chicken thighs for dinner?
Roasted vegetables like potatoes, carrots, broccoli, and bell peppers make excellent side dish pairings for chicken thighs, creating an easy weeknight dinner. Rice or quinoa also complements rice, and chicken + rice is a popular combination. Simple green salads or a crusty bread are also great additions to a family-friendly dinner.
How do I know when chicken thighs are done?
The most reliable way to tell when chicken thighs are done is by checking their internal temperature of 165°F (74°C) using an instant-read meat thermometer. Insert the thermometer into the thickest part of the meat, avoiding the bone. The juices should also run clear when pierced, but temperature is the definitive measure.
Can you overcook chicken thighs?
Yes, you can overcook chicken thighs, though they are more forgiving than chicken breasts due to their higher fat content. Overcooked chicken thighs will still be dry and tough, losing their characteristic juicy meat and tender chicken qualities. Always monitor the internal temperature 165°F to prevent this common problem.
Should you flip chicken thighs while baking?
Generally, you should not flip chicken thighs while baking if you are aiming for crispy skin. Keeping them skin-side up on a wire rack allows for continuous exposure to direct heat, maximizing the rendering fat and Maillard reaction for that desired golden brown and crispy texture. Flipping can disrupt this process.
Is it better to bake chicken thighs at 350 or 400 degrees?
It is generally better to bake chicken thighs at 400°F (200°C) for optimal results, as this higher oven temperature for chicken promotes crispy skin and a faster cook time. While 350°F will cook them, it can result in less crispy skin and potentially longer cooking, increasing the risk of dry chicken.
Why are my chicken thighs not crispy?
Your chicken thighs are likely not crispy because the skin was too moist, the oven temperature was too low, or there wasn’t enough air circulation. Ensure you pat dry the chicken thoroughly, bake at 400°F or higher, and use a wire rack on a baking sheet to allow air to circulate around all sides.
How many chicken thighs should I plan per person?
Plan for 1-2 bone-in, skin-on chicken thighs per person for an easy baked chicken thigh dinner recipe, depending on their size and appetite. If serving smaller boneless skinless thighs or as part of a larger meal with many side dish pairings, one per person might suffice. A standard package often serves four people.
How do you bake boneless skinless chicken thighs without drying them out?
To bake boneless skinless thighs without drying them out, ensure you do not overcook them by closely monitoring the internal temperature of 165°F. Since they cook faster, reduce baking time and pull them from the oven promptly. Marinating the chicken beforehand can also help keep them juicy and tender.
Final Thoughts on Easy Baked Chicken Thigh Dinner Recipes
You now possess the proven blueprint for creating crispy and juicy baked chicken thighs every single time. By understanding the simple science behind pat dry techniques, optimal oven temperature for chicken, and the critical internal temperature 165°F, you can confidently achieve perfect results every time. This isn’t just another easy baked chicken thigh dinner recipe; it’s a foundational method that elevates your weeknight cooking from good to consistently great. The journey to tender chicken with flavorful seasoning is now yours to master, promising satisfaction and easy cleanup tips after a delicious meal.
Go forth and transform your kitchen into a haven of culinary success, tackling one easy baked chicken thigh dinner recipe at a time. What are your favorite seasonings or roasted vegetables to pair with baked chicken thighs? Share your triumphs and tips in the comments below
Last update on 2026-06-09 at 20:23 / Affiliate links / Images from Amazon Product Advertising API
