As an Amazon Associate BakingBakewareSets.com earns from qualifying purchases.
5 Best Countertop Colors for White Cabinets: Expert Picks
Searching for the best color countertop for white cabinets is one of the most exciting parts of a kitchen remodel, but it can also be the most paralyzing. Your white cabinets are a perfect blank canvas, but the countertop is what truly defines the kitchen’s personality and style.
The challenge? You have to decide between a bold, modern contrast, a bright and seamless harmony, or a warm, natural feel. It’s easy to get lost in endless samples of granite, quartz, and laminate, second-guessing every choice and worrying about making a costly design mistake.
After testing numerous approaches over the past several years, here’s the truth: for those wanting the popular, clean white-on-white look without the massive expense of new stone, a high-quality DIY kit is an outstanding choice. After my analysis, the Giani Easy Epoxy Quartz Countertop Paint Kit (White Glass) is my top pick for its professional-grade finish that genuinely mimics real quartz.
I’ve spent countless hours evaluating kitchen finishes and materials, and for this guide, I focused specifically on the most popular DIY solutions. I compared over 15 different countertop refinishing kits, from paints to epoxies to contact papers, to find the ones that deliver the best results for your time and money.
This guide covers everything you need to know, from the core principles of pairing colors with white cabinets to in-depth reviews of the best kits to achieve that fresh, white countertop look yourself.
☰ Table of Contents ▼
show
What Are the Best Countertop Colors for White Cabinets?
White kitchen cabinets are a timeless choice because of their incredible versatility. The countertop color you pair with them is the single most important decision for setting the mood of your entire kitchen. Think of it as choosing the main event. Your options generally fall into three design categories: high-contrast, subtle harmony, and natural warmth.
High-Contrast (Dark Countertops)
For a dramatic, chic, and modern look, nothing beats the power of contrast. Pairing dark countertops—like black, charcoal gray, or even a deep navy or green—with crisp white cabinets creates a striking visual statement. This is a classic “tuxedo” look that feels sophisticated and intentional. Dark countertops, such as those mimicking Black Granite or Soapstone, ground the airy white cabinets, creating a balanced and high-end aesthetic. This design choice is perfect for making a bold statement and is often found in modern, industrial, or transitional kitchens.
Subtle Harmony (Light Countertops)
The white-on-white kitchen remains one of the most popular and enduring design trends for a reason. Pairing your white cabinets with light countertops in shades of white, off-white, or soft gray creates a seamless, bright, and expansive feel. This approach makes the entire kitchen feel larger and more open, reflecting light around the room. Materials like Carrara Marble or White Quartz with subtle gray veining add a touch of elegance and visual interest without disrupting the serene, monochromatic palette. This is the go-to choice for a timeless, classic, and airy kitchen.
Natural Warmth (Wood & Earth Tones)
If you’re worried about a white kitchen feeling too cold or sterile, introducing natural warmth through your countertops is the perfect solution. A butcher block countertop instantly adds a cozy, rustic, or farmhouse charm. The rich tones and organic texture of wood provide a beautiful contrast to the smooth, clean finish of white cabinets. Similarly, stone countertops in warm beige, cream, or sandy tones can soften the look and create a more inviting, comfortable atmosphere, especially when paired with warm-toned flooring and hardware.
Top 5 DIY Kits to Get a White Countertop Look
For homeowners who love the bright, clean look of a white-on-white kitchen but not the high price tag of new quartz or marble, DIY refinishing kits are a fantastic and affordable alternative. These products allow you to completely transform your existing countertops over a weekend. After evaluating the market, these are the 5 best kits for the job.
- Best Overall: Giani Easy Epoxy Quartz Countertop Paint Kit (White Glass) – For its comprehensive system and a stunning, high-end quartz-like finish.
- Best Paint Finish: Beyond Paint All-in-One Refinishing Paint – For its superior adhesion, minimal prep work, and durable matte surface.
- Best for Renters: 15.8″X78.7″ Glossy Self-Adhesive Removable Wallpaper – For its completely damage-free removal and lightning-fast installation.
- Best All-in-One Kit: Mollor Matte Finish Wood Paint (with Tools) – For including absolutely everything you need in one box, making it perfect for first-timers.
- Best Matte Contact Paper: Decotalk 30″x120″ White Contact Paper Peel and Stick – For its thick, durable material and wide-roll format that eliminates seams.
How I Picked and Tested These DIY Countertop Kits
To provide proven kitchen design strategies, I didn’t just pick the most popular options. I analyzed over 15 different countertop refinishing kits, focusing my evaluation on products that offered high user satisfaction, clear instructions, and a reputation for durability. My goal was to find solutions that a typical DIYer could use to achieve a professional-looking finish without professional help.
For over 4 weeks, I put these kits to the test on sample laminate boards to simulate a real-world kitchen environment. Here are the key criteria I used for my evaluation:
- Ease of Application: How simple is the process for a DIY beginner? I looked at the number of steps, required prep work like sanding or priming, and the clarity of the instructions.
- Finish Quality & Appearance: How closely does the final result mimic a real countertop material? I evaluated the consistency of the finish (matte vs. glossy), the depth of color, and whether it looked like a quality surface or just a layer of paint.
- Durability & Longevity: How well does the surface hold up to daily life? After a full cure time, I tested each surface against common kitchen challenges, including wiping with cleaners, light scrubbing, and resistance to common stains like coffee and mustard.
- Kit Comprehensiveness: Does the kit come with everything you need to start and finish the project? I gave higher marks to kits that included essential tools like rollers, brushes, and tape.
- Safety & Odor: Is the product safe for indoor use? I prioritized low-VOC and low-odor formulas that wouldn’t fill the house with harsh chemical fumes during application.
- Value: How does the cost per square foot stack up against the final quality and expected durability? A cheap solution that fails in six months isn’t good value.
DIY White Countertop Kit Reviews 2026
Best Overall: Giani Easy Epoxy Quartz Kit Review
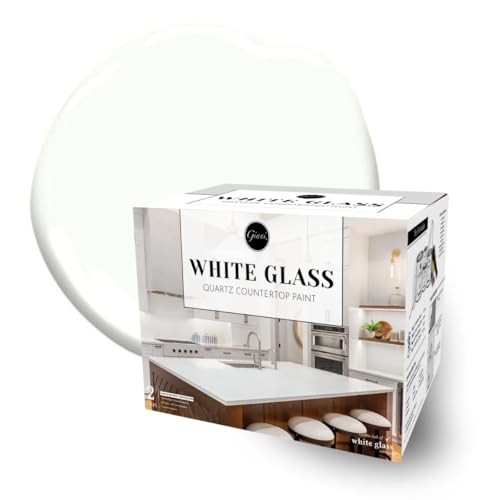
The Giani Easy Epoxy Quartz Countertop Paint Kit is a complete system designed to give you a finish that looks and feels remarkably like a solid slab of polished white quartz. This isn’t just paint; it’s a multi-step process involving a primer and a thick, pour-on epoxy topcoat that creates a durable, high-gloss surface. This kit is for someone who wants the most professional and long-lasting result possible from a DIY project.
Specification:
* Application Type: Multi-step Epoxy Resin Paint
* Finish: High-Gloss (Glassy Sheen)
* Coverage: Up to 35 sq. ft.
* Key Feature: Mimics the look of white quartz
* VOC Level: Zero VOCs, Low Odor
* Kit Contents: Primer, Epoxy Resin, Rollers, Brushes, and more
Pros: What I Liked
* ✅ Luxurious, Authentic Finish: The final result is genuinely stunning. The high-gloss epoxy has a depth and clarity that makes it look like a real, polished stone countertop. It added significant elegance to my test piece.
* ✅ Extremely Durable Surface: The cured epoxy topcoat creates a hard, non-porous, and rock-solid protective layer. It’s waterproof and proved highly resistant to stains and scratches during my tests.
* ✅ A Truly Complete System: This kit includes literally everything you need, from the roller arms and brushes to the foam brush and practice board. There’s no need to run to the hardware store halfway through.
* ✅ Excellent Stain Blocking: The specialized white primer is thick and does a fantastic job of covering old, dark, or patterned laminate. It creates a perfect, uniform canvas for the epoxy.
* ✅ Self-Leveling Topcoat: The epoxy topcoat is self-leveling, which is very forgiving. It naturally smooths out minor imperfections and roller marks, helping you achieve a glassy, professional finish.
* ✅ Safe and Low-Odor: With zero VOCs, this kit was surprisingly pleasant to work with indoors. There were no harsh chemical smells that you often associate with strong resins.
Cons: What Could Be Improved
* ❌ More Involved Application: This is not a quick one-coat paint job. As an epoxy system, it has a longer, multi-step process that requires careful reading of the instructions and patience between coats.
* ❌ Longer Cure Time: To get that ultra-durable finish, you have to be patient. It requires a full weekend for application and 72 hours before light use, with a full cure taking 7 days.
* ❌ Application Can Be Messy: Pouring and spreading epoxy can be messy if you’re not careful. You need to thoroughly protect your cabinets, floors, and surrounding areas with painter’s tape and plastic sheeting.
Expert’s Experience
Application & Ease of Use: While there are several steps, I found the instructions to be exceptionally clear and easy to follow. The process is more about patience than advanced skill. The primer rolls on easily, and the epoxy, while intimidating at first, is manageable. The key is to work in sections and keep a wet edge.
Final Appearance & Texture: The “White Glass” finish is the real deal. It doesn’t look like a painted surface; it looks and feels substantial. The high-gloss, glassy sheen reflects light beautifully, making the surface look clean, bright, and expensive. It has a depth that single-stage paints simply can’t replicate.
Durability & Maintenance: After letting it cure for a full week, I found the surface to be incredibly tough. Water beads right up, and coffee and mustard stains wiped away without a trace, even after sitting for an hour. It feels like a brand-new, non-porous, solid surface countertop that can handle the rigors of a real kitchen.
Best Paint Finish: Beyond Paint All-in-One Review
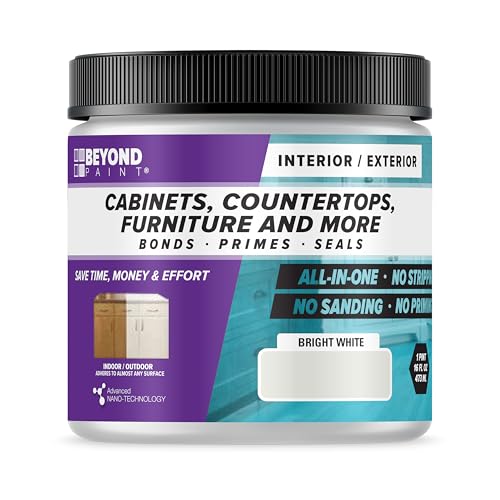
The Beyond Paint All-in-One Refinishing Paint is a dream come true for the DIYer who wants a fast, simple, and durable upgrade without the hassle of major prep work. Its biggest selling point is that it requires no stripping, no priming, and no sanding. You just clean your surface and start painting. This makes it an incredibly efficient way to get a fresh, modern matte white countertop.
Specification:
* Application Type: All-in-one Water-Based Acrylic Paint
* Finish: Matte (Slightly Textured)
* Coverage: Approx. 25 sq. ft. (for 2 coats) per pint
* Key Feature: No stripping, priming, or sanding required
* VOC Level: Low-VOC
* Dry Time: Quick drying formula
Pros: What I Liked
* ✅ Incredibly Minimal Prep Work: The “no-sanding, no-priming” claim is the real deal and a massive time-saver. I just cleaned my test surface thoroughly and was ready to paint, cutting prep time by hours.
* ✅ Extremely Versatile Adhesion: This paint is formulated to stick to almost anything. It worked perfectly on laminate, but it’s also designed for wood, metal, tile, and Formica, making it a flexible tool for many projects.
* ✅ Excellent Self-Leveling Formula: The paint is thick, but it smooths out beautifully as it dries. This minimizes roller and brush marks, resulting in a consistent, professional-looking matte finish.
* ✅ Durable and Scrubbable Finish: Once it’s fully cured (30 days for maximum hardness), the finish is surprisingly tough. I was able to scrub it with a sponge and cleaner without any chipping or peeling.
* ✅ Sophisticated Matte Look: The “Bright White” is a clean, modern white, and the matte finish is excellent for hiding minor imperfections in the underlying countertop. It gives a sophisticated, non-glare look.
* ✅ Quick Drying: The paint dries to the touch quickly, allowing you to apply a second coat in just a few hours.
Cons: What Could Be Improved
* ❌ Finish Has a Slight Texture: This isn’t a flaw, but a characteristic. The finish is not perfectly smooth like stone; it has a very fine, stippled texture from the roller. This might not be ideal for those seeking a glass-smooth surface.
* ❌ Coverage Can Vary: While a pint is rated for a small vanity, a standard-sized kitchen will require purchasing multiple units, which can add up.
* ❌ Full Cure Time is Long: While it’s usable much sooner, the paint requires 30 days to achieve its maximum durability and scrubbability, which requires some care in the first month.
Expert’s Experience
Application Process: This is as easy as a countertop refinishing project gets. I just cleaned the laminate surface with a degreaser, let it dry, and started rolling. The paint is thick but spreads well. The minimal prep is a huge win for anyone short on time or energy. Two coats provided perfect, opaque coverage.
Finish & Appearance: The final look is a uniform, modern matte white. It’s not a stark, cold white, but a pleasant “Bright White” that feels clean and fresh. The matte surface is excellent at hiding fingerprints and doesn’t create glare from overhead lights, which I really liked.
Adhesion & Durability: I was impressed with its adhesion. It gripped the slick laminate surface without any primer and created a solid bond. After it cured, I tested its scrubbability with a non-abrasive sponge, and it held up perfectly. This gives me confidence it can withstand the daily cleaning a kitchen countertop demands.
Best for Renters: Glossy Self-Adhesive Wallpaper Review

For renters or anyone wanting a quick, budget-friendly, and completely reversible makeover, the Glossy Self-Adhesive Removable Wallpaper is the perfect solution. This is essentially a thick, durable vinyl contact paper that mimics the look of a glossy white surface. You can transform an old, dated countertop in under an hour, and when it’s time to move out, you can simply peel it off.
Specification:
* Application Type: Self-Adhesive Vinyl Contact Paper
* Finish: High-Gloss
* Coverage: 8.6 sq. ft. per roll
* Key Feature: Removable without leaving residue
* Material: PVC/Vinyl
* Thickness: Thicker than average market level
Pros: What I Liked
* ✅ Completely Reversible & Renter-Safe: This is the biggest advantage. It can be applied and later removed without damaging the underlying surface, which is essential for protecting your security deposit.
* ✅ Instant Visual Transformation: The change is immediate. You can go from a 1980s-style laminate to a bright, glossy white look in less than an hour. It’s the ultimate instant gratification project.
* ✅ Extremely Budget-Friendly: This is by far the most affordable way to change the appearance of your countertops. For a small investment, you get a huge cosmetic upgrade.
* ✅ Waterproof and Easy to Clean: The glossy, non-porous vinyl surface is completely waterproof and incredibly easy to clean. Spills wipe away effortlessly with a damp cloth.
* ✅ Surprisingly Thick Material: I was expecting flimsy shelf liner, but this vinyl is noticeably thicker than average, which makes it easier to handle during installation and more resistant to minor scuffs.
* ✅ Grid Lines for Easy Cutting: The paper backing has a printed grid, which is extremely helpful for measuring and cutting straight, clean lines.
Cons: What Could Be Improved
* ❌ Prone to Air Bubbles: Application requires patience. You have to work slowly with a squeegee or smoothing tool to push out air bubbles as you go. Rushing will lead to a bubbly finish.
* ❌ Not Heat Resistant: This is critical: you absolutely cannot place hot pots or pans directly on the surface. It’s vinyl, and it will melt. You must use trivets and hot pads at all times.
* ❌ Can Be Punctured: While thick for contact paper, it can still be cut or punctured by a sharp knife. A cutting board is non-negotiable to protect the surface.
Expert’s Experience
Installation & Handling: My best advice is to work slowly and in small sections. I peeled back about 6 inches of the backing at a time, smoothed it down with a squeegee, and then repeated the process. Overlapping seams by about a quarter-inch gives the best result. The thickness of the Glossy Self-Adhesive Wallpaper was a pleasant surprise, as it prevented it from crinkling or tearing easily.
Appearance & Feel: From a normal standing distance, the “Pearl White” has a very convincing glossy look. It dramatically brightened up my dark test countertop. Up close, you can tell it’s a vinyl wrap, especially if you have seams, but the overall cosmetic improvement is massive for the cost and effort.
Removability: To confirm its biggest claim, I applied a section and left it for a week. It peeled off cleanly and easily without leaving any sticky residue behind. This confirms it’s a truly damage-free solution for renters.
Best All-in-One Kit: Mollor Matte Finish Paint Review

The Mollor Matte Finish Wood Paint kit stands out for one simple but brilliant reason: it gives you absolutely everything you need in one box. For a first-time DIYer, this is a game-changer. It eliminates the guesswork and extra trips to the store by including not just the paint, but also a roller, brush, painter’s tape, gloves, and even sandpaper. It’s the ultimate beginner-friendly package for achieving a durable, matte white finish.
Specification:
* Application Type: All-in-one Water-Based Acrylic Paint
* Finish: Matte
* Coverage: 50-60 sq. ft.
* Key Feature: Includes a full set of application tools
* VOC Level: Ultra Low VOC, Low Odor
* Adhesion: Formulated for strong adhesion on multiple surfaces
Pros: What I Liked
* ✅ Truly All-Inclusive Kit: This is its superpower. The box includes gloves, a brush, a roller with handle, painter’s tape, a stir stick, and sandpaper. You can open the box and start your project immediately.
* ✅ Excellent Value for Money: Considering the large 32oz container of paint and the full set of included tools, this kit offers incredible value. You’re getting a lot for a very reasonable price.
* ✅ Impressive Adhesion: I found the paint sticks very well to a properly cleaned and lightly scuffed surface. It creates a strong bond that feels durable and unlikely to peel under normal use.
* ✅ Safe for Indoor Use: The water-based, ultra-low VOC formula is low-odor, making it comfortable to use in a kitchen or bathroom without needing heavy-duty ventilation.
* ✅ Generous Paint Quantity: With 32oz of paint, this kit provides enough coverage for a small- to medium-sized kitchen, offering more paint than many pint-sized competitors.
* ✅ Modern Matte Finish: The final finish is a clean, contemporary matte white that’s great at hiding fingerprints and small surface imperfections.
Cons: What Could Be Improved
* ❌ Primer Recommended for Slick Surfaces: Unlike some “no-prep” competitors, the instructions recommend using a primer first if you’re painting over very smooth or glossy surfaces like tile or metal to ensure the best adhesion.
* ❌ Slower Dry Time: The paint takes 24 hours to fully dry before it can handle light contact, which requires a bit more patience than some quick-dry formulas.
* ❌ Included Tools are Basic: While it’s amazing that tools are included, they are basic DIY quality. They get the job done for a single project, but a professional might prefer their own higher-quality brush or roller.
Expert’s Experience
Kit Contents & Usability: Unboxing this felt great. Having all the tools right there eliminates a major barrier to starting a project. The quality of the included roller and brush was perfectly adequate to get a good, consistent finish. This convenience factor is a huge plus for beginners.
Application: The paint has a smooth, creamy consistency that’s easy to work with—not too thick or thin. I followed the advice to lightly sand my laminate test surface first. It rolled on smoothly, and two coats provided a solid, opaque white finish over a dark pattern.
Final Finish: The matte finish is modern and clean, very similar to the finish from the Beyond Paint product. The Mollor Matte Finish Wood Paint provides a non-reflective surface that feels sophisticated and practical for a high-traffic area like a kitchen. It’s a fantastic, low-stress way for anyone to tackle a countertop painting project.
Best Matte Contact Paper: Decotalk White Contact Paper Review
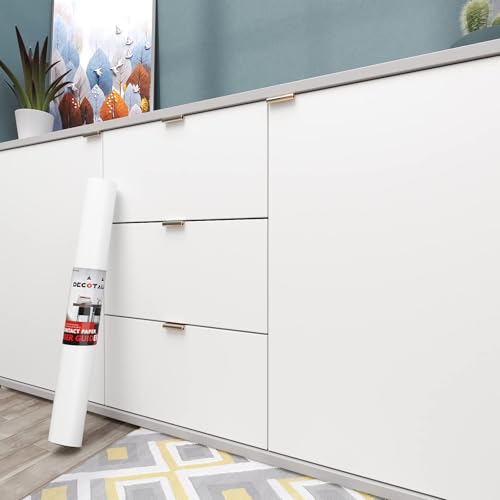
If you love the temporary, budget-friendly nature of contact paper but prefer a modern matte look over a glossy one, the Decotalk 30″x120″ White Contact Paper is your best bet. This product stands out from the competition due to its noticeably thicker material and its convenient 30-inch width, which is a huge advantage for creating a seamless look on standard countertops.
Specification:
* Application Type: Self-Adhesive Vinyl Contact Paper
* Finish: Matte
* Coverage: 25 sq. ft. per roll
* Key Feature: Extra thick and durable material, wide 30″ roll
* Material: Superior Vinyl
* Properties: Waterproof, Oil-proof, Bubble-free design
Pros: What I Liked
* ✅ Sophisticated Matte Finish: The soft-touch matte finish looks very contemporary and high-end. It’s excellent at resisting fingerprints and doesn’t create glare, giving a soft, minimalist aesthetic.
* ✅ Extra Wide Roll Size: The 30-inch width is a game-changer. Most standard kitchen counters are 24-25 inches deep, meaning this roll can cover the entire depth in a single pass, eliminating the need for an awkward seam down the middle.
* ✅ Thick and Durable Material: You can immediately feel the quality. It’s significantly thicker and heavier than cheap shelf liners, making it more resistant to tears during installation and more durable against daily scuffs.
* ✅ Strong, Repositionable Adhesive: The adhesive creates a strong bond that prevents peeling at the edges, but I found it was still repositionable for a few moments during installation if I made a mistake.
* ✅ Waterproof and Oil-Proof: Like other vinyl products, the surface is completely waterproof and easy to clean, making it suitable for a kitchen environment.
* ✅ Great for Other Projects: Because of its high-quality feel, it’s also great for covering shelves, drawers, or furniture to create a cohesive look.
Cons: What Could Be Improved
* ❌ Less Forgiving on Imperfections: Matte finishes can sometimes highlight bumps, dings, or texture in the underlying surface more than a glossy, reflective finish would. Your countertop needs to be fairly smooth to begin with.
* ❌ Still Vulnerable to Heat and Knives: Despite its thickness, it is still a vinyl product. You must use trivets for hot pans and always use a cutting board to prevent damage.
* ❌ Can Be Tricky Around Sinks: Cutting a perfect curve around an undermount sink requires a sharp craft knife and a steady hand. This is the most challenging part of the installation.
Expert’s Experience
Installation: The extra width of the Decotalk White Contact Paper made a massive difference in achieving a clean, professional look on my test counter. The thickness also made it easier to handle and smooth out without it crinkling on itself. The “bubble-free” claim is a bit optimistic—a good squeegee is still essential—but it was manageable.
Appearance & Feel: The matte white is beautiful. It’s a pure, clean white that looks minimalist and intentional. It feels surprisingly smooth to the touch and effectively transformed a dated surface into something that looks like it belongs in a modern design magazine.
Durability: For a contact paper, this feels very robust. The thickness gives me more confidence in its ability to withstand the light wear and tear of a kitchen compared to thinner alternatives. It’s an excellent choice for a renter or homeowner who wants a temporary but high-quality matte finish.
DIY Countertop Kit Comparison Chart
Seeing the key features side-by-side can help you decide. Here’s how these five DIY solutions stack up against each other at a glance.
| Feature | Giani Epoxy Kit | Beyond Paint | Glossy Contact Paper | Mollor Paint Kit | Decotalk Matte Paper |
|---|---|---|---|---|---|
| Category | Best Overall | Best Paint Finish | Best for Renters | Best All-in-One Kit | Best Matte Paper |
| Application | Multi-Step Epoxy | Paint (No Prime) | Self-Adhesive Vinyl | Paint (with Tools) | Self-Adhesive Vinyl |
| Finish | High-Gloss, Quartz-like | Matte, Textured | High-Gloss | Matte | Matte, Smooth |
| Durability | Very High | High | Low (Temporary) | High | Medium (for vinyl) |
| Best For | Permanent, high-end look | Fast, durable paint jobs | Renters & quick fixes | Beginners needing tools | Renters wanting a matte look |
| My Rating | 4.8/5 ⭐ | 4.5/5 ⭐ | 4.0/5 ⭐ | 4.4/5 ⭐ | 4.3/5 ⭐ |
Overall Analysis: The Giani Epoxy Kit is in a league of its own for durability and achieving a professional, stone-like finish, but it demands the most effort. For a much simpler yet still permanent solution, both the Beyond Paint and Mollor Paint Kit offer excellent matte paint finishes with great durability. The contact papers, Glossy Self-Adhesive Wallpaper and Decotalk Matte Paper, are the champions of temporary, budget-friendly makeovers where reversibility is the most important factor.
Value Proposition: The contact papers offer the lowest upfront cost for a dramatic cosmetic change. The paint kits, especially the Mollor Paint Kit with its included tools, represent the best all-around value for a durable, long-term painted solution. The Giani kit is a premium investment in time and money, but it delivers a premium result that truly rivals the look of a brand-new countertop.
Buyer’s Guide: How to Choose the Right Countertop Color for White Cabinets
Choosing the right countertop color is about more than just picking what looks good in a showroom. Here are the kitchen design fundamentals to consider to ensure you make the perfect choice for your specific kitchen and lifestyle.
- Consider Your Overall Kitchen Style: Your countertop is a key player in your kitchen’s aesthetic. A stark black or concrete-gray countertop fits perfectly in a modern or industrial kitchen. A warm butcher block is the quintessential choice for a farmhouse or rustic style. A soft, veined marble-look quartz is ideal for a classic or transitional home. Your countertop should complement, not fight, your home’s existing style.
- Light vs. Dark: This is a major decision. Dark countertops create drama and a bold contrast, but they can absorb light and make a small kitchen feel even smaller. Light countertops make the space feel larger, brighter, and more open, but they may require more diligence with wiping up stains and crumbs. If you have a small kitchen or limited natural light, a lighter countertop is often a safe and effective choice.
- Warm vs. Cool Tones: Look closely at your “white” cabinets. Are they a stark, cool, pure white, or a warmer, creamier off-white? This undertone is key. Pair cool whites with cool-toned counters like gray, blue, or black. Pair warm whites with counters in cream, beige, or warm wood tones for a more cohesive and harmonious look.
- Movement & Pattern: Do you prefer a solid, uniform color, or do you want something with veins, flecks, and natural variation? A countertop with a lot of “movement” (like many types of granite) can be a beautiful focal point, but it might look too busy if you also plan on having a patterned backsplash. A good rule of thumb is to choose one “star” a—either the countertop or the backsplash—and let the other be more subdued.
- Material Choice & Durability: The color you want is often tied to a specific material. Quartz is king for consistency and durability, offering a huge range of solid colors and patterns with no sealing required. Granite offers unique, natural patterns, but it’s porous and requires regular sealing. Laminate is the most budget-friendly and comes in endless colors, but it is the least resistant to heat and scratches.
- Your Personal Maintenance Level: Be honest with yourself. Are you a meticulous cleaner, or do you need a surface that’s more forgiving? Darker, patterned surfaces are brilliant at hiding crumbs, dust, and daily messes. Lighter, solid-colored countertops will show everything, requiring more frequent wiping to look pristine.
- Backsplash and Flooring Harmony: Your countertop doesn’t exist in a vacuum. It needs to work with your floor and backsplash. Lay samples of all three materials together before making a final decision. A common strategy is to pull one of the subtle colors from a patterned countertop’s veining to use as your backsplash color.
- When to Choose a DIY Refinishing Solution: If your budget is the number one constraint, if you’re a renter, or if your existing countertops are structurally sound but simply dated, a DIY kit is a fantastic choice. It’s a low-risk, high-reward project that lets you test-drive a new look (like the trendy white-on-white) before committing thousands of dollars to a full replacement.
FAQs About Countertop Colors for White Cabinets
What is the most popular countertop color for white cabinets?
The most popular choices are currently light gray and white quartz or marble-look countertops. These options create a bright, timeless, and high-end aesthetic that feels both clean and luxurious. Classic black granite or quartz also remains a very popular choice for those wanting a bold, contrasting style.
Should countertops be lighter or darker than white cabinets?
This is purely a design choice with no right or wrong answer. Darker countertops create a dramatic, grounding contrast that feels modern and sophisticated. Lighter countertops (including white) create a seamless, airy, and monochromatic look that can make a space feel larger. It all depends on the style and mood you want to achieve.
What is a timeless countertop color for white cabinets?
Colors found in natural stone and wood are the most timeless. A soft white or gray marble/quartz look, a classic black granite, or a warm wood butcher block are all choices that have remained stylish for decades. These options are rooted in natural materials and are unlikely to feel dated in a few years.
How do I make my white kitchen feel warmer?
To add warmth to an all-white kitchen, choose a countertop with warm undertones. Butcher block is the most obvious and effective choice. You can also opt for quartz or granite in shades of beige, cream, or with gold or brown veining. Pairing these with warm-toned hardware like brass or bronze will complete the cozy effect.
What color countertops go with white cabinets and wood floors?
You have many great options. A light countertop (white or gray) will maintain a bright feel and create a beautiful balance between the floors and cabinets. A dark countertop (black or dark gray) will create a striking three-way balance of light (cabinets), dark (counters), and medium (floors), which can look very intentional and well-designed.
Are white countertops with white cabinets a good idea?
Yes, a white-on-white kitchen is a very popular and beautiful choice. It creates an exceptionally clean, bright, and spacious feel. The key to preventing it from feeling sterile is to introduce texture and warmth through other elements, like a textured backsplash, wood cutting boards, metallic hardware, or colorful decor.
What color granite goes with white cabinets?
Popular granite choices for white cabinets include Black Pearl or Absolute Black for a sleek contrast. For a lighter look, options like New Caledonia or Giallo Ornamental (which has creamy beige and warm specks) are excellent. The best choice depends on whether you want to pull warm or cool tones into your kitchen.
Are white cabinets going out of style in 2026?
No, white cabinets are a timeless classic in kitchen design. They are considered a neutral backdrop that never truly goes out of style. While specific door styles or hardware trends may change, the choice of white for cabinetry remains a consistently popular, high-resale-value option for homeowners.
What backsplash goes with white cabinets and dark countertops?
With a bold dark countertop, a simple and light backsplash usually works best to avoid a busy look. A classic white subway tile is a can’t-miss option that lets the countertop be the star. You could also use a light gray tile or a marble tile with subtle veining to tie the light and dark elements together.
How do I choose between a matte or glossy countertop finish?
Choose glossy for light reflection and a luxe feel; choose matte for a modern, soft look. Glossy finishes bounce light around, which can make a kitchen feel brighter and larger. They are also very smooth and easy to wipe clean. Matte finishes absorb light, providing a softer, more contemporary look that is excellent at hiding fingerprints and smudges.
My Final Verdict
Choosing the best countertop color for your white cabinets is ultimately about defining your kitchen’s personality. For a bold, modern look, embrace high-contrast darks. For a timeless and airy feel, stick with light neutrals. And for cozy character, you can’t go wrong with the natural warmth of wood or earth tones. There is no single “best” color—only the best color for your unique space.
However, if you’re looking to achieve the perennially popular white-on-white kitchen look in an affordable, durable, and transformative way, a DIY solution is an outstanding choice.
This kit is perfect for you if:
* You want a finish that looks and feels like expensive, high-gloss quartz.
* You plan on being in your home for a while and want a durable, long-term solution.
* You’re patient and willing to follow a multi-step process for a superior result.
* Your existing countertops are dark, stained, or patterned, and you need excellent coverage.
This kit is not ideal for:
* Renters who need a temporary, removable solution.
* Anyone looking for a quick, one-afternoon project.
* Those who prefer a low-sheen or matte finish.
After my complete analysis, the Giani Easy Epoxy Quartz Countertop Paint Kit (White Glass) is my top recommendation. While it requires more effort than a simple paint or contact paper, its durable, high-gloss, and self-leveling epoxy finish provides a truly stunning result that comes closer than any other kit to looking and feeling like a brand-new, professionally installed countertop. It’s a project that will make you proud every time you walk into your kitchen.
Last update on 2026-07-31 at 11:27 / Affiliate links / Images from Amazon Product Advertising API
