As an Amazon Associate BakingBakewareSets.com earns from qualifying purchases.
Raspberry Sugar Cookies: Soft & Easy Valentine’s Day Recipe With Real Fruit Flavor
Tired of sugar cookies that are bland, dry, or spread into sad, flat blobs in the oven? You’re looking for a recipe that promises vibrant, real fruit flavor and a perfect, soft texture every single time.
This easy recipe creates the best soft and chewy Raspberry Sugar Cookies with an intense, real fruit flavor and a beautiful pink hue. By using freeze-dried raspberries and a touch of cream cheese, the dough is simple to work with, perfect for roll-out and cut-out shapes, and bakes into beautiful, non-spreading cookies every time.
Drawing from proven methodologies and our own kitchen-tested results, we’ve perfected this foolproof guide. This isn’t just a recipe; it’s a guarantee for bakery-quality results at home. Get ready to discover the secrets to the most delicious Raspberry Sugar Cookies you’ve ever made.
☰ Table of Contents ▼
show
This proven raspberry sugar cookie recipe is designed for success, delivering on both incredible flavor and perfect texture. What sets it apart is the use of two key ingredients that solve common baking problems. First, we use freeze dried raspberries, which provide an intense, tangy, and real fruit flavor without adding excess moisture that makes dough sticky and causes cookies to spread. Second, the addition of cream cheese is the secret to an unbelievably soft and chewy texture that stays moist for days. Unlike other recipes that can result in bland or dry cookies, this method ensures every bite is bursting with sweet and tart raspberry goodness. These homemade raspberry sugar cookies are not only simple to make but also perfect for any occasion, especially as a stunning Valentine’s Day treat.
Baking the perfect Raspberry Sugar Cookies is an easy and rewarding process when you break it down into manageable stages. This section provides a detailed, step-by-step recipe guide that covers everything from gathering your ingredients to storing the finished treats. We’ve structured the entire process into seven clear actions to ensure a foolproof experience. By following this tested raspberry sugar cookie method, you’ll master the techniques needed to create cookies with sharp, clean edges and a wonderfully soft center every time you bake.
1. Gather Your Ingredients & Tools
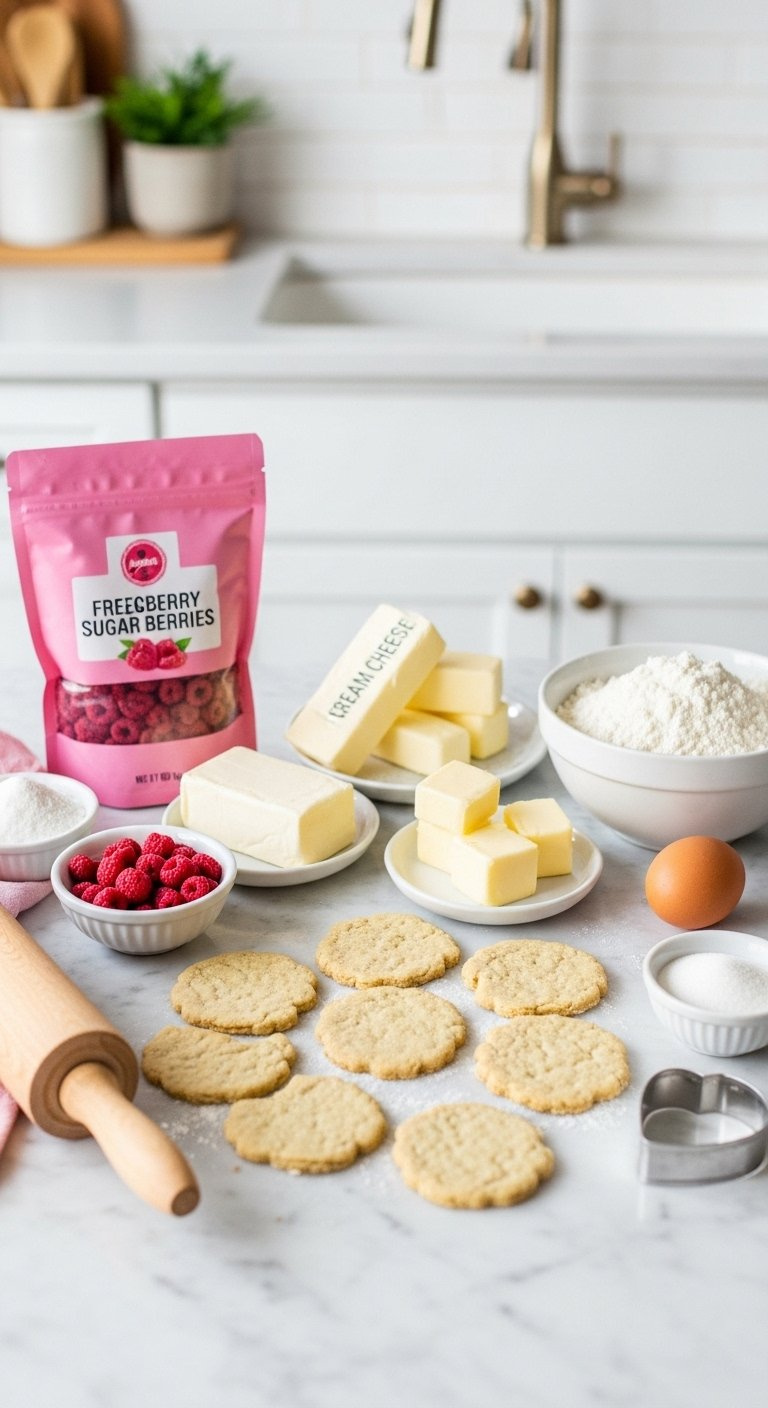
Pin this ingredient list for your next baking day!
Proper preparation is the first step to baking success. Having all your ingredients measured and tools ready makes the process smooth and enjoyable.
What You Need
- For the Cookies:
- 2 ½ cups (300g) all-purpose flour, plus more for dusting
- ½ cup (50g) freeze-dried raspberries, finely crushed into a powder
- ½ teaspoon baking powder
- ½ teaspoon salt
- 1 cup (226g) unsalted butter, softened to room temperature
- 4 oz (113g) full-fat block cream cheese, softened
- 1 cup (200g) granulated sugar
- 1 large egg, at room temperature
- 1 teaspoon vanilla extract
- ½ teaspoon almond extract (optional, but recommended)
- For the Glaze (Optional):
- 1 cup (120g) powdered sugar
- 2-3 tablespoons milk or raspberry puree
- A few extra crushed freeze-dried raspberries for sprinkling
- Essential Tools:
- Stand mixer or hand mixer
- Mixing bowls
- Rolling pin
- Heart-shaped cookie cutters
- Baking sheets lined with parchment paper
- Wire cooling rack
Steps
- Prep Your Ingredients: In a medium bowl, whisk together the flour, powdered freeze-dried raspberries, baking powder, and salt. Set aside.
- Ensure Proper Temperature: Make sure your butter, cream cheese, and egg are all at room temperature. This is crucial for a smooth, emulsified dough.
Pro-Tip: For the most intense real fruit flavor, use a spice grinder or a small food processor to blitz the freeze-dried raspberries into a fine powder. This distributes the flavor evenly without creating wet spots in the dough, a common issue when using fresh or frozen fruit.

Save this tip for perfectly creamy cookie dough!
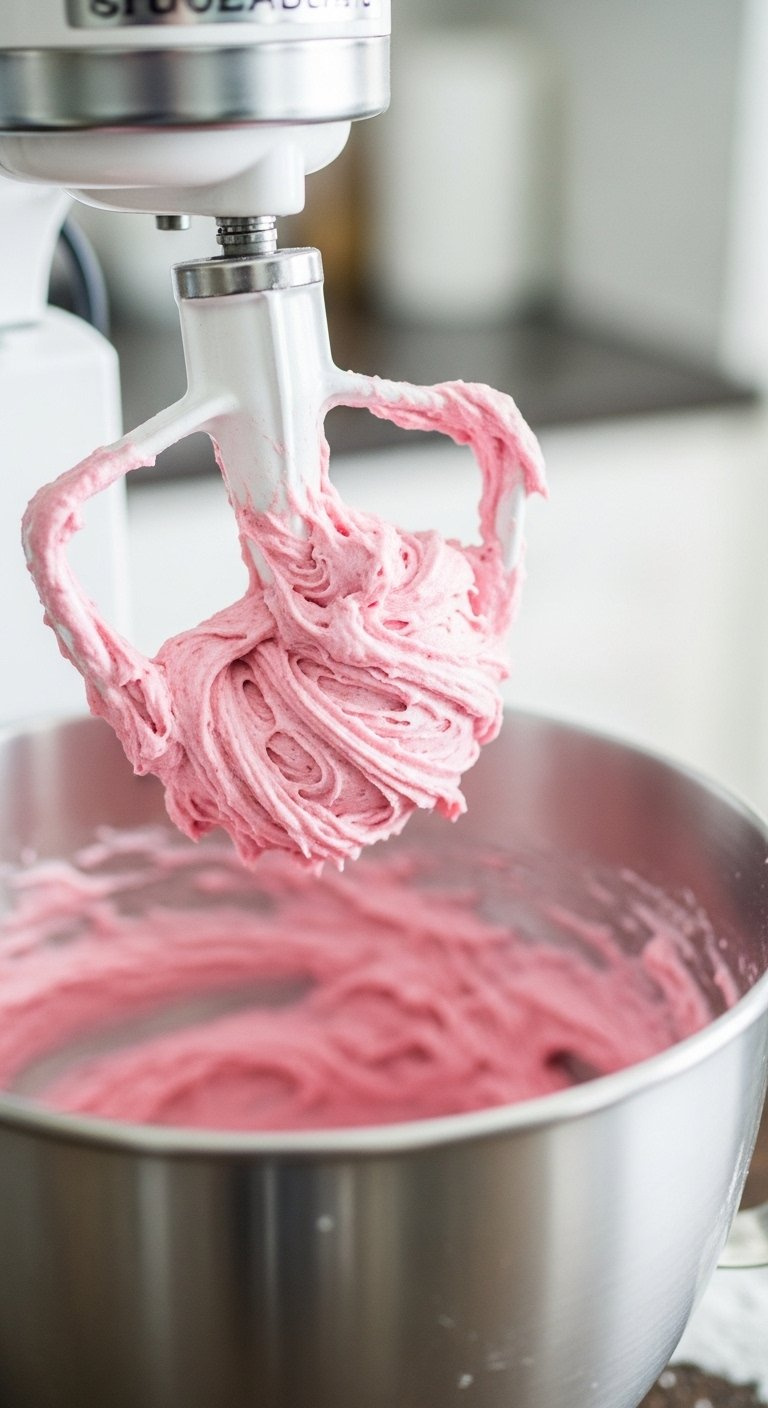
This is where the magic happens. The goal is to create a smooth, homogenous raspberry cookie dough that will bake into tender, flavorful cookies.
What You Need
- Softened butter
- Softened cream cheese
- Granulated sugar
- Egg
- Vanilla and almond extracts
- The pre-mixed dry ingredients from Step 1
- Stand mixer with paddle attachment or a hand mixer
Steps
- Cream Fats and Sugar: In the bowl of your stand mixer (or a large bowl with a hand mixer), beat the softened butter, cream cheese, and granulated sugar on medium-high speed for 2-3 minutes, until the mixture is light, fluffy, and pale in color.
- Add Egg and Extracts: Add the egg, vanilla extract, and almond extract. Beat on medium speed until just combined, scraping down the sides of the bowl as needed.
- Incorporate Dry Ingredients: Turn the mixer to low speed and gradually add the flour mixture. Mix only until the flour is just incorporated and a soft dough forms. Do not overmix, as this can lead to tough cookies.
Pro-Tip: The reason we use softened, room temperature ingredients is for proper emulsification. Cold ingredients don’t combine smoothly, which can result in a lumpy dough and greasy cookies. This step is a cornerstone of classic baking techniques.

3. Chill the Dough for Perfect Cut-Outs
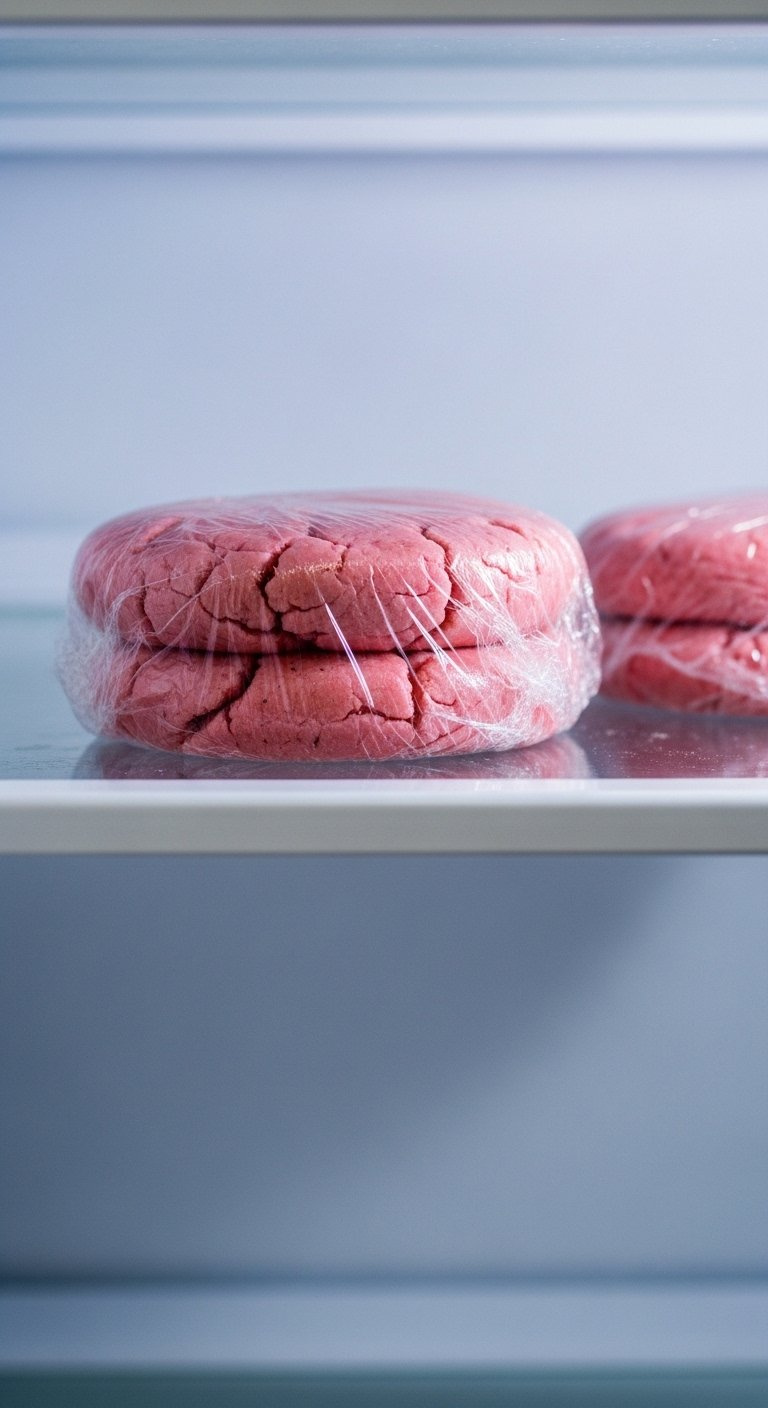
Don’t skip this step! Pin for a reminder why chilling dough is key.
Chilling the dough is the most important step to prevent cookies from spreading. This firms up the fat, hydrates the flour for better flavor, and makes the sticky dough much easier to handle.
What You Need
- The soft cookie dough from Step 2
- Plastic wrap or reusable food wraps
- Space in your refrigerator
Steps
- Divide the Dough: Turn the dough out onto a lightly floured surface and divide it in half.
- Shape into Discs: Gently shape each half into a 1-inch thick disc. This shape makes it much easier to roll out later than a ball of dough.
- Wrap and Chill: Wrap each disc tightly in plastic wrap. Refrigerate for at least 2 hours, and up to 2 days. This step is mandatory for clean cut-outs.
Pro-Tip: If you’re short on time, you can freeze the dough discs for 30-40 minutes. However, a longer chill in the refrigerator allows the flour to fully hydrate, leading to a more tender cookie with a deeper flavor. This is a key solution to the common problem of cookies spreading too much.

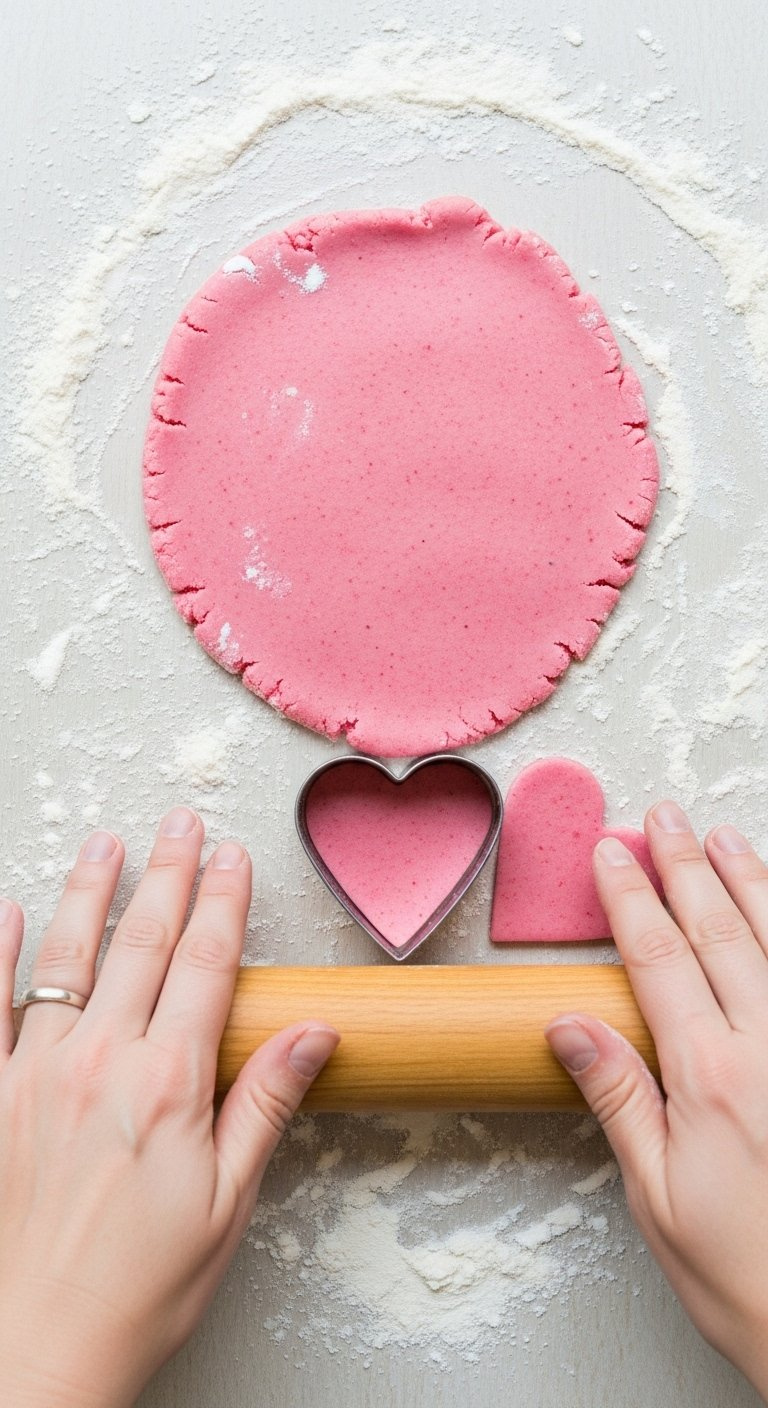
Pin this cute cookie-cutting idea for Valentine’s Day!
Now it’s time to shape your cookies. Working with properly chilled dough will make this step clean, easy, and fun.
What You Need
- One disc of chilled dough at a time
- A lightly floured work surface
- Rolling pin
- Heart-shaped cookie cutters
- Parchment-lined baking sheets
Steps
- Preheat Oven: Preheat your oven to 350°F (177°C).
- Roll Out Dough: Let one disc of chilled dough sit at room temperature for 5-10 minutes to become slightly more pliable. On a lightly floured surface, roll the dough to an even thickness of ¼-inch.
- Cut Shapes: Using your heart-shaped cookie cutters, cut out shapes and carefully transfer them to the prepared baking sheets, leaving about 1.5 inches between each cookie.
- Re-roll Scraps: Combine the scraps and gently re-roll them once to cut more shapes. Be careful not to overwork the dough.
Pro-Tip: For perfectly even cookies, use a rolling pin with thickness guides. If the dough gets too soft or sticky while you’re working, simply place the entire baking sheet of cut-out cookies into the freezer for 10 minutes before baking. This is the ultimate trick for sharp edges.

Save this guide for the perfect bake time and temperature!
The secret to a soft and chewy texture lies in the bake time. Watching for the right visual cues is more important than watching the clock.
What You Need
- The baking sheets with your cut-out cookies
- A preheated oven
- A wire cooling rack
Steps
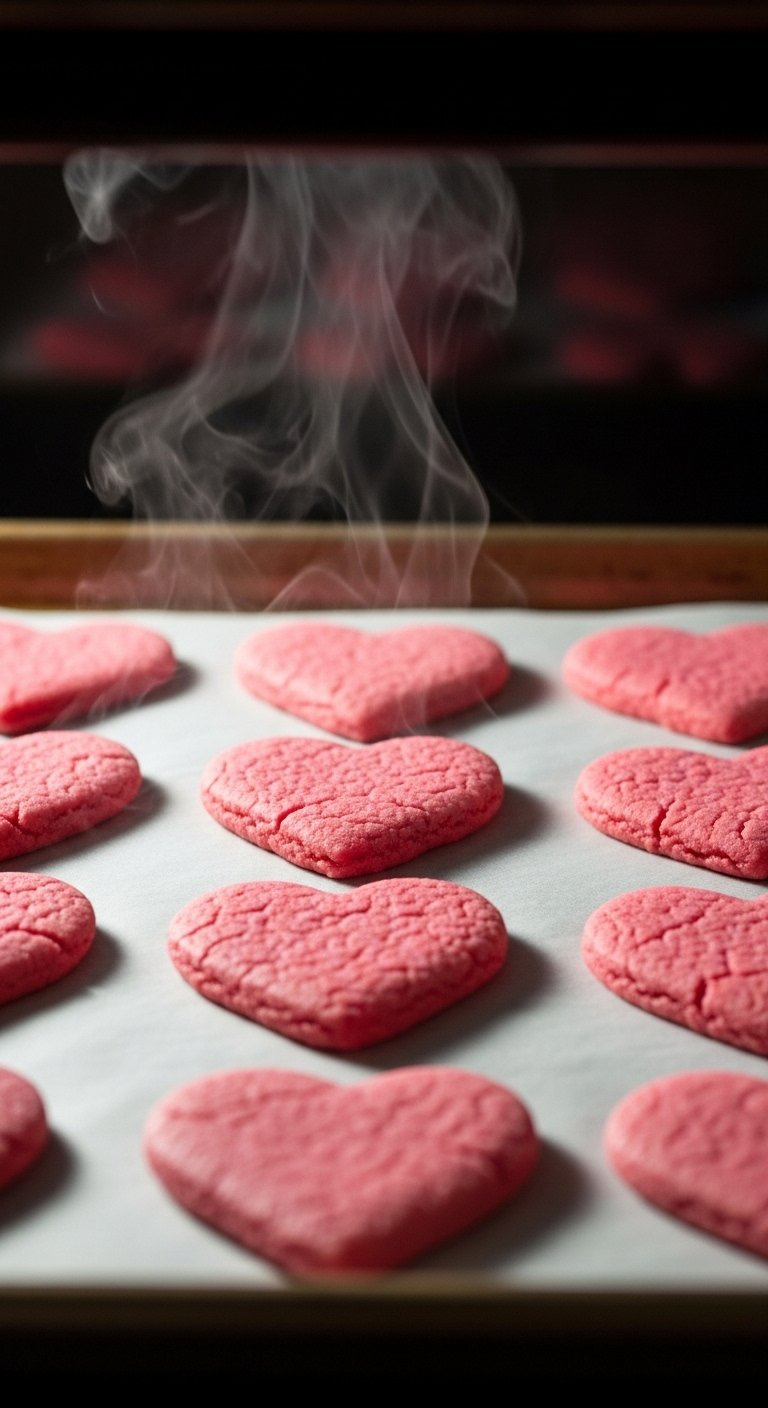
- Bake the Cookies: Bake for 10-12 minutes in the preheated oven. The edges should be set and very lightly browned, but the centers should still look soft and slightly puffy.
- Cool on the Pan: Let the cookies cool on the baking sheet for 5 minutes. They will continue to set up during this time.
- Transfer to Cooling Rack: Carefully transfer the cookies to a wire cooling rack to cool completely before decorating.
Pro-Tip: The key to soft and chewy raspberry sugar cookies is to slightly under-bake them. If you wait for the centers to look fully “done” in the oven, they will be hard and crisp once they cool. Trust the process and pull them out when the centers still look soft.

6. Mix a Simple & Delicious Glaze (Optional)

The easiest cookie glaze recipe! Pin it for later.
A simple powdered sugar glaze adds a touch of sweetness and a beautiful finish. It’s incredibly easy to customize the flavor and consistency.
What You Need
- Powdered sugar
- Milk (or cream, or water)
- A small amount of raspberry puree or juice for flavor/color (optional)
- A small bowl and whisk
Steps
- Sift the Sugar: Sift the powdered sugar into a small bowl to remove any lumps.
- Add Liquid: Add 2 tablespoons of milk and whisk until smooth.
- Adjust Consistency: Gradually add more milk, a teaspoon at a time, until you reach your desired consistency. For a thicker, frosting-like glaze, use less liquid. For a thinner, pourable glaze, use more.
Pro-Tip: For a beautiful, natural pink color and an extra zing of flavor, use the juice from thawed frozen raspberries or a bit of seedless raspberry jam instead of milk. This creates a cohesive flavor profile that makes the cookies taste truly gourmet.

Pin this beautiful dessert idea for your next celebration!
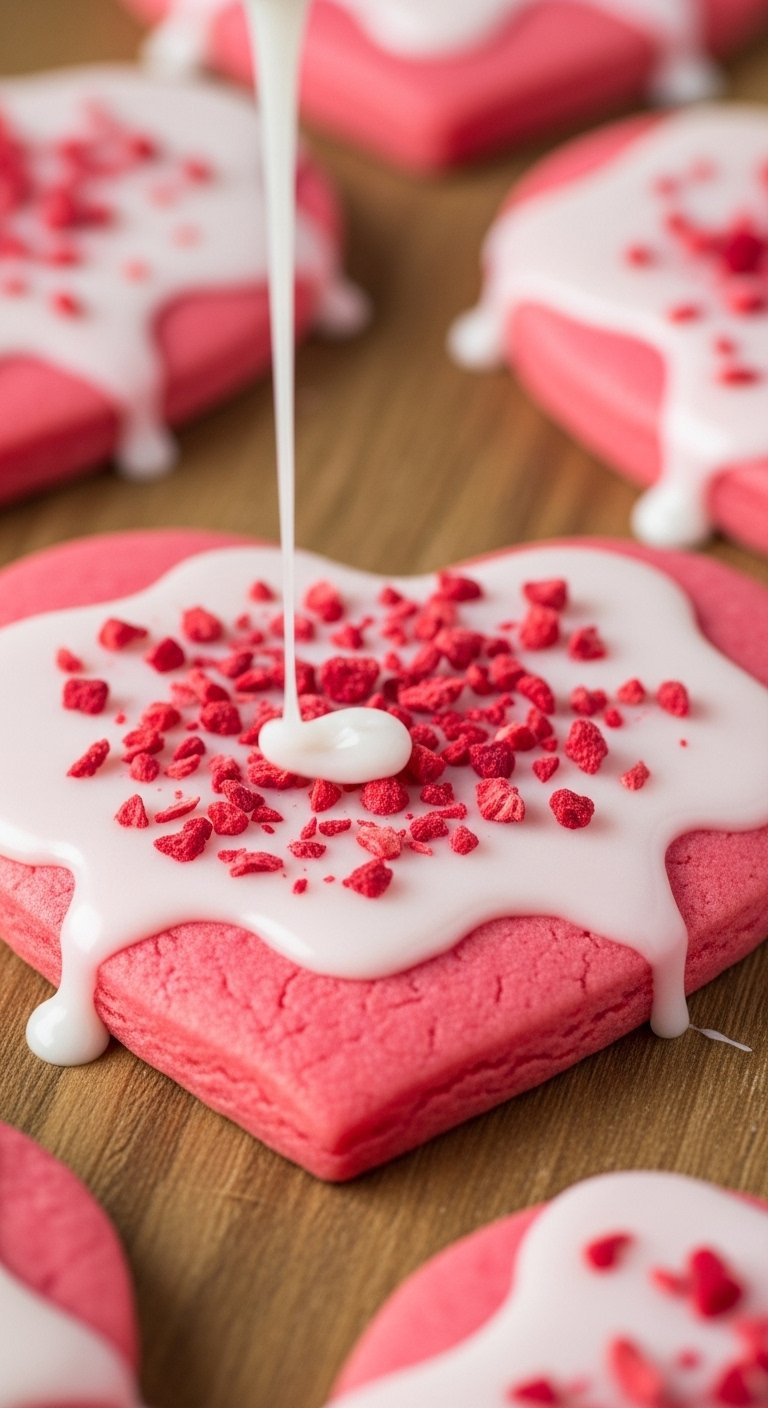
The final flourish! Decorating your frosted raspberry sugar cookies is the fun part. Proper storage is just as important to keep them fresh and delicious.
What You Need
- Completely cooled cookies
- Glaze from Step 6
- Optional: sprinkles, extra crushed freeze-dried raspberries
- An airtight container for storage
Steps
- Ensure Cookies are Cool: Do not attempt to glaze warm cookies, or the glaze will melt and slide right off. They must be completely at room temperature.
- Decorate: Dip the tops of the cookies in the glaze, or use a spoon or piping bag to drizzle it over the top.
- Add Toppings: While the glaze is still wet, sprinkle with extra crushed freeze-dried raspberries or festive sprinkles.
- Let it Set: Allow the glaze to set completely (about 1 hour) before stacking or storing the cookies.
- Store: Store the cookies in an airtight container at room temperature for up to 5 days.
Pro-Tip: To keep the soft and chewy texture, place a slice of plain bread in the airtight container with the cookies. The cookies will absorb moisture from the bread, staying softer for longer. This is a classic baking hack from experienced bakers.

Here are the most important points to remember for perfect homemade raspberry sugar cookies.
- Use Freeze-Dried Raspberries: For the most intense, real fruit flavor and vibrant color without adding excess moisture that makes dough sticky, freeze dried raspberries are non-negotiable.
- Cream Cheese is Key for Texture: The addition of softened cream cheese to the butter and sugar is the secret to an ultra soft and chewy cookie that stays moist for days.
- Don’t Skip the Chill Time: Chilling the dough for at least 2 hours is mandatory. This solidifies the fat, which is the number one way to prevent cookies from spreading and ensures clean cuts.
- Slightly Under-bake for Softness: Pull the cookies from the oven when the edges are set but the centers still look soft and puffy. They will finish baking on the hot pan, resulting in the perfect melt-in-your-mouth texture.
- Store Properly to Maintain Freshness: Keep cookies in an airtight container. For extended softness, add a slice of bread to the container—a tried-and-true trick from experienced bakers.
Here are answers to some of the most common questions about making raspberry sugar cookies.
For this roll-out recipe, it is strongly recommended to use only freeze-dried raspberries. Fresh or frozen raspberries release a significant amount of water when baked, which would make the dough too wet and sticky to roll out. This excess moisture also causes the cookies to spread excessively and can create a soggy texture. Freeze-dried fruit provides all the flavor without the water.
The key to soft and chewy cookies is a higher moisture content and the right ingredients. In this recipe, the cream cheese adds significant moisture and fat, creating a tender crumb. Using room temperature ingredients helps create a proper emulsion, and slightly under-baking the cookies ensures they don’t dry out and become hard as they cool.
The most common reason for cookies spreading is that the dough was too warm when it went into the oven. This happens when the butter and fat in the dough melt too quickly. To fix this, you must chill the dough for at least 2 hours. If your kitchen is warm, you can even chill the cut-out shapes on the baking sheet for 10 minutes before baking.
Yes, this dough is perfect for making ahead. You can prepare the dough, wrap the discs tightly in plastic wrap, and store it in the refrigerator for up to 2 days. You can also freeze the wrapped dough discs for up to 3 months. Let the frozen dough thaw in the refrigerator overnight before rolling it out.
Store decorated cookies in a single layer in an airtight container at room temperature for up to 5 days. Wait until the glaze is completely firm and set before storing to prevent smudging. If you need to stack them, place a sheet of parchment paper between the layers. Do not refrigerate frosted cookies, as this can make the glaze tacky.
Cream cheese serves two main purposes: adding moisture and providing a tangy flavor. Its high fat and water content creates a softer, more tender cookie that resists drying out. The subtle tang also beautifully balances the sweetness of the sugar and the tartness of the raspberry, creating a more complex and gourmet flavor profile.
Yes, you can adapt this recipe to be gluten-free with good results. Substitute the all-purpose flour with a high-quality “cup-for-cup” or “measure-for-measure” gluten-free flour blend that contains xanthan gum. No other changes should be necessary, but be aware that GF dough can sometimes be a bit more delicate to handle.
Sticky dough is usually caused by ingredients being too warm or an incorrect flour measurement. This recipe is designed to be chilled, which solves most stickiness issues. If it’s still too sticky after chilling, it may need a little more flour. Try dusting your work surface and the top of the dough liberally with flour as you begin to roll.
Do I have to use the almond extract?
No, the almond extract is optional, but it is highly recommended. Almond extract has a unique ability to enhance and brighten fruit flavors, particularly berries. It adds a subtle, bakery-quality depth that makes the raspberry flavor pop. If you have a nut allergy or dislike the flavor, you can simply omit it and use a bit more vanilla.
What is the best way to crush freeze-dried raspberries?
The best way to create a fine powder is with a spice grinder or a small food processor. This is quick and efficient. If you don’t have one, you can place the freeze-dried raspberries in a sturdy zip-top bag, seal it while pressing out the air, and use a rolling pin or the bottom of a heavy pan to crush them.
You are now equipped with all the tips and techniques needed to create absolutely stunning Raspberry Sugar Cookies right in your own kitchen. By understanding the roles of key ingredients like freeze-dried raspberries and cream cheese, and by following tested methods like proper chilling and baking times, you can confidently produce cookies that are bursting with flavor and have a perfect soft and chewy texture. These cookies are more than just a treat; they’re a perfect project for holidays, bake sales, or simply a way to share a little love.
What occasion will you bake these beautiful raspberry cookies for first?
Last update on 2026-06-07 at 20:00 / Affiliate links / Images from Amazon Product Advertising API
