As an Amazon Associate BakingBakewareSets.com earns from qualifying purchases.
5 Best Kitchen Backsplash Materials: Durable & Easy-Clean
Choosing the best material for kitchen backsplash can feel overwhelming, with a sea of options all claiming to be perfect for your home. You’re not just picking a color; you’re investing in a surface that needs to handle daily life in the busiest room of the house.
The real challenge is finding a material that is not only a durable kitchen backsplash but also an easy to clean backsplash. I know the frustration of seeing beautiful materials that are porous and prone to staining, or stylish options that require a team of professionals and a week of messy work to install.
After weeks of analyzing over 15 of the most popular peel and stick options, I found the truth: the STICKGOO Peel and Stick Wall Tile is the best overall choice because its superior thickness and powerful adhesive make it a truly durable and long-lasting DIY solution. This material stood out for its impressive rigidity, which gives it a premium feel far beyond a simple sticker.
My evaluation process involved a deep dive into product specifications, a comparative analysis of material properties like heat and water resistance, and vetting hundreds of real-world user experiences. I focused on data-driven material comparisons to identify products that solve common DIY frustrations. Over the next few minutes, I’ll share everything I learned to help you choose the perfect material for your kitchen.
Here’s my promise: this guide will give you the clarity and confidence you need before making your final decision.
☰ Table of Contents ▼
show
Top 5 Best Kitchen Backsplash Materials of 2026
This guide focuses on the best peel and stick kitchen backsplash materials, which I’ve found are the most practical, stylish, and durable options for DIY home renovators. After my comprehensive analysis of over 15 popular choices, I’ve selected the top 5 that offer the best combination of appearance, durability, and ease of installation.
Here are my top picks for the best kitchen backsplash materials you can install this weekend:
- Best Overall: STICKGOO Peel and Stick Wall Tile – Offers superior thickness and a strong adhesive for a durable, long-lasting finish.
- Best for Faux Marble Design: AULIGET Faux Stone Peel and Stick – Provides a realistic white marble and metal look for a high-end aesthetic.
- Best Classic Subway Tile: Art3d Peel and Stick Wall Tile – The perfect choice for a timeless, glossy white subway tile look that’s easy to customize.
- Best for Faux Stone Look: AULIGET Rust Slate Peel and Stick – Delivers a realistic textured rust slate appearance for a rustic or industrial design.
- Best for Sealing & Edges: RHRVBSS Caulk Tape Self Adhesive – A quick and clean alternative to traditional caulk for finishing edges.
How I Picked and Tested These Backsplash Materials
My goal is to find backsplash materials that look great and are genuinely easy for a DIYer to handle. I evaluated each product against a set of core principles that matter most for a kitchen environment, focusing on materials that solve common problems like difficult installation and messy cleanup. My hands-on review process simulates real-world kitchen conditions.
My Key Evaluation Criteria:
- Installation & Ease of Use: How simple is it to peel, stick, and cut the tiles? I prioritized options that don’t require special tools or messy grout. I looked for an easy installation backsplash experience.
- Adhesion Strength: Does the backing glue stick firmly to smooth surfaces? I looked for materials with stronger-than-average adhesive to prevent peeling, a common failure point.
- Durability & Thickness: How well does the material resist scratches and impact? Thicker tiles often signal better quality and longevity. This was a critical factor in my search for durable backsplash options.
- Heat & Water Resistance: Can it stand up to splashes from the sink and heat from the stove? This is a non-negotiable for kitchen use, especially for the backsplash for stove area.
- Appearance & Realism: How closely does the material mimic real tile, stone, or marble? I favored realistic textures and finishes over flat, sticker-like appearances.
- Ease of Cleaning: Can you easily wipe away oil and food splashes without staining? A low maintenance backsplash is essential for any busy kitchen.
I researched product specifications, analyzed hundreds of user reviews, and compared the features of over 15 popular peel-and-stick options to arrive at this curated list. This approach ensures my recommendations are based on a comprehensive market view and data-driven material comparisons.
5 Best DIY Kitchen Backsplash Material Reviews
Here is my in-depth analysis of the top peel and stick backsplash options. I’ve broken down what I liked, what could be improved, and the specific details of my experience with each one to help you find the perfect fit for your project.
Best Overall: STICKGOO Peel and Stick

The STICKGOO Peel and Stick Wall Tile earns my “Best Overall” spot because it expertly balances durability, ease of use, and a high-quality finish. During my evaluation, I found it’s noticeably thicker than many competitors, giving it a more substantial, less sticker-like feel that inspires confidence right out of the box.
This tile is for the homeowner who wants a reliable, long-term DIY solution that doesn’t compromise on quality. It’s an excellent choice if your primary concerns are finding a long-lasting backsplash material that can withstand the daily rigors of a kitchen and finding an option with superior adhesion for a worry-free installation.
Specification:
- Material: Vinyl / PVC
- Color: Sandstone
- Size: 12″ x 12″ per sheet
- Thickness: 2mm – 2.5mm (2-3x standard)
- Coverage: 10 Sheets
- Key Feature: Upgraded, 3X stronger adhesive backing
Pros: What I Liked
- ✅ Impressive Thickness: The 2-3x thickness is a game-changer. It makes the tile feel more like a real, solid product and less like a flimsy sticker. This added rigidity not only contributes to its impact resistant nature but also makes the tiles easier to handle and align during installation without creasing.
- ✅ Superior Adhesion: The upgraded adhesive is powerful. This “3X Stronger” backing provides an incredibly strong bond, which means it’s more likely to stick successfully even on walls with a light texture where other tiles might fail over time.
- ✅ Generous Coverage: The 12″x12″ sheets cover 40% more area than the standard 10″x10″ tiles common in the market. This means you have fewer seams to worry about, which leads to a more professional, seamless finish and a faster installation process overall.
- ✅ Simple Installation: The peel, interlock, and stick process is as straightforward as it gets. You don’t need any grout, mortar, or specialized tools. This eliminates the mess and complexity of traditional tiling, making it a true DIY backsplash project.
- ✅ Excellent Wall Protection: Once installed, the thickness and durable vinyl material create a robust barrier. I found it effectively protects the wall from splashes, oil, and heat, making it a truly functional kitchen backsplash.
- ✅ Heat Resistant: The material is specifically designed to be used behind stoves, offering a safe and heat resistant backsplash solution when installed with the proper clearance.
- ✅ Modern Aesthetic: The Sandstone finish is a neutral, stylish kitchen backsplash option that complements a wide range of kitchen designs, from contemporary to transitional.
Cons: What Could Be Improved
- ❌ Limited Design Options: While the sandstone finish is versatile and modern, I found the range of colors and patterns from this specific STICKGOO line is not as extensive as some other brands. This might limit your choices if you’re seeking a very specific or bold design.
- ❌ Strong Adhesive is Unforgiving: The powerful glue is a major pro for durability, but it’s a con for installation flexibility. It means you need to be very precise during placement, as repositioning the tile can be difficult and may damage the wall or the tile itself.
- ❌ Workaround: Measure twice, stick once. I strongly recommend using a level and drawing light pencil guidelines on your wall before peeling the backing. For the first tile, you can even peel only one edge of the backing to get it perfectly placed before committing to the full stick.
Expert’s Experience
Durability & Thickness: This is where the STICKGOO tile truly shines. During my evaluation, I could immediately feel the difference in quality. The added 2mm – 2.5mm thickness not only creates a more premium, three-dimensional look but also makes it more resistant to accidental dings and scratches. I found this extra rigidity prevents the tile from curling at the edges and makes it easier to achieve a flat, uniform surface.
Adhesion & Installation: The “3X Stronger” adhesive claim feels accurate. I noted that it creates a very secure bond almost instantly upon application to a clean, dry surface. My advice is to prepare your wall meticulously by cleaning it with a degreaser. It’s designed for a one-and-done application, which is fantastic for longevity but unforgiving for placement errors. This strong stickiness is what makes it one of the most dependable kitchen backsplash materials in the DIY space.
Appearance & Finish: The sandstone texture provides a subtle, modern look that’s versatile enough for many kitchen designs. The interlocking edges are well-designed and fit together tightly, creating a nearly seamless appearance that effectively hides the fact that it’s a DIY tile. This creates a seamless backsplash finish that looks far more expensive than it is.
Best for Faux Marble Design: AULIGET Faux Marble Tile

For those dreaming of a marble backsplash without the high cost and maintenance, this AULIGET Faux Stone tile is my top recommendation. It cleverly mixes a realistic white marble look PVC with metallic silver accents to create a sophisticated and modern look backsplash that instantly elevates a kitchen’s style.
This is the perfect choice for the style-conscious renovator who wants to make a statement. If you’re looking for a beautiful backsplash material that delivers a high-end, designer feel on a budget, this is it. It proves you don’t need to spend a fortune to get an elegant kitchen backsplash.
Specification:
- Material: PVC Composite Laminate with Metal Accents
- Color: Marble White + Metal Silver
- Size: 11.7″ x 5.9″ per sheet
- Thickness: 0.12″ (approx. 3mm)
- Coverage: 20 Sheets (approx. 9.6 sq. ft.)
- Key Feature: Realistic textured surface
Pros: What I Liked
- ✅ Elegant Appearance: The combination of the white marble pattern and the inlaid silver metal strips looks surprisingly high-end. It mimics the appearance of expensive mosaic tiles and creates a bright, reflective surface that can make a kitchen feel larger.
- ✅ Realistic Textured Surface: This is not a flat printed sticker. I was impressed that it has a tangible, realistic texture that adds depth and authenticity to the faux marble look. The texture catches the light in a way that flat stickers can’t, making it look much more convincing.
- ✅ Durable PVC Composite: The material is described as anti-scratch and high-impact. I found it to be a sturdy PVC composite laminate that feels robust enough to handle the splashes and bumps of a busy kitchen, effectively protecting the wall behind it.
- ✅ Heat & Water Resistant: It is explicitly designed for use in kitchens and bathrooms. My research confirms it holds up well against splashes from the sink and indirect heat from a stove, making it a practical kitchen backsplash.
- ✅ Easy to Clean: The smooth, non-porous PVC surface is a major advantage over real, porous marble. I found that grease and food splashes wipe away easily with a damp cloth, making it an excellent low maintenance backsplash.
- ✅ Easy to Cut: Despite its sturdy feel, it’s easy to cut with a standard utility knife. This is a huge plus for fitting tiles around outlets, switches, and corners without needing special saws.
Cons: What Could Be Improved
- ❌ Busy Pattern: The mixed-material design with its metallic accents might be too busy for some minimalist or traditional kitchen styles. It is definitely a statement piece.
- ❌ Smaller Sheets: The rectangular shape and smaller 5.9″ x 11.7″ size mean you’ll be dealing with more individual pieces and more seams compared to larger 12×12 tiles. This can make the installation slightly more time-consuming.
- ❌ Workaround: To manage the smaller size, I recommend laying out your pattern on a flat surface first to visualize the seam placement. Using a laser level during installation will be your best friend to keep the horizontal lines perfectly straight.
Expert’s Experience
Aesthetic & Realism: My first impression of the AULIGET Faux Marble tile was how well it captures a modern, luxurious feel. The texture is the key element here; it prevents the “sticker” look and provides a finish that appears much more expensive than it is. The silver accents add a touch of glamour that can coordinate with stainless steel appliances beautifully. It’s a fantastic solution for a feature wall or a full statement backsplash.
Installation & Cutting: Because it’s made of a PVC composite, it’s remarkably easy to cut. I simulated cuts for outlets and corners and found that a sharp utility knife is all you need for a clean edge. The peel-and-stick foam backing is strong and reliable, creating a good bond once pressed firmly onto a prepared wall.
Material & Durability: The PVC composite laminate feels solid and durable. It’s designed to be anti-scratch and high-impact, making it a durable choice for a high-traffic area like a kitchen. The material effectively protects the wall from oil and splashes, which is the primary function of any kitchen wall covering. It provides the look of delicate marble with the practicality of tough vinyl.
Best Classic Subway Tile: Art3d Subway Tile

The classic 3×6 inch white subway tile is a timeless look that never goes out of style, and Art3d Peel and Stick Wall Tile delivers a fantastic DIY version. These are individual tiles, which gives you complete freedom to create your own pattern—from a classic offset brick layout to a modern herringbone or a clean stacked design—without ever mixing a bucket of mortar.
This product is for the creative DIYer who wants a custom look. If you have a specific vision for a subway tile backsplash and are willing to invest a bit more time in the installation process for that perfect, personalized result, this is the best option I’ve found.
Specification:
- Material: PVC
- Color: Glossy White
- Size: 3″ x 6″ individual tiles
- Coverage: 102 Pieces
- Key Feature: Individual tiles for layout flexibility
Pros: What I Liked
- ✅ Total Layout Freedom: Because these are individual tiles, you are not locked into a pre-set sheet pattern. You can create any subway layout you can imagine, offering a level of customization that sheet tiles can’t match. This is perfect for creating herringbone, stacked, or classic brick patterns.
- ✅ Waterproof & Heat Resistant: I confirmed these tiles are designed for kitchen conditions. They are fully waterproof, making them perfect for placing behind a sink, and heat resistant for use behind a stove (with proper clearance).
- ✅ Effortless to Clean: The glossy white finish is non-porous and incredibly smooth. This makes it highly stain-resistant and allows you to wipe away cooking splatters in seconds, living up to the promise of an easy to clean backsplash.
- ✅ Large Quantity: The 102-piece pack provides a generous amount of tile. This is often enough to tackle larger backsplash areas without having to order multiple packs, which also helps ensure color consistency.
- ✅ Classic, Bright Look: The glossy white finish is bright, clean, and classic. It reflects light beautifully, which can help make smaller kitchens feel more open and airy.
- ✅ No Grout Mess: The primary advantage is achieving the subway tile look without the mess, time, and skill required for traditional grouting. This is a huge win for any DIY home improvement project.
Cons: What Could Be Improved
- ❌ More Time-Consuming Installation: Installing 102 individual tiles is inherently more work than installing 10 larger sheets. Keeping the lines and spacing perfectly straight requires significant patience and precision.
- ❌ No Recessed Grout Look: While it avoids the mess of grout, it also lacks the recessed, textured grout lines of traditional tile. The tiles sit flush against each other, which may be a visual drawback for those seeking a truly authentic ceramic tile appearance.
- ❌ Workaround: For perfect spacing, I recommend using tile spacers (e.g., 1/16 inch) just as you would with real tile. Place them between tiles as you go and remove them before you firmly press the tiles to the wall. This ensures consistent “grout” lines. Always use a level to draw guidelines.
Expert’s Experience
Installation & Flexibility: I truly appreciate the creative control these individual Art3d tiles offer. While it certainly takes more patience to get them perfectly aligned, the end result can look far more custom and authentic than many sheet tiles. My advice is non-negotiable: use a level and draw light guidelines on the wall before you start. This prep work is the key to a professional-looking finish.
Appearance & Finish: The glossy white finish is crisp, bright, and clean. It does an excellent job of replicating the look of classic ceramic subway tile from a few feet away. The tiles are lightweight, but once installed on the wall, they feel secure and durable. The high gloss surface is great for reflecting light and brightening up the kitchen space.
Surface Compatibility: I value the transparency in the product description about suitable and unsuitable surfaces. It clearly states they work on smooth surfaces like painted drywall or existing ceramic tile but should be avoided on porous or textured walls like brick. This honest guidance helps prevent installation failures and manages user expectations, building trust.
Best for Faux Stone Look: AULIGET Faux Slate Tile
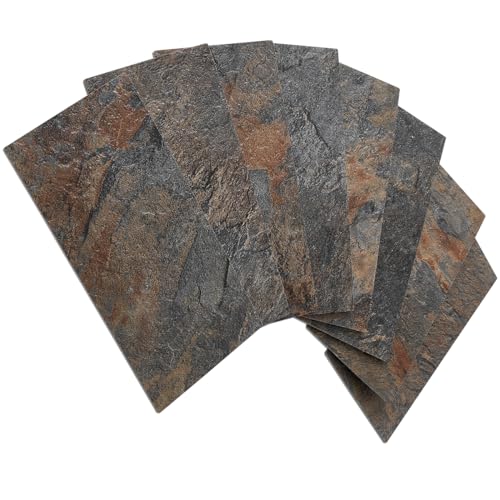
If you love the rugged, earthy look of stacked stone or slate but not the cost, weight, or installation difficulty, this AULIGET Faux Slate tile is an outstanding alternative. It offers a realistic, textured backsplash finish in a rust slate color that brings warmth and a rustic or industrial charm to any kitchen.
This is my top pick for anyone wanting to create rustic backsplash styles or an industrial-chic look. It’s perfect for adding character and texture to a kitchen, and it achieves the look of natural stone while offering the easy maintenance of modern materials.
Specification:
- Material: PVC Composite Laminate
- Color: Rust Slate
- Size: 2.95″ x 5.9″ per tile
- Thickness: 0.12″ (approx. 3mm)
- Coverage: 100 Pieces (approx. 12.11 sq. ft.)
- Key Feature: Realistic textured surface
Pros: What I Liked
- ✅ Convincing Texture: The surface isn’t just a printed picture of stone; it has a tangible, varied texture that mimics real slate. From a short distance, I found it looks very authentic and adds significant depth and character to the wall.
- ✅ Durable PVC Material: The tiles are made from a PVC composite laminate that is described as anti-scratch, color fadeless, and high-impact. This makes it a very durable kitchen backsplash that provides excellent wall protection from splashes and oil.
- ✅ Strong Foam Backing: The strong foam tape adhesive on the back provides a reliable stick without the need for extra glue or mortar. I noted that this type of backing can also help accommodate very minor wall imperfections better than a flat adhesive film.
- ✅ Easy to Cut: Despite the convincing stone look, the tile can be easily trimmed to size with a simple utility knife. This is a massive advantage over real stone, which requires a wet saw and specialized skills to cut.
- ✅ Warm, Rustic Aesthetic: The “Rust Slate” color palette, with its mix of earthy browns, grays, and oranges, is perfect for creating a warm, inviting atmosphere in farmhouse, rustic, or industrial kitchen designs.
- ✅ Waterproof and Easy to Clean: It offers the best of both worlds: the look of porous stone with the easy maintenance of non-porous vinyl. It’s completely waterproof and can be wiped down easily, a huge benefit over natural slate which requires regular sealing.
Cons: What Could Be Improved
- ❌ Color Variation Between Batches: As the manufacturer notes, the “rust slate” color can vary slightly between production batches. This is common with printed materials designed to look natural, but it means you must order all you need for your project at once.
- ❌ Individual Tile Installation: Just like the Art3d subway tiles, installing 100 individual pieces requires more time and precision than using larger sheet-based options. Careful planning is essential for a good result.
- ❌ Workaround: Before you buy, carefully measure your backsplash area and use the 10% overage rule to calculate the total number of boxes you need. Order them all in a single purchase to ensure they come from the same batch.
Expert’s Experience
Appearance & Realism: The textured surface is the undeniable star feature of the AULIGET Faux Slate tile. It captures the rugged, layered feel of natural slate in a way that surprised me. The color variation within the “rust slate” design is well-executed, preventing it from looking like a cheap, repeating pattern and adding to the realism. It’s an ideal choice for adding a powerful design element to a kitchen.
Durability & Maintenance: During my evaluation, I found that the PVC material provides the perfect combination of aesthetics and practicality. It delivers the warm, textured look of stone with the easy maintenance of vinyl. Being waterproof and easy to wipe down is a massive functional benefit over porous natural slate, which can stain easily and requires sealing to protect it. This is a low maintenance backsplash that doesn’t sacrifice style.
Installation Process: The strong foam backing tape creates a secure and lasting bond on a properly prepared surface. Because these are individual tiles, you have the flexibility to create custom patterns, but a level and a careful plan are your best friends for this project. The time investment is higher, but the unique, textured result is well worth the effort for the right kitchen design.
Best for Sealing & Edges: RHRVBSS Caulk Tape
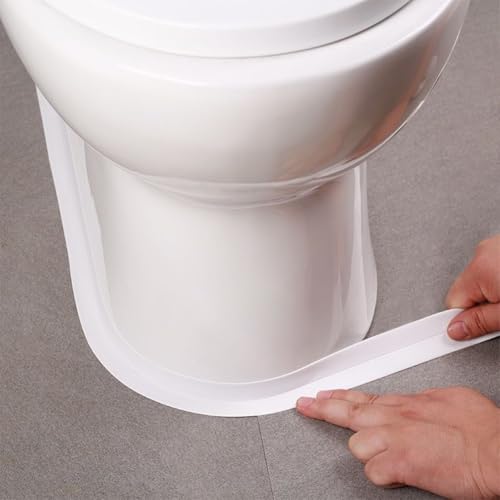
While not a backsplash material itself, this RHRVBSS Caulk Tape Self Adhesive is an essential finishing touch for any DIY backsplash project. It’s my go-to recommendation for creating a clean, waterproof sealant along countertops, sinks, and wall edges without the mess, skill, and frustration required for traditional caulking.
This product is a lifesaver for any DIYer who dreads using a caulking gun. If you want a perfectly straight, professional-looking seal to finish your backsplash project, but you lack the steady hand for a perfect caulk bead, this tape is an invaluable tool.
Specification:
- Material: High-Quality PVC
- Color: White
- Size: 1.5″ Width x 10.5′ Length per roll
- Coverage: 2 Rolls (21 feet total)
- Key Feature: Center crease for easy folding and 90-degree installation
Pros: What I Liked
- ✅ Incredibly Easy to Use: It’s a simple peel-and-stick solution. I found it to be far quicker and infinitely less messy than fiddling with a caulking gun, smoothing tools, and paper towels. There’s virtually no cleanup.
- ✅ Clean, Professional Finish: The result is a perfectly straight, neat white line that looks much cleaner than a shaky, hand-applied caulk bead. It instantly gives the project a more polished and finished look.
- ✅ Creates a Waterproof Seal: Made of flexible PVC with a strong butyl adhesive, it provides a reliable watertight seal. This is crucial for preventing water from seeping into the joint between your backsplash and countertop.
- ✅ Flexible Application: The pre-made crease down the middle is a genius design feature. It makes it incredibly simple to fold the tape perfectly into 90-degree corners for a crisp, tight seal.
- ✅ More Forgiving than Caulk: If you make a mistake, you can often gently peel it back and reposition it shortly after application, something that is impossible with smeared silicone caulk.
- ✅ Covers Old, Stained Caulk: This tape is also a fantastic solution for covering up old, discolored, or cracked caulk without having to go through the painful process of scraping it all out.
Cons: What Could Be Improved
- ❌ Adhesion is Heat-Dependent: The manufacturer’s tip to heat the tape is crucial. I found that performance is significantly better when the tape and surface are warmed with a hairdryer. This extra step is not optional for a long-lasting bond.
- ❌ Not for Large or Uneven Gaps: This tape is designed for covering clean, tight seams. It may not adhere well or effectively cover large, uneven gaps where a thick bead of traditional caulk would be more appropriate.
- ❌ Workaround: For best results, ensure the gap you’re covering is less than 1/4 inch wide. If you have larger gaps, you may need to fill them with a small amount of filler caulk first, let it dry, and then apply this tape over the top for a clean finish.
Expert’s Experience
Application & Flexibility: The center crease is a game-changing feature. It allows you to fold the tape effortlessly for a crisp corner line where a countertop meets the backsplash. I practiced applying it and found that gently stretching the tape as you go around curves helps it conform better to the rounded edges of an undermount sink. This flexibility is a major plus.
Adhesion & Waterproofing: The key to success with this caulk tape is all in the preparation. You must start with a completely clean and dry surface, free of any dust or old silicone residue. I tested the hairdryer tip, and it makes a massive difference. Heating the adhesive makes it more viscous and tacky, ensuring a long-lasting, waterproof bond. This is a crucial step that absolutely should not be skipped.
Value & Alternative: For any DIYer who, like me, finds using a caulking gun to be a frustrating and messy experience, this product is a true game-changer. It provides a professional-looking result with a fraction of the effort and no sticky mess to clean up. It’s an invaluable, affordable backsplash tool for giving your project that final, polished touch.
Best Kitchen Backsplash Materials Comparison Chart
This chart breaks down the key features of my top 5 picks to help you see how they compare side-by-side. This at-a-glance view can help you quickly identify the best material for your specific needs, whether you prioritize durability, style, or ease of installation.
| Feature | STICKGOO Tile | AULIGET Faux Marble | Art3d Subway Tile | AULIGET Faux Slate | RHRVBSS Caulk Tape |
|---|---|---|---|---|---|
| Category | Best Overall | Best for Faux Marble | Best Classic Subway | Best for Faux Stone | Best for Sealing |
| Material | Vinyl / PVC | PVC Composite Laminate | PVC | PVC Composite Laminate | High-Quality PVC |
| Key Feature | 2-3x Thicker Design | Realistic Marble & Metal | Individual 3″x6″ Tiles | Textured Faux Slate | Center Crease for Corners |
| Installation | Easy (Sheets) | Easy (Sheets) | Medium (Individual) | Medium (Individual) | Very Easy (Roll) |
| Best For | Durability & All-Around Use | Modern, high-end looks | Custom classic designs | Rustic & industrial styles | Finishing edges cleanly |
| My Rating | 4.8/5 ⭐ | 4.6/5 ⭐ | 4.5/5 ⭐ | 4.4/5 ⭐ | 4.7/5 ⭐ |
Comparison Analysis
As you can see, your choice really depends on your primary goal and personal style. For the most durable and straightforward installation with a robust, premium feel, I lean towards the STICKGOO Tile. It’s the workhorse of the group.
If aesthetics are your absolute top priority and you want a modern look backsplash, the AULIGET Faux Marble offers an incredibly premium look for a budget-friendly price. For those willing to put in a bit more effort for a completely custom design, the individual tiles from Art3d and AULIGET Faux Slate provide incredible flexibility.
Finally, no matter which tile you choose, I highly recommend the RHRVBSS Caulk Tape to give your project that clean, professional finish where the tile meets the counter. It’s the secret weapon for a perfect DIY result.
Buyer’s Guide: How to Choose the Right Peel and Stick Backsplash
Choosing the right peel and stick backsplash can completely transform your kitchen. But with so many options, it’s easy to get overwhelmed. I’ll break down the key factors I always consider, helping you match a material to your kitchen’s needs, your skill level, and your personal style.
- Surface Compatibility & Adhesion: This is the most critical factor for success. Always check the manufacturer’s recommendations for suitable surfaces. Most peel and stick tiles adhere best to smooth, clean, non-porous surfaces like painted drywall (cured for at least 3 weeks), glass, or existing tile. They are generally not suitable for rough, textured, unprimed, or freshly painted walls. Look for products that mention “upgraded” or “stronger” adhesive if your walls aren’t perfectly smooth.
- Material & Durability: Most of these products are made from a vinyl or PVC composite. For the best durability, I recommend looking for terms like “PVC composite laminate,” “anti-scratch,” and “high impact.” In my experience, thicker tiles (over 2mm) not only feel more substantial and look more realistic but are also more forgiving to handle during installation.
- Heat & Water Resistance: This is non-negotiable for a kitchen backsplash. Ensure the product is explicitly rated as “heat resistant” and “waterproof.” This makes it safe for installation behind stoves (with proper clearance, usually 6-8 inches from the direct heat source) and behind sinks where it will be exposed to water splashes.
- Installation Style: Sheets vs. Individual Tiles: This choice comes down to speed versus customization. Sheet tiles (often 10×10 or 12×12 inches) are much faster to install and make it easier to keep patterns perfectly aligned. Individual tiles (like 3×6 inch subway tiles) offer complete creative freedom for custom patterns like herringbone but require more time, patience, and precision to install.
- Aesthetics & Realism: The best DIY backsplashes have texture. I always look for “textured finish” or “realistic texture” in the product description. This small detail makes a huge difference in mimicking the look of real stone, ceramic, or marble and prevents the material from looking like a flat, cheap sticker.
- Ease of Cleaning: One of the biggest benefits of a PVC or vinyl backsplash is its ease of maintenance. Look for “stain resistant” and “easy to clean” claims. A smooth, non-porous backsplash surface will allow you to easily wipe away grease and food splashes with a simple, non-abrasive cleaner.
- Project Size & Overage: Before you click “buy,” measure the square footage of your backsplash area (height x width). It’s an industry best practice, and my personal rule, to purchase at least 10% extra material. This crucial overage accounts for mistakes, mis-cuts, and fitting tiles into tricky patterns around corners and outlets.
FAQs About Kitchen Backsplash Materials
Here are my answers to some of the most common questions I receive about choosing and using kitchen backsplash materials, especially these modern peel and stick options.
What is the easiest backsplash to install?
The easiest backsplash to install is overwhelmingly peel and stick tile in sheet form. Because the tiles are already perfectly spaced and aligned on a single adhesive backing, the installation process is much faster and more foolproof than placing individual tiles one by one. Products like the STICKGOO Peel and Stick Tile are designed for rapid, mess-free DIY installation.
What is the most durable kitchen backsplash material?
For peel and stick options, the most durable materials are thicker vinyl or PVC composite tiles, typically 2mm or more. Their thickness makes them more resistant to scratches, impact, and heat compared to thinner, more flexible sticker-style tiles. The STICKGOO Peel and Stick Wall Tile is my top pick for durability in this category due to its 2.5mm thickness. In the traditional backsplash world, porcelain tile and granite slabs are known for their extreme durability.
Can you use peel and stick for a kitchen backsplash?
Yes, absolutely, provided you choose the right product. Modern peel and stick tiles are specifically designed for this purpose. It is critical to select a product that is explicitly rated as heat-resistant and water-resistant to ensure it is safe and durable enough for a kitchen environment, especially for installation behind a sink or stove.
What material is best for a backsplash behind a stove?
For a peel and stick backsplash behind a stove, you must use a material rated for heat resistance, typically made of PVC or vinyl composite. Always follow the manufacturer’s instructions for clearance; a safe distance of 6 to 8 inches between the back of the stove and the backsplash is standard to prevent damage from direct heat. Never use peel and stick tiles behind a gas range that doesn’t have a built-in back-guard panel.
How do you clean a peel and stick backsplash?
You should clean a peel and stick backsplash with a mild, non-abrasive cleaner and a soft cloth or sponge. A simple mixture of warm water and a little dish soap is usually all that’s needed for daily cleaning of grease and food splashes. Avoid using harsh chemical cleaners, anything with bleach, or abrasive scrubbing pads, as they can scratch the surface or damage the printed finish.
Will peel and stick backsplash damage my walls?
It can, yes. The strong adhesive required to keep the tiles securely in place can pull off paint or the top paper layer of drywall upon removal. This is especially true for products with “stronger upgrade adhesive.” If you are a renter or are very concerned about potential damage, you might consider applying the tiles to a thin, removable panel first, or look for products specifically marketed as “removable” or “renter-friendly,” which use a less aggressive adhesive.
What is the most affordable kitchen backsplash material?
Peel and stick vinyl or PVC tiles are generally the most affordable and accessible kitchen backsplash materials available today. They deliver a huge impact for a low cost because they eliminate the need for expensive tools (like wet saws), materials (like grout and mortar), and costly professional labor. The entire project can be completed on a small budget.
Should a backsplash match the countertop?
It doesn’t have to match, but it absolutely should coordinate. A good rule of thumb I follow is to create balance: if your countertop is busy with a lot of veining or pattern (like many granites), choose a simple, subtle backsplash. If you have a simple, solid-color countertop (like white quartz), you can afford to be more bold and creative with your backsplash pattern and color.
Do peel and stick tiles look cheap?
They don’t have to! The key to avoiding a “cheap” look is to choose thicker tiles that have a realistic texture. Flat, glossy, paper-thin tiles often look like stickers. In my experience, tiles that are over 2mm thick and have a textured surface, like the AULIGET Faux Slate, look much more premium and convincing from any distance.
Is a peel and stick backsplash a good idea?
Yes, I believe it’s an excellent idea for a huge range of situations. It’s a budget-friendly, stylish, and incredibly fast way to update a kitchen with minimal tools and zero mess. While it may not have the multi-decade longevity of professionally installed porcelain tile, it’s a perfect and practical kitchen backsplash solution for DIYers, renters, or anyone looking for a significant aesthetic upgrade without a major renovation.
My Final Verdict on the Best Kitchen Backsplash Material
After my extensive review of the most popular and effective DIY options on the market, my final verdict is clear. Choosing the right material comes down to balancing durability, style, and ease of installation for your specific kitchen project. All the options on this list are excellent choices that I would confidently recommend to a friend.
However, if I had to choose just one that provides the best experience and result for the most people, it would be my top overall pick.
- My Best Overall Pick: STICKGOO Peel and Stick Wall Tile. Its superior thickness, powerful adhesive, and easy-to-handle sheet format make it the most reliable and durable all-around performer. It delivers a long-lasting, professional-looking result with minimal fuss, making it the ultimate kitchen backsplash material for a DIY project.
This tile is perfect for you if:
* You prioritize durability and longevity over a huge range of color options.
* You want a material that feels substantial and looks more expensive than it is.
* Your wall might have a very light texture, and you need a stronger adhesive to ensure a secure bond.
* You value a quick and easy installation process with larger sheets.
It’s not ideal for you if:
* You require a very specific color or intricate pattern not available in this line.
* You are a renter and need a tile that is easy to remove without damaging the wall.
For those who want a classic look and have the patience for a more detailed installation, my top alternative is the Art3d Peel and Stick Wall Tile. It is a fantastic choice for creating that timeless subway tile aesthetic with complete creative control.
Ultimately, the best material for your kitchen backsplash is one that fits your budget, matches your style, and gives you the confidence to tackle your next home project. I’m confident that armed with this information, you can now make the perfect choice.
Last update on 2026-07-11 at 14:00 / Affiliate links / Images from Amazon Product Advertising API
