As an Amazon Associate BakingBakewareSets.com earns from qualifying purchases.
13 Ultimate No-Bake Halloween Recipes for June 2026
Struggling to find Halloween treats that are more fun than frightful to make? You want spooky, delicious desserts for your party, but the thought of complex baking is the real horror story. This is where the magic of no-bake Halloween recipes comes in—delightful, festive treats made without ever turning on your oven.
No-Bake Halloween Treats are perfect for busy June 2026 celebrations, offering quick, fun, and spooky dessert solutions without the need for an oven. Ideal for parties and kids, these easy recipes cut down on prep time while maximizing festive flair. This ultimate guide will show you how to create 13 incredible, stress-free treats that will wow your guests.
☰ Table of Contents ▼
show
Why Choose No-Bake Halloween Treats for Your 2026 Celebration?
Choosing no-bake Halloween treats offers significant advantages, especially when you’re short on time or baking skills. According to consumer behavior research, a major pain point for home cooks during holidays is a lack of time. No-bake recipes are the perfect solution, eliminating oven preheating and baking time for incredibly quick assembly.
This approach is not just about saving time; it’s about reducing stress. The fear of a baking failure—a sunken cake or burnt cookies—is completely removed. This makes the process more enjoyable and perfect for involving little helpers. Kid-friendly recipes that allow children to participate safely in tasks like stirring, decorating, or assembling turn treat-making into a memorable family activity. Ultimately, these effortless recipes allow you to enjoy the festivities with your guests instead of being stuck in the kitchen.
13 Ultimate No-Bake Halloween Recipes for Spooktacular Fun
Get ready to skip the oven and dive into spooktacular fun! We’ve hand-picked the 13 ultimate no-bake Halloween recipes for June 2026, chosen for their proven success, incredible visual appeal, and effortless preparation. From creepy crawly Oreo spiders to ghoulishly good graveyard cups, each recipe comes with clear, actionable steps to guarantee a delicious and stress-free celebration.
1. Spooky Spider Oreo Bites
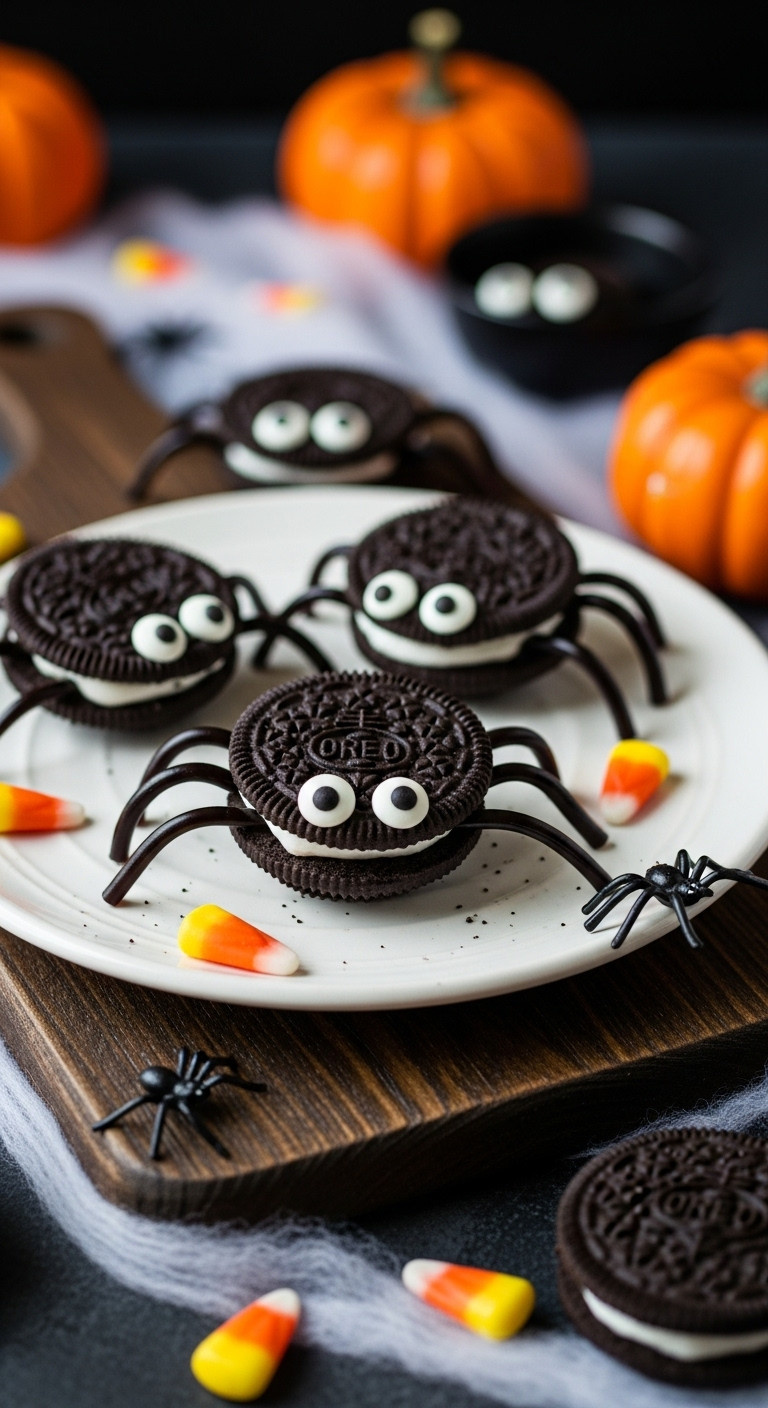
Pin this genius tips to your ‘Spooky Snacks’ board!
Materials Needed:
- 1 package (15.3 oz) Oreo cookies (classic, double stuf, or dark chocolate flavor)
- 1 tub (16 oz) chocolate frosting (store-bought or homemade buttercream)
- 1 bag (0.5 oz) edible googly eyes, various sizes
- Black licorice laces or thin pretzel sticks (for spider legs)
- Wax paper or parchment paper
- Baking sheet
Step-by-Step Directions:
- Prepare the Bodies: Carefully twist apart each Oreo cookie, separating the two halves. For extra stability, you can gently scrape off some of the cream filling from one half if desired.
- Assemble Spiders: On the cream-filled half of the cookie, add a small dollop of chocolate frosting. Gently press the second cookie half (chocolate side up) onto the frosting to create the spider’s body. Repeat for all cookies.
- Add Eyes: While the frosting is still soft, attach two edible googly eyes to the top of each Oreo “spider body” using a tiny dab of extra frosting if needed.
- Create Legs: Cut black licorice laces into small (approx. 1.5-inch) segments. Gently insert four segments on each side of the Oreo cookie to create eight spider legs. Alternatively, use thin pretzel sticks for a crunchier texture.
- Chill to Set: Arrange the finished spider bites on a baking sheet lined with wax paper and refrigerate for at least 30 minutes, or until the frosting has set and the spiders are firm.
- Serve Spooky: Serve chilled on a spooky platter and watch them disappear!
Pro-Tip: For extra sticky eyes and legs, warm a small amount of chocolate frosting in the microwave for a few seconds until slightly melted, then use it as edible “glue.”

2. Graveyard Dirt Cups
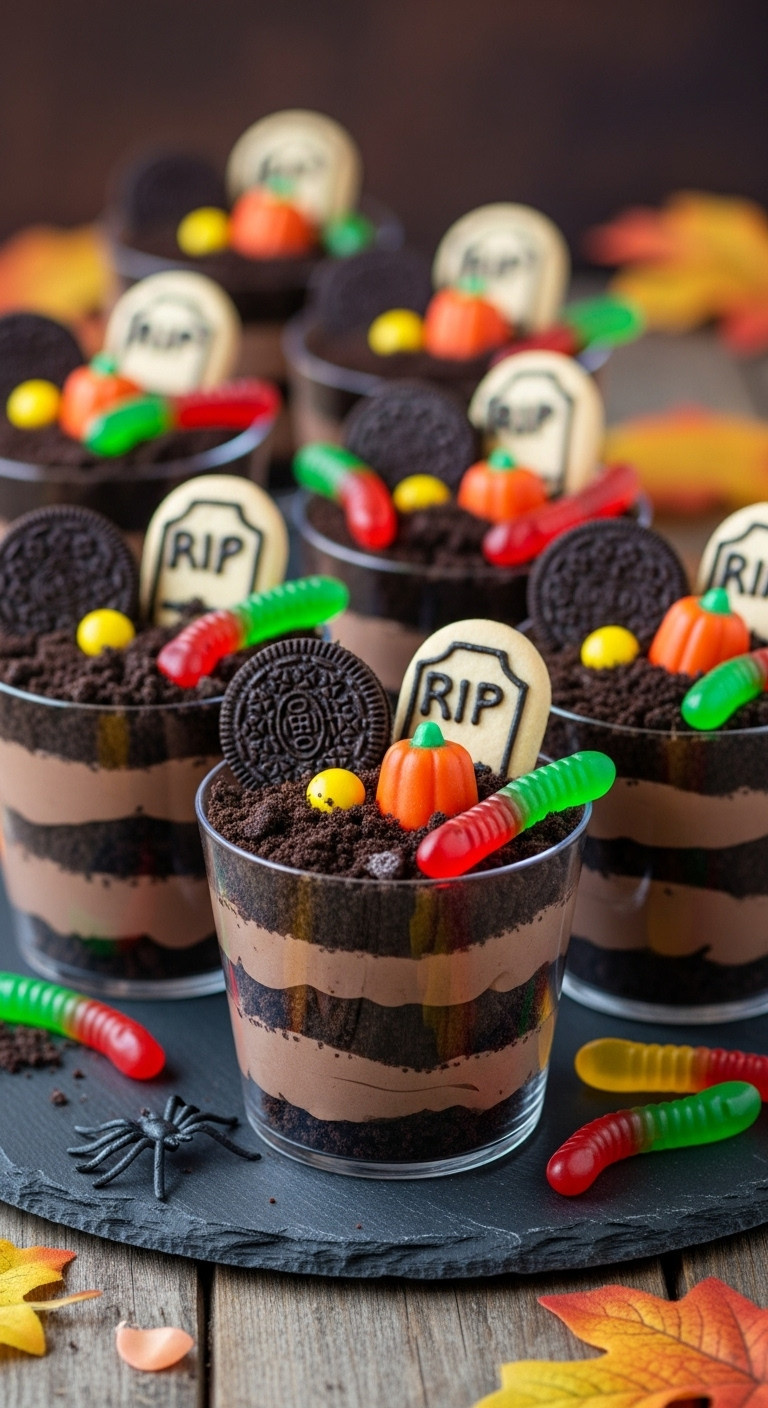
Save this clever organization idea!
Materials Needed:
- 1 package (15.3 oz) Oreo cookies, finely crushed
- 2 packages (3.9 oz each) instant chocolate pudding mix
- 4 cups cold milk (dairy or non-dairy for dairy-free option)
- 1 tub (8 oz) whipped topping, thawed (or homemade whipped cream)
- 1 bag gummy worms
- Small rectangular shortbread cookies or Milano cookies (for gravestones)
- Optional: Green food coloring, candy pumpkins, plastic spiders
- 8-10 clear individual serving cups (8-10 oz capacity)
Step-by-Step Directions:
- Crush Oreos: Place Oreo cookies in a food processor and pulse until finely crushed, resembling dirt. Alternatively, place in a zip-top bag and crush with a rolling pin. Set aside about 1 cup of crumbs for topping.
- Prepare Pudding: In a large bowl, whisk together instant chocolate pudding mix and cold milk for 2 minutes, until thickened. Let stand for 5 minutes.
- Combine & Fold: Gently fold in the whipped topping and the remaining crushed Oreo crumbs into the pudding mixture until just combined. For a “slimy” effect, you can add a drop or two of green food coloring at this stage.
- Layer the Cups: Spoon about 2-3 tablespoons of the pudding mixture into the bottom of each clear serving cup. Add a layer of reserved crushed Oreos, then another layer of pudding, and repeat, ending with a final layer of crushed Oreos on top, creating the “dirt.”
- Decorate: Push 1-2 gummy worms into the “dirt” of each cup, making them look like they’re crawling out. If using shortbread cookies for gravestones, write “RIP” on them with an edible food marker (optional) and gently stand one in each cup. Add candy pumpkins or plastic spiders for extra spooky flair.
- Chill & Serve: Refrigerate the dirt cups for at least 1 hour to allow them to set and flavors to meld. Serve chilled.
Pro-Tip: For gluten-free dirt cups, use gluten-free chocolate sandwich cookies and ensure your pudding mix is certified gluten-free.

3. Pumpkin Patch Pudding Parfaits
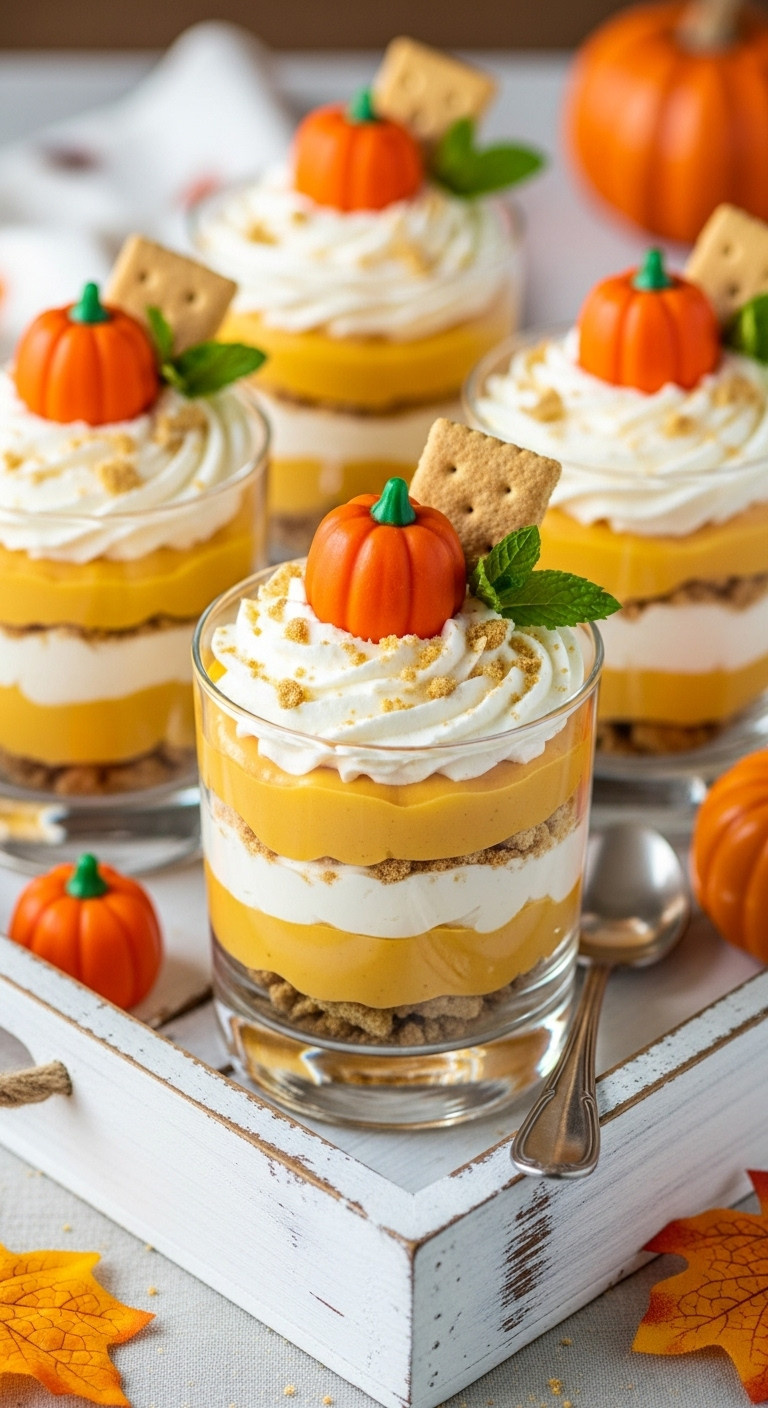
Pin this festive fall treat idea!
Materials Needed:
- 1 package (3.4 oz) instant vanilla pudding mix
- 1 can (15 oz) pumpkin puree (not pumpkin pie filling)
- 1 teaspoon pumpkin pie spice
- 1/2 teaspoon ground cinnamon
- 1 ¾ cups cold milk (dairy or non-dairy)
- 1 tub (8 oz) whipped topping, thawed
- 1 cup crushed graham cracker crumbs
- Optional: Mini candy pumpkins for garnish, fresh mint leaves
- 6-8 clear individual parfait glasses or dessert cups
Step-by-Step Directions:
- Prepare Pudding: In a large bowl, whisk together instant vanilla pudding mix, pumpkin puree, pumpkin pie spice, and cinnamon. Gradually add cold milk, whisking for 2 minutes until fully combined and thickened.
- Assemble Layers: Begin by spooning about 2 tablespoons of crushed graham cracker crumbs into the bottom of each parfait glass.
- Add Pumpkin Layer: Next, carefully layer about ¼ cup of the pumpkin pudding mixture over the graham crackers.
- Whipped Topping Layer: Add a layer of whipped topping (about 2 tablespoons) on top of the pumpkin pudding.
- Repeat Layers: Continue layering graham cracker crumbs, pumpkin pudding, and whipped topping until the cups are full, ending with a dollop of whipped topping on top.
- Garnish & Chill: Garnish each parfait with a mini candy pumpkin and a sprig of fresh mint, if desired.
- Set & Serve: Refrigerate for at least 1-2 hours to allow the parfaits to chill and set. Serve cold.
Pro-Tip: For an extra autumnal crunch, lightly toast the graham cracker crumbs in a dry pan for a few minutes before crushing.

4. Monster Eye Pretzel Bites
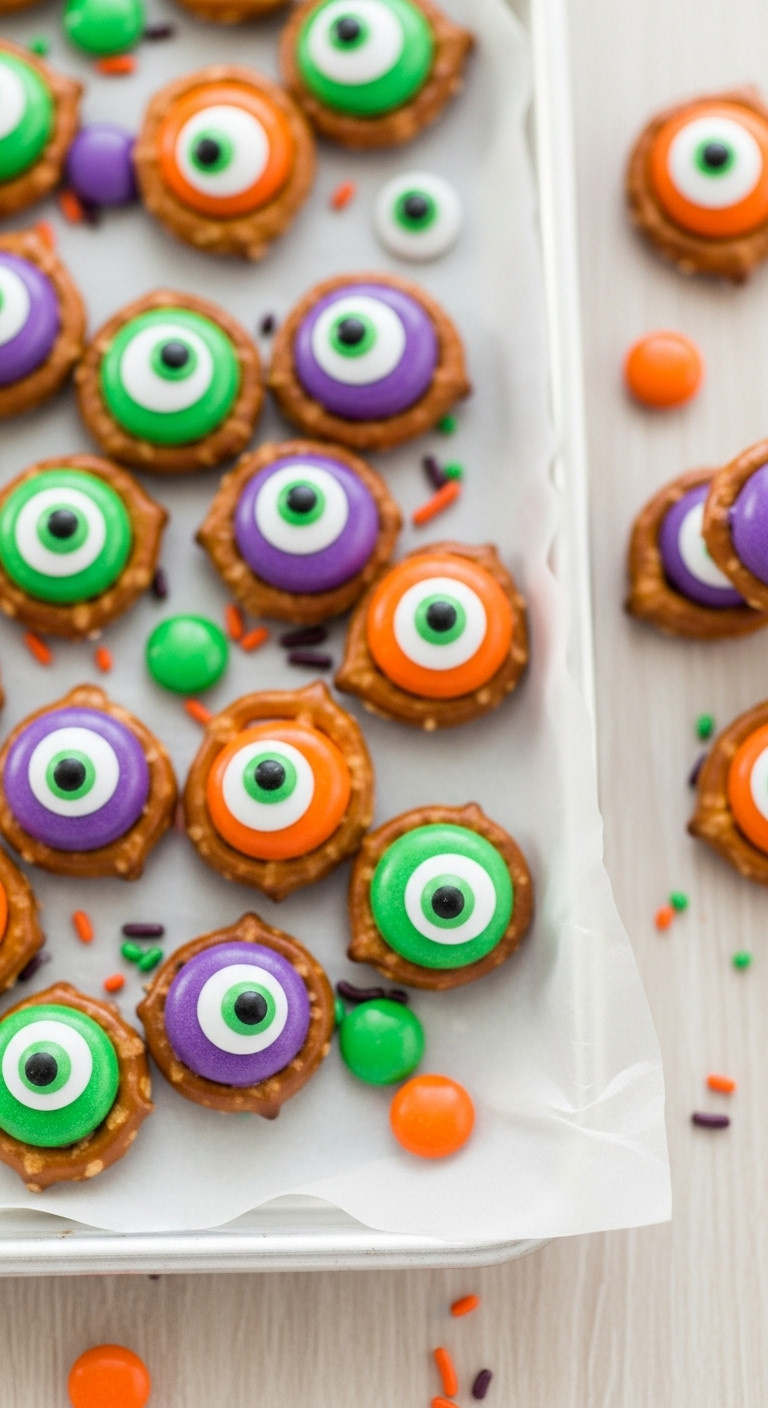
Save this quick and easy monster snack!
Materials Needed:
- 1 bag (16 oz) mini pretzel twists
- 1 bag (12 oz) green candy melts
- 1 bag (12 oz) purple candy melts
- 1 bag (12 oz) orange candy melts (or other Halloween colors)
- 1 bag (0.5 oz) edible googly eyes, small size
- Parchment paper
- Baking sheets
Step-by-Step Directions:
- Arrange Pretzels: Line a baking sheet with parchment paper. Arrange mini pretzel twists in a single layer, leaving a small space between each.
- Melt Candy Melts: Place each color of candy melts in separate microwave-safe bowls. Microwave on 50% power for 30-second intervals, stirring after each, until smooth and fully melted. Be careful not to overheat.
- Dollop & Press: Spoon about ½ teaspoon of melted candy melt onto the center of each pretzel twist. The heat from the candy will slightly soften the pretzel, allowing it to adhere better.
- Add Eyes: Immediately, while the candy melt is still wet and soft, gently press one edible googly eye into the center of each candy dollop.
- Chill to Set: Once all pretzels are decorated, transfer the baking sheet to the refrigerator for 10-15 minutes, or until the candy melts are completely set and firm.
- Serve & Store: Once set, carefully peel the pretzel bites off the parchment paper. Store in an airtight container at room temperature for up to one week.
Pro-Tip: If the candy melts start to harden while you’re working, microwave them for another 10-15 seconds at 50% power to re-soften.

5. Ghostly Banana Pops
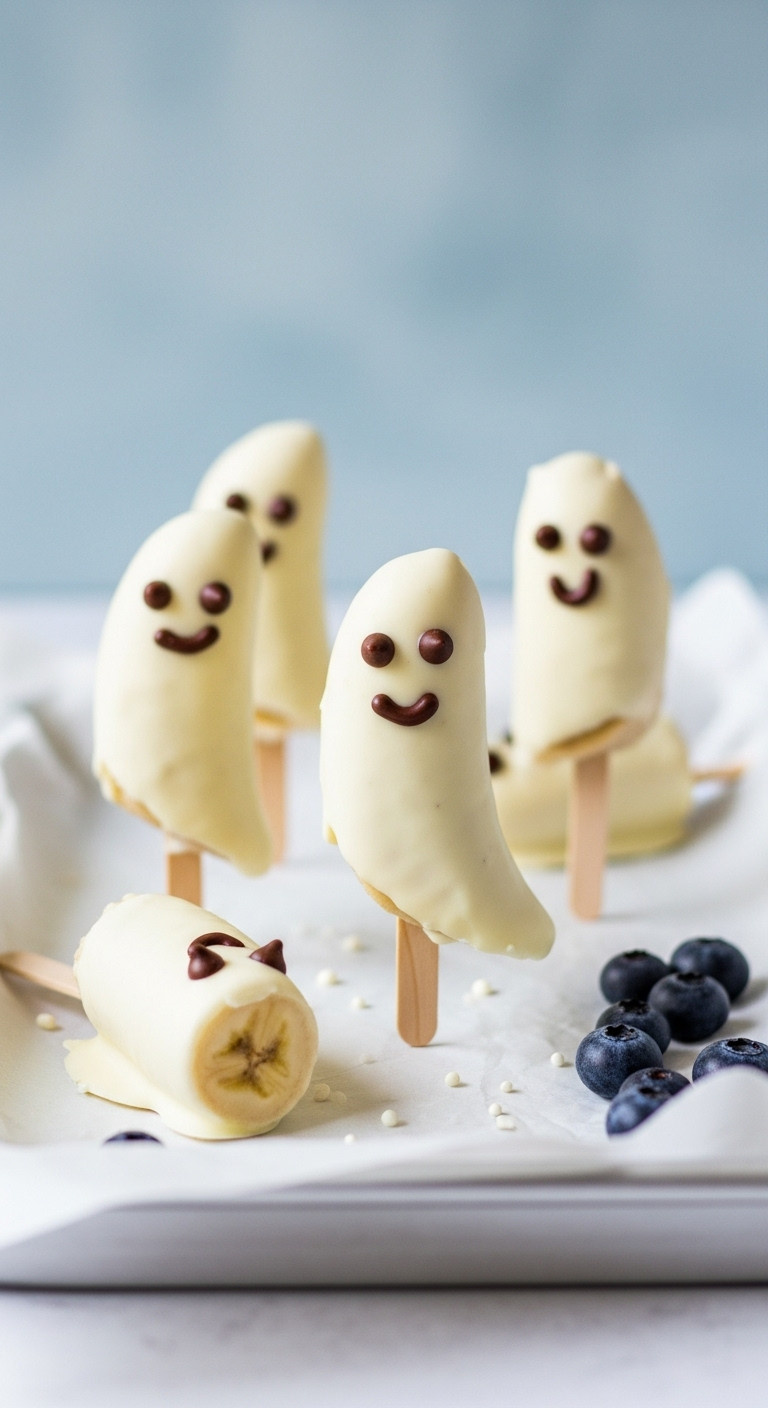
Pin this healthy-ish Halloween treat!
Materials Needed:
- 4 ripe but firm bananas
- 1 cup white chocolate chips or white candy melts
- 1 teaspoon coconut oil (optional, for smoother dipping)
- Mini chocolate chips or edible googly eyes (for ghost faces)
- 8 wooden popsicle sticks
- Parchment paper
- Baking sheet
Step-by-Step Directions:
- Prepare Bananas: Peel the bananas and cut each in half horizontally. Gently insert a wooden popsicle stick into the cut end of each banana half.
- Freeze Bananas: Arrange the banana pops on a parchment-lined baking sheet and freeze for at least 30-60 minutes, or until firm. This helps the chocolate set quickly.
- Melt White Chocolate: In a microwave-safe bowl, combine white chocolate chips and coconut oil (if using). Microwave on 50% power for 30-second intervals, stirring well after each, until smooth and fully melted.
- Dip Bananas: Holding a banana pop by its stick, dip it into the melted white chocolate, rotating to fully coat. Let any excess chocolate drip off.
- Decorate Ghosts: Immediately place two mini chocolate chips for eyes and one for a mouth onto the white chocolate-coated banana to create a ghost face. If using googly eyes, attach them now.
- Freeze Again: Place the decorated banana pops back on the parchment-lined baking sheet. Return to the freezer for at least 30 minutes, or until the chocolate is completely set and the bananas are firm.
- Serve Chilled: Serve directly from the freezer.
Pro-Tip: If the white chocolate starts to harden, microwave it for a few seconds to re-soften. For a dairy-free option, use dairy-free white chocolate chips.

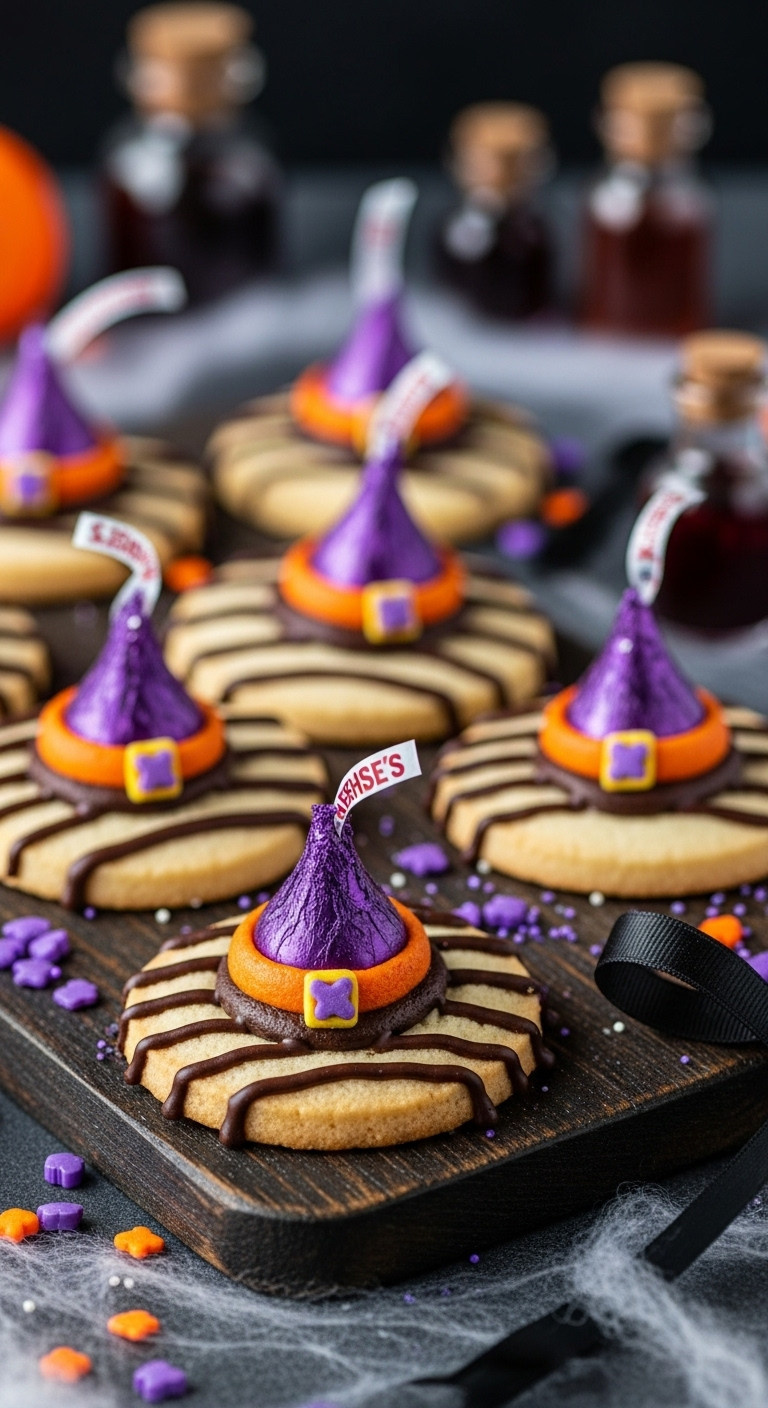
Save this magical cookie idea for your Halloween party!
Materials Needed:
- 1 package (11.3 oz) Keebler Fudge Stripes Cookies (original or dark chocolate)
- 1 bag (10 oz) Hershey’s Kisses, unwrapped
- 1 tub (16 oz) orange, purple, or green frosting (store-bought or homemade)
- Optional: Halloween sprinkles or yellow/gold edible glitter for “buckles”
- Wax paper
Step-by-Step Directions:
- Unwrap Kisses: Unwrap all Hershey’s Kisses and set aside.
- Prepare Frosting: If using canned frosting, stir well to ensure a smooth consistency. You can tint white frosting with food coloring to achieve desired Halloween colors.
- Assemble Hats: Place the fudge-striped cookies, chocolate side up, on a sheet of wax paper.
- Add “Glue”: Spoon a small amount of frosting onto the center of the fudge-striped side of each cookie. This will act as the “glue” for the Kiss.
- Attach Kiss: Gently press an unwrapped Hershey’s Kiss onto the frosting, making sure it stands upright to form the hat’s peak.
- Decorate: If desired, pipe a small line or dot of contrasting colored frosting (e.g., yellow for a buckle) around the base of the Hershey’s Kiss to resemble a hat band or buckle. Add sprinkles for extra flair.
- Set: Let the cookies sit at room temperature for about 15-30 minutes, or until the frosting has set enough to hold the Kiss firmly in place. No chilling required!
- Serve & Store: Serve immediately or store in an airtight container at room temperature for up to 3-4 days.
Pro-Tip: For extra pizzazz, try using special edition Halloween-colored Hershey’s Kisses!

7. Candy Corn Krispie Treats
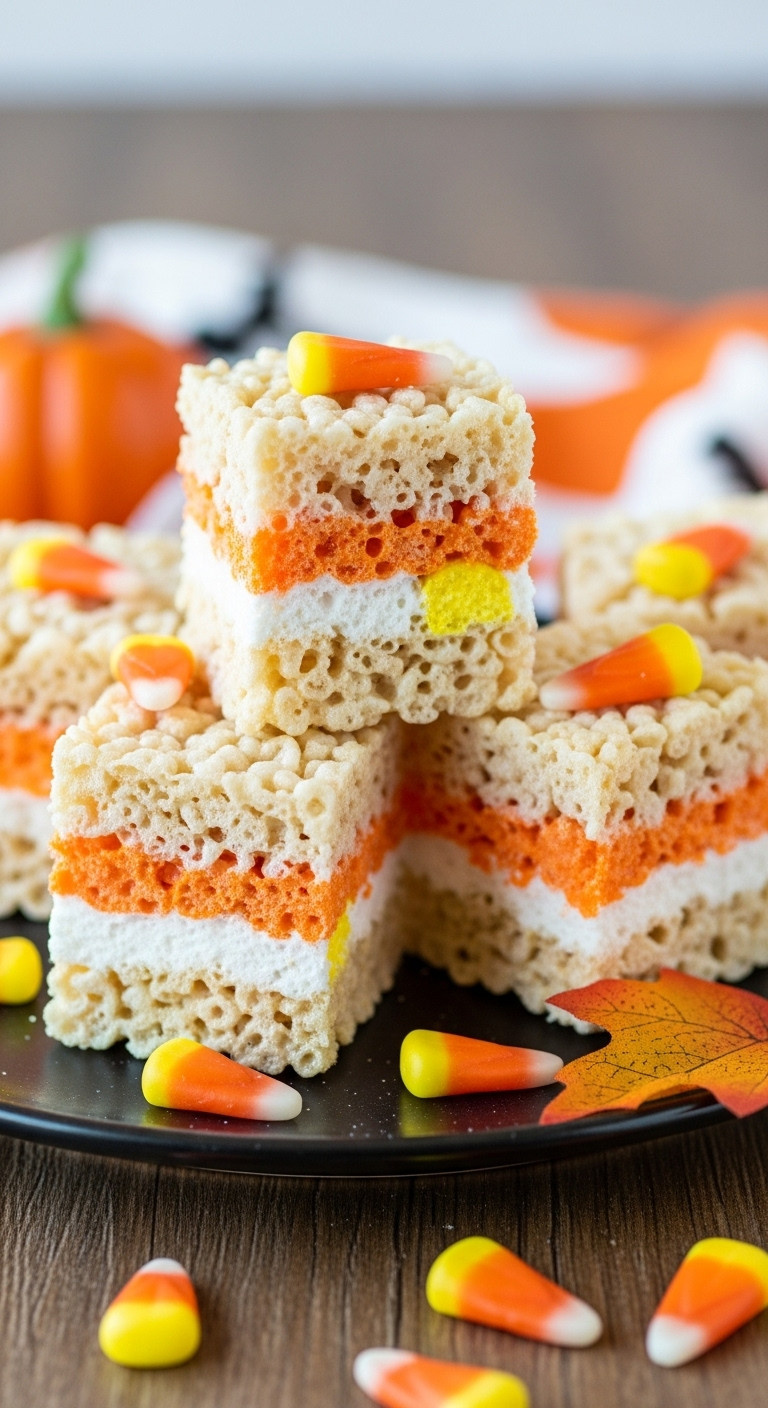
Pin this classic Halloween twist on a favorite!
Materials Needed:
- 6 cups Rice Krispies cereal
- 1 bag (10 oz) mini marshmallows (divided)
- 6 tablespoons unsalted butter (divided)
- Yellow food coloring gel
- Orange food coloring gel
- 9×13 inch baking pan, lightly greased and lined with parchment paper
- Spatula
Step-by-Step Directions:
- Prepare Pan: Lightly grease a 9×13 inch baking pan and line with parchment paper, leaving an overhang on the sides for easy removal.
- White Layer: In a large microwave-safe bowl, combine 2 tablespoons butter and 3.5 oz (about 2 cups) mini marshmallows. Microwave for 30-60 seconds until melted and smooth when stirred. Quickly stir in 2 cups of Rice Krispies. Press evenly into the bottom of the prepared pan using a greased spatula or buttered hands. Set aside.
- Orange Layer: In another microwave-safe bowl, combine 2 tablespoons butter and 3.5 oz (about 2 cups) mini marshmallows. Microwave until melted. Stir in a few drops of orange food coloring until desired shade is achieved. Quickly stir in 2 cups of Rice Krispies. Immediately and gently spread this orange mixture over the white layer in the pan.
- Yellow Layer: Repeat the process for the yellow layer: combine 2 tablespoons butter and remaining 3 oz (about 1.5 cups) mini marshmallows, microwave, add yellow food coloring, and stir in 2 cups of Rice Krispies. Gently spread this yellow mixture over the orange layer.
- Chill & Cut: Let the treats cool completely at room temperature for at least 1 hour, or chill in the refrigerator for 30 minutes to speed up setting. Once firm, lift the treats out of the pan using the parchment paper overhang.
- Slice into Triangles: Using a sharp, greased knife, trim the edges. Cut the large rectangle lengthwise into three equal strips. Then, cut each strip diagonally into triangles to resemble candy corn shapes.
- Serve: Serve your festive Candy Corn Krispie Treats!
Pro-Tip: Work quickly when mixing the cereal with the marshmallow mixture, as it sets fast. Using buttered hands or a greased spatula helps prevent sticking.

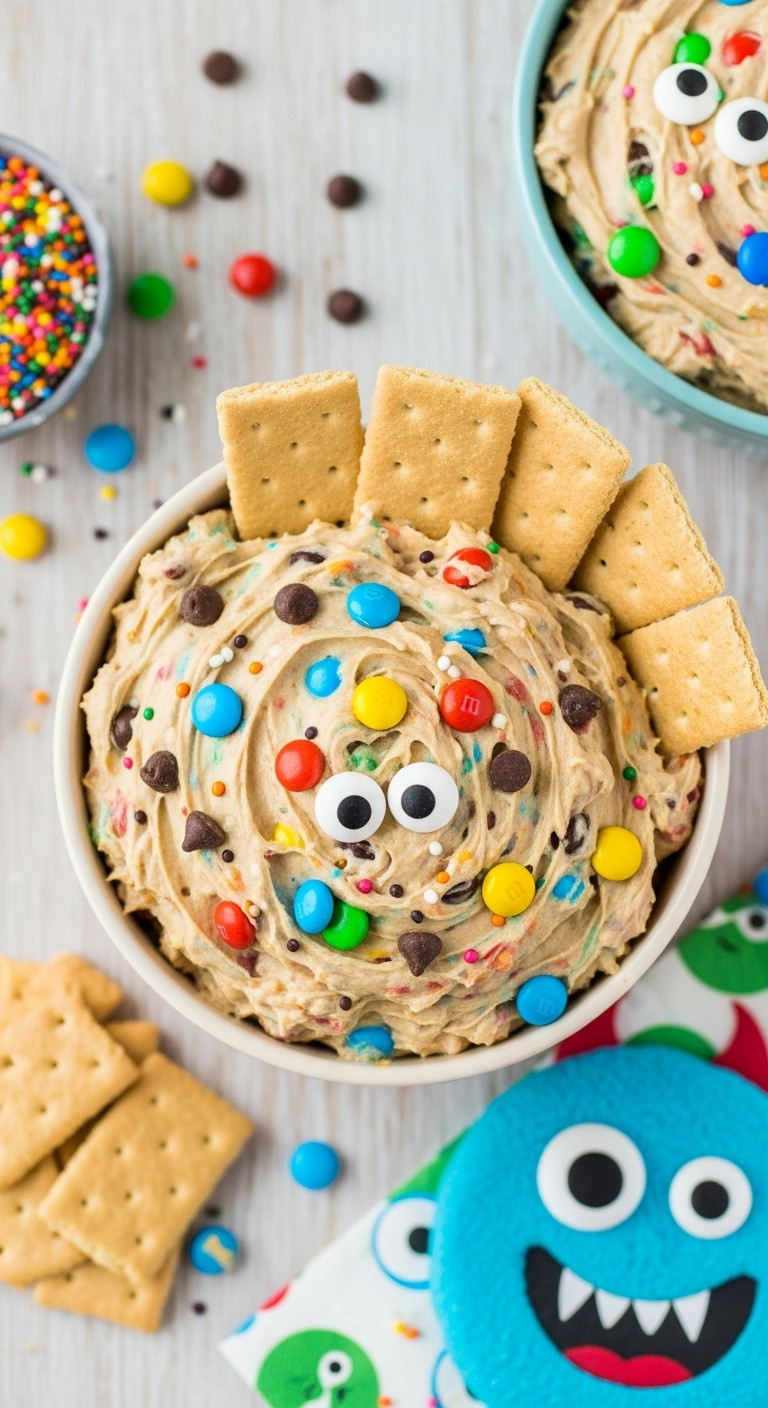
Save this crowd-pleasing Halloween dip!
Materials Needed:
- 1/2 cup (1 stick) unsalted butter, softened
- 1/2 cup granulated sugar
- 1/4 cup packed light brown sugar
- 8 oz cream cheese, softened
- 1 teaspoon vanilla extract
- 1/4 teaspoon salt
- 1 cup all-purpose flour, heat-treated (see Pro-Tip)
- 1/2 cup mini chocolate chips
- 1/2 cup M&M’s candies (Halloween colors if possible)
- Optional: Edible googly eyes for garnish
- Dippers: Graham crackers, vanilla wafers, pretzel crisps, apple slices
Step-by-Step Directions:
- Heat-Treat Flour (CRITICAL for safety): Spread flour on a microwave-safe plate. Microwave on high for 1 minute, stirring after 30 seconds, until it reaches 160°F (use a food thermometer). Let cool completely. This kills potential bacteria.
- Cream Butter & Sugars: In a large bowl, cream together softened butter, granulated sugar, and brown sugar with an electric mixer until light and fluffy (about 2-3 minutes).
- Add Cream Cheese & Flavor: Beat in the softened cream cheese until smooth and fully incorporated. Mix in the vanilla extract and salt.
- Incorporate Flour: Gradually add the cooled, heat-treated flour to the mixture, beating on low speed until just combined. Do not overmix.
- Stir in Mix-ins: Gently fold in the mini chocolate chips and M&M’s by hand.
- Chill: Transfer the dip to a serving bowl. Cover and refrigerate for at least 30 minutes for flavors to meld and to firm up slightly.
- Garnish & Serve: Before serving, garnish with a few edible googly eyes on top to make it look like a monster. Serve chilled with your favorite dippers.
Pro-Tip: Heat-treating the flour is crucial for making raw cookie dough safe to eat. Ensure it cools completely before adding to the butter mixture to prevent melting.

9. Mummy Rice Krispie Treats
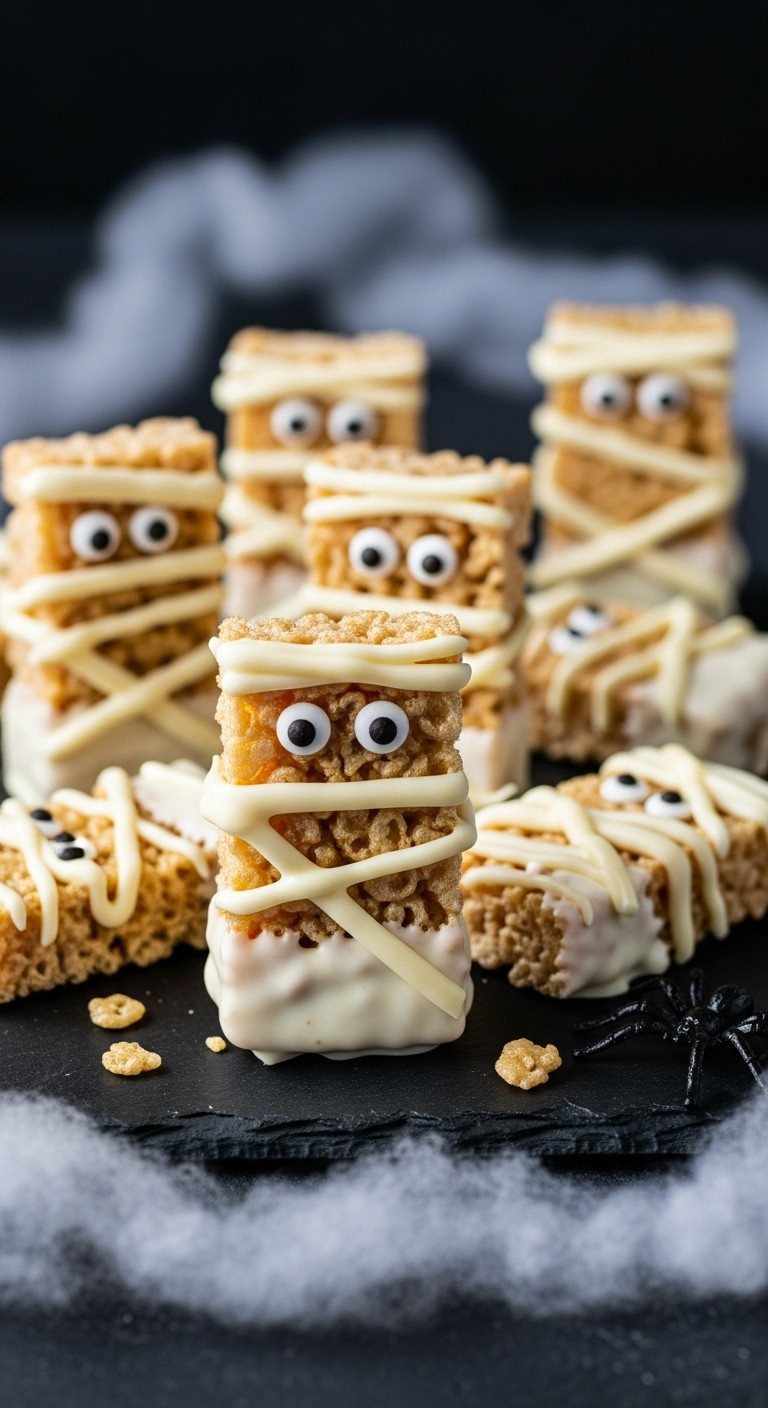
Pin this easy Halloween classic with a spooky twist!
Materials Needed:
- 6 cups Rice Krispies cereal
- 1 bag (10 oz) mini marshmallows
- 3 tablespoons unsalted butter
- 1 cup white chocolate chips or white candy melts
- 1 teaspoon coconut oil (optional, for smoother melting)
- 1 bag (0.5 oz) edible googly eyes
- 9×13 inch baking pan, lightly greased and lined with parchment paper
- Large saucepan or microwave-safe bowl
Step-by-Step Directions:
- Make Rice Krispie Treats: In a large saucepan, melt butter over low heat. Add marshmallows and stir until completely melted and smooth. Remove from heat.
- Add Cereal: Quickly stir in Rice Krispies cereal until fully coated.
- Press into Pan: Press the mixture evenly into the greased and parchment-lined 9×13 inch baking pan using a greased spatula. Let cool completely (about 30-60 minutes).
- Cut into Rectangles: Once cool and set, lift the treats out of the pan using the parchment paper. Cut into desired rectangular “mummy” shapes (e.g., 2×3 inches).
- Melt White Chocolate: In a microwave-safe bowl, melt white chocolate chips with coconut oil (if using) on 50% power for 30-second intervals, stirring until smooth.
- Dip & Decorate: Dip each Rice Krispie treat into the melted white chocolate, coating one side or completely immersing, then let excess drip off. Place on a new parchment-lined baking sheet. While the chocolate is still wet, attach two edible googly eyes to each treat.
- Create Bandages: Let the chocolate set partially (about 10-15 minutes). Spoon any remaining melted white chocolate into a piping bag with a small round tip, or use a Ziploc bag with a tiny corner snipped off. Drizzle haphazard lines across the treats, crisscrossing over the eyes, to create the mummy bandage effect.
- Chill to Set: Refrigerate for 15-30 minutes until the chocolate is completely set.
- Serve Spooky: Serve and enjoy these cute mummy treats!
Pro-Tip: For perfectly smooth white chocolate, ensure your bowl and utensils are completely dry before melting, as even a drop of water can cause the chocolate to seize.

10. No-Bake Monster Mash Cheesecake
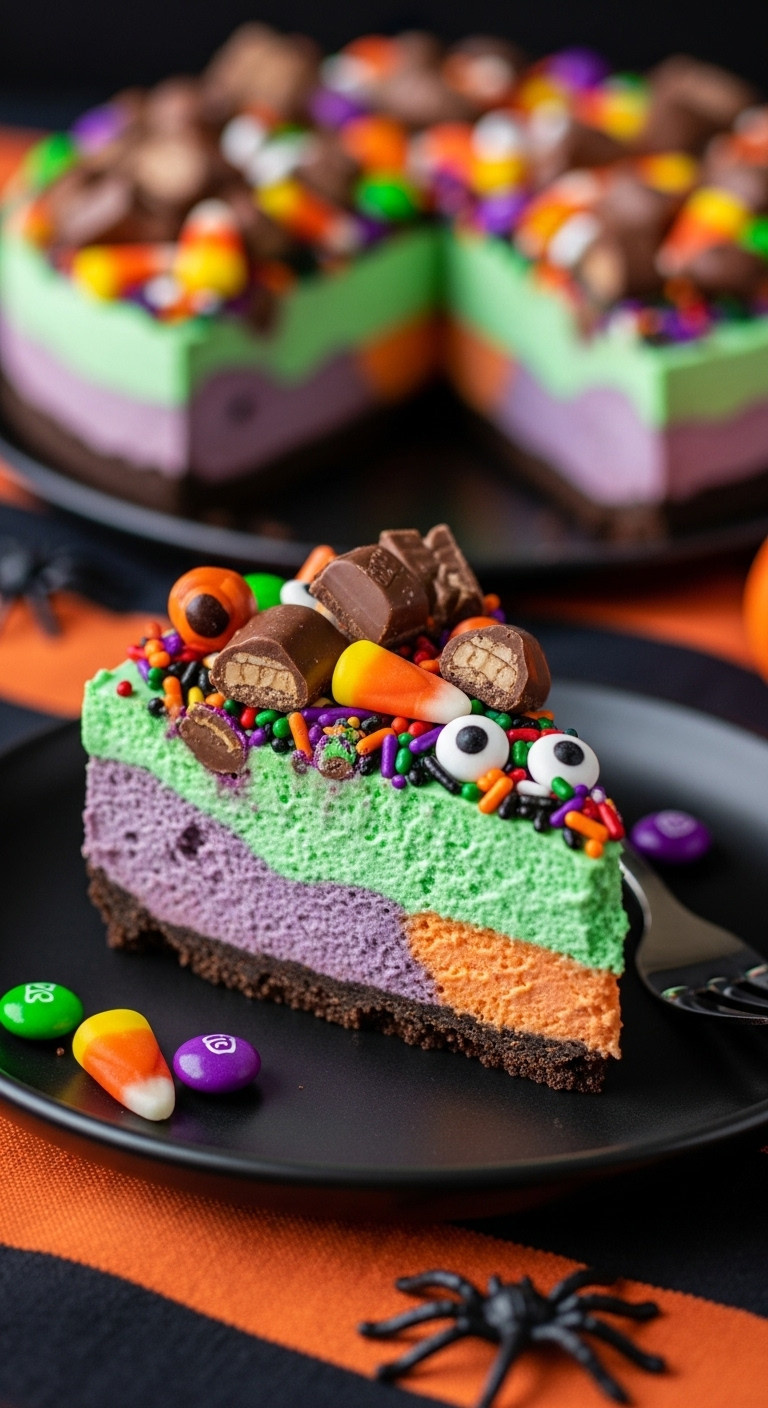
Pin this showstopping no-bake cheesecake!
Materials Needed:
- 1 ½ cups graham cracker crumbs (or crushed chocolate cookies for darker crust)
- ¼ cup granulated sugar
- 6 tablespoons unsalted butter, melted
- 2 packages (8 oz each) cream cheese, softened
- 1 cup powdered sugar
- 1 teaspoon vanilla extract
- 1 cup heavy whipping cream, cold
- Green, purple, and orange food coloring gels
- Assorted Halloween candies (e.g., mini chocolate bars, candy corn, sprinkles, edible googly eyes) for topping
- 9-inch springform pan
- Electric mixer
Step-by-Step Directions:
- Make the Crust: In a medium bowl, combine graham cracker crumbs, granulated sugar, and melted butter. Press the mixture firmly into the bottom of the 9-inch springform pan. Refrigerate for at least 30 minutes while you prepare the filling.
- Prepare Cheesecake Base: In a large bowl, beat the softened cream cheese with an electric mixer until smooth. Add powdered sugar and vanilla extract, beating until fully combined.
- Whip Cream: In a separate clean bowl, whip the cold heavy whipping cream with an electric mixer on high speed until stiff peaks form.
- Combine: Gently fold the whipped cream into the cream cheese mixture until just combined and smooth.
- Divide & Color: Divide the cheesecake mixture into three separate bowls. Add green food coloring to one bowl, purple to another, and orange to the third. Mix each color until vibrant and evenly distributed.
- Layer Cheesecake: Randomly drop spoonfuls of each colored cheesecake mixture onto the chilled crust, alternating colors. Use an offset spatula or the back of a spoon to gently swirl the colors together, creating a “monster mash” effect, but avoid overmixing to keep distinct colors.
- Chill Thoroughly: Cover the springform pan with plastic wrap and refrigerate for at least 4-6 hours, or preferably overnight, to allow the cheesecake to set completely.
- Decorate & Serve: Once thoroughly chilled, remove the cheesecake from the springform pan. Top generously with assorted Halloween candies, sprinkles, and edible googly eyes. Slice and serve cold.
Pro-Tip: For vibrant colors, use gel food colorings instead of liquid ones, as they provide more intense hues without thinning the mixture.

11. Frankenstein Rice Krispie Treats
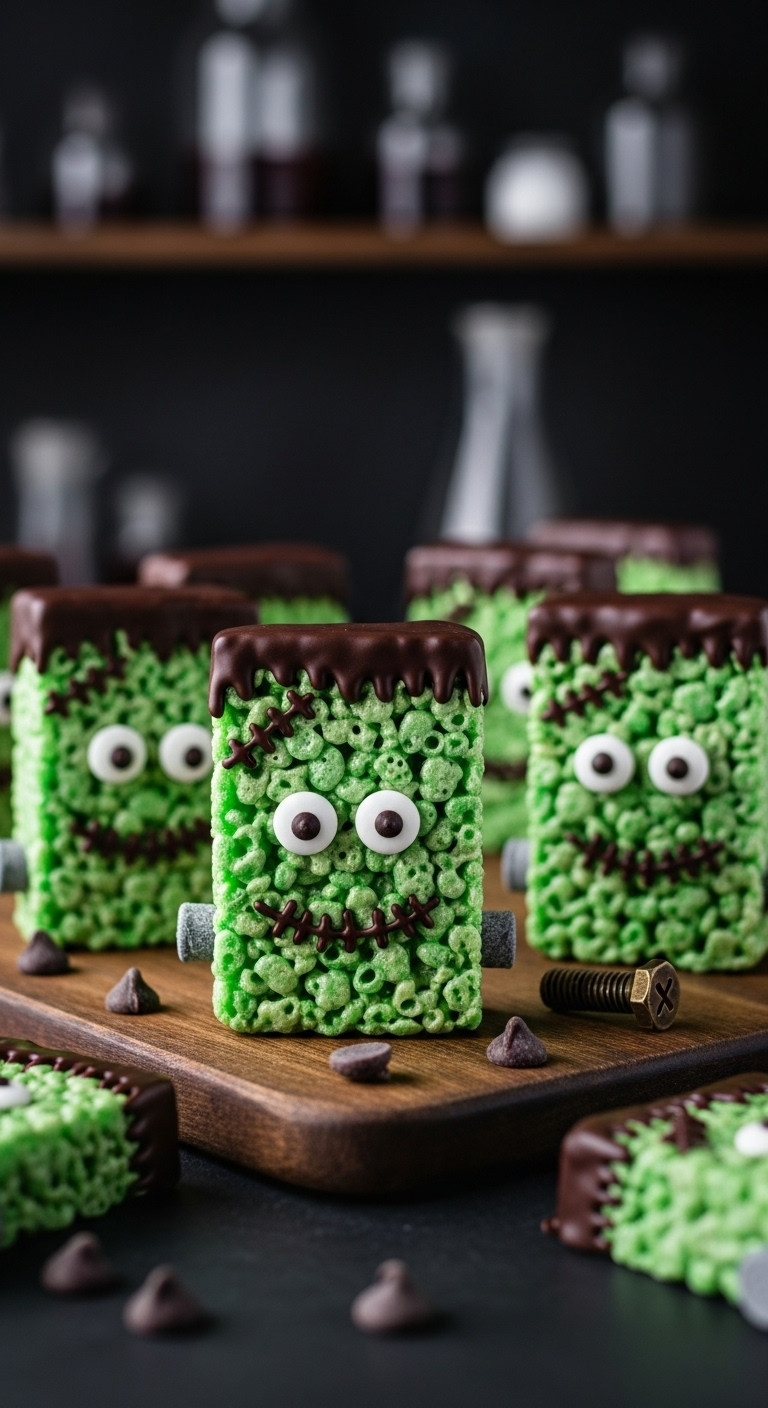
Pin this classic monster treat!
Materials Needed:
- 6 cups Rice Krispies cereal
- 1 bag (10 oz) mini marshmallows
- 3 tablespoons unsalted butter
- 1 cup green candy melts
- 1 teaspoon coconut oil (optional)
- 1/4 cup dark chocolate chips (for melting)
- Edible googly eyes
- 9×13 inch baking pan, lightly greased and lined with parchment paper
- Large saucepan
Step-by-Step Directions:
- Prepare Rice Krispie Treats: In a large saucepan, melt butter over low heat. Add marshmallows and stir until completely melted and smooth. Remove from heat.
- Add Cereal: Quickly stir in Rice Krispies cereal until fully coated.
- Press into Pan: Press the mixture evenly into the greased and parchment-lined 9×13 inch baking pan. Let cool completely (about 30-60 minutes).
- Cut into Rectangles: Once cool and set, lift the treats out of the pan. Cut into desired rectangular “Frankenstein head” shapes (e.g., 2×3 inches). You can slightly round the top corners for a head shape.
- Melt Green Candy Melts: In a microwave-safe bowl, combine green candy melts and coconut oil (if using). Microwave on 50% power for 30-second intervals, stirring until smooth.
- Coat Treats: Dip each Rice Krispie treat into the melted green candy, coating completely. Let excess drip off, then place on a clean parchment-lined baking sheet.
- Add Eyes: While the green candy is still wet, immediately place two edible googly eyes onto each treat to form the monster’s eyes.
- Melt Dark Chocolate: In a small microwave-safe bowl, melt dark chocolate chips. If too thick, add a tiny bit of coconut oil. Spoon into a piping bag with a tiny snip or a Ziploc bag with a tiny corner cut off.
- Decorate: Once the green candy has slightly set (about 10-15 minutes), use the melted dark chocolate to pipe hair along the top edge of each Frankenstein head. Then, pipe a horizontal line for the mouth and a few small vertical lines for stitches.
- Chill to Set: Refrigerate for 15-30 minutes until all chocolate is completely set.
- Serve Spooky: Serve these monstrously fun treats!
Pro-Tip: For even neater “hair” and “stitches,” ensure your melted dark chocolate is not too hot and has a good, flowing consistency. A toothpick can also be used for fine detail.

12. Halloween Monster Bark
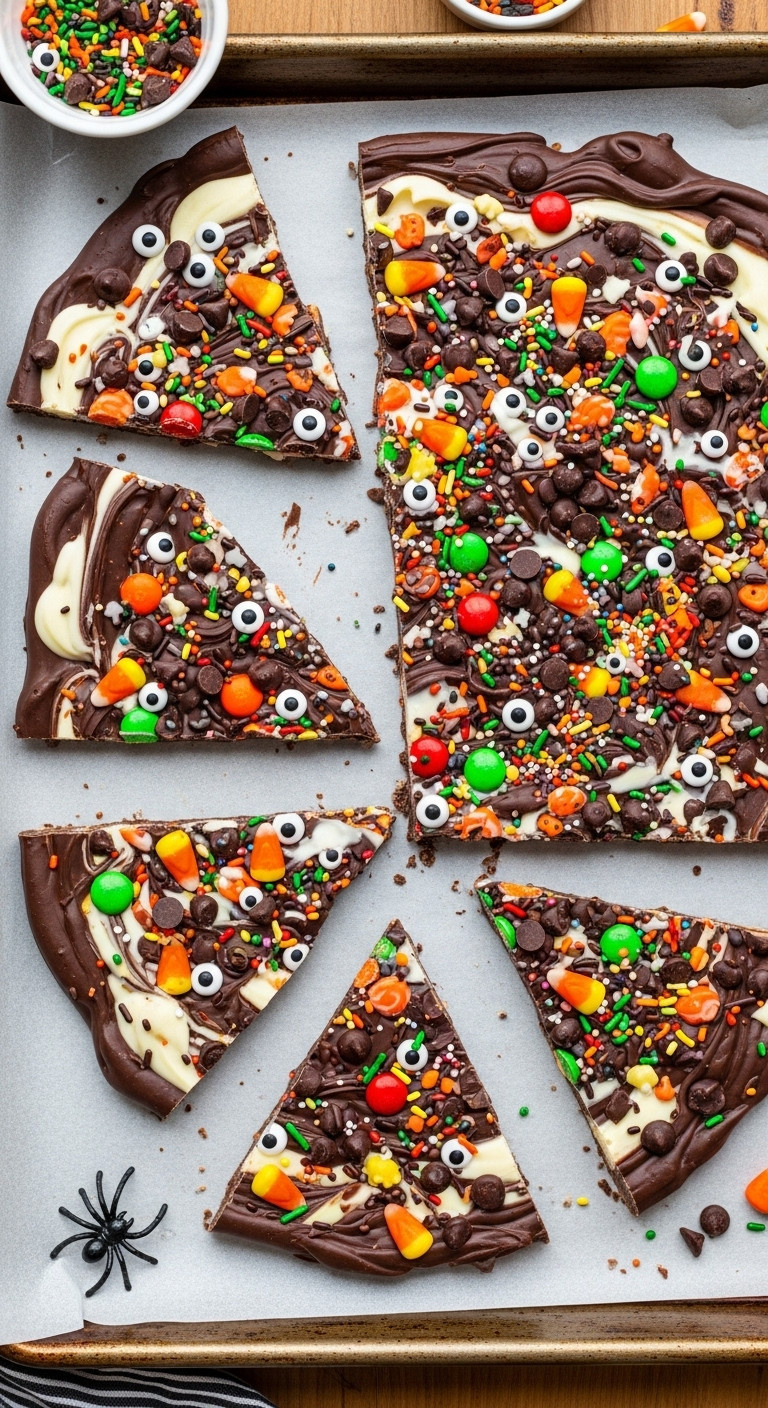
Save this last-minute monster bark idea!
Materials Needed:
- 1 bag (12 oz) dark chocolate chips or melting wafers
- 1 bag (12 oz) white chocolate chips or melting wafers
- 1 teaspoon coconut oil (optional, for smoother melting)
- Assorted Halloween candies (e.g., candy corn, M&M’s, mini chocolate chips, sprinkles, edible googly eyes, gummy worms)
- Baking sheet
- Parchment paper
Step-by-Step Directions:
- Prepare Baking Sheet: Line a large baking sheet (approx. 10×15 inches) with parchment paper.
- Melt Dark Chocolate: In a microwave-safe bowl, melt dark chocolate chips with half of the coconut oil (if using) on 50% power for 30-second intervals, stirring until smooth. Spread this melted chocolate evenly over the parchment-lined baking sheet.
- Melt White Chocolate: In another microwave-safe bowl, melt white chocolate chips with the remaining coconut oil (if using) on 50% power for 30-second intervals, stirring until smooth.
- Swirl & Decorate: Dollop spoonfuls of the melted white chocolate over the dark chocolate layer. Using a butter knife or a toothpick, gently swirl the two chocolates together to create a marbled effect, taking care not to overmix.
- Add Toppings: Immediately and generously sprinkle all your assorted Halloween candies, sprinkles, and edible googly eyes over the still-wet chocolate bark. Press some of the larger pieces down gently to ensure they adhere.
- Chill to Set: Place the baking sheet in the refrigerator for at least 30-60 minutes, or until the chocolate is completely hardened and firm.
- Break into Pieces: Once set, remove the bark from the refrigerator. Lift the parchment paper off the baking sheet and break the hardened bark into irregular pieces by hand or using a sharp knife.
- Serve & Store: Serve immediately or store in an airtight container at room temperature for up to 1-2 weeks.
Pro-Tip: Don’t be afraid to be generous with the toppings! The more varied and colorful, the more “monster-like” your bark will appear.
13. Brain Jell-O Mold
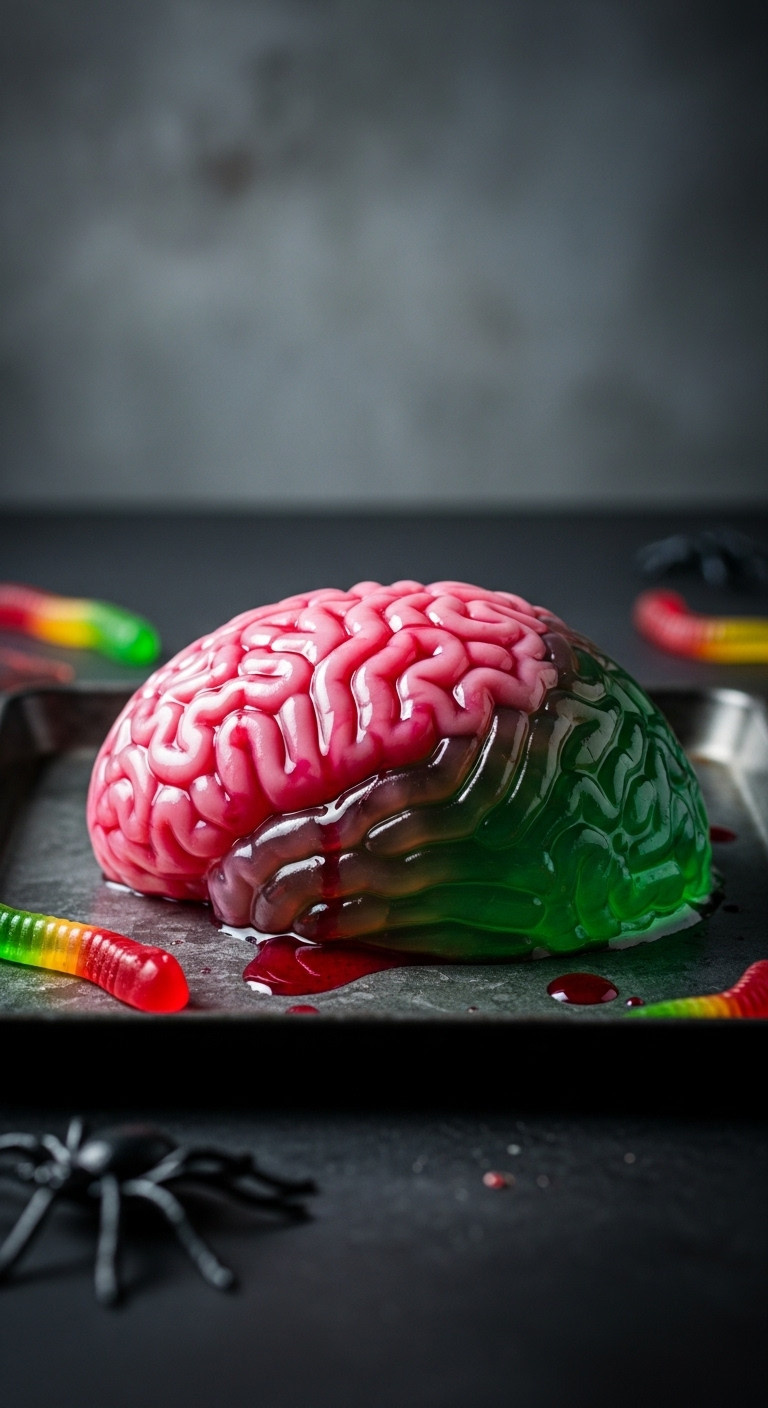
Pin this gruesomely good Jell-O mold!
Materials Needed:
- 2 packages (3 oz each) Jell-O gelatin, pink or red flavor (e.g., strawberry, cherry, raspberry)
- 1 package (3 oz) unflavored gelatin powder
- 2 cups boiling water (divided)
- 1 can (14 oz) sweetened condensed milk
- 1 cup cold water
- 1 cup heavy cream (optional, for creamier texture)
- Silicone brain mold (approx. 6-cup capacity)
- Optional: Red syrup or raspberry sauce for “blood”
Step-by-Step Directions:
- Prepare Pink Jell-O Layer: In a large bowl, combine the two packages of flavored Jell-O with 1 cup of boiling water. Stir until completely dissolved. Let cool slightly.
- Prepare Creamy Layer: In a separate bowl, sprinkle the unflavored gelatin over 1/2 cup of cold water and let it bloom for 5 minutes. Then, add 1 cup of boiling water and stir until dissolved. Stir in the sweetened condensed milk and heavy cream (if using) and the remaining 1/2 cup of cold water.
- Combine & Chill: Pour the creamy mixture into the cooled pink Jell-O. Stir well to combine. The mixture should be a milky, opaque pink color.
- Pour into Mold: Lightly spray the silicone brain mold with cooking spray (this helps with release, though silicone is naturally non-stick). Carefully pour the Jell-O mixture into the brain mold.
- Chill to Set: Refrigerate the Jell-O mold for at least 4-6 hours, or preferably overnight, until it is completely firm and set.
- Unmold: To unmold, gently pull the edges of the silicone mold away from the Jell-O. Place a serving platter over the mold and quickly invert, allowing the Jell-O to release onto the platter. If it sticks, gently tap the top or very briefly dip the bottom of the mold in warm water.
- Garnish & Serve: Serve the “brain” as is, or drizzle with red syrup or raspberry sauce for a gruesome “bloody” effect. Serve chilled.
Pro-Tip: For extra creepy effect, use a light pink Jell-O color (like strawberry or peach) and very gently score lines into the surface with a knife after it’s set to emphasize the brain’s texture.

People Also Ask About No-Bake Halloween Recipes
How long do no-bake Halloween treats last?
Most no-bake Halloween treats, especially those containing dairy like cream cheese or whipped topping, should be stored in an airtight container in the refrigerator for 3-5 days. Candy-based bark or pretzel bites may last longer at room temperature if sealed, but always check individual recipe guidelines for optimal freshness.
Can I make these no-bake treats ahead of time for a party?
Absolutely! Many no-bake Halloween treats are ideal for preparing 1-2 days in advance, as they often require significant chilling time to set. This makes them perfect for stress-free party planning. Ensure they are covered tightly and refrigerated to maintain quality.
What are some popular no-bake Halloween dessert ingredients?
Common ingredients include crushed cookies (like Oreos or graham crackers for crusts), cream cheese, whipped topping, instant pudding, melted chocolate or candy melts, peanut butter, and festive candies such as candy corn, gummy worms, and edible googly eyes for spooky decorations.
How can I make no-bake Halloween treats look extra spooky?
Achieving a spooky look is easy with simple decorations! Use edible googly eyes for monster faces, create spider webs with chocolate drizzles, use green food coloring for ‘slime’ effects, or crush dark cookies for ‘dirt.’ Silicone molds in skull or pumpkin shapes also work wonders for themed gelatin or chocolate.
Are there allergy-friendly no-bake Halloween options?
Yes, you can adapt many no-bake recipes for common allergies. Use gluten-free sandwich cookies or graham crackers for crusts. For dairy-free options, choose plant-based milks, coconut cream, or vegan cream cheese. Always verify ingredient labels and be mindful of cross-contamination for severe allergies.
Final Thoughts for a June 2026 Full of Spooky Sweets
This Halloween, you can trade kitchen stress for festive fun. Embracing the world of no-bake recipes means you can easily create an impressive spread of spooky, delicious, and creative treats that delight both kids and adults. With simple ingredients and even simpler steps, you’re now equipped to make your 2026 celebration memorable for all the right reasons.
Which of these ultimate no-bake Halloween recipes will you conjure up first for your June 2026 celebration? Share your spooky creations and favorite tips in the comments below
Last update on 2026-06-12 at 09:06 / Affiliate links / Images from Amazon Product Advertising API
