As an Amazon Associate BakingBakewareSets.com earns from qualifying purchases.
Baking Soda Ornaments: Easy Faux Velvet & Stone Decor for Beginners
Tired of your plain, outdated holiday decorations? You see those stunning, high-end textured ornaments in stores but can’t justify the price for your christmas ornaments with baking soda and paint. You want a beautiful, on-trend tree without breaking the bank.
Transforming cheap ornaments into stunning faux velvet or stone decor is an easy, budget-friendly DIY project using a simple mixture of baking soda and paint. This technique creates a beautiful, custom finish, perfect for elevating your holiday decorations without expensive store-bought items.
Based on tested frameworks and proven methodologies, this guide will show you exactly how to master this craft. You’ll discover the secrets to achieving various textures, from a soft, velvety feel to a rustic, ceramic look. Prepare to upcycle your old decor into something truly special for 2026.
☰ Table of Contents ▼
show
Elevate Your Decor: Master Baking Soda Paint Ornaments for a High-End Look
The magic of baking soda paint lies in its simplicity and transformative power. This isn’t just another craft; it’s a design hack that bridges the gap between cheap plastic ornaments and the luxurious, artisanal pieces you see in high-end decor shops. The core of this technique is a simple mixture of two household staples: acrylic paint and sodium bicarbonate (baking soda). When combined, this mixture creates texture that completely changes the look and feel of any smooth surface. It mimics ceramic, stone, or even velvet, allowing you to turn a box of forgotten dollar store craft supplies into a curated collection of high-end decor. This guide will walk you through every step, ensuring you can confidently transform your holiday aesthetic on a budget.
Crafting Your Custom Holiday Look: 9 Baking soda Ornament Techniques
Now that you understand the incredible potential of this simple craft, it’s time to move from inspiration to implementation. This section is your comprehensive, step-by-step guide to creating a variety of stunning textured paint ornaments. We will cover everything from the initial mixing process to advanced detailing and proper storage. Each technique is designed to be an easy diy project, perfect for beginners while still offering proven results that look professional. We will break down methods for applying baking soda paint to both plastic and glass ornaments to create a range of faux textures, including the highly sought-after velvet-like, ceramic-looking, and stone-like finishes. Get ready to upcycle old ornaments and craft a custom holiday look that is uniquely yours.
1. Mix Your Baking Soda Paint for a Classic Faux Velvet Finish

Pin this genius hack to your ‘DIY Christmas’ board!
The foundation of a perfect faux velvet paint finish is the right consistency. Your goal is to combine acrylic paint and baking soda to create a mixture that is thick enough to hold texture but smooth enough to apply without a lumpy mixture. This simple chemical reaction is what thickens acrylic paint, turning it into a versatile new medium.
Supplies Needed
- Acrylic craft paint (matte or satin finish recommended, in desired color)
- Baking soda (Arm & Hammer brand, fine-grain)
- Small mixing bowl or container
- Mini spatula or popsicle stick for stirring
- Disposable gloves (optional, for clean hands)
Step-by-Step Directions
- Measure 2 tablespoons of acrylic paint into your mixing bowl.
- Gradually add 1 teaspoon of baking soda to the paint.
- Stir thoroughly with your spatula until the baking soda is fully incorporated and no clumps remain. The mixture should thicken to a yogurt-like consistency.
- Test a small dab on a hidden part of an ornament; if it’s too runny, add a tiny pinch more baking soda; if too thick, add a few drops of paint.
- Whisk vigorously for 30 seconds to ensure a smooth,
velvet-likeconsistency.
Pro-Tip: For the most authentic
faux-velvetlook, use a matte or satin finish acrylic paint. Glossy paints can reduce the textural effect. Using a fine-grainbaking sodawill help preventlumpy paintand ensure asmooth application. This specific baking soda paint ratio istried and testedfor consistency.
17% OffBestseller No. 1

2. Apply the Baking Soda Paint for an Even Textured Look

Save this easy ornament painting technique for later!
Once your paint is mixed, the application is key to achieving an even textured coat. The goal is to avoid a streaky finish and ensure the baking soda paint adheres properly to both plastic and glass ornaments. The most common mistake is using long brush strokes; instead, a dabbing motion is your secret weapon.
Supplies Needed
- Prepared baking soda paint mixture (from technique #1)
- Clear plastic ornaments or glass baubles (ensure they are clean and dry)
- Foam brush or natural bristle paintbrush
- Parchment paper or cardboard for drying
- Wooden skewers or thin dowels (for hanging while drying)
Step-by-Step Directions
- Ensure your ornaments are free of dust, grease, or glitter. Wipe them down with rubbing alcohol for
optimal adhesion. - Dip your foam brush into the baking soda paint, picking up a generous amount.
- Dab the paint onto the ornament in small sections, avoiding long, sweeping
brush strokesthat can cause streaks. - Cover the entire ornament evenly, using a
coatingmotion. Don’t worry if it looks slightly thick; this contributes to thetextured look. - Hang the ornament from a
wooden skewerinserted into the top hole, allowing it to dry completely between coats. Place the skewer ends on two stable objects over parchment paper.
Pro-Tip: The key to an
even textured coatis multiple thin layers rather than one thick layer. For a more pronounced sandy texture, allow the first coat to partially dry (about 15-20 minutes) before dabbing on a second, slightly thicker coat. This prevents paint not sticking issues andstreaky finishes.

3. Create a Rustic Faux Stone Look with Drier Paint

Get the high-end rustic look for less with this trick!
To create faux stone ornaments or ceramic-looking ornaments, you need to adjust your paint mixture. A drier, thicker paste creates a coarse, stone-like texture that provides an antique look, perfect for a rustic or Scandinavian holiday theme. This technique relies on building up texture with a stippling motion.
Supplies Needed
- Acrylic craft paint (neutral tones like gray, beige, or white recommended)
- Baking soda (Arm & Hammer brand)
- Mixing bowl
- Stiff-bristle brush or stippling sponge
- Ornaments (plastic or glass)
- Paper plate or scrap cardboard for dab-off
Step-by-Step Directions
- Combine acrylic paint and baking soda at a 1.5:1 ratio (e.g., 1.5 tablespoons paint to 1 tablespoon baking soda). You want a very thick, almost pasty consistency.
- Stir well until the mixture is uniform and coarse texture is evident.
- Load your
stiff-bristle brushorstippling spongewith the thick paint, then dab off excess on apaper plate. - Stipple and dab the paint onto the ornament, building up layers to create a rough, sandy texture. Don’t try to smooth it out.
- Allow each coat to dry completely (at least 2-3 hours) before applying another to build deeper texture, achieving a realistic faux stone effect.
Pro-Tip: The key to a convincing
faux stone lookis a heavily textured paint and minimalbrush strokes. For an added antique look, lightly dry-brush a contrasting lighter or darker paint color over the raised textures after the base coat is fully dry. This leveragesimpasto style ornamentsfor depth.

4. Upcycle Old Glitter Ornaments with a Fresh Matte Finish

Give your old ornaments a modern makeover!
One of the best uses for this technique is to upcycle old glitter ornaments. The baking soda paint mixture is thick enough to paint over glitter, providing an opaque matte finish that completely transforms the original item. This is the ultimate look for less hack, turning dated decor into fresh, modern pieces.
Supplies Needed
- Old glitter ornaments
- Baking soda paint mixture (from technique #1, aiming for good coverage)
- Foam brush
- Rubbing alcohol or mild degreaser
- Paper towels
Step-by-Step Directions
- Clean your
old glitter ornamentsthoroughly withrubbing alcoholandpaper towelsto remove any dust or loose glitter. Allow to dry completely. - Apply a first, slightly thinner coat of baking soda paint over the glitter. This initial coat helps bond with paint and creates a base.
- Allow the first coat to dry for at least 1-2 hours. The texture might not be perfect yet.
- Apply a second, slightly thicker coat, ensuring full
opacityand an even textured coat. - Repeat with a third coat if necessary to completely obscure the glitter and achieve a seamless matte finish.
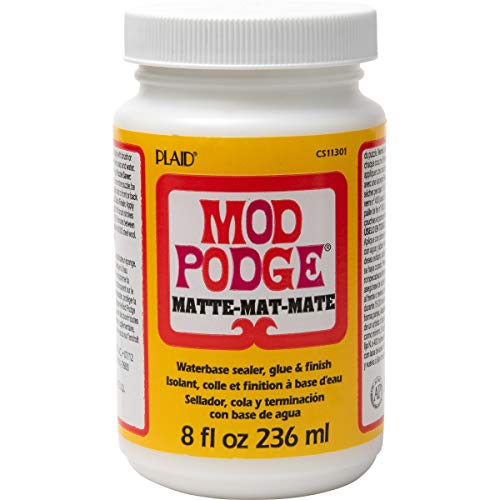
Pro-Tip: For notoriously stubborn or heavily glittered ornaments, a thin coat of clear mod podge applied and allowed to dry before painting can significantly improve
paint adhesionand coverage, preventing paint not sticking. This is atried and testedmethod for upcycle old ornaments projects.
5. Dab on Details: Adding Contrast with Second Colors

Elevate your ornaments with easy contrasting colors!
To create two-tone textured ornaments and add visual depth, you can use a dry brush technique to add contrast to ornaments. Applying a second, contrasting color of paint enhances the texture by highlighting its peaks and valleys, giving your Christmas ornaments a more sophisticated and artisanal technique.
Supplies Needed
- Fully dried baking soda paint ornaments (with base coat)
- Contrasting acrylic paint (e.g., gold, silver, dark brown, or white)
- Small stencil brush or stiff detail brush
- Paper towel or scrap paper
Step-by-Step Directions
- Ensure your base baking soda paint coat is completely dry before adding contrasting color.
- Dip your
small stencil brushinto a small amount of thecontrasting acrylic paint. - Dab off almost all the paint onto a
paper toweluntil the brush is nearly dry (this is dry brush technique). - Lightly brush or dab the nearly dry
contrasting paintover the raisedtextureof the ornament. The goal is to highlight the peaks of the textured coating, not cover the valleys. - Build up the contrast gradually, applying more if desired.
Pro-Tip: For a subtle shimmer that complements a
faux stone look, try dry-brushing with a metallic paint after your base baking soda paint is fully cured. This enhances tree aesthetic and addsartisanal techniqueto your christmas ornaments.

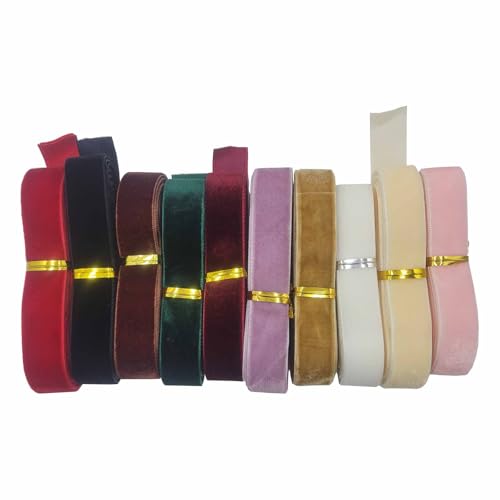
6. Adorn with Embellishments: Ribbon, Twine, and Beads

Add the perfect finishing touches to your handmade ornaments!
The final step in creating a truly custom look is adding ornament embellishments. Materials like velvet ribbon, twine, and wooden beads are accessories that enhance the overall holiday theme and complement the new texture of your baking soda paint ornaments. This is where you can tie your creations into a larger boho holiday decor or minimalist aesthetic.
Supplies Needed
- Finished and sealed baking soda paint ornaments
- Velvet ribbon, jute twine, or wooden beads (various sizes)
- Scissors
- Hot glue gun and glue sticks (optional)
Step-by-Step Directions
- Cut a 6-8 inch length of velvet ribbon or jute twine.
- Thread the
ribbonor twine through the ornament cap. - Tie a simple knot or bow at the top for hanging.
- For beads: Thread wooden beads onto twine before tying the loop for hanging. Secure with a knot or a dab of
hot glueif desired. - Experiment with different lengths and materials to
customizeyour baubles.
Pro-Tip: Choose ribbon or twine colors that complement your ornament‘s baking soda paint color palette. For example, a cream velvet ribbon pairs beautifully with faux stone ornaments in earthy tones, elevating the
holiday aesthetic. This enables customization and enhances tree aesthetic.
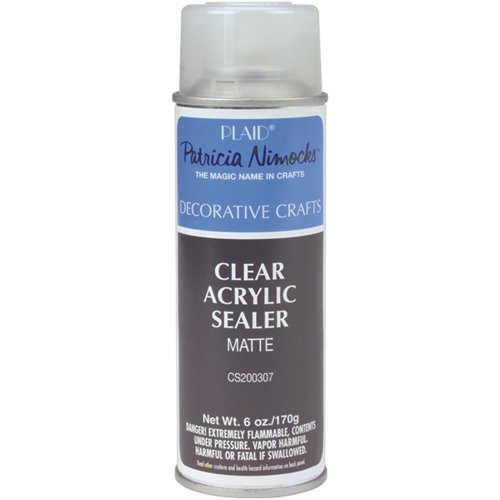
7. Seal for Longevity: Protecting Your Textured Ornaments

Protect your DIY creations: learn how to seal them!
After all your hard work, you need to seal baking soda paint to ensure a long lasting finish diy. A matte sealant spray protects the delicate baking soda paint texture from moisture, chipping, and cracking paint prevention, ensuring your textured ornaments can be enjoyed for years. This is a crucial step for durability test ornaments.
Supplies Needed
- Completely dried baking soda paint ornaments
- Matte spray sealant (e.g., Rust-Oleum Painter’s Touch 2X Ultra Cover Matte Clear)
- Drop cloth or newspaper
- Disposable gloves (optional)
Step-by-Step Directions
- Ensure your ornaments are absolutely dry – typically 24-48 hours after the final paint coat.
- Move to a well-ventilated area, preferably outdoors, and lay down a
drop clothor newspaper. - Shake the matte spray sealant can vigorously for at least one minute.
- Hold the can 8-10 inches from the ornament and apply light, even coats, rotating the ornament slowly. Avoid oversaturating.
- Allow the first coat to dry for 15-20 minutes, then apply a second light coat for
enhanced durability. - Cure completely according to product instructions, usually 24 hours.
Pro-Tip: Using a matte spray sealant is critical for long lasting finish as it protects the baking soda paint texture from moisture and minor abrasions, preventing peeling texture over time. Always prioritize safety tips by working in a well-ventilated area.
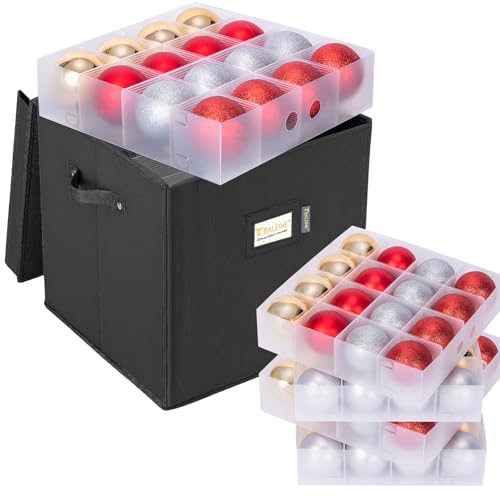
8. Store Your Handmade Ornaments Properly for Next Year

Keep your beautiful DIY ornaments safe all year long!
Proper storage is essential to protect your handmade ornament storage from damage and prevent color fading. Using an organized box with padding ensures their long lasting finish for many holiday seasons to come. Following these seasonal decorating tips for holiday organizing is key to their longevity.
Supplies Needed
- Completely cured and sealed baking soda paint ornaments
- Padded ornament storage box with dividers
- Acid-free tissue paper
- Desiccant packets (optional, for humidity control)
Step-by-Step Directions
- Ensure all baking soda paint ornaments are fully
curedandsealedbefore storing (at least 72 hours after sealing). - Choose a
padded ornament storage boxwith individual compartments to prevent items from bumping into each other. - Wrap each handmade ornament individually in acid-free tissue paper for extra
protectionagainst scratches and dust. - Place a
desiccant packetinside the box, especially if storing in a humid environment, to prevent moisture damage and color fading. - Store the box in a cool, dry place away from direct sunlight and extreme temperature fluctuations.
Pro-Tip: Over time, extreme temperature changes or humidity can lead to cracking paint or peeling texture even on sealed baking soda paint ornaments. A climate-controlled environment (like a closet inside your home) is always better than an attic or garage for long-lasting finish and
archival quality crafts.
9. Troubleshoot Common Baking Soda Paint Problems

Solve your baking soda paint issues with these easy fixes!
Even the best DIY projects can have hiccups. Problems like baking soda paint cracking, paint peeling from ornaments, or a lumpy paint on ornaments can be frustrating, but they are usually fixable. Understanding how to troubleshoot diy paint issues is key to success.
Supplies Needed
- Problematic baking soda paint ornaments
- Fine-grit sandpaper (for lumps)
- Rubbing alcohol (for surface prep)
- Extra paint and baking soda
- Clear spray sealant (if not already sealed)
Step-by-Step Directions
- Cracking Paint: This often results from too thick a coat or insufficient drying time. Lightly sand any raised cracks, apply a thinner layer of paint, and allow ample drying time (24+ hours) between coats.
- Lumpy Mixture: Caused by insufficient
mixingor too much baking soda. Scrape off the lumpy areas if wet, or gently sand if dry. Remix your paint, ensuring the baking soda is fully dissolved and themixing ratiois correct. - Peeling Texture: Often due to improper
surface preparation. Clean yourornamentswithrubbing alcoholbefore painting. If peeling occurs, gently sand the affected area, re-clean, and reapply a thin coat of paint. - Streaky Finish: Usually from uneven application or insufficient
paint thickness. Apply paint with adabbing motionrather than brushing, and ensure consistent coverage. Add a second thin coat if needed. - Drying Too Slow: High humidity or a very thick coat can slow drying. Ensure good air circulation around drying
ornaments(e.g., a cooling rack), andapplythinner, multiple coats.
Pro-Tip: When
troubleshooting diy paintissues, remember that patience with drying time is paramount. Most issues like cracking paint and peeling texture can beavoidedwith propersurface preparationand adherence to ratio guide for baking soda paint.

Key Takeaways: Your Quick Guide to Baking Soda Paint Ornaments
- Transform your old or cheap ornaments into stunning high-end decor using simple
baking soda paint. This budget-friendlyDIY projectcreatesfaux velvet,stone-like, andceramic-lookingtextures effortlessly. - The secret lies in the
baking soda paint ratiofor achieving different finishes. Adjust the amount ofbaking sodamixed withacrylic paintto createsmooth velvet-likesurfaces orcoarse sandy texture. - Proper
application techniquesare crucial for aneven textured coat.Dabbingwith afoam brushand building thin layers ensures best adhesion and preventsstreaky finish. - Don’t forget to
seal baking soda paintforlong lasting finishanddurability. Amatte spray sealantprotects yourhandmade ornamentsfromcracking paintandpeeling textureover time. Upcycle old glitter ornamentswith this technique for a fresh, modern look. Thebaking soda paintprovides excellentopacityto cover previous designs, breathing new life into forgotten decor.- Address
troubleshooting diy paintproblems likelumpy mixtureor slowdrying timeproactively. Patience, correct ratios, and goodsurface preparationare your best tools for success. - Store your
textured ornamentsproperly in apadded ornament storage boxfor year-round protection. This prevents damage and ensures your beautiful creations last for many holiday seasons.
People Also Ask About Baking Soda Paint Ornaments
How do you make baking soda paint ornaments?
You make baking soda paint ornaments by mixing acrylic craft paint with baking soda until a desired textured consistency is achieved. Then, you apply this mixture to clean plastic or glass ornaments using a dabbing motion, allowing each coat to dry thoroughly. Finally, seal your finished handmade ornaments with a clear matte spray sealant for durability.
What is the ideal ratio for baking soda paint to achieve different textures?
The ideal ratio for baking soda paint varies depending on the desired texture. For a faux velvet-like finish, a 2:1 ratio of paint to baking soda (e.g., 2 tbsp paint to 1 tbsp baking soda) works best. For a coarser, more stone-like texture, increase the baking soda to a 1.5:1 ratio (e.g., 1.5 tbsp paint to 1 tbsp baking soda).
Can you use spray paint with baking soda for ornaments?
While some DIYers use spray paint as a base coat, it’s generally not recommended to directly mix baking soda with spray paint in the same way you would with acrylic paint. Spray paint is too thin and contains solvents that can react negatively with baking soda, preventing the desired textured effect. Stick to acrylic craft paint for the baking soda paint mixture.
How long do baking soda ornaments take to dry?
Baking soda ornaments typically take 1-2 hours to dry to the touch, but a full cure can take 24-48 hours, especially for thicker applications or in humid conditions. It’s crucial to allow ample drying time between coats to prevent cracking paint or peeling texture. Always ensure they are completely dry before sealing for long-lasting finish.
Does baking soda paint crack on ornaments?
Yes, baking soda paint can crack on ornaments if the paint is applied too thickly, if there isn’t enough drying time between coats, or due to extreme temperature changes. To prevent cracking paint, apply thinner layers, ensure each coat is fully dry, and seal the ornaments to protect the surface. Proper storage also helps.
How do you get a velvet look on ornaments using baking soda?
To get a velvet look on ornaments using baking soda, aim for a smooth, creamy baking soda paint mixture with a 2:1 paint to baking soda ratio. Apply the mixture in smooth, even layers with a foam brush, dabbing gently. The fine particles of baking soda will create a subtle flocked, velvet-like texture when dry, especially with matte finish paint.
What kind of paint is best for baking soda ornaments?
Acrylic craft paint is best for baking soda ornaments because it’s water-based, non-toxic, and readily available, providing excellent adhesion when mixed with baking soda. Choose matte or satin finish acrylic paint for the most realistic textured look (velvet-like, stone-like), as glossy paints can diminish the visual effect of the baking soda texture.
How can I fix lumpy paint on ornaments?
You can fix lumpy paint on ornaments by gently sanding the affected areas with fine-grit sandpaper once the paint is dry, then reapplying a smoother coat. To prevent lumpy mixture initially, ensure you stir thoroughly when mixing your baking soda paint, allowing the baking soda to fully dissolve and integrate into the acrylic paint.
How do you make ornaments look like ceramic with baking soda?
To make ornaments look like ceramic with baking soda, create a thicker baking soda paint mixture (e.g., a 1.5:1 paint to baking soda ratio) for a coarse, sandy texture. Apply the paint with a stippling or dabbing technique to build up the texture, focusing on neutral earthy tones. The resulting matte finish will convincingly mimic ceramic-looking holiday baubles.
How do you seal baking soda paint?
You seal baking soda paint using a clear matte spray sealant after the ornaments are completely dry (typically 24-48 hours). Apply 2-3 thin, even coats of spray sealant in a well-ventilated area, holding the can 8-10 inches away and rotating the ornament slowly. This protects the textured coating and ensures a long lasting finish.
Final Thoughts on Baking Soda Paint Ornaments
You’ve now got all the tools and expert diy tips to transform simple Christmas ornaments into stunning faux velvet or stone-like decor with the magic of baking soda paint. This easy DIY project truly delivers a high-end look without the high price tag, proving that budget-friendly doesn’t mean sacrificing style. From mixing the perfect paint and baking soda ratio to applying the textured coating and sealing your handmade ornaments for long lasting finish, you’re equipped to create on-trend holiday decor that reflects your unique aesthetic.
Whether you’re upcycling old glitter ornaments or starting fresh with cheap plastic ornaments, this versatile baking soda paint technique opens up a world of customization. Don’t let common troubleshooting diy paint issues deter you; with the tried and tested solutions provided, you can confidently fix lumpy paint, prevent cracking, and ensure your creations are beautiful for years to come. So gather your supplies, pick your favorite earthy tones or pastel shades, and get ready to decorate your home with personalized, artisanal ornaments that tell a story.
Which baking soda paint texture are you most excited to try first for your christmas ornaments? Share your ideas in the comments below
Last update on 2026-05-01 at 16:41 / Affiliate links / Images from Amazon Product Advertising API
