As an Amazon Associate BakingBakewareSets.com earns from qualifying purchases.
Baked Chicken Chimichanga Recipe: Perfectly Crispy Guide
Tired of soggy, disappointing homemade chimichangas that fall apart? You crave that perfect, restaurant-quality crunch but want to skip the messy, unhealthy deep-frying. Achieving a crispy shell with a juicy, flavorful filling at home can feel impossible.
**Our baked chicken chimichanga recipe creates a perfectly crispy, golden-brown shell by brushing tortillas with melted butter and baking at high heat.** This tested method delivers a satisfying crunch and a juicy, cheesy chicken filling without the mess of deep-frying, making it an easy weeknight family dinner.
Drawing from established best practices and a tested and perfected method, this guide will show you the secrets to a crunchy outside and juicy inside. You will discover a simple, step-by-step process for making the best **Baked Chicken Chimichanga Recipe** you’ve ever had. Get ready to master this Tex-Mex classic.
## What Makes This The Best Baked Chicken Chimichanga Recipe?
The secret to an unforgettable chimichanga lies in mastering two key elements: an irresistibly crunchy shell and a savory, **juicy chicken filling**. Many homemade attempts end in disappointment, either with a soft, pale exterior or a dry, bland center. This **easy chicken chimichanga bake** is different because it’s built on a tested and perfected method that guarantees success. We’ll show you how to achieve that **crispy baked chicken chimichanga** texture that rivals any deep-fried version, all while keeping the process simple and mess-free. This isn’t just a list of ingredients; it’s a proven framework for solving the most common chimichanga problems, giving you a delicious and reliable family dinner.
## 7 Simple Steps to Make The Perfect Baked Chicken Chimichangas
Making restaurant-quality chimichangas at home is easier than you think. This section breaks down the entire process into seven clear, actionable steps. From preparing the flavorful **shredded chicken filling** to achieving that perfect **golden brown crispy** crust, we’ll guide you through every stage. Each step is designed to be highly scannable and easy to follow, ensuring you know exactly what you need and what to do. By following this guide on **how to make baked chicken chimichangas**, you’ll master the technique for a perfect fold and the secret to an undeniably crunchy finish.
### 1. Prepare the Juicy Chicken Filling
Pin this easy chicken filling recipe for later!
The heart of any great chimichanga is its filling. This **shredded chicken filling** is packed with flavor, combining savory **Mexican spiced chicken** with gooey, melted cheese for a truly satisfying bite. Using pre-cooked rotisserie chicken is a fantastic time-saver, but you can easily cook and shred your own. The blend of **Monterey Jack cheese** and Cheddar provides both superior meltiness and a classic sharp flavor.
#### Ingredients for the Filling
– 3 cups cooked, **shredded chicken** (rotisserie chicken works great)
– 1 cup shredded **Monterey Jack cheese** (for superior meltiness)
– 1 cup shredded Cheddar cheese
– 4 oz can diced **green chilies**, drained
– 1/2 cup **salsa** or picante sauce
– 1 tsp **cumin powder**
– 1/2 tsp dried **oregano for Mexican food**
– Salt and pepper to taste
#### Steps
1. **Cook and Shred Chicken:** If not using pre-cooked chicken, boil or bake 1.5 lbs of chicken breasts until cooked through. Let cool slightly, then shred using two forks or a stand mixer with the paddle attachment.
2. **Combine Ingredients:** In a large mixing bowl, **combine chicken mixture** with the Monterey Jack cheese, Cheddar cheese, green chilies, salsa, cumin, and oregano.
3. **Mix Thoroughly:** Stir until all ingredients are evenly distributed. Taste and season with salt and pepper as needed. Your **flavorful chicken chimichanga filling** is now ready.
> **Pro-Tip:** For an extra creamy texture, mix in 4 oz of softened cream cheese. This is a common variation found in `restaurant style baked chimichanga` recipes and helps keep the filling moist.

### 2. Warm the Tortillas for Easy Folding
Never tear a tortilla again! Pin this simple trick.
This quick step is the most important trick to **prevent tearing** and ensure your chimichangas don’t burst open in the oven. When you **warm tortillas**, the gluten in the flour becomes soft and flexible, making them easy to fold without cracking. There are two foolproof methods to get your **flour tortillas** perfectly pliable and ready for stuffing.
#### Supplies Needed
– 8 large (10-inch) **flour tortillas**
– Damp paper towels
– Microwave-safe plate or a tortilla warmer
#### Steps
1. **Microwave Method:** Stack the tortillas on a plate, separated by lightly damp paper towels. Microwave on high for 30-45 seconds, or until they are warm and flexible.
2. **Skillet Method:** Heat a dry non-stick skillet over medium heat. Warm each tortilla for 15-20 seconds per side until soft. Keep warmed tortillas stacked under a clean kitchen towel.
> **Lesson Learned:** Don’t skip this step! Cold tortillas will crack and tear when you try to **fold chimichangas**, causing the delicious filling to leak out during baking. This is the number one secret to a perfectly sealed chimichanga.
27% OffBestseller No. 2

### 3. Assemble and Fold Your Chimichangas
Master the perfect fold! Pin this guide for your next Tex-Mex night.
Now it’s time to **assemble chimichangas** using the classic **folding burritos technique**. The goal is to create a tight, secure parcel that will keep all the gooey, cheesy filling contained while it bakes. Taking a moment to fold them correctly ensures a professional-looking result and prevents any messy leaks on your baking sheet.
#### Tools Required
– A clean, flat work surface (like a cutting board)
– A large spoon or portion scoop
#### Step-by-Step Directions
1. **Spoon Filling:** Lay one warm tortilla flat. **Spoon filling** (about 1/2 cup) in a line across the lower third of the tortilla, leaving about a 2-inch border on the left and right sides.
2. **First Fold:** Fold the bottom edge of the tortilla up and snugly over the filling.
3. **Side Folds:** Fold in the left and right sides toward the center, creating an envelope shape.
4. **Final Roll:** Tightly roll the chimichanga up toward the top edge. Place it seam-side down on a plate. Repeat with the remaining tortillas.
> **Pro-Tip:** Don’t overstuff the tortillas. It’s tempting, but overfilling is the main cause of splitting. A 1/2 cup scoop is the perfect amount for a 10-inch tortilla to ensure a tight, secure roll.

### 4. Brush with Butter for Ultimate Crispiness
This is the secret to a crunchy, golden-brown crust! Pin it now.
This is the most critical step for **making chimichangas crispy** in the oven. To achieve that delicious, **oven-fried** texture, you need to **brush with butter**. The fat in the butter is what essentially ‘fries’ the tortilla in the oven’s dry heat, creating a bubbly and **golden brown crispy** shell. Don’t be shy here; a generous coating is your ticket to a perfect crunch.
#### What You Need
– 4 tablespoons unsalted butter, melted
– A pastry or basting brush
#### Instructions
1. **Arrange Chimichangas:** Place the folded chimichangas seam-side down on a parchment-lined baking sheet, leaving about an inch of space between each one.
2. **Melt Butter:** Melt the butter in a small, microwave-safe bowl or in a small saucepan on the stove.
3. **Brush Generously:** Using a basting brush, **brush with butter** over the entire top and sides of each chimichanga. Be generous; this is the key to a **golden brown crispy** result.
> **Pro-Tip:** For an extra flavor boost, mix 1/4 tsp of chili powder or smoked paprika into your melted butter before brushing. This adds color and a subtle smoky flavor to the crust.
### 5. Bake to Golden Brown Perfection
The moment of truth! Pin this satisfying “after” shot to your dinner board.
The final step is to **bake chimichangas** until they reach a state of **crispy perfection**. It’s crucial to **preheat oven** properly, as placing the chimichangas into a hot oven is essential for crisping the exterior quickly. Placing the rack in the middle position ensures even heat circulation for a uniformly golden crust.
#### Equipment Needed
– Baking sheet
– Oven
#### Baking Instructions
1. **Preheat Oven:** Adjust an oven rack to the middle position and **preheat oven** to 400°F (200°C). A hot oven is essential for a crispy crust.
2. **Bake:** Place the baking sheet in the preheated oven. **Bake chimichangas** for 20-25 minutes.
3. **Flip for Even Crisping (Optional but Recommended):** After 15 minutes, you can carefully flip the chimichangas using tongs to ensure the bottom gets just as crispy.
4. **Check for Doneness:** The chimichangas are done when they are deep **golden brown and crispy** all over.
> **Lesson Learned:** Every oven is different. Start checking at the 18-minute mark to prevent burning. You’re looking for a deep golden color, not a light tan. That deep color equals maximum crunch!

### 6. Garnish and Serve Immediately
The perfect finishing touch! Pin this for serving inspiration.
The best way to **serve chimichangas** is hot from the oven, loaded with fresh and flavorful toppings. The cool, creamy **sour cream topping** and fresh **guacamole dip** provide a perfect contrast to the hot, crispy chimichanga. These garnishes add freshness and acidity, which balances the richness of the cheesy chicken filling.
#### Classic Toppings
– **Sour cream** or Mexican crema
– **Guacamole dip** or sliced avocado
– **Pico de gallo salsa** or your favorite salsa
– Shredded lettuce
– Chopped fresh **cilantro garnish**
– Crumbled Cotija cheese
#### How to Serve
1. **Rest Briefly:** Let the chimichangas cool on the baking sheet for 1-2 minutes. They will be extremely hot.
2. **Plate:** Carefully transfer the chimichangas to individual plates.
3. **Garnish:** Drizzle with sour cream and top with a generous spoonful of guacamole, salsa, and a sprinkle of cilantro.
4. **Serve Immediately:** **Serve chimichangas** while they are hot and at their peak crispiness for the best experience.
> **Pro-Tip:** For a “smothered” restaurant-style experience, top the baked chimichanga with warm queso dip or enchilada sauce before adding the other cold toppings.

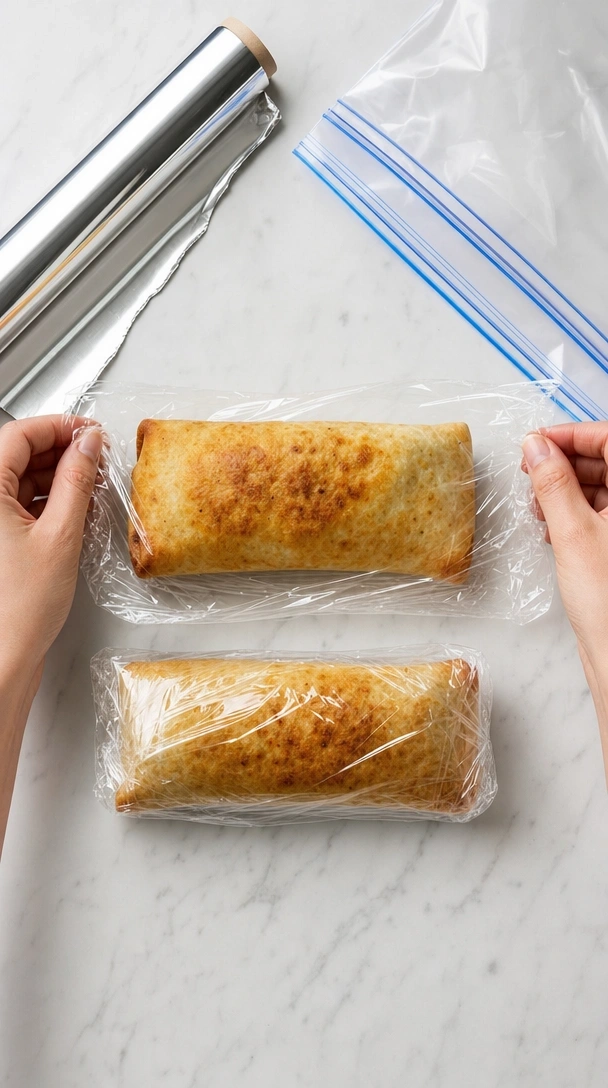
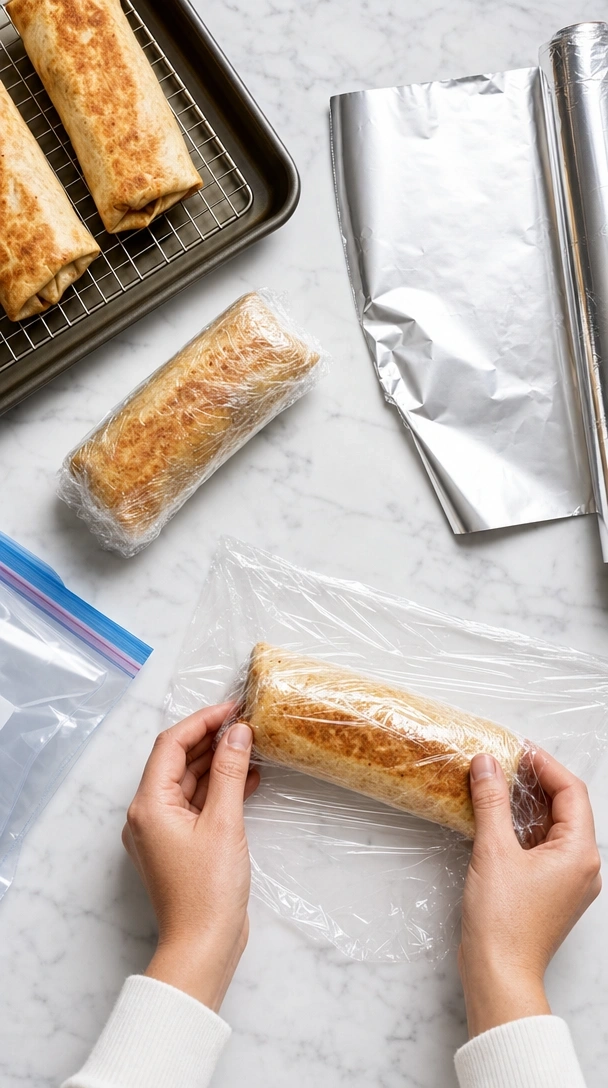
### 7. Store, Freeze, and Reheat for Later
Meal prep made easy! Pin these instructions for freezing chimichangas.
This recipe is perfect for meal prep. Learning how to properly **store chimichangas** allows you to enjoy them later without sacrificing that essential crispy texture. The key is to **reheat leftovers** correctly—the oven or air fryer will re-crisp the shell, while a microwave will only make it soggy. You can also **freeze chimichangas** for a quick and satisfying meal on a busy night.
#### Supplies Needed
– Plastic wrap
– Aluminum foil
– Freezer-safe bags or airtight containers
#### Instructions
1. **To Store Leftovers:** Let chimichangas cool completely. Store in an airtight container in the refrigerator for up to 3 days.
2. **To Freeze (Make Ahead):** Let chimichangas cool completely. Wrap each one individually and tightly in plastic wrap, then a layer of aluminum foil. Place the wrapped chimichangas in a large freezer-safe bag. They can be frozen for up to 3 months. **Do not garnish before freezing.**
3. **To Reheat:** For the best crispy texture, **reheat leftovers** in a 375°F (190°C) oven or air fryer for 10-15 minutes (15-25 minutes from frozen), until heated through and re-crisped. Avoid the microwave, which will make them soggy.
> **Pro-Tip:** This is a fantastic **make ahead chicken chimichanga** meal. Prepare a double batch and freeze half for a busy weeknight. It’s a lifesaver for a quick and satisfying dinner.
## Key Takeaways: Your Quick Guide to Crispy Baked Chimichangas
– **Crispiness Comes from Fat & Heat:** The secret to a **crispy baked chimichanga** is brushing it generously with melted butter and baking in a hot 400°F oven. This mimics frying without the oil.
– **Warm Your Tortillas:** Never skip warming your **flour tortillas** before folding. This makes them pliable and prevents the dreaded cracking and leaking of the filling.
– **Don’t Overstuff:** Use about 1/2 cup of the **shredded chicken filling** per 10-inch tortilla. A tight, secure fold is more important than an overstuffed chimichanga that bursts in the oven.
– **Reheat in the Oven or Air Fryer:** To bring leftovers back to their original crispy glory, always use the oven or an air fryer. The microwave will result in a soggy shell.
– **Freezing is Your Friend:** These chimichangas are perfect for meal prep. Wrap un-garnished, cooled chimichangas individually and freeze for a quick and delicious meal later.
## FAQs About Baked Chicken Chimichanga Recipe
### How do you get chimichangas crispy in the oven?
**The key to crispy oven-baked chimichangas is fat and high heat.** Brush the entire surface of the chimichanga generously with melted butter or oil and bake in a preheated oven at 400°F (200°C). The fat effectively “fries” the tortilla in the dry heat, creating a golden-brown, bubbly, and **crispy baked chicken chimichanga** shell that rivals its deep-fried counterpart.
### What is the difference between a burrito and a chimichanga?
**A chimichanga is essentially a deep-fried burrito.** Both start with a flour tortilla filled with ingredients like meat, cheese, and beans. However, after being folded, a burrito is typically served soft, while a chimichanga is fried (or, in this case, baked until crispy) to create a crunchy exterior. This cooking method is the primary difference.
### What temperature do you bake chicken chimichangas at?
**You should bake chicken chimichangas at a high temperature, ideally 400°F (200°C).** This high heat is crucial for quickly crisping the exterior of the tortilla before the inside gets a chance to steam and make it soggy. Cooking at a lower temperature will result in a soft, pale, and less crispy chimichanga.
### How do you prevent chimichangas from getting soggy?
**To prevent soggy chimichangas, use a less-watery filling and bake at high heat.** Avoid adding too much salsa to your chicken mixture. Most importantly, the combination of brushing with fat (butter) and baking at 400°F creates a barrier and crisps the tortilla quickly, which is the best defense against a soggy bottom.
### Can I make baked chicken chimichangas ahead of time?
**Yes, baked chicken chimichangas are perfect for making ahead.** You can assemble them completely (without brushing with butter), store them in an airtight container in the fridge for up to 24 hours, and then brush with butter and bake as directed. You can also freeze them for up to 3 months for an even quicker meal.
### What kind of tortillas are best for chimichangas?
**Large (10-inch) flour tortillas are the best for chimichangas.** Their size provides enough room to hold a good amount of filling and still be folded securely without tearing. The gluten in flour tortillas also allows them to become pliable when warmed and to crisp up nicely in the oven. Corn tortillas are not recommended as they tend to crack.
### Can I freeze baked chicken chimichangas?
**Absolutely. For best results, freeze them after assembling but before baking.** Let the assembled chimichangas cool completely, then wrap each one individually in plastic wrap and then foil. Place in a freezer bag for up to 3 months. Bake directly from frozen, adding about 10-15 extra minutes to the baking time.
### Are baked chimichangas healthy?
**Baked chimichangas are a significantly healthier option compared to traditional deep-fried versions.** Baking uses only a few tablespoons of butter instead of cups of oil, which dramatically reduces the overall fat and calorie count. While still a comforting meal, this **healthy baked chicken chimichanga** recipe is a much lighter choice.
### What spices are in chicken chimichangas?
**The most common spices in chicken chimichangas are cumin, oregano, and chili powder.** Our recipe uses cumin and oregano for a classic Tex-Mex flavor profile. You can also add garlic powder, onion powder, or a pinch of smoked paprika to the chicken mixture for added depth and complexity.
### What to serve with chicken chimichangas?
**Chicken chimichangas pair well with classic Mexican and Tex-Mex side dishes.** Popular options include Mexican rice or **lime rice**, refried beans or black beans, and a simple side salad with a vinaigrette. Corn salad (esquites) is also a fantastic and refreshing accompaniment to the rich, savory chimichanga.
## Final Thoughts on This Baked Chicken Chimichanga Recipe
You now have the proven method to create a truly exceptional **Baked Chicken Chimichanga Recipe** at home. By following these simple techniques—warming the tortillas, using a flavorful filling, and brushing with butter before baking at high heat—you can say goodbye to soggy shells forever. This **easy weeknight chicken chimichanga** delivers all the satisfying crunch of a deep-fried version in a healthier, simpler package. It’s a reliable, family-friendly meal that proves you don’t need a restaurant kitchen to achieve delicious results. What topping will you try on your perfectly crispy chimichangas first?
Last update on 2026-06-18 at 23:00 / Affiliate links / Images from Amazon Product Advertising API
