As an Amazon Associate BakingBakewareSets.com earns from qualifying purchases.
Gourmet Cookie Recipes: 11 Secrets for Thick & Chewy Cookies
Why do your homemade cookies always bake into flat, sad little puddles? It is incredibly frustrating when you crave massive, bakery-quality treats but pull thin discs from the oven. Mastering authentic gourmet cookie recipes solves this exact baking struggle permanently.
Gourmet cookie recipes are characterized by their jumbo size, ultra-thick centers, and complex flavor profiles. Achieving this authentic bakery-style result requires chilling the dough to prevent spreading, weighing ingredients in grams for accuracy, and utilizing techniques like browning butter to enhance the rich, decadent texture.
Drawing from comprehensive analysis of tested recipe methodologies and professional baker standards, we reveal the science behind perfect baking. Today, you will discover the exact gram measurements and techniques required to master artisan cookies. These proven secrets will elevate your baking game instantly.
☰ Table of Contents ▼
show
True gourmet homemade cookies require precise chemical reactions, premium ingredients, and strategic temperature control to achieve their signature thick, chewy, and addictive texture.
Moving past basic recipe blogs requires understanding the actual science of baking. If you constantly battle flat cookies, the solution lies in treating baking as a science rather than relying on luck. A flat, average homemade cookie often results from warm butter, unweighed flour, and rushed baking times. To craft an impressive, bakery-level masterpiece, you must implement professional techniques.
We are diving deep into the science of the perfect cookie to solve these leavening issues permanently. By utilizing problem solution keywords and expert methodologies, you will transform your kitchen into a boutique bakery. Let’s transition into the 11 actionable secrets that guarantee massive, soft-centered artisan cookies.
The secret to thick gourmet cookies lies in a structured, 11-step masterclass emphasizing actionable techniques like precise weighing, dough stabilization, and optimal convection oven usage.
Baking a massive jumbo cookie recipe requires more than just throwing ingredients into a stand mixer. Each distinct step builds upon the last, transforming basic pantry staples into larger than life creations. We will explore advanced concepts like starch gelatinization, maillard browning, and fat emulsion.
These creative cookie ideas require precise execution, from the initial ingredient prep to the final wire rack cooling phase. By following these exact step-by-step techniques, you will easily replicate professional-quality results at home.
1. Brown Your Butter to Maximize Bakery Style Flavor

Browning butter is the foundational secret to maximizing bakery style flavor, as the maillard reaction toasts the milk solids to create a rich, nutty, and complex caramelization.
Pin this genius browning hack to your ‘Dream Desserts’ board! Taking the time to brown your butter elevates your bakery style chocolate chip cookies brown butter from basic to extraordinary. The process evaporates the water content while toasting the milk solids, creating a profoundly rich flavor profile.
Ingredients
- Unsalted European-style butter (high fat content preferred)
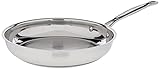
- 1 heavy-bottomed light-colored stainless steel skillet (essential for monitoring color)
- Heat-proof silicone spatula or whisk
- 1 tablespoon of milk or water (to replace evaporated moisture)
Instructions
- Slice the butter into even tablespoons to ensure consistent melting and prevent burning.
- Melt the butter over medium heat in the light-colored skillet, whisking continuously as it begins to foam and bubble.
- Watch carefully as the foam subsides and small golden specks appear at the bottom of the pan.
- Remove from heat immediately once a nutty aroma peaks and the solids turn rich amber.
- Transfer the liquid and all the toasted brown bits into a heat-safe bowl to cool before creaming.
What most guides miss: In my experience as a professional baker, maillard browning removes about 15% of the butter’s moisture. Always weigh your butter after browning and whisk in a splash of milk to bring it back to its original weight, ensuring your dough hydration remains perfect.
2. Weigh Your Ingredients for Perfect Flour Ratios

Weighing ingredients with a digital food scale guarantees perfect flour ratios, ensuring consistent dough hydration and a flawlessly thick texture every single time.
Save this crucial baking tip for your next massive cookie batch! Cups are notoriously inaccurate, often packing in excess flour that leads to dry, crumbly disasters. A kitchen scale recommended by professionals ensures precise gram measurements, completely eliminating the guesswork.
Tools Required
- Digital kitchen scale with a tare/zero function
- Large mixing bowl
- Sifter or fine mesh strainer
- Whisk for aerating dry ingredients
Instructions
- Place your empty mixing bowl on the digital scale and press the ‘Tare’ button to zero it out.
- Pour your flour directly into the bowl until the exact gram measurement is reached, ensuring you avoid packing the flour.
- Tare the scale again before adding the next dry ingredient, such as cocoa powder or baking soda.
- Whisk all the accurately weighed dry ingredients together vigorously to ensure even distribution of leavening agents.
Expert insight: A cup of flour can weigh anywhere from 120g to 150g depending on how you scoop it. Using gram measurements eliminates the flour ratio gamble, ensuring your cookies have the exact moisture balance needed to remain dense and fudgy rather than dry and cakey.

3. Blend Bread Flour to Maximize Chewy Texture

Blending high-protein bread flour with all-purpose flour maximizes gluten development, providing the necessary structure to create a distinctly thick and chewy bakery cookie.
Don’t forget to pin this texture-changing flour secret! The great bread flour vs all purpose debate ends here. Higher protein content yields a dense, satisfying chew that all-purpose flour simply cannot achieve alone. By mixing them, you soften the crumb while maintaining incredible structural integrity.
Ingredients
- King Arthur Flour Bread Flour (12.7% protein content)
- High-quality Unbleached All-Purpose Flour
- Danish dough whisk for gentle folding
- Fine mesh sifter
Instructions
- Measure a 50/50 blend of bread flour and all-purpose flour on your digital scale.
- Sift both flours together to remove lumps and begin aerating the dry mixture.
- Fold the dry ingredients into your wet butter-sugar mixture gently using a Danish dough whisk.
- Stop mixing the exact moment the last streak of white flour disappears into the dough to prevent overworking.
An often-overlooked strategy: Bread flour vs all purpose isn’t just a preference—it’s a structural necessity for massive cookies. The higher protein content in bread flour promotes superior gluten development, which is exactly what gives a jumbo cookie its signature satisfying, tearable chew.


Incorporating premium couverture chocolate feves introduces massive, fluid pools of decadent chocolate that stay melted longer due to the absence of heavy stabilizers.
Pin this chocolate upgrade to bake like a true pastry chef! Standard grocery store chips contain stabilizers that prevent a true melt-in-mouth experience. By upgrading to couverture baking discs, you achieve that decadent texture famous in boutique bakeries.
Ingredients
- Valrhona or Guittard chocolate chips (Couverture Feves)
- High-quality dark chocolate bars (for rough chopping)
- Large chef’s knife
- Heavy wooden cutting board
Instructions
- Reserve a handful of the large chocolate wafers to press into the tops of the cookies right before baking.
- Rough-chop the dark chocolate bars into uneven shards to create varied textures throughout the dough.
- Fold the remaining whole feves and chopped shards gently into the dough using a folding motion.
- Ensure the chocolate is evenly distributed so every bite contains a massive pool of melted chocolate.
Expert insight: Standard grocery store chips contain high amounts of lecithin in chocolate to help them hold their shape in the oven. Using premium couverture baking discs (feves) bypasses this issue, resulting in massive, aesthetic pools of melt-in-mouth chocolate that stay fluid even after the cookie cools.

5. Enhance Depth with Espresso Powder and Sea Salt

Enhancing your dough with espresso powder deeply intensifies the dark chocolate notes, while finishing with flaky maldon sea salt perfectly balances the intense sweetness.
Save this flavor-boosting secret to instantly elevate your recipes! The pairing of dark chocolate + espresso is a classic flavor theory trick that dramatically enhances flavor without making the dessert taste like coffee. Meanwhile, a brown butter + sea salt combination provides a stunning aesthetic and flavor contrast.
Ingredients
- Instant Espresso powder (fine grind, not regular coffee grounds)
- Maldon sea salt flakes (for finishing)
- High-quality Vanilla Bean Paste
- Measuring spoons
Instructions
- Whisk 1 to 2 teaspoons of espresso powder directly into your dry flour mixture to ensure it distributes seamlessly.
- Add a tablespoon of vanilla bean paste to your wet ingredients, allowing the intense vanilla notes to merge with the espresso.
- Mix the dough completely, fold in the chocolate, and portion into balls.
- Generously sprinkle the tops of each unbaked dough ball with flaky Maldon sea salt right before they go into the oven.
What most guides miss: The combination of dark chocolate + espresso is a classic bakery secret. The espresso powder doesn’t make the cookie taste like coffee; instead, it dramatically enhances flavor, intensifying the cocoa notes, while the finishing Maldon sea salt actively balances sweetness.


Chilling your cookie dough for 24 hours prevents spreading by allowing fats to solidify and sugar to absorb excess moisture through a process called hygroscopy.
Pin this chilling dough technique to completely stop your cookies from spreading! A massive gourmet cookie requires chilling to retain its heavyweight, firm structure in the hot oven. Comparing chilled vs unchilled dough reveals a night and day difference in thickness and flavor complexity.
Ingredients & Tools
- Prepared, portioned cookie dough balls
- Airtight dough proofing container or heavy-duty plastic wrap
- Refrigerator with consistent temperature controls
- Parchment paper
Instructions
- Portion the freshly made, soft dough into your desired giant sizes immediately after mixing.
- Place the dough balls closely together on a parchment-lined tray or inside a proofing box.
- Wrap the tray tightly with plastic wrap, ensuring no air can dry out the surface of the dough.
- Chill in the refrigerator for a minimum of 24 hours (up to 72 hours) to let the flavors meld and the fats solidify.
- Bake straight from the fridge; do not let the dough return to room temperature.
Expert insight: Comparing chilled vs unchilled dough yields night and day results. Chilling allows for sugar hygroscopy—where the sugar actively absorbs the free moisture in the dough. This stabilizes dough, creates a deeper caramel flavor, and completely prevent spreading in the oven.


Portioning massive 4-ounce dough balls using a large cookie scoop ensures uniform size and yields the larger than life texture required for bakery aesthetics.
Save this portioning hack to guarantee jumbo, bakery-sized treats every time! You cannot achieve a soft center with a standard 1-ounce drop cookie. A commercial cookie scoop and scoop and stack method forces the dough upward, building height and creating gorgeous caramelized edges.
Tools Required
- Extra-large mechanical cookie scoop (size #8 or #10, which holds about 4 ounces)
- Kitchen scale (for verifying weights)
- Latex or nitrile food-safe gloves (optional, for shaping)
- Baking sheet
Instructions
- Dig your large cookie scoop deeply into the chilled or semi-chilled dough, packing it firmly against the side of the bowl.
- Release the massive mound of dough onto your scale to verify it hits the target 4 to 6-ounce mark.
- Split the dough ball perfectly in half horizontally.
- Turn the jagged, torn interiors so they face outward, and gently press the halves back together (the ‘scoop and stack’ method) to create a highly textured top.
An often-overlooked strategy: If you want that craggy, highly textured surface seen in every jumbo cookie recipe, use the scoop-and-stack method. Tearing the dough and exposing the rough interior prevents a perfectly smooth dome, allowing the caramelized edges to bake into incredibly crispy, jagged peaks.

8. Stuff Centers with Ganache or Cream Cheese

Stuffing cookies with frozen ganache or cream cheese guarantees a gooey, soft centered surprise without the filling bursting through the dough during baking.
Pin this brilliant stuffing technique to create surprise-center cookies! The gourmet stuffed red velvet cookies recipe trend relies entirely on freezing the decadent fillings first. An overstuffed cookie requires meticulous sealing to ensure the rich cream cheese + strawberry or ganache complements the chocolate perfectly.
Ingredients & Tools
- Thick filling (e.g., chocolate ganache, Nutella, or sweetened cream cheese)
- Reusable silicone pastry bag or piping tool
- Small silicone half-sphere molds or a parchment-lined tray
- Extra cookie dough for sealing
Instructions
- Load your chilled ganache or cream cheese filling into a sturdy silicone pastry bag.
- Pipe 1-ounce dollops of the filling onto a parchment-lined tray or directly into silicone half-sphere molds.
- Freeze the filling mounds for at least 2 hours until they are rock solid.
- Flatten a 3-ounce portion of cookie dough in your palm, place the frozen filling disc in the center, and wrap the dough entirely around it.
- Roll the dough gently between your hands to seal any cracks completely, ensuring no filling can escape during baking.
Expert insight: The ultimate bakery secret for overstuffed cookies is freezing the filling independently. Attempting to stuffed dough with room-temperature ganache will cause the filling to rapidly boil in the oven, bursting through the dough and ruining that aesthetic, soft centered surprise.

9. Bake at Precise Temperatures for Soft Centers

Baking at highly precise, elevated temperatures in a convection oven triggers rapid ovenspring, locking in crispy edges while preserving a gooey texture inside.
Save this temperature secret to nail the perfect gooey center! The perfect bake time for a 4-ounce cookie relies on an initial blast of extreme heat. Proper temperature control caramelizes the edges immediately while retaining moisture safely within the massive core.
Tools Required
- Analog oven thermometer (ovens are notoriously inaccurate)
- Heavy-duty, light-colored aluminum baking sheet (dark pans burn bottoms)
- Silicone baking mat or parchment paper
- Timer
Instructions
- Hang an independent oven thermometer on your middle rack and preheat your convection oven to a high heat of 375°F to 410°F (depending on the specific recipe).
- Wait an extra 10 minutes after the oven beeps to ensure the walls of the oven are fully saturated with heat.
- Place cold, chilled dough balls on the baking sheet, spacing them several inches apart.
- Bake for a very short duration (typically 9-12 minutes for a 4oz cookie) so the outside sets rapidly while the core remains slightly underbaked.
What most guides miss: The key to a gooey texture combined with crispy edges is a flash-bake at a higher temperature. This rapid blast of heat causes extreme ovenspring, setting the exterior structure immediately and trapping the moisture inside before the massive center has time to fully cook through.


Scooting hot, freshly baked cookies with a large biscuit cutter forcefully rounds the edges, creating a perfectly circular, thickened, and highly aesthetic final product.
Pin this brilliant ‘cookie scooting’ hack for flawless bakery aesthetics! Fixing dough that spread unevenly is incredibly simple if you act fast. This pan banging and swirling technique guarantees a uniform size, forcing beautiful cookies to rise even higher as the edges push inward.
Tools Required
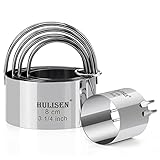
- Large round biscuit cutter, pastry ring, or a wide mouth glass/bowl (must be larger than the baked cookie)
- Hot, freshly baked cookies (still on the hot pan)
- Heat-proof gloves
Instructions
- Remove the baking sheet from the oven the moment the cookie edges are lightly golden but the center still looks puffed and raw.
- Immediately place your large circular biscuit cutter or inverted bowl flat on the tray, completely enveloping one hot cookie.
- Swirl the cutter rapidly in a circular motion around the cookie for 3-5 seconds.
- Let the edges of the cutter gently knock against the soft, molten edges of the cookie, pushing them inward into a thicker, flawlessly round shape.
- Repeat quickly for all cookies on the tray before they begin to cool and set.
Expert insight: “Cookie scooting” not only guarantees perfectly circular and aesthetic results, but the physical swirling motion actually pushes the spreading edges back toward the center. This effectively thickens dough vertically, giving you an even taller, more impressive final product.
11. Cool on a Wire Rack to Set the Crumb Structure

Cooling cookies on a wire rack allows air circulation that properly sets the crumb structure, locking in a thick and chewy bite without soggy bottoms.
Save this cooling step—it’s the secret to the perfect chewy bite! Resting your massive treats on a wire cooling rack is essential for stabilizing the dough. This final step utilizes carryover cooking to soften the crumb while ensuring the base remains structurally sound.
Tools Required
- Heavy-duty stainless steel wire cooling rack
- Large, thin metal spatula
- Hot cookies on a baking sheet
Instructions
- Leave the cookies undisturbed on the hot baking tray for exactly 10-15 minutes after removing them from the oven.
- Allow this residual heat from the pan to gently finish baking the bottoms while the delicate centers begin to firm up.
- Carefully slide a thin metal spatula under the cookies and transfer them to the wire cooling rack.
- Allow air to circulate completely around the cookie for at least 30 minutes before breaking them open, preventing the steam from making the bottoms soggy.
What most guides miss: Removing massive gourmet cookies from the oven when they look underbaked is mandatory. The 15-minute rest on the hot pan utilizes carry-over cooking to finalize starch gelatinization. Moving them to a wire cooling rack halts the cooking process, locking in that thick and chewy texture without burning the base.

Mastering gourmet cookie recipes requires a foundational shift from casual baking to precise, scientifically backed methodologies that prioritize ingredient quality and temperature control.
Before diving into the specific troubleshooting queries in our FAQ, let’s review the main takeaways. This bakery style cookies overview condenses our extensive guide into highly actionable points. Memorize these core concepts to guarantee your next batch of high-end baked goods turns out absolutely flawless.
- Always weigh your ingredients with a digital scale – Cups are too inconsistent. Measuring in grams is the foundational secret for achieving perfect gourmet cookie recipes summary results every time.
- Blend bread flour with your all-purpose flour – The higher protein content accelerates gluten development, giving bakery style cookies their signature massive, tearable chew.
- Chill the dough for a minimum of 24 hours – This essential step halts spreading in the oven, allows fats to solidify, and deepens flavor through sugar hygroscopy.
- Use the “Scoop and Stack” method for jumbo sizes – Ripping a large 4-ounce dough ball in half and stacking the jagged edges upward creates those highly aesthetic, textured crispy tops.
- Bake hot and fast for a gooey interior – Baking at a higher heat (375°F – 410°F) for just 9-12 minutes creates intense ovenspring, setting the crispy edges while leaving the center delightfully soft.
- Utilize the ‘cookie scoot’ for perfect circles – Swirling a large biscuit cutter around the hot cookie the second it leaves the oven guarantees perfectly uniform, aesthetic edges.
- Never skip the resting phase – Letting massive cookies cool on the hot pan for 15 minutes utilizes carryover cooking to finish the center without drying out the crumb.
Common questions about gourmet cookie recipes typically revolve around preventing flat dough, selecting the best ingredients, and understanding the science behind bakery-level thickness.
Even with a perfect recipe, bakers often encounter specific challenges based on their unique kitchen environments. We have compiled the most common cookie queries to help you troubleshoot failures and optimize your techniques. These questions about gourmet cookie recipes pull directly from professional bakery insights to ensure your gourmet cookie recipes FAQs resolve every baking doubt you might have.
A gourmet cookie is defined by its jumbo size (usually 4 to 6 ounces), complex flavor profile, premium ingredients, and a distinct texture featuring crispy edges and a thick, gooey center.
Unlike standard homemade cookies, gourmet varieties utilize professional techniques like browning butter, blending bread flour for chewiness, incorporating high-end couverture chocolate, and chilling the dough for up to 72 hours. These meticulous steps elevate the humble cookie into a high-end, boutique bakery experience.
To make cookies thick like a bakery, you must use cold butter or chill your dough extensively, blend in high-protein bread flour, and bake large 4-ounce portions at a high temperature.
The combination of cold dough and a high oven temperature creates rapid ovenspring. The outside of the dough sets immediately, building a structural wall that prevents the massive interior from spreading out into a thin puddle across your baking pan.
Chilling cookie dough allows the fats to solidify and the flour to fully hydrate, which stops the cookie from spreading flat in the oven and dramatically intensifies the flavor.
During the resting period, the sugar absorbs excess moisture in the dough (hygroscopy). This results in a more concentrated, caramelized flavor when baked, and ensures your cookies retain their impressive, heavyweight structure rather than melting flat.
The best flour for gourmet cookies is a 50/50 blend of high-protein bread flour and unbleached all-purpose flour.
While all-purpose flour provides tenderness, bread flour contains roughly 12.7% protein, which encourages stronger gluten development. This extra structure is what gives massive, stuffed, or bakery-style cookies their satisfying, tearable chew without making them tough or bread-like.
Cookies usually bake flat because the butter was too warm, the dough wasn’t chilled long enough, or you used incorrect flour-to-fat ratios by measuring with cups instead of a digital scale.
If your oven temperature is too low, the butter will melt completely before the edges have a chance to set. Always ensure your dough is rock-hard from the fridge before baking, and utilize a digital food scale to guarantee your moisture balance is perfectly accurate.
To achieve a beautifully crinkled top, you must employ the “scoop and stack” method by tearing your dough ball in half and facing the jagged, torn interiors upward before baking.
Additionally, banging the baking sheet firmly against the oven rack halfway through the baking time will cause the puffed, aerated dough to intentionally collapse. This forces the setting crust to crack, resulting in a gorgeously textured, crinkly surface.
A true bakery-style gourmet cookie should weigh between 115 grams (4 ounces) and 170 grams (6 ounces) prior to baking.
This massive size is essential for texture contrast. A standard 1-ounce dough ball cooks uniformly all the way through. By portioning massive 115-gram dough balls, the exterior has time to deeply caramelize and crisp up while the thick center remains soft, fudgy, and slightly underbaked.
The best chocolate for gourmet cookies is premium couverture chocolate wafers (feves) or hand-chopped high-quality baking bars from brands like Valrhona or Guittard.
Standard grocery store chocolate chips are manufactured with high amounts of soy lecithin, a stabilizer designed to prevent melting. Couverture chocolate lacks these stabilizers, allowing it to melt into massive, luxurious pools of liquid chocolate that stay softer even after the cookie cools.
To package gourmet cookies, allow them to cool completely, then place them in individual self-sealing cellophane bags to lock in moisture and protect their delicate textures.
Once individually wrapped, stack them in a rigid bakery box padded with crinkle paper or food-safe tissue. This prevents the heavy cookies from crushing each other during transport and provides a highly professional, boutique presentation perfect for the holidays.
Properly stored gourmet cookies will stay fresh and soft for 3 to 5 days at room temperature when kept in an airtight container.
If you need them to last longer, do not refrigerate them, as the cold air accelerates staling. Instead, freeze the baked cookies in airtight freezer bags for up to 3 months. When ready to eat, simply reheat them in a 350°F oven for 3-5 minutes to restore their gooey, fresh-baked texture.
Mastering gourmet cookie recipes at home isn’t about finding a magic ingredient—it’s about elevating your technique. The difference between a flat, forgettable treat and a show-stopping, bakery-style masterpiece lies entirely in the precision of your process. By transitioning away from cup measurements to a digital scale, respecting the crucial dough-chilling phase, and utilizing professional tricks like browning butter and blending flours, you are fundamentally changing the chemistry of your baking.
These 11 secrets are the exact methodologies used by high-end boutique bakeries to command premium prices. Whether you are baking a massive batch of stuffed cookies for a holiday exchange, launching your own cottage-industry bakery, or simply trying to recreate that viral Crumbl aesthetic in your own kitchen, these structural rules will guarantee consistent, mouth-watering success every single time you turn on your oven.
Remember, patience is just as important as your ingredients. Let that dough rest, bake hot and fast, and never skip the cooling rack.
Which of these 11 gourmet baking secrets are you most excited to try in your next batch, and what flavor combination are you planning to create first? Let us know in the comments below!
Last update on 2026-07-28 at 13:27 / Affiliate links / Images from Amazon Product Advertising API
